Cisco DevNet Associate Exam 200-901 cheats
See https://developer.cisco.com/certification/devnet-associate/ to start
1 Cisco Modelling Labs - Personal
See cml.org file.
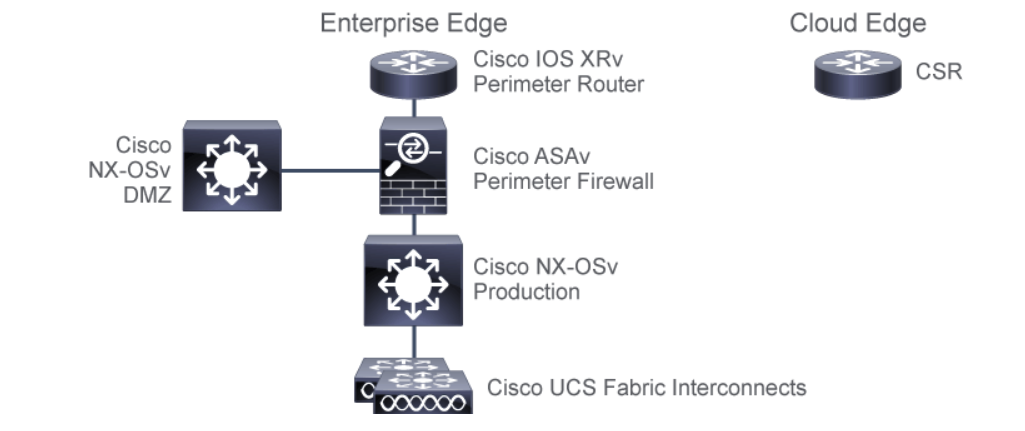
Other Cisco products/devices are available in a virtual machine form factor as well. These can be used much like cml, to model and test network changes before these changes are implemented in production. Cisco virutalized products are:
NX-OSvNexus NX-OS running as a VMUCS-PEUCSM Platform Emulator, as a VM as if running on the FIsASAvASA firewall as a VM. Supports programmability feature natively. Only need to enable the API servicesCSR1KvCloud Services Router, a.k.a/ CSR 1000v running as a VM. Extends enterprise network into the public cloudACI Simulatorruns a real, fully-featured APIC as a VM
2 PyATS
Other than cml, cisco provides PyATS which is a python framework for creating automated tests and validations. Everything from a device, to network, even web GUI features can be tested…
3 ACI
Many cisco products support YANG, used with Netconf encoded in XML, and YANG used with RESTCONF encoded in XML and JSON. But not all cisco products support YANG, even though they are model driven. Two biggies are ACI, and Cisco Nexus 3000 and Nexus 9000, which use their own NX-API REST.
3.1 Differences between ACI REST API and other REST API
Most other REST APIs use Content-Type and Accept headers to indicate
the data format to be used. Not ACI REST API.
3.1.1 .json or .xml
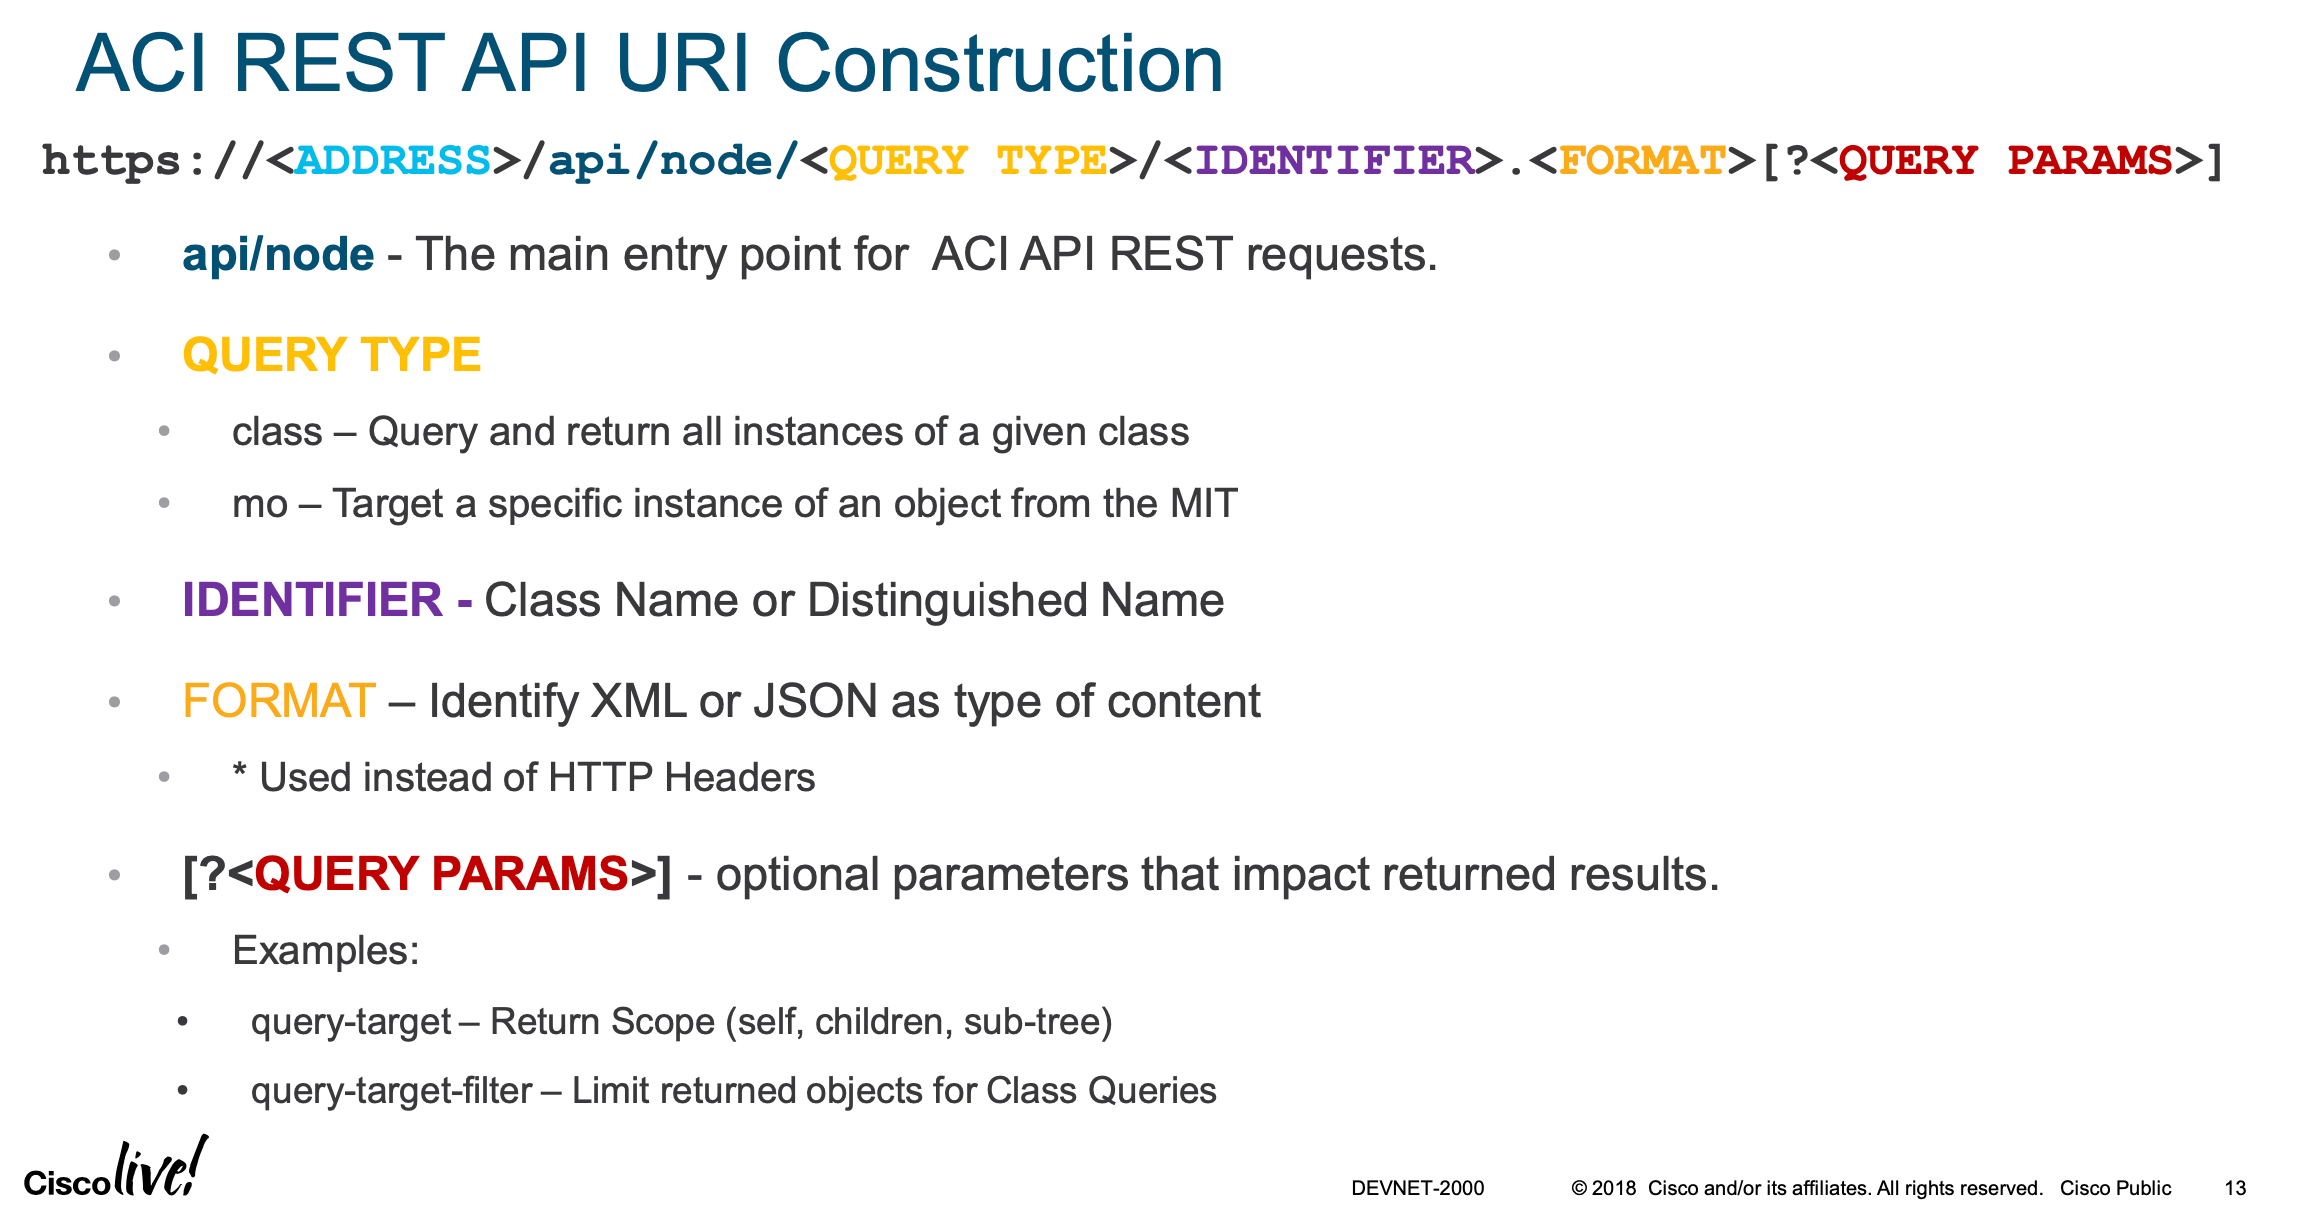
Within the URI (Universal Resource Identified), the /ending/ specifies what
format is requested. either .json or .xml.
Rather than using the usual headers, type and accept, you simply call one of these two URI endings when writting the URI
- .json
- .xml
As the URL trailing type.. For example:
https://{{apic}}/api/aaLogin.jsonhttps://{{apic}}/api/aaLogin.xml
That is also how you login to the ACI REST API. The response is a token which is automatically included in subsequent request as a cookie
{
   "totalCount" : 1
   "imdata": [
      {
	 "aaaLogin": {
	    "attributes": {
	       "token": "p3148fhap8eghjo2ihgpoaeirgypo
	       /ihtpq98wyegloiqhtgekjdhgpoqiunrq
	       "siteFingerprint": "lkjo3ignoqiw",
	       "refreshTimeoutSeconds": 600
      ...
3.2 Subsequent API REST URL Construct
3.3 ACI API REST API authentication
Different from other authentication methods APIC does use tokens for
authenticating API calls, but the controller responds with a cookie,
and that becomes your token.
To get a token from APIC, you send a POST request with username and password.
The token is then returned as a cookie. POSTMAN automatically adds the
credentials as POSTMAN environment variables. See the eyeball for the
updated token. The POST request has a body, as shown below.
- POST https://{{apic}}/api/aaaLogin.json
- POST https://{{apic}}/api/aaaLogin.json # to get a cookie
- POST https://{{apic}}/api/aaaLogin.json
- POST https://{{apic}}/api/aaaLogin.json
With this body:
{
    "aaaUser": {
        "attributes": {
	   "name": {{username}},
	   "pwd": {{password}}
        }
     }
}
After getting a 200 OK, you will get a token in the body of the response.
Because ACI uses cookies for the token, you do NOT have to include this ACI API Token as a header, in any subsequent requests. Unlike DNAC where you have to send the token as a header in every request to DNAC.
3.4 API class types or Managed Objects (MO)
API will target a specific class type or mo. If you are working with a specific
4 Programming differences
The following table summarizes syntactical differences in different programming environments
| Language | assigning | reading | Notes |
|---|---|---|---|
| variables | variables | ||
| python | pi = 3.1415 |
A = pi*36 |
variables label |
| objects. objects | |||
| can have multiple | |||
| labels (a.k.a. aliases) | |||
| pytyon | a = (3.14, 2.718) | a(1) | - tuples are immutable. |
| tuples | a(2) | Can't even add a element | |
| b = tuple(cast) | b(1) | - creates a tuple from a | |
| list | |||
| python | cast = ['eric', 'john'] | cast[0] | mutable with pop or |
| lists | append, and changing | ||
| python if | if <con>: | if a == "alpha": |
|
| .. commands | |||
| else: | |||
| bash | EDITOR=/bin/emacs | echo $EDITOR | ${EDITOR} is preferred, |
| echo ${EDITOR} | but both WORK. | ||
| bash | task=$(jobs) | ${tasks} | $(command) runs a command |
| and lets you assign output | |||
| to a variable. | |||
| But, variable retrieval | |||
| always uses ${} | |||
| bash | ext=txt | touch "yourfile.${ext}" |
Can be interpretted in |
| ${ext} | strings. | ||
| bash | read ext | echo $ext | assigns user input to $ext |
| arguments to functions | |||
| by default are $1, $2, | |||
| $3, … | |||
| mkdir -p – "$1" | |||
| && cd -P – "$1" | |||
| bash | while [ -d $dir ]; do | ||
| loops | cd $dir | ||
| done | |||
bash if |
if TEST-COMMANDS | "=" is a string comparison |
-d directory exists? |
| then | eq is a numeric comparison |
-e file exists | |
| …echo "hey dude" | -r file is readable | ||
| fi | -w file is writeable | ||
| if TEST-COMS2 | -x file with execute bit | ||
| then | |||
| …<commands> | |||
| else | |||
| …<more commands> | |||
| fi | |||
| multiple elif works too | if, then, | ||
| elif, then, | |||
| else, fi |
| bash | examples |
| INSTPREFIX="/opt/cisco/anyconnect" | |
| INSTPREFIX="/opt/cisco/anyconnect" | |
| BINDIR="${INSTPREFIX}/bin" | |
| PLUGINSDIR="${BINDIR}/plugins" | |
| LIBDIR="${INSTPREFIX}/lib" | |
| PROFILESDIR="${INSTPREFIX}/nvm" | |
| ACMANIFESTDAT="${INSTPREFIX}/VPNManifest.dat" | |
| NVMMANIFEST="ACManifestNVM.xml" | |
| UNINSTALLLOG="/tmp/nvm-uninstall.log" |
5 15% 1.0 Software Developement and Design 15%
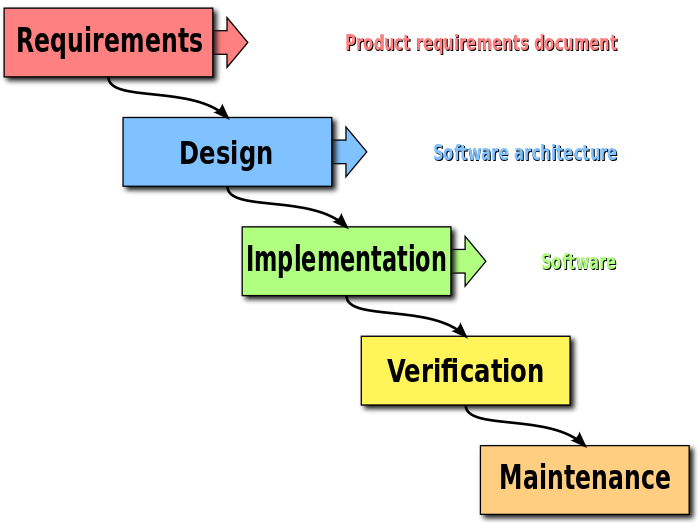
Software development life cycle, SDLC, starts wtih an idea, ends with quality working s/w. It includes:
- 1 Requirements and Analysis
- Design
- Implementation (
build) TestingDeployment- Maintenance
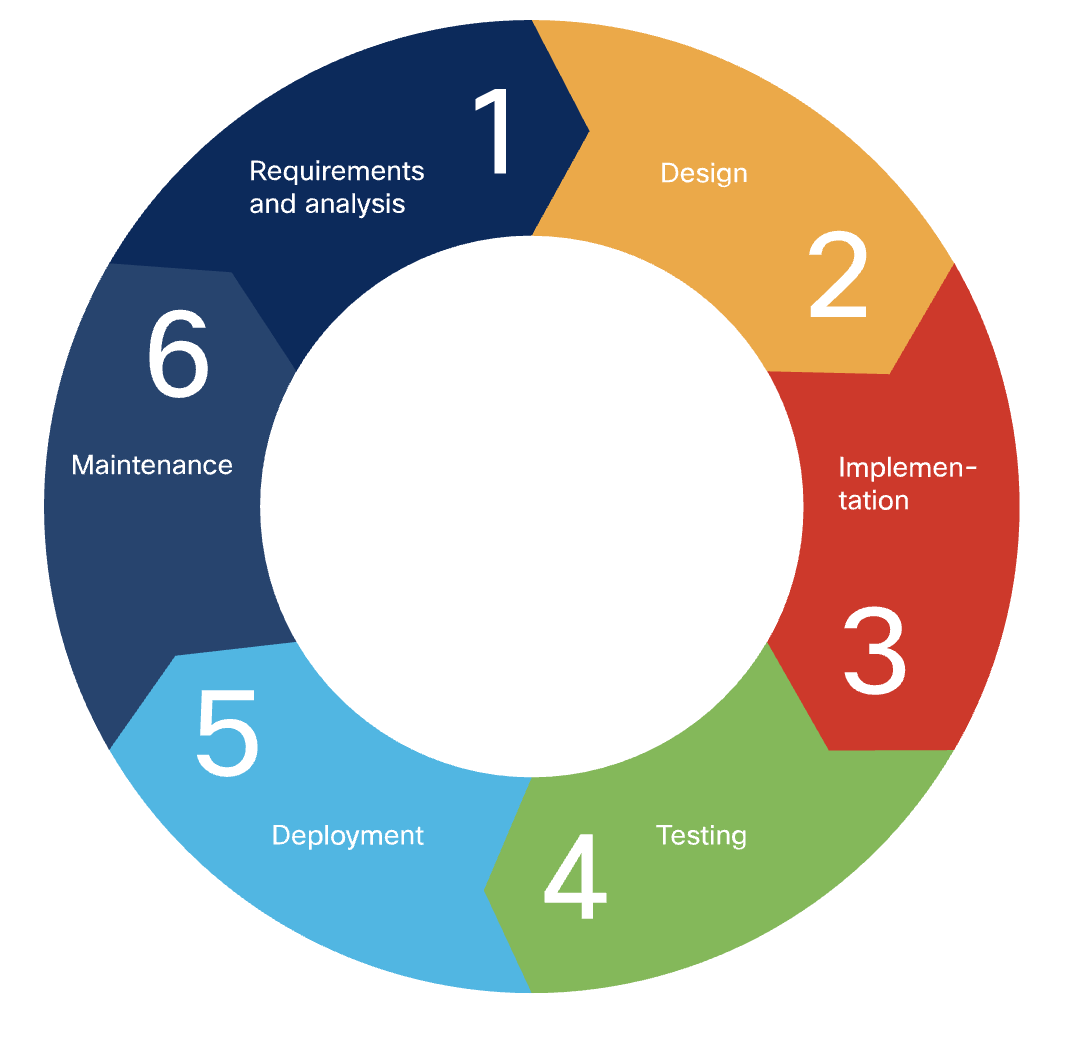
Several methodologies can be used for this purpose. Such as waterfall, agile,
test driven, lean
5.1 1.4 Compare software development methods (agile, lean, and waterfall)
Architectural Patterns There are several relevant patters, and many others too. Architectures are an abstraction of the application overall organization. They are where you also define API that will be used to communicate between components and outside systems.
5.2 waterfall
The waterfall model is a breakdown of project activities into linear
sequential phases, where each phase depends on the deliverables of the
previous one and corresponds to a specialisation of tasks. The approach is
typical for certain areas of engineering design. In software development, it
tends to be among the less iterative and flexible approaches, as progress
flows in largely one direction ("downwards" like a waterfall) through the
phases of conception, initiation, analysis, design, construction, testing,
deployment and maintenance.
One of the differences between agile software development methods and
waterfall is the approach to quality and testing. In the waterfall model,
work moves through Software Development Lifecycle (SDLC) phases —with one
phase being completed before another can start—hence the testing phase is
separate and follows only after the build phase. Also with waterfall, the
detailed requirements analysis up-front is supposed to lay out the details
of all the requirements that will be needed up front, so head-count and
timelines can be allocated. It rarely works out like this though, and since
there is no flexibilty to return to a completed phase it is very inflexible.
(In agile software development, however, testing is completed in the same
iteration as programming.)
- 1 Requirements and Analysis
owner and developer team gather the requirements for the s/w to be built. Important to include potential customer direct user's input.
- who are the stakeholders?
- what are their challenges/pain-points
- what has already been tried
- will this s/w replace existing s/w or processes?
- what is the culture/acceptance to change, risk, technical skills.
Next with these questions answered, start answering more settings questions:
- What is the company' current infrastructure, apps, user environments, i.e. windows or mac or linux users?, mobile or desktop, on-staff developer skills
- what is the company's current IT infrastructure, roadmap, headcount, developer skills,
- how much cloud? - mobile? web, devops, testing, ci/cd?
Then you start getting detailed requirements:
- what features are needed/wanted
- how many users will use it, at what projected load?
- what user experience is expected? mobile/web/desktop?
- what are the integration points to other s/w and company processes?
- how much should the s/w scale?
Finally start nailing down architecture:
- is the project feasible with the given budget
- how will the s/w be tested?
- how is this s/w delivered to end users?
Result is
SRSor Software Requirements Specification document. Compare that to agile dev. where you get an "MVP" minimum viable product, which is a starting point which will be used - Design
Takes the SRS as input. s/w is written to meet the SRS. Protypes are written, sometimes to confirm best design for the final s/w.
At conclusion of design phase output is a HLD (High-Level Design) and a LLD (Low-Level Design) document. HLD is written in plain english, LLD describes details in individual components, inter-component protocols, lists required classes etc.
Compare to
agilethat not document much at this stage. - Implementation.
Takes HLD/LLD as input and writes the code to completion. All components are written to completion. This is the longest phase. testing engineers also write test plans now.
Compare to
agilewhere some whiteboarding is enough to start coding. That works because the MVP is simple and team is small. Comparing further,agilebegins stressing code with tests much earlier. AndTDDwrites testbefore all else.Implementation phase a.k.a. build phase, coding phase, development phase.
- Testing
code is run through test plan. Test plan is a document that includes a list of every single test to be performed in order to cover all of the features and functionality of the software, as specified by the customer requirements.
Testing also includes:
- integration testing
- performance testing
- security testing
After testing phase is complete, code is ready for production.
- Deployment
Code is
moved into production. If no problems installing into production environement product manager with architects adn testing engineers decide whether to release the code. Code is ideally bug free, but ideals are never attained. - Maintenance
During
maintenance phaseyou- provide customer support
- fix bugs found in production
- work on s/w improvements
- gather new requirements/feature requests from customer
With new requirements collected the whole process loops back to start over. Compare that with
agilewhere this loop is closed immediately and often. Much shorter develpment sprints are the norm.
5.2.1 Benefits of Waterfall
Design errorsare highlightedbeforeanycode is written,saving time during the implementationphase.Good documentationis mandatory for this kind of methodology. This effort is useful for engineers in the later stages of the process.- Because the process is rigid and structured, it is
easy to measure progress and set milestones.
5.2.2 Disadvantages of Waterfall
- In the very early stages of a project, it can be
difficult to gather all the possible requirements. Clients can only fully appreciate what is needed when the application is delivered. - It becomes very difficult (and
expensive)to re-engineerthe application, making this approach veryinflexible. - The product will only be
shippedat the very end of the chain,without any middle phases to test. Therefore, it can be a verylengthyprocess.
5.3 Advantages of Agile
- The rapid and continuous delivery of software releases helps
customerstobetter understandwhat thefinalpiece willlooklike. This capability also provides afully working codeimprovedweek after week, leading tocustomer satisfaction. - Thanks to Scrum, people
interactionisemphasized. Lateproject changes are morewelcome.
5.4 Disadvantages of Agile
- This kind of approach lacks emphasis on good documentation, because the
main goal is to
releasenew codequicklyand frequently. - Without a complete requirement-gathering phase at the beginning of the process, customer expectations may be unclear, and there is a good chance for scope creep.
- Rapid development increases the
chance for major design changesin the upcoming sprints, because not all the details are known.
5.5 1.3 Describe the concepts of test-driven development TDD
Start wtih capturing design requirements as tests, then writing software to
pass those tests. This is called Test-Driven Development (TDD).
5.5.1 TDD Workflow
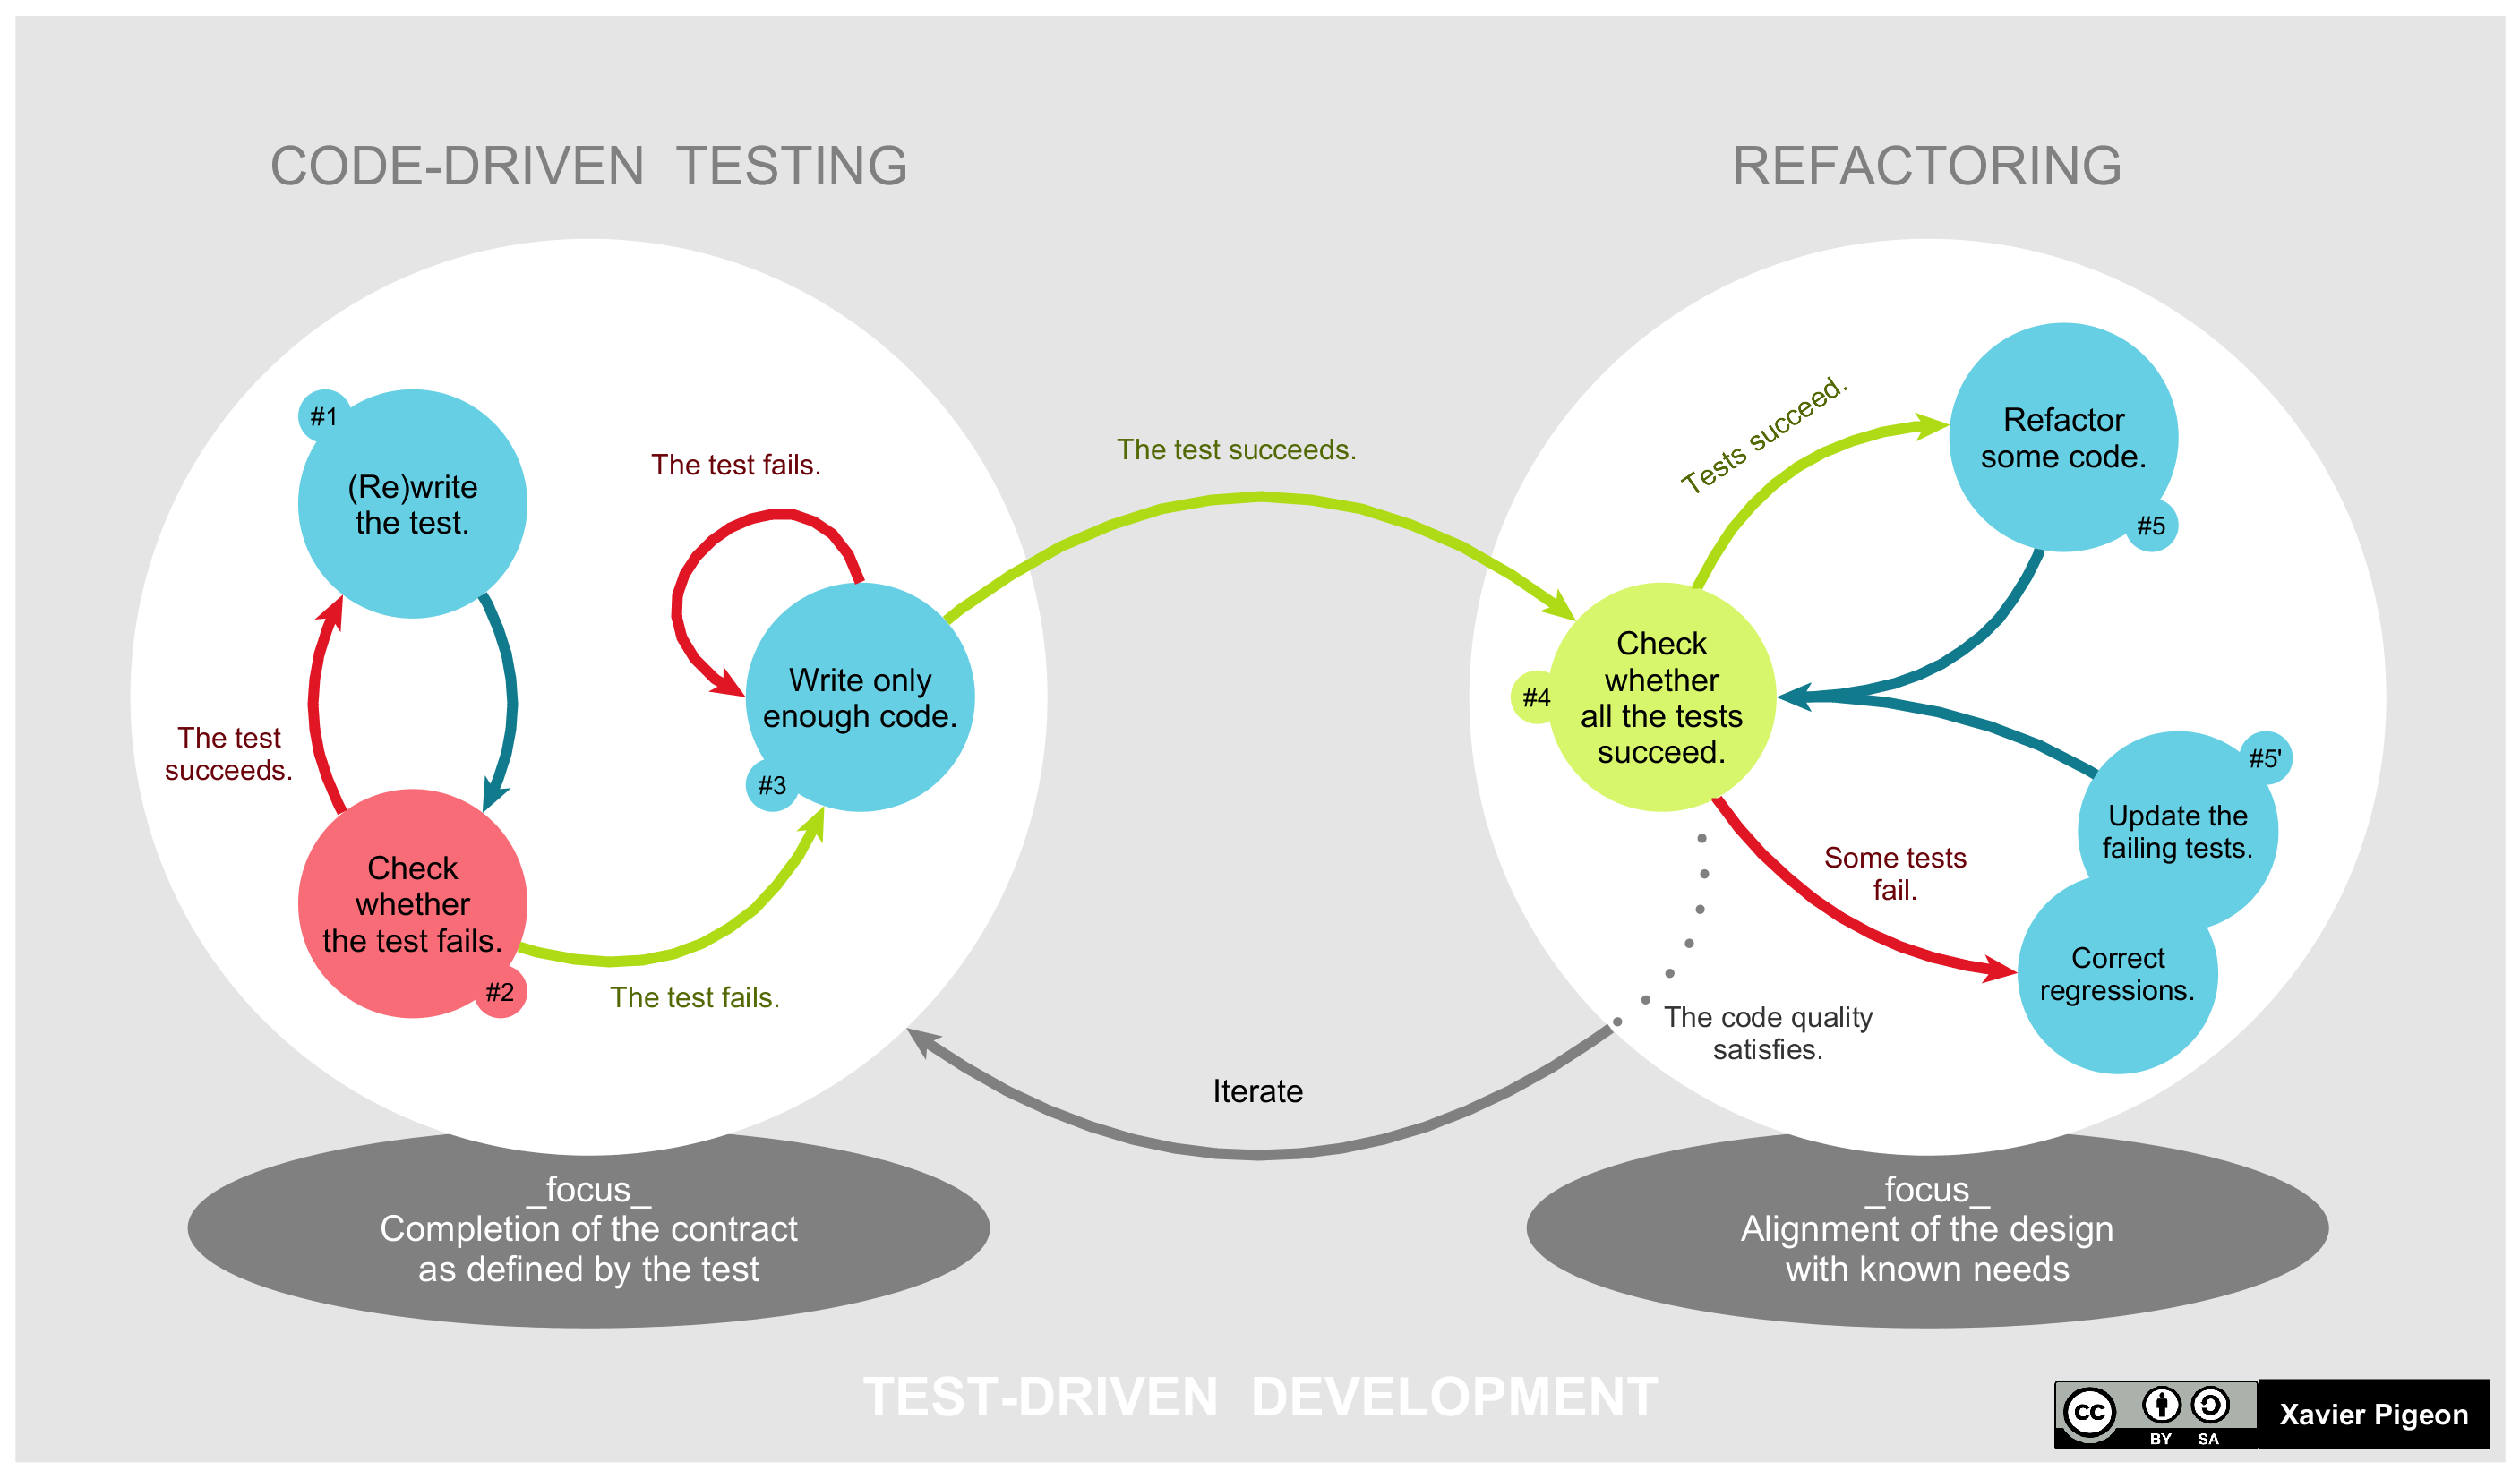
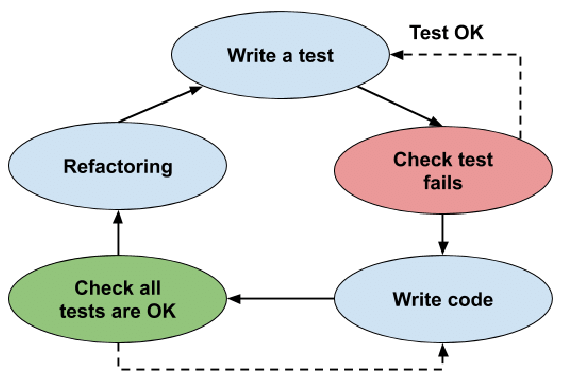
Workflow is as straightforward as the illustration below shows. In planning, the team thinks, discusses, and comes up with ideas. The ideas become tests, but the first test is designed to be expected to fail. The code is then rewritten to enable the test to pass. Once the test has passed, the code is refactored further until the best design eventually emerges. This newly refactored code continues to be under test until design finalization.

A differentiating feature of test-driven development versus writing unit tests
after the code is written is that it makes the developer focus on the requirements
before writing the code, a subtle but important difference.
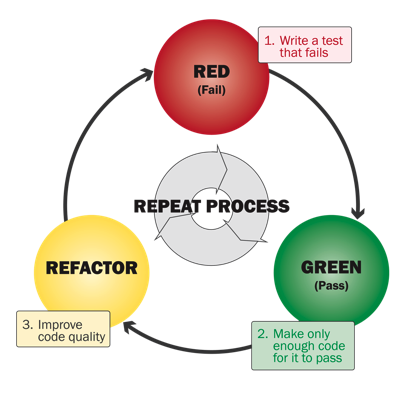
From: mokacoding.com :
When learning about test driven development you'll soon come across the "red,
green, refactor" mantra. It's TDD in a nutshell. Write a failing test, write
the code to make it pass, make the code better.
The refactor set is often skipped though. People write the failing test, they
write the code to make it pass, and move on to the next test.
Skipping the refactor step means you're not taking full advantage of what the
TDD process has to offer. Having green lets you change your code with
confidence. Don't pass on this opportunity.
A more full view would be this lifecycle:
5.5.2 TDD from study group
Straight copy from /Test Driven Development Test-Driven Development Building small, simple unit and integration tests around small bits of code helps us:
Ensure that units are fit for purpose. In other words, we make sure that they're doing what requirements dictate, within the context of our evolving solution. Catch bugs locally (such as at the unit level) and fix them early, saving trouble later on when testing or using higher-order parts of our solution that depend on these components. The first of these activities is as important as the second (maybe more important), because it lets testing validate system design or — failing that — to guide local refactoring, broader redesign, or renegotiation of requirements.
Testing to validate (or initially, to clarify) design intention in light of requirements implies that we should write testing code before we write application code. Having expressed requirements in our testing code, we can then write application code until tests pass.
This is the principle of Test-Driven Development (sometimes called Test-First Development). The basic pattern of TDD is a five-step, repeating process:
- Create a new test (adding it to existing tests, if they already exist): The idea
here is to capture some requirement of the (perhaps not-yet-created) unit of application code we want to produce.
- Run tests to see if any fail for
unexpected reasons: If this happens, correct the tests. Note that expected failures, here, are acceptable (for example, if our new test fails because the function it's designed to test doesn't yet exist, that's an acceptable failure at this point).
- Write application code to pass the new test: The rule here is
to add nothing more to the application besides what is required to pass the test.
- Run tests to see if any fail: If they do, correct the application code
and try again.
- Refactor and improve application code: Each time you do, re-run
the tests and correcting application code if you encounter any failures.
By proceeding this way, the test harness leads and grows in lockstep with your application, perhaps literally on a line-by-line basis, providing very high test coverage (verging on 100%) and high assurance that both the test harness and the application are correct at any given stopping-point. Co-evolving test and application code this way:
Obliges developers to consistently think about requirements (and how to capture them in tests). Helps clarify and constrain what code needs to do (because it just has to pass tests), speeding development and encouraging simplicity and good use of design patterns. Mandates creation of highly-testable code. This is code that, for example, breaks operations down into pure functions (functions that don't access global variables of possibly-indeterminate state) that can be tested in isolation, in any order, and so on.
5.6 1.6 Identify the advantages of common design patterns (MVC and Observer)
First off the Gang of Four published a book on s/w design patterns that
revolutionized s/w development. They classified three main categories of
design patterns:
- Creational - Patterns used to guide, simplify, and abstract software object creation at scale.
- Structural - Patterns describing reliable ways of using objects and classes for different kinds of software projects.
- Behavioral - Patterns detailing how objects can communicate and work together to meet familiar challenges in software engineering.
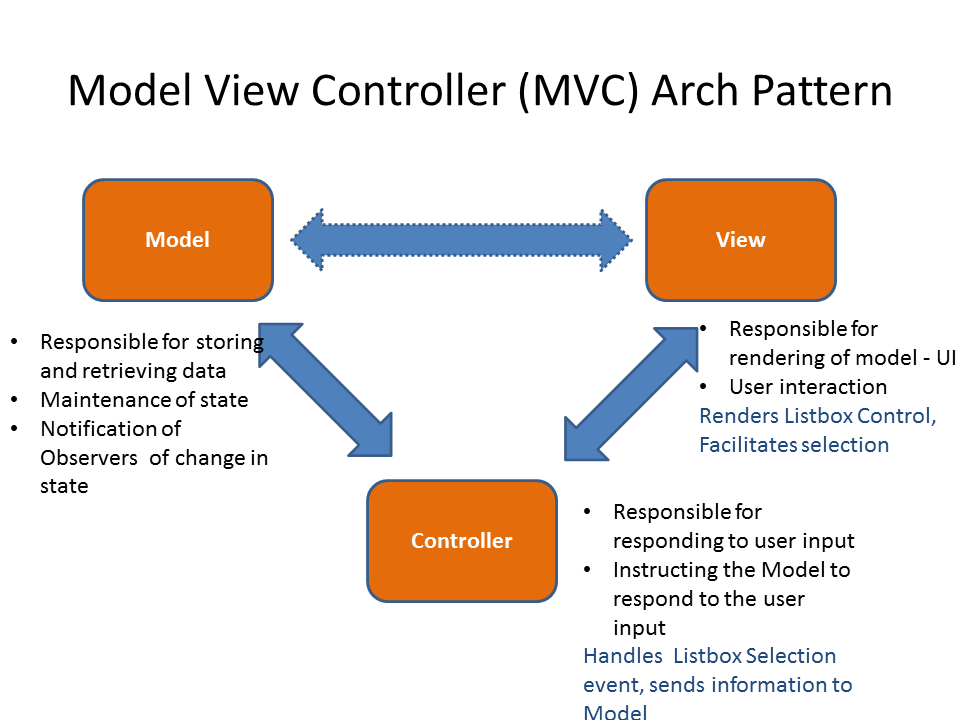
5.6.1 MVC
Model–view–controller is a software design pattern commonly used for
developing user interfaces that divides the related program logic into three
interconnected elements. This is done to separate internal representations of
information from the ways information is presented to and accepted from the
user.
See more in MVC Model View Controller org file.
the web based MVC is different than the classic model due to request/response nature of the web.
- Model
The model is the application's data structure and is responsible for managing the data, logic and rules of the application. It gets input from the controller.
- View
The view is the visual representation (the presentation) of the data. There can be multiple representations of the same data.
- Controller
The controller is like the middleman between the model and view. It takes in user input and manipulates it to fit the format for the model or view.
The execution of the Model-View-Controller looks like this:
- The user provides input.
- The controller accepts the input and manipulates the data.
- The controller sends the manipulated data to the model.
- The model accepts the manipulated data, processes it, and sends the selected data (in the strictest forms of MVC, via the controller) to the view.
- The view accepts the selected data and displays it to the user.
- The user sees the updated data as a result of their input.
The
benefitof theModel-View-Controllerdesign pattern is that each componentcan be built in parallel. Since each component is abstracted, theonly informationeach component needsis the input and output interfacefor the other two components. Components don't need to know about the implementation within the other components. What's more, because each component is only dependent on the input it receives,components can bereusedas long as the other components provide the data according to the correct interface.in classic MVC pattern, the
view(via ui elements) sends messages to thecontroller. thecontrollerthan updates themodelvia business logic. the model in turn fires change events that the view receives, and uses them update its display. this is really popular where the UI runs on a separate thread. see OS/X and IOS applications which use the builtin MVC pattern.in the
web based MVC, the view does a form get/post to acontroller. the controller updates state info, and builds a new view model. the view model is sent to the view engine, and returns the view as html to the browser, which redisplay the page.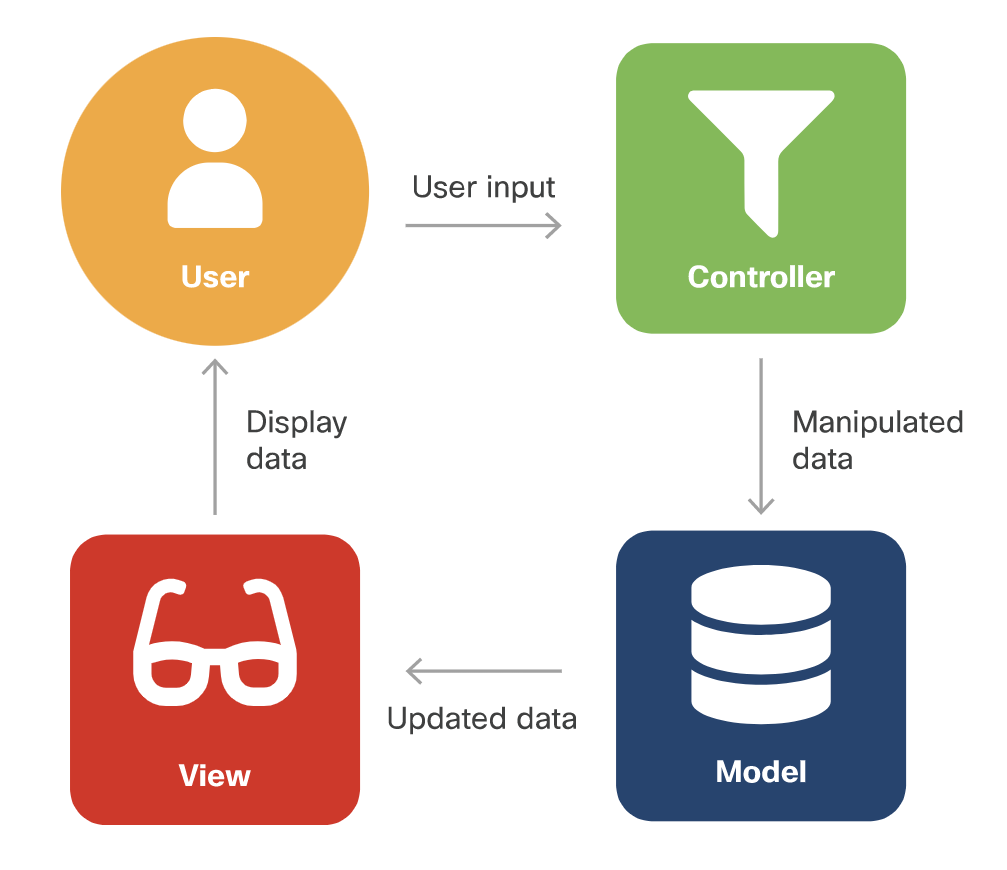
Figure 10: Model View Controller Cisco's diagram
5.6.2 MVC Benefits
Fasterdevelopment- Easy to
provide multiple views(no need to alter model or controller) - support
async(sofastfor user) - Mods
do NOT affecttheentire model - Model returns data
without formatting
5.7 Comparing MVC wiht MTV
Model maps to Model : i.e. the data Template maps to View : i.e. the layout View maps to Controller : i.e. the business logic
| MVC | MTV | |
|---|---|---|
| Model | Model | the data |
| View | Template | the layout |
| Controller | View | the business logic |
5.8 MVC pattern has several design patterns, that maintain relations between the components
5.8.1 Observer
The Observer design pattern is based on subscriptions and notifications. It
allows observers (objects or subscribers) to receive events when there are
changes to a object that is being observed. Has a many-to-1 model. The
subscriptions then also often support authorization and authentication.
From wikipedia: "The observer pattern is a software design pattern in which an object, a.k.a. the subject:
- subjects maintains a list of its
dependentscalledobservers, - subjects have methods to
addandremoveobservers - implement a callback that
notifiesthemautomaticallyof any state changes,
usually by calling one of their methods."
The Observer pattern addresses the following problems:[2]
- A
one-to-manydependency between objects should be defined without making the objects tightly coupled. - It should be ensured that
when one object changes state, an open-ended number ofdependent objectsareupdated automatically. - It should be possible that
one objectcan notify anopen-ended number ofother objects.
Uses notify() when subject
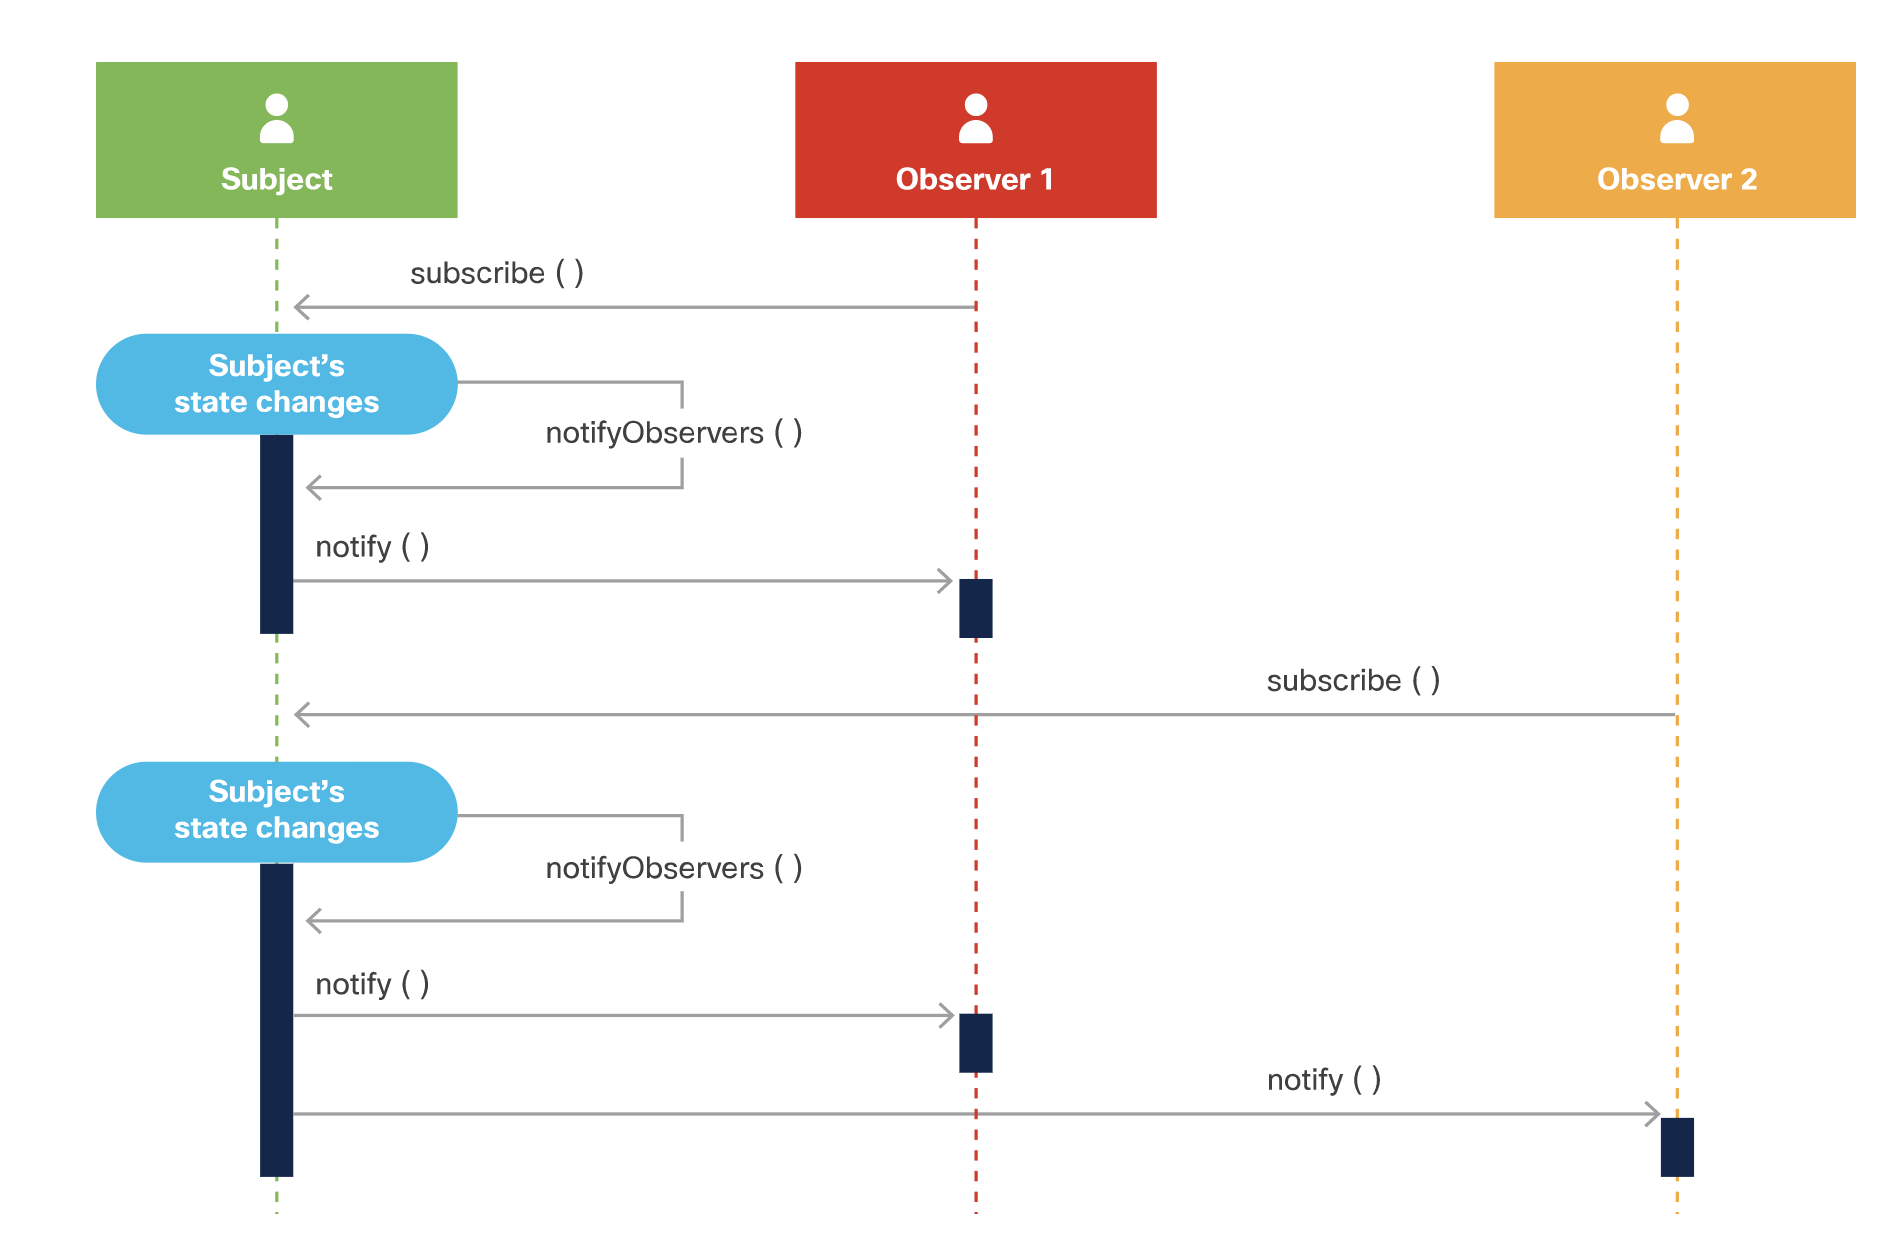
Executing this diagram would take these steps: The execution of this design pattern looks like this:
- An observer adds itself to the subject's list of observers by invoking the subject's method to add an observer.
- When there is a change to the subject, the subject notifies all of the observers on the list by invoking each observer's callback and passing in the necessary data.
- The observer's callback is triggered, and therefore executed, to process the notification.
- Steps 2 and 3 continue whenever there is a change to the subject.
- When the observer is done receiving notifications, it removes itself from the subject's list of observers by invoking the subject's method to remove an observer.
5.8.2 Observer Benefits
- A benefit is that
observers get real time datafrom the subject as soon as subject changes. This is going to providebetter performance than polling - Support
loose couplingbetween objects that interact.- allows sending data to other classes without needing to change those other classes.
Flexible(observers can be added or removed at any time)
5.8.3 Strategy Design Patter
The relationship between the view and a controller is an example of the
strategy design pattern. This behavioral strategy design pattern suggests
taking a class that has many different related implementations and deriving
all the implementations into separate classes, which are then called
strategies.
Strategies can be, as the previous example suggests, interchangeable objects
that are referenced by a class —in your example, the class implementing the
view. This view class, which requires a strategy, works with the strategies
through the same generic interface, making the view class independent of the
specific strategy class implementation of the algorithm, and is capable of
replacing the strategy whenever that is needed.
5.8.4 Composite / Structural Design Pattern
When your user interface can be combined hierarchically, using different
elements, such as nested frames and buttons that can be represented as a
tree, then you are probably using a structural composite design pattern. The
MVC architectural pattern suggests using the composite pattern inside view
components.
There are other patterns that can be found in MVC, such as factory method, adapter, and decorator, but the main relationships in MVC are constructed using observer, strategy, and composite design patterns.
5.8.5 Benefits of MVC
- separate views and controller all the usual separation of duties
- Separation of concern
- Multiple views of the same model
- Flexible presentation changes
- Independent testing of components
- Pluggable components
5.8.6 Drawbacks of MVC
Since multiple views can use the same model, you need to make sure that
all active views get updated on a model state change. This is typically
accomplished with the observer pattern, where the view acts as the observer
of the model, and the view starts the update proceduer when the model
notifies the observers of a state change.
- Increased complexity i.e. some use cases are tricky if you need to stay within MVC contraints
- Excessive number of change notifications
- View and controller tight coupling
- Separate controller is sometimes not needed
5.9 Implementing MVC in python
Remember to try to stick to loose coupling between the model, view and controller
so that they can be developed/updated/changed independently. Even to the point
that views and controllers can be interchanged during runtime!!
5.9.1 Python UML view:
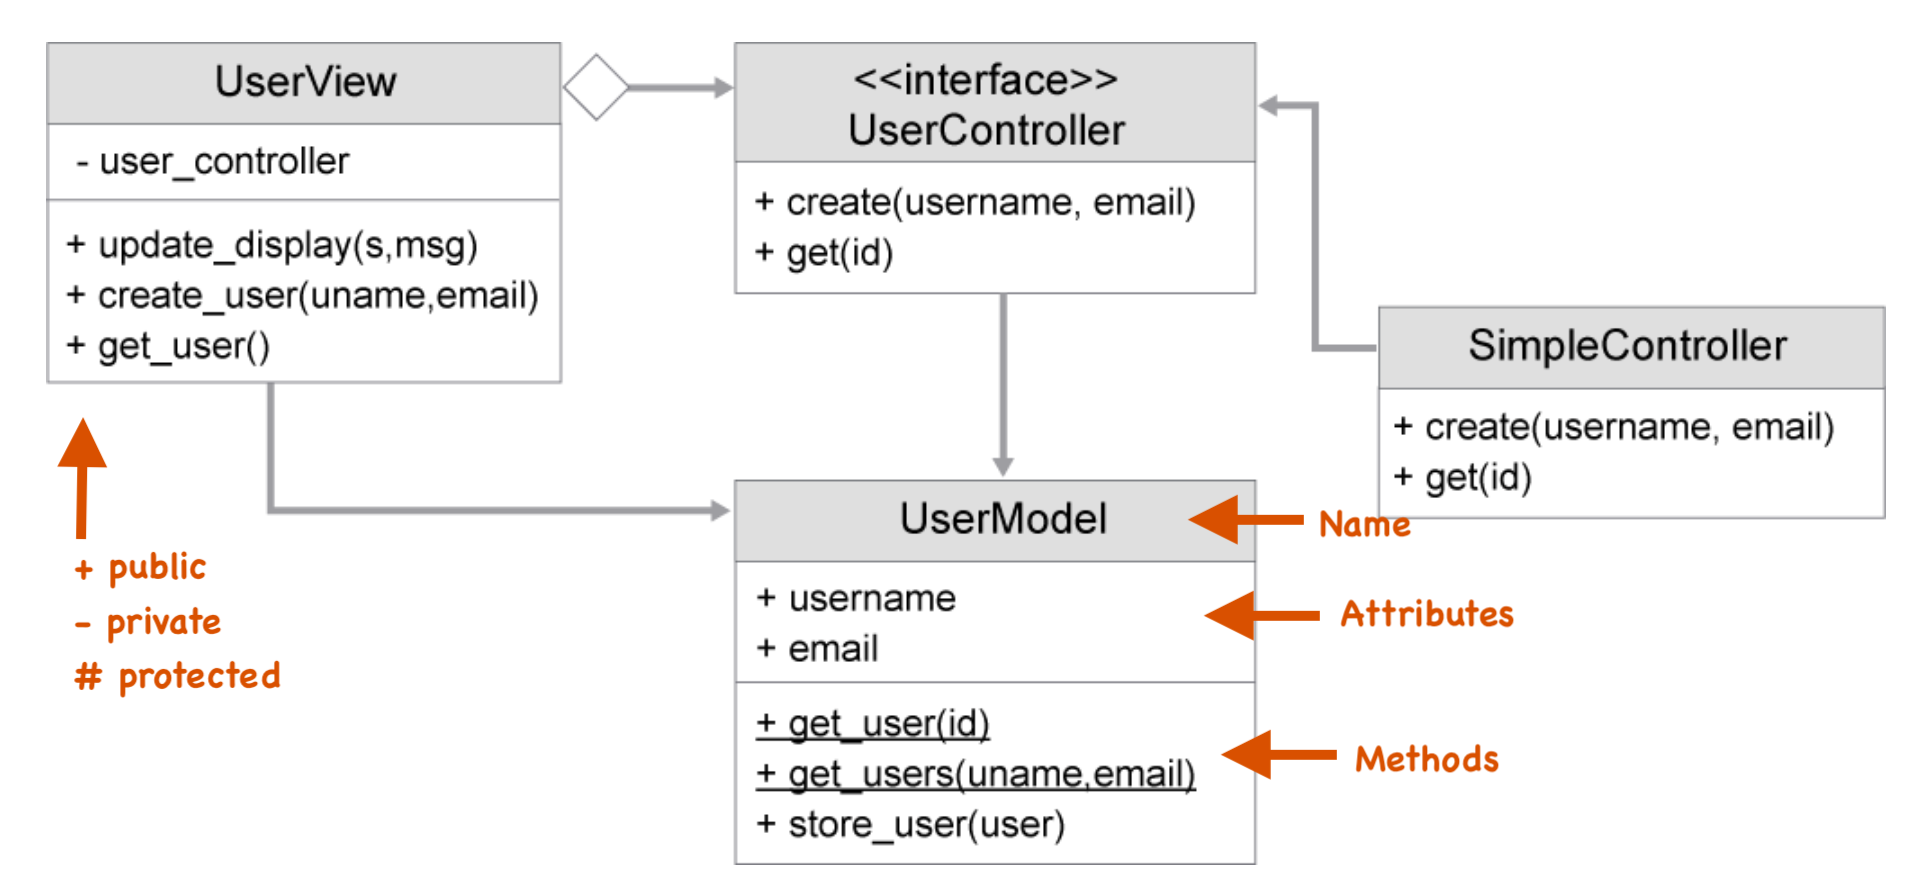
The program has one view, UserView, that uses a UserController interface and
UserModel. The controller interface is implemented with SimpleController
class, which defines create() and get() methods for working with users. The
controller talks to the UserModel to store user information, and the view
contacts the model after the state has been changed.
This diagram taken from developers.cisco.com. 2021.
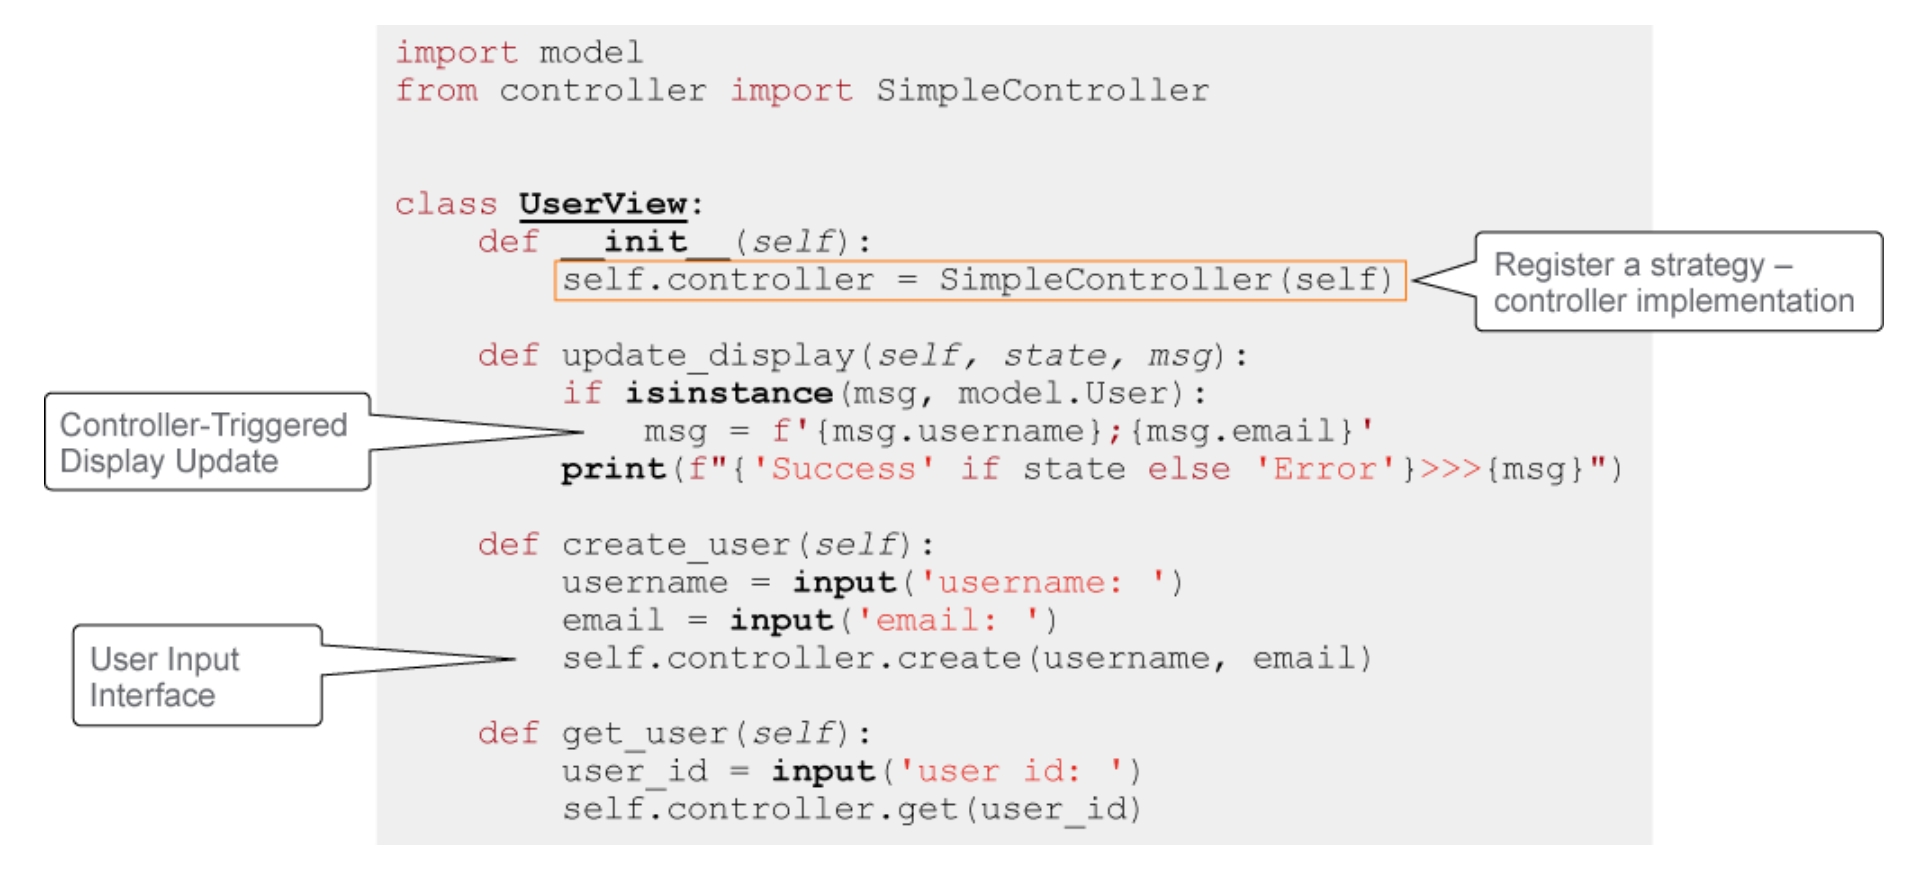
This diagram taken from developers.cisco.com. 2021.
Last of the three is the controller component:
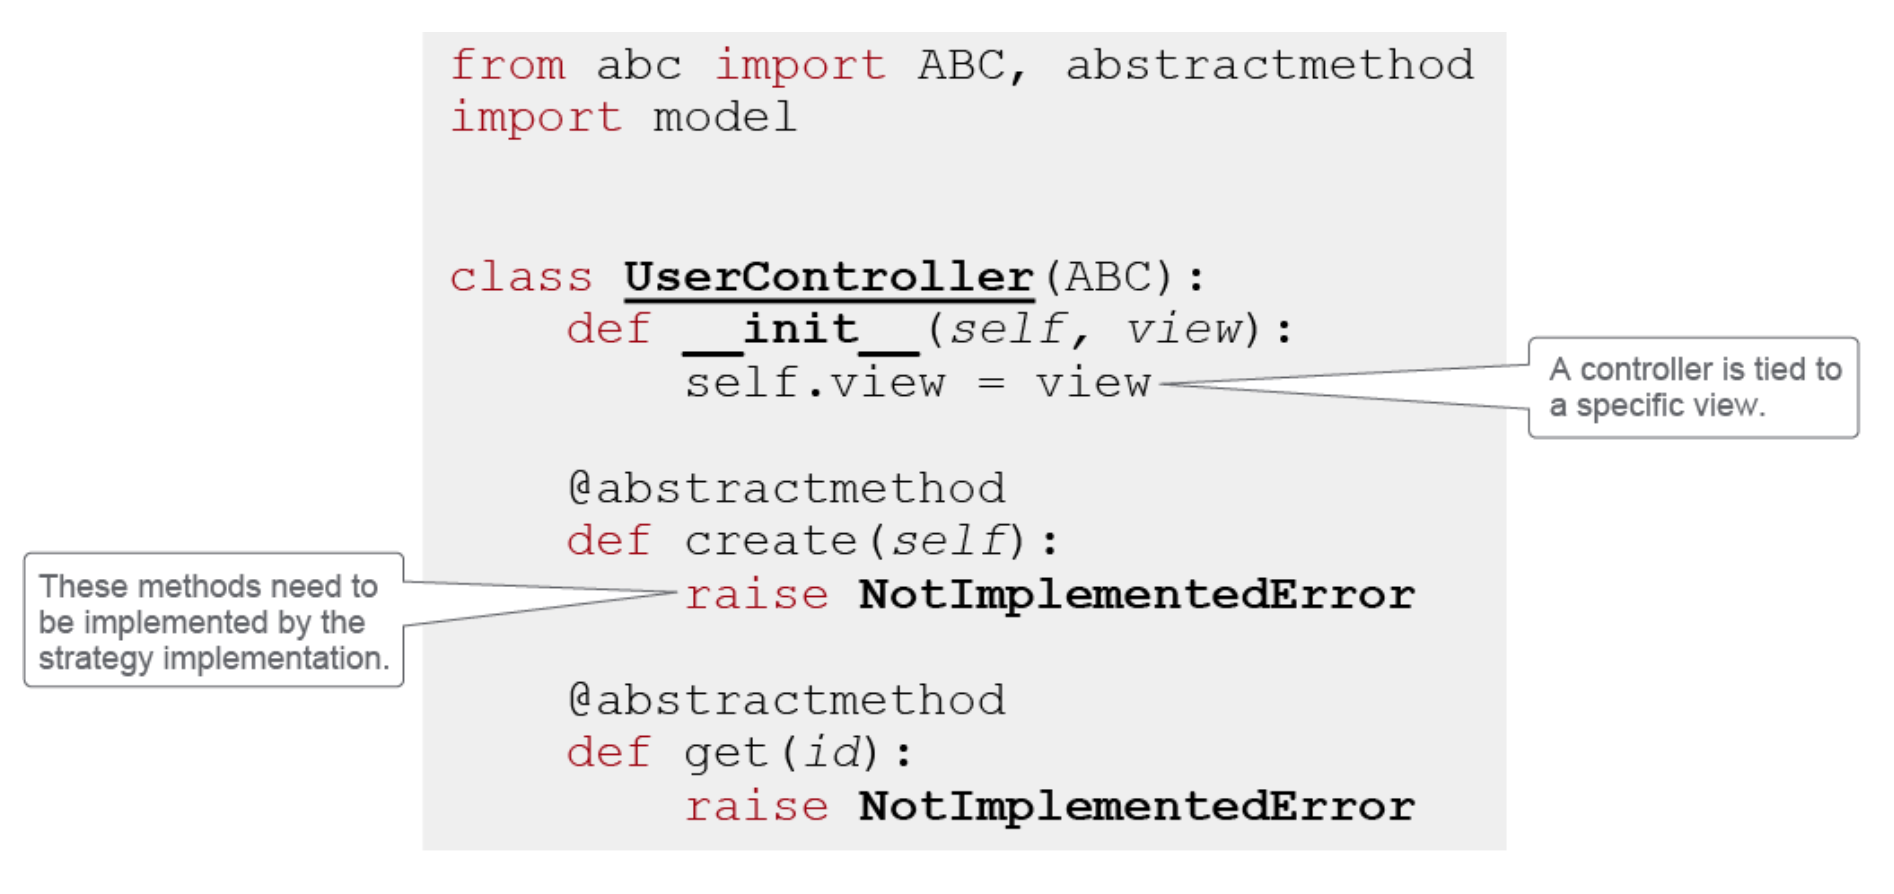
Further to that could be the following, simpleController class
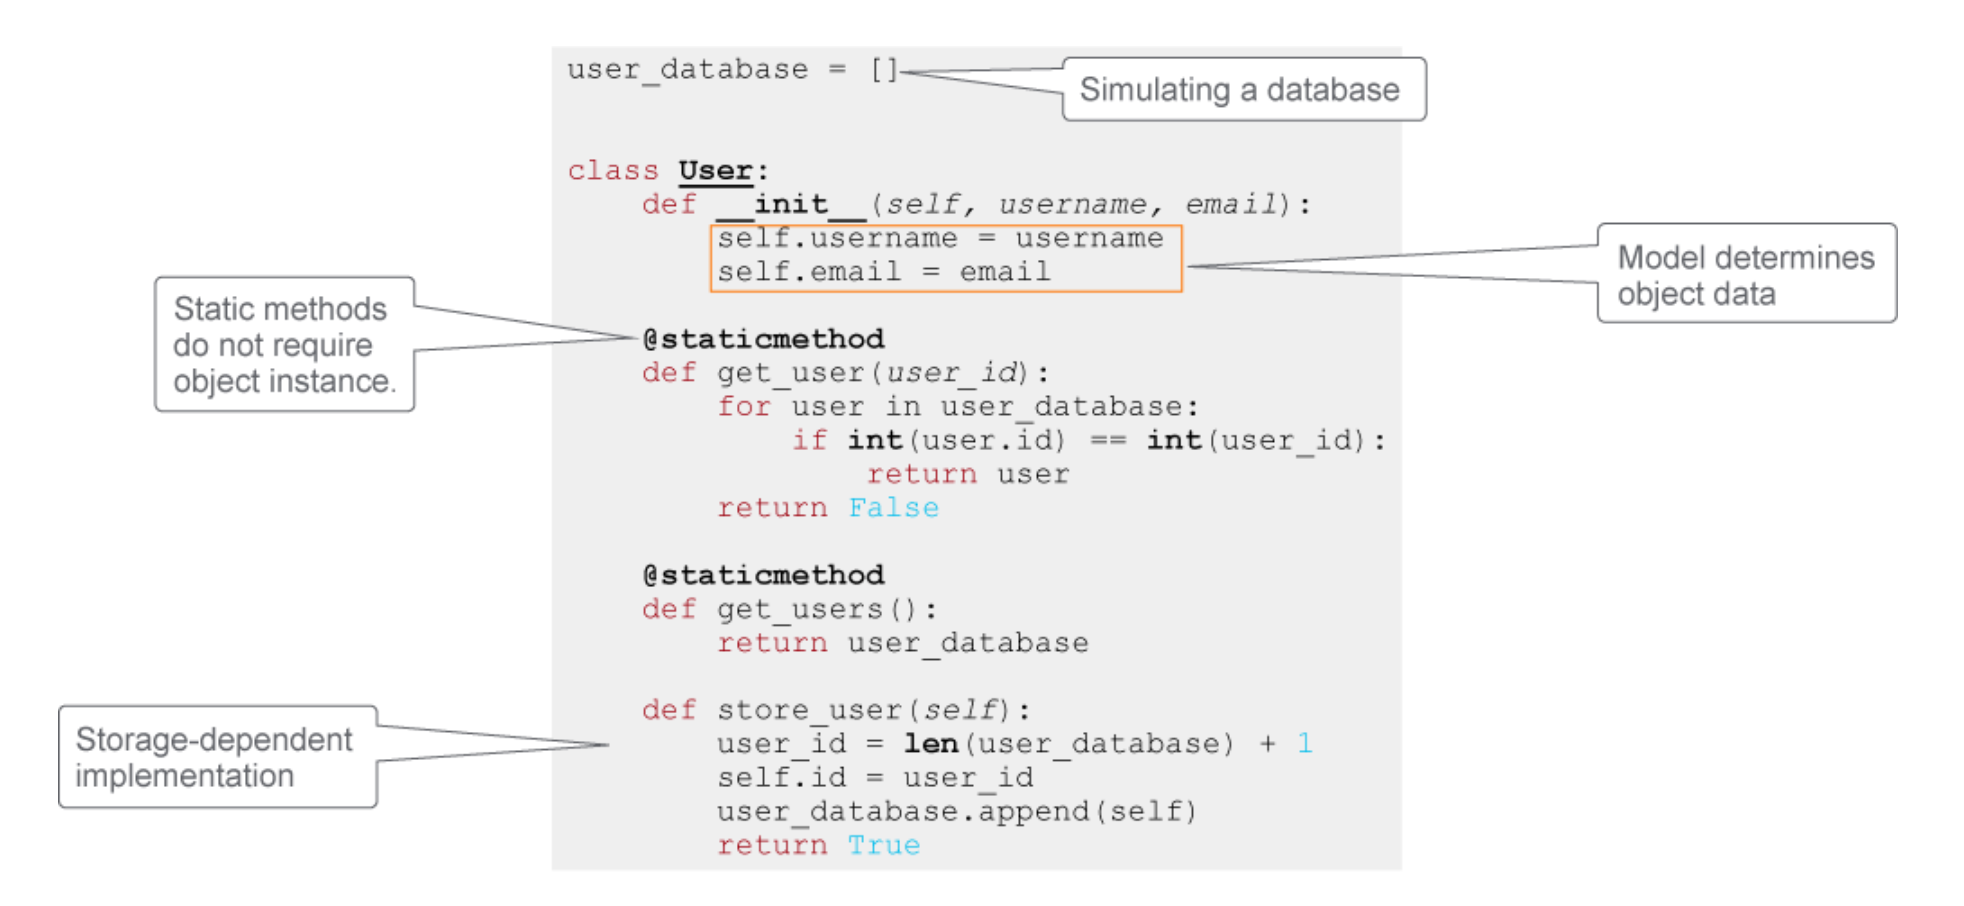
class SimpleController(UserController):
  def create(self, username, email):
    if '@' not in email:
      self.view.update_display(False, "Email not valid")
    else:
      user = model.User(username, email)
      result = user.store_user()
      if result:
    self.view.update_display(True, "User created!")

  def get(self, id):
    user = model.User.get_user(id)
    if user:
      self.view.update_display(True, user)
    else:
      self.view.update_display(False, f"User id {id} not found')
5.10 Modern MVC frameworks:
- ASP.NET MVC
- Django, Pyramid, web2py
- Symfony, Laravel, Zend Framework
- AngularJS, Ember.js, Wakanda
- Spring
5.11 1.5 Explain the benefits of organizing code into methods / functions, classes,
and modules
5.11.1 methods/functions
Help with the DRY principle, "don't repeat yourself". Code is written once,
then reused many times. Also, each method/function should implement only a
part of the functionality provided by the software. This is called the
single responsibility principle. Two benefits of separating s/w code into
modules are:
- Code can be separated from the rest of the application
- Module code can be used by multiple applications
5.11.2 classes
Creating a class means creating a new TYPE of object, not an instance of a type of object. x = 3 simply creates a new instance of an integer class object, and assigning it to "x". But creating a class is creating a new TYPE.
The new TYPE of object allows new instances of that type to be made. Each class instance can have attributes attached to it for maintaining its state. Class instances can also have methods (defined by its class) for modifying its state.
Benefits of classes (object oriented programming)
modularityfor easier troubleshootingReuseof code through inheritanceFlexibilitythrough polymorphismEffective problem solving(breaking down problme into smaller easier ones)
Antoher source has these 3 benefits to classes (oop)
MAINTAINABILITYObject-oriented programming methods make code more maintainable. Identifying the source of errors is easier because objects are self-contained.REUSABILITYBecause objects contain both data and methods that act on data, objects can be thought of as self-contained black boxes. This feature makes it easy to reuse code in new systems.Messages provide a predefined interface to an object's data and functionality. With this interface, an object can be used in any context.SCALABILITYObject-oriented programs are also scalable. As an object's interface provides a road map for reusing the object in new software, and provides all the information needed to replace the object without affecting other code. This way aging code can be replaced with faster algorithms and newer technology.
5.11.3 Why classes are more than just dictionaries.
Classes can have:
methods(any function inside a class is called a "method")initializationhelp text
- Init method (a.k.a. "constructor")
def __init__( self,The init method is called every time you create a new instance of this class. Said in other words, the init method is always called the first time you create an object of this class.
The first arguement is always called "self". It is a
referenceto thenewobject being created.The additional arguements are
optional. If they are added, then you must store these values in fields, using the self. syntax as below:def __init__(self, arguement2, argument3) self.field2 = arguement2 self.field3 = arguement3 import datetime class User: ''' this docstring will be displayed if one issues help(User). The class has two methods, init and age. ''' def __init__(self, full_name, birthday): self.name = full_name self.birthday = birthday # can store the value in birthday in a field called birthday. # so be careful when coding. The second 'birthday' in that line is # the value provided when you create a new instance of the object # the first 'birthday' is the name of the field where we will store # this provided value. # Expanding the init method, we can extract first and last names name_pieces = full_name.split(" ") # this will store strings split on spaces into an array. self.first_name = name_pieces[0] self.last_name = name_pieces[-1] # just look at the last string # self.last_name = name_pieces[1] # would give you the second string # which might be an initial, and not the last name # Note that we can create variables in the method, but they exist # only inside the method and are killed when the method exits. # i.e. first_name = name_pieces[0] would NOT assign anythying to the # object def age(self): ''' Return the age of the user in years. ''' yyyy = init(self.birthday[0:4]) mm = init(self.birthday[4:6]) dd = init(self.birthday[6:8]) dob = datetime.date(yyyy, mm, dd) age_in_days = (today - dob).days age_in_years = age_in_days / 365 return int(age_in_years) # Now we can create an object, let's call it 'user': user = User("Michael Palin", 19430505) print(user.age()) # will print 80 if you run this in Nov, 2019 help(User) to see all sorts of additional info to the docstrings you added.
5.11.4 Modules
Independent, python code, able to be imported into other code, and thus reused many times.
5.12 1.1 Compare data formats (XML, JSON, and YAML)
See my org file on XML <key> value </key> and JSON "Key":Value and YAML Key:Value as well as key-value-notation.html
5.13 1.2 Describe parsing of common data format (XML, JSON, and YAML) to Python data structures
- minidom for XML
from xml.dom.minidom import parse, parseString datasource = open('c:\\temp\\mydata.xml') dom2 = parse(datasource) - xml.etree.ElementTree
import xml.etree.ElementTree as ET
tree = ET.parse('acme-employees.xml')
tree2 = ET.fromstring(acme-employees-long-string-of-xml)      # if a string
ET has two classes,
ElementTreeclass represents thewhole xmldocument as a tree. WhileElementrepresentsa single nodein this tree. So interactions to the whole document use ElementTree while single elements and its sub-elements use Element.Could also use xmltodict
- json:
Read (json.load) and write (json.dump)
with open('/Users/zintis/eg/code-examples/mydevices.json', 'r') as readdevices: ingest_dict = json.load(readdevices) with open('/Users/zintis/eg/code-examples/sample.json', 'w') as dumpback2json: json.dump(ingest_dict, dumpback2json) - json.load(filehandle) to read
- json.dump(jsonobject, filehandle) to write
A real-life example of an ip table read in from a router. The file is [file:///Users/zintis/eg/code-examples/show-ip-route-response.json]
After the json is parsed into a python dictionary, say X, then 172.16.17.18 could be retrieved as:
IPaddr = X["ietf-interfaces"]- YAML
writing:
with open(r'E:\data\store_file.yaml', 'w') as file:
  documents = yaml.dump(dict_file, file)
You can also dump in a sorted keys order:
with open(r'E:\data\store_file.yaml') as file:
  documents = yaml.load(file, Loader=yaml.FullLoader)

sort_file = yaml.dump(doc, sort_keys=True)
print(sort_file)
5.14 1.7 Explain the advantages of version control
- collaboration
- backups / versions
- documented changes
5.15 1.8 Utilize common version control operations with Git
git sees a project directory as a root of a tree, with sub-directories as
trees, and files as blobs.
1.8.a Clone
git clone <url>
Takes the whole repository and copies it into a new directory. The repository
could be a remote one or a local one. If local it will just create hard-links
to the files in the repository, rather than duplicate space. (if you are
taking a backup, you can add option -no hard-links and the copies will be
true copies.
1.8.b Add/remove
git add <new or modified files> to the respository (from the staging area)
1.8.c Commit
git commit -m "Commit message"
takes staging area files and creates a point in time state of all the files
in the staging area (that your are adding)
1.8.d Push / pull
The git pull command is used to fetch i.e. download, content from a remote
repository and immediately update the local repository to match that content.
The git pull command is actually a combination of two other commands, git
fetch followed by git merge. In the first stage of operation git pull will
execute a git fetch scoped to the local branch that HEAD is pointed at. Once
the content is downloaded, git pull will enter a merge workflow. A new merge
commit will be-created and HEAD updated to point at the new commit.
git push # will send the locally modified files to the git repository
git pull # will receive a copy of the latest version from the git repository
1.8.e Branch
git branch will display all the available branches as well as the branch
currently active. git branch -vv will be extra verbose about it.
git branch covid-19 creates a new branch called covid-19, which points to
the same place where HEAD is pointing. At this point HEAD will point to
master as well as covid-19. (HEAD -> master, covid-19)
git checkout covid-19 will replace the current directory contents with the
contents of what covid-19 is pointing to, (which at this point is the same, so
no change really) but git log --all --graph --decorate shows us that we are
now (HEAD -> covid-19, master) ie. that HEAD is pointing to covid-19 which is
also the same place where master is.
Now if you start editing and adding files, the changes will be committed into the covid-19 branch, where HEAD is pointing. Master will still be pointing to the master snapshot.
any changes are committed to covid-19. i.e. (HEAD -> covid-19) and (master) is beside the snapshot it was on before. i.e. master stays the same
If we issue git checkout master, the current directory is overwritten with
what was in the master commit, and HEAD -> master, Covid-19 is unchanged.
So you can flip back and forth between two developments streams.
git checkout mastergit checkout covid-19
1.8.f Merge and handling conflicts
git merge is the opposite of git branch.
After you have 1 or more branches and you want to re-combine them into the
master train, you use the git merge.
git checkout master# to git you back on the master train.- git log –all –graph –decorate –oneline # just to take bearings
git merge covid-plotsIf there are no merge conflicts, you are done. However if conflicts arise between master and covid-plots, a human has to decide what changes take precedence and what changes will be discarded.git merge --abortif you get messed up.git mergetool# start comparing what changes over-write each other.- if you configure git properly, you can tell it to use
vimdiffevery time you run git mergetool. OR, you can manually runvimdiff - vimdiff
git merge --continueto proceed where you left off to make the human conflict resolution change.
1.8.g diff
git diff filename is the same as saying git diff HEAD filename i.e. it
compares the current file to the file as it was in the last commit.
Similarly git diff 42bcdea8 main.py will compare the current main.py file
to the state it was in the commit identifited by commit-id 42bcdea8
zp: checkout
gitcheckout -b <new branch name>
git checkout covid-19 will replace the current directory contents with the
contents of what covid-19 is pointing to, (which at this point is the same, so
no change really) but git log --all --graph --decorate shows us that we are
now (HEAD -> covid-19, master) ie. that HEAD is pointing to covid-19 which is
also the same place where master is.
6 20% 2.0 Understanding APIs
6.1 2.1 Construct a REST API request to accomplish a task given API documentation
6.1.1 Tools for REST APIs
There are 4 common tools, and many other tools not mentioned here:
- curl
- postman
- python libraries
- OpenAPI/Swapper
6.1.2 1) curl
curl https://deckofcardsapi.com/api/deck/dec40fca2d5/draw/?count=3 | python -m json.tool
The uri is the usual scheme://host/path/?query
The full uri is:
userinfo host port ┌───────┴───────┐ ┌────┴─────┐ ┌┴┐ http://john.doe:password@www.acme.com:123/forum/questions/?tag=networking&order=newest#top └─┬─┘ └───────────┬─────────────────────┘└─┬─────────────┘└────────┬──────────────────┘└┬─┘ scheme authority path query fragment
curl uses:
-Xfollowed by a request verb,GET, PUT,POST, PATCH, or DELETEor-Hfollowed by a header such as a token to send with the requests.Device:~# curl -i -k -X "POST" "https://10.85.116.30:443/restconf/data/Cisco-IOS-XE-native:native/logging/monitor" \ > -H 'Content-Type: application/yang-data+json' \ > -H 'Accept: application/yang-data+json' \ > -u 'admin:admin' \ > -d $'{ > "severity": "alerts" > }'
- -X
what follows is a request verb:
GET, PUT, POST, PATCH, DELETE - -K <file>
–config <file> Specify a text file from which to read curl arguments
- -H <header>
–header Either a file of headers or the actual headers
- -i
–include Include the HTTP resposne headers in the output
- -v
–verbose Let's you see request headers.
- -u
Specify user and password
-u 'admin:admin' - -d
–data Sends the specified data in a POST request to the server If the data starts with a @, then what follows is a filename that has the data.
- example
6.1.3 2) postman
6.1.4 3) python librarires'
- import requests
- import
6.1.5 4) OpenAPI/Swagger
See REST-API Overview and specifically Example REST Request and Example REST Response
6.2 2.2 Describe common usage patterns related to webhooks
From wikipedia:
Webhooks are "user-defined HTTP callbacks". They are usually triggered by
some event, such as pushing code to a repository or a comment being posted to
a blog. When that event occurs, the source site makes an HTTP request to the
URL configured for the webhook.
Webhooks are the solution to otherwise continually polling a webserver with a request, then parsing the response to see if there was any change. Like a kid asking "are we there yet? are we there yet? are we there yet?".
Webhooks is like the kid asking the parent, "can you tell me when we are there?"
Webhooks use the server to asynchronously notify the client about changes. So,
greatly reduced number of web requests are sent, and the client is notified
of a change, or an event very close to real-time.
Polling is pull and Webhooks is a push.
There are two ways your apps can communicate with each other to share
information: polling and webhooks.
Pollingis like knocking on your friend’s door and asking if they have any sugar (aka information), but you have to go and ask for it every time you want it.Webhooksare like someone tossing a bag of sugar at your house every time they have some.You never have to ask for it. They are automated messages sent from apps when something happens.- They have a message, or payload, and are sent to a unique URL, essentially the app's phone number or address.
Webhooksare almost alwaysfasterthan polling, andrequire less workon your end. you can say webhooks areefficientandlow latency, because when the event happens, you don't have to wait the polling interval to ask "did this happen?" repeatedly. The event happens, and BAM, the notice is sent.
https://yourapp.com/data/dude42?Customer=cleese&value=105&item=pens

To: yourapp.com/data/dude42
Message: Customer:   Cleese
            Value:   105
	     Item:   Pens
6.3 How do webhooks work?
- A client needs to subscribe to a specific
webhook, by creating aPOSTrequest to the webhook endpoint. ThePOSTusually contains- authentication data
- which events the client is subscribing to
- which address and port should be notified (i.e. telling the server where to send the notice of change
- the
server
Take another look at our example message about a new order. Cleese opened your store's website, added $105 of pens to his shopping cart, and checked out. Boom, something happened, and the app needs to tell you. Time for the webhook.
Wait: who's the app gonna call? Just like you need to tell the bank your phone number before they can text you, for webhooks, you need to tell the originating app—your eCommerce store, in this case—the webhook URL of the receiving app, the app where you want the data to be sent.
Say you want to make an invoice for this new order. The app that creates this invoice is on the receiving end—it’s the app that needs the order data.
You'd first open your invoice app, make an invoice template, and copy its webhook URL—something like yourapp.com/data/12345. Then open your eCommerce store app, and add that URL to its webhook settings. That URL is your invoice app's phone number, essentially. If another app pings that URL (or if you enter the URL in your browser's address bar), the app will notice that someone is trying to send it data.
Ok. Back to the order. Your eCommerce store got the order and knows it needs
to send the details to yourapp.com/data/12345. It then writes the order in a
serialization format. The simplest of those formats is called “form-encoded”,
and means your customer's order would look something like this:
Customer=bob&value=10.00&item=paper
Now your eCommerce store needs to send the message. The simplest way to send
data to a webhooks URL is with an HTTP GET request. Literally, that means to
add the data to the URL and ping the URL (or enter it in your browser's
address bar). The same way you can open Zapier's about page by typing /about
after zapier.com, your apps can send messages to each other by tagging extra
text with a question mark on the end of a website address. Here's the full
GET request for our order:
https://yourapp.com/data/12345?Customer=cleese&value=105&item=pens
Deep inside your invoice app, something dings and says "You've got mail!" and the app gets to work, making a new invoice for Cleese's $105 pen order. That's webhooks in action.
Remember when you had to check your email to see if you had new messages—and how freeing push email (“You’ve got mail!”) was? That's what webhooks are for your apps. They don't have to check for new info anymore. Instead, when something happens, they can push the data to each other and not waste their time checking and waiting.
Then there's REST Hooks: REST Hooks itself is not a specification, it is a collection of patterns that treat webhooks like subscriptions. These subscriptions are manipulated via a REST API just like any other resource. That's it. Really.
From developer.cisco.com learning:
Meraki Webhooks are a powerful and lightweight new way to subscribe to alerts
sent from the Meraki Cloud when an event occurs. These include a JSON
formatted message and are sent to a unique URL where they can be processed,
stored or used to trigger powerful automations. For a comprehensive list of
alerts, please see our general documentation on Monitoring and Alerting.
6.3.1 Webex and webhooks
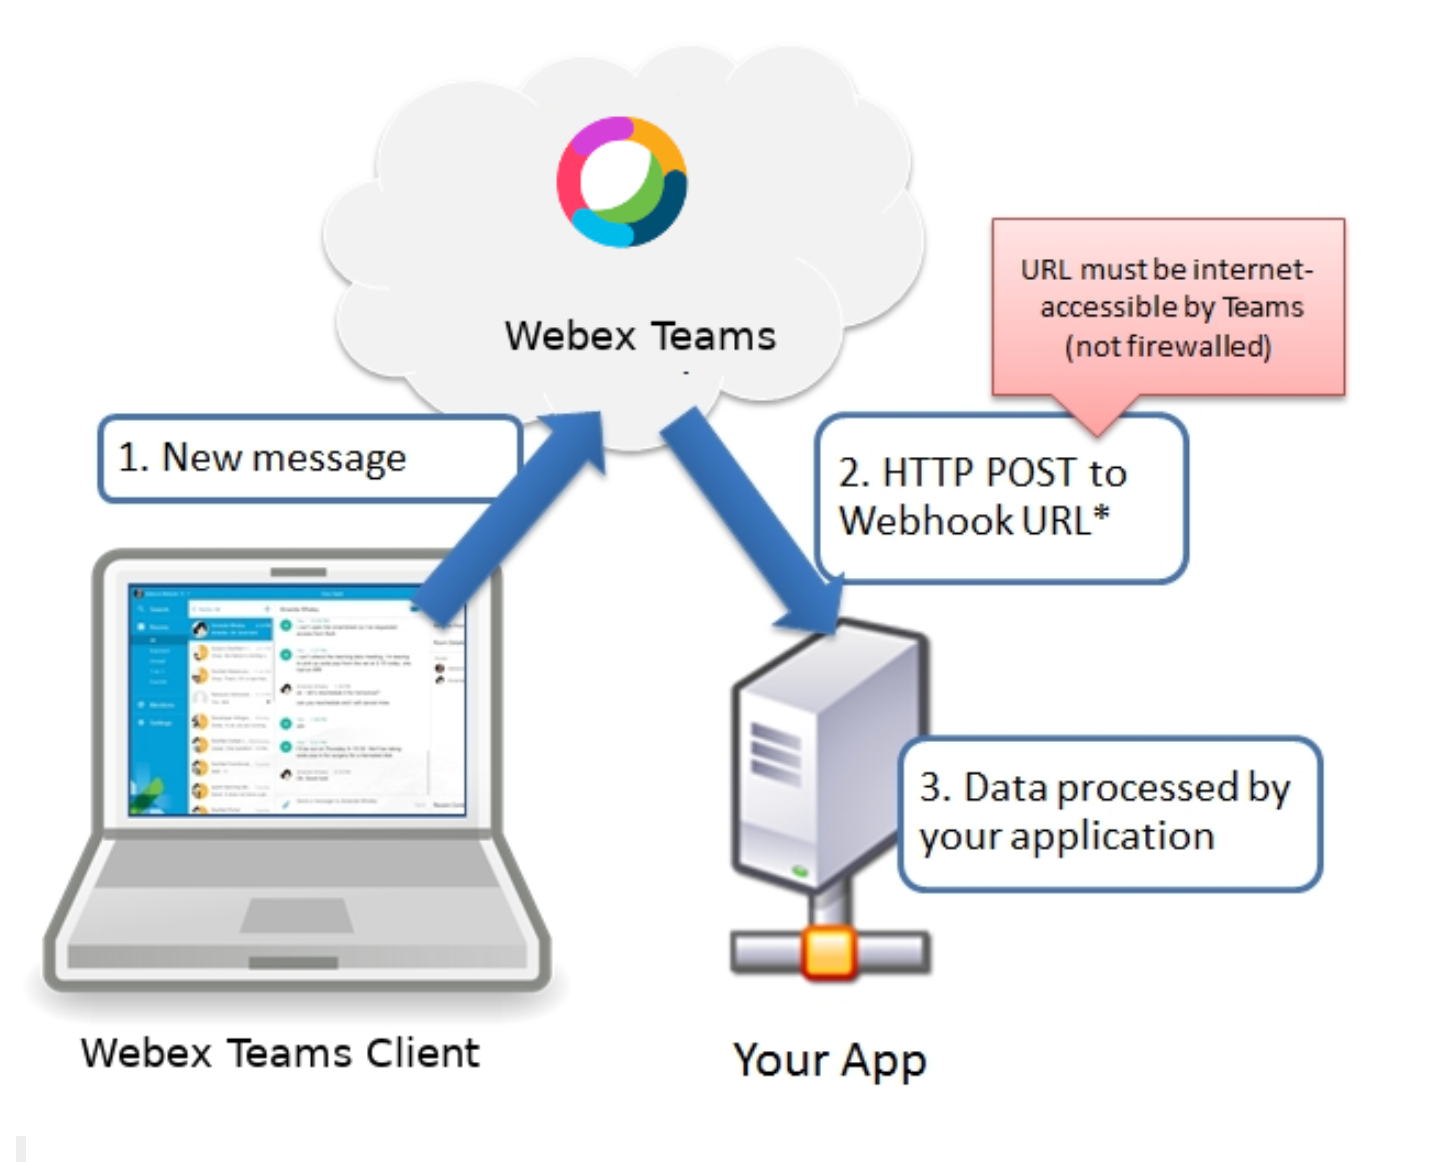
Incoming webhooks let you post messages in Webex Teams spaces when an event occurs in another service that supports webhooks. Webhook events trigger in near real-time allowing your Webex Teams spaces to stay in sync with events happening outside of Webex Teams.
To use incoming webhooks, simply connect this integration to your Webex Teams account, create a new webhook below, and configure your service to post messages to the provided URL. The incoming webhook URL expects an HTTP request with a JSON payload which includes the message in either a plaintext field or Markdown-formatted field.
To send a plaintext message, make an HTTP POST to the URL and provide the message body in the text field of the request:
curl -X POST -H "Content-Type: application/json" ∖ -d '{"text" : "This is a message from a Cisco Webex Teams incoming webhook."}' ∖ "https://api.ciscospark.com/v1/webhooks/incoming/"
To send a formatted message, make an HTTP POST to the URL and provide the message body (in Markdown format) in the markdown field:
curl -X POST -H "Content-Type: application/json" ∖ -d '{"markdown" : "This is a formatted message from a Cisco Webex Teams incoming webhook."}' ∖ "https://api.ciscospark.com/v1/webhooks/incoming/".
6.4 Webex and Webhooks Details
TO use webex webhooks you must first subscribe to a webex webhook as follows:
- Authenticate your request, just as you would when consuming the API.
- Pick a name for your webhook subscription.
- Set the target URL. This URL (or IP address) will be notified when the webhook triggers.
- Select the subscription resource. This, together with the event parameter/ determines about which events you will be notified.
- Add filters. In this case, you only care about messages, posted in a
specific room, so you add a room filter.
From Devnet:

This POST request modifies the resource. If you change that to a GET your
response will be a list of all the webhooks currently subscribed
If that POST request was successful, the server will send a webhook notification to your listener, that you have to setup. Several good s/w packages exist, your you can write your own using python,
6.5 2.3 Identify the constraints when consuming APIs
- pagination
- authentication
- rate limiting
6.6 2.4 Explain common HTTP response codes associated with REST APIs
6.7 2.5 Troubleshoot a problem given the HTTP response code, request and API
documentation
6.8 2.6 Identify the parts of an HTTP response (response code, headers, body)
6.9 2.7 Utilize common API authentication mechanisms:
Basic |
Authorization: Basic mybase64string |
|---|---|
Auth |
AMP = {"KEY": "e815426e-bb64-cf4f-71ba-5112febdead5", |
| "ID": "8595782abe51ba411223"} | |
| Token | url = "https://<ampid>:<ampkey>@api.amp.cisco.com/v1/computers" |
| Custom | Request a custom token with username/password. Token returned |
| API | is dynamically generated. Use token in subsequent reqests |
in Authorization: Bearer header. When token expires, reissue |
|
| a new one | |
| API | Use GUI to retrieve it. Does not expire til revoked. Use in |
| keys | headers: X-Auth-Token or |
'Authorization': "Bearer " + zintis_bearer_code |
From RFC 6750: use bearer tokens in HTTP requests to access OAuth 2.0 protected resources. Any party in possession of a bearer token (a "bearer") can use it to get access to the associated resources (without demonstrating possession of a cryptographic key). To prevent misuse, bearer tokens need to be protected from disclosure in storage and in transport.
See API Authentication file.
6.10 2.8 Compare common API styles (REST, RPC, synchronous, and asynchronous)
6.11 2.9 Construct a Python script that calls a REST API using the requests library
- response = requests.post(url,data=json.dumps(payload), headers=myheaders, auth=(switchuser,switchpassword)).json() # nx-api
- response = requests.request("GET", url, headers=headers, data=payload, timeout=400) # amp
- response = requests.request('GET', url, headers=headers, data = payload) # dna-c
- response = requests.request('POST', url, headers=headers, data = payload # dna-c
- response = session.pushtoapic(tenant.geturl(), data=tenant.getjson()) # aci (pre-standard REST API)
7 15% 3.0 Cisco Platforms and Development
7.1 3.1 Construct a Python script that uses a Cisco SDK given SDK documentation
See 3.1 Construct a Python script that uses a Cisco SDK given SDK documentation in the api.org file
7.2 3.2 Describe the capabilities of Cisco network management platforms and APIs
(Meraki, Cisco DNA Center, ACI, Cisco SD-WAN, and NSO)
7.3 3.3 Describe the capabilities of Cisco compute management platforms and APIs
(UCS Manager, UCS Director, and Intersight)
7.4 3.4 Describe the capabilities of Cisco collaboration platforms and APIs
(Webex Teams, Webex devices, Cisco Unified Communication Manager including AXL and UDS interfaces, and Finesse)
7.5 3.5 Describe the capabilities of Cisco security platforms and APIs (Firepower,
Umbrella, AMP, ISE and ThreatGrid)

ThreatGrid
- Module - a pluggable and configurable code component that handles API communication with an integrated product or data source.
- Observable - any identifiable network or system artifact that can be observed. Eg; File hashes, IP and other addresses, user accounts, etc.
- Judgement - an opinion held by an integrated product or data source about an observable at a given time.
- Verdict - a single Judgement deemed by Threat Response to be the most accurate/trustworthy at the current time.
- Sighting - an observation of an observable. For example, an endpoint detecting a file hash detected on a filesystem, or on the network by a firewall.
- Target - a system that interacted with an observable. All local sightings will involve one or more targets.
- CTIM - Cisco Threat Intelligence Model. A data model that lays out items, parameters, and relationships, in order to encapsulate security knowledge.
- CTIA - Cisco Threat Intelligence Architecture. An instance of a database housing data in CTIM format.
- Scopes - Granular permissions that control what various user accounts and API clients can do. For example, trigger responses or write to the private data store.
The API is actually a suite of APIs. They are documented at https://visibility.amp.cisco.com/#/help/integration.
The APIs available at the time of this lab's creation are:
- inspect - take text input and find observables within it
- enrich - various lookups on observables, including finding sightings and judgements
- response - catalog and take response actions
- settings - manage user account setting
- oauth - handle authentication for Threat Response users and API clients
- global-intel - manages retrieval of a wide variety of data types in the public CTIA
- private-intel - manages creation and retrieval of a wide variety of data types in the user-private CTIA
Example script to generate Threat Grid API Token
Https://visibility.amp.cisco.com/iroh/oauth2/token
import requests
import time

client_id = 'client-asdf12-34as-df12-34as-df1234asdf12'
client_password = 'asdf1234asdf1234asdf1234asdf1234asdf1234asdf1234asdf12'
url = 'https://visibility.amp.cisco.com/iroh/oauth2/token'
headers = {'Content-Type':'application/x-www-form-urlencoded', 'Accept':'application/json'}
payload = {'grant_type':'client_credentials'}

response = requests.post(url, headers=headers, auth=(client_id, client_password), data=payload)

print(response.json())
7.6 3.6 Describe the device level APIs and dynamic interfaces for IOS XE and NX-OS
7.7 3.7 Identify the appropriate DevNet resource for a given scenario (Sandbox,
Code Exchange, support, forums, Learning Labs, and API documentation) See the file: api.org
7.8 3.8 Apply concepts of model driven programmability (YANG, RESTCONF, and
NETCONF) in a Cisco environment
- Automating Device Operational Life Cycle
discuss this . . Lastly, optimizations to the device are made, such as extensions to the device capabilities, enhancements to operational robustness, or patches and software upgrades. Referred to as "Day n," it implies an iterative approach, looping back through Days 0, 1, and 2.
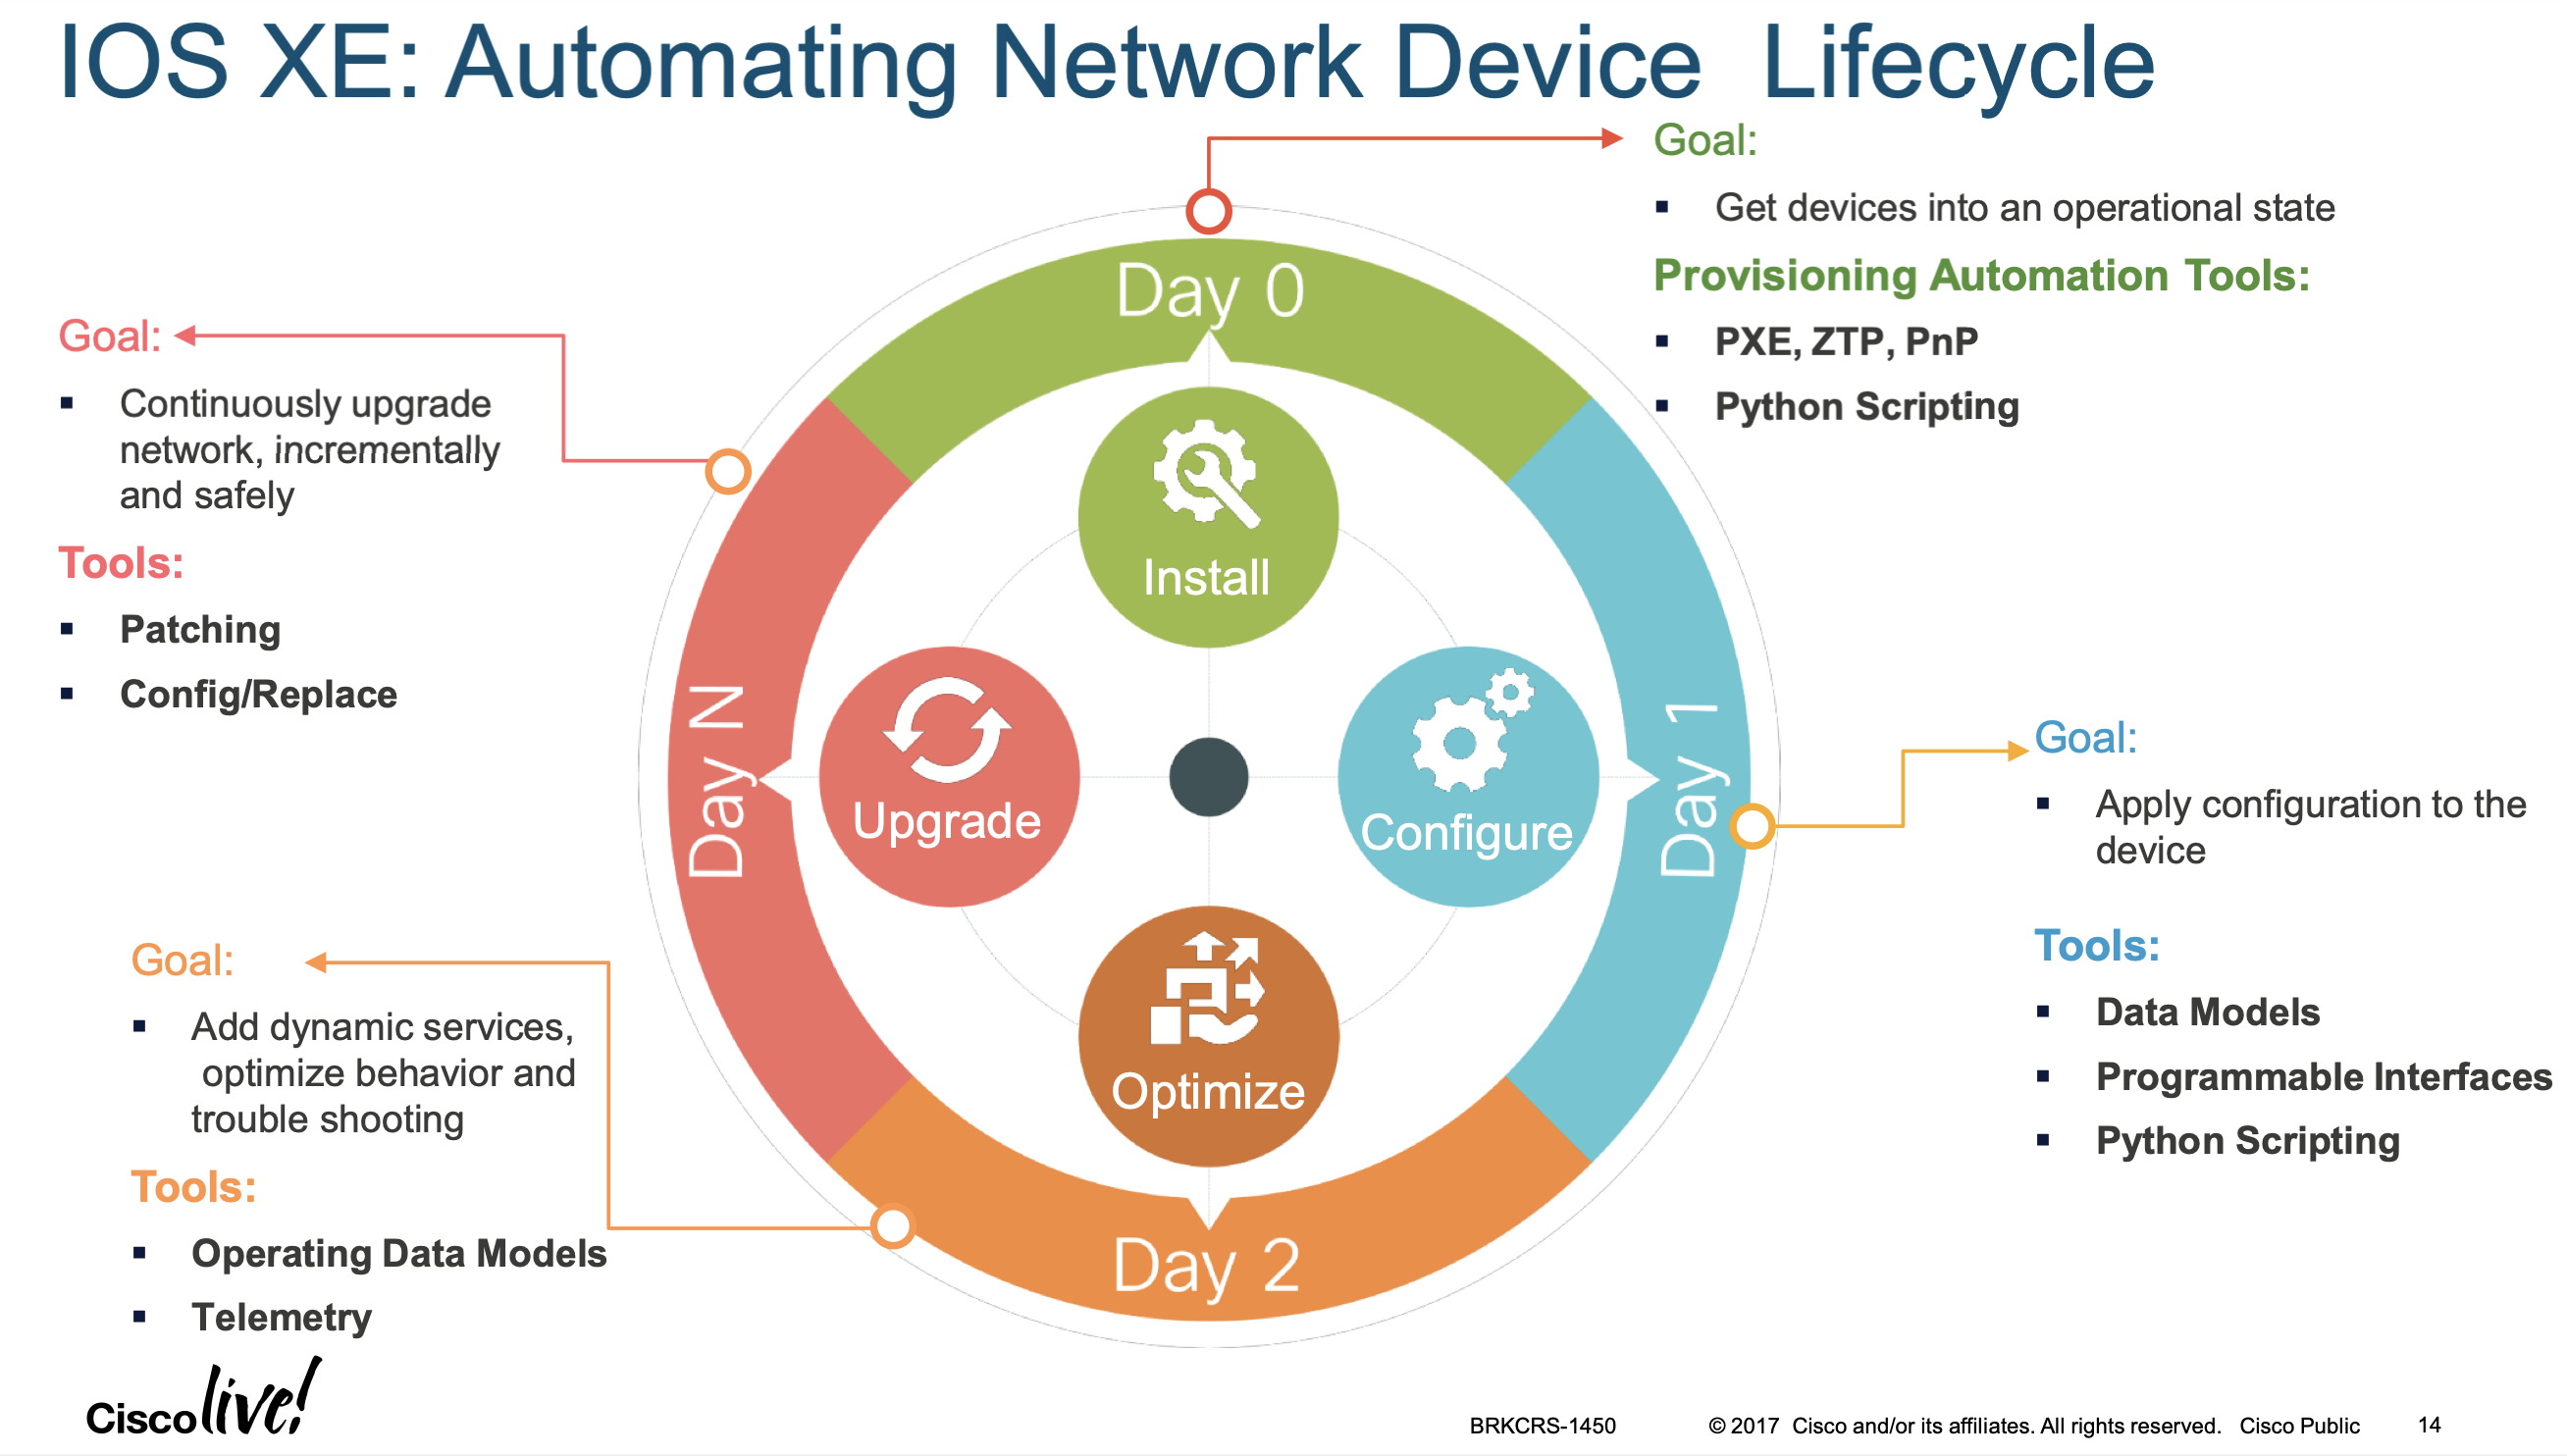
Figure 20: IOS-XE Automation Lifecycle - Day Zero Automation
The first challenge is getting a device onto the network. This part is commonly referred to as
"Day 0"deviceonboarding. The key requirement is to get the device connected with as little effort as possible. Depending on the operational mode and security requirements, either a small subset of the configuration or a "full" initial configuration will be deployed A good use case of model driven programmability is day zero automation:
Figure 21: Day Zero Automation Get details in developer.cisco.com/docs/ios-xe
- Day 1
Once the device is provisioned, the configuration of the device needs to be
maintainedandupgraded. "Day 1" device configuration management is responsible for theongoing configuration. Changes to the configuration need to be reliable, efficient, and auditable. - Day 2
The next challenge is
monitoringthe network andmeasuring performance. "Day 2" device monitoring provides a view of how the network is/operating. Based on this view, some changes may be required - Day n
Optimizations, extensions to device capabilities, enchancements to ops robustness etc… All ongoing as an interative loop, through day 0 to day n again.

Figure 22: Net Programmability Approaches APIs for networks, starting with proprietary and later open standards were developed for network configuration over time. They include these four types:
Programmable APIsVendor specific to control existing network devices, that still have a control plane. Such as:- NX-API
Pure SDNwhite box network devices with 100% brains and control plane in a SDN controller- OpenFLow
- NETCONF
- RESTCONF
- PCEP: Path Computation Element Protocol
- I2RS: Interface to the Routing System
Hybrid SDNController yes, but it controlls devices that maintain their control plane. Otherwise can see the same protocols used from controller to net devices.- OpenFLow
- NETCONF
- RESTCONF
- PCEP: Path Computation Element Protocol
- I2RS: Interface to the Routing System
OverlaysVirtual switches and controller use VXLAN to overlay a virtual network on to a physical network devices that each still have their control plane.
Traditional approach is using CLI, NETFLOW and SNMP to manage each network device individually.
7.9 3.9 Construct code to perform a specific operation based on a set of
requirements and given API reference documentation such as these:
7.9.1 3.9.a Obtain a list of network devices by using
- Meraki,
- Cisco DNA Center,
- ACI,
- Cisco SD-WAN, or NSO
7.9.2 3.9.b Manage spaces, participants, and messages in Webex Teams
7.9.3 3.9.c Obtain a list of clients / hosts seen on a network using
- Meraki or
- Cisco DNA Center
7.9.4 cmlutils to generate pyats testbed
A quick and simple way to generate your testbed file:
With pyats also installed in your cml venv, you can do lots if command-line quick-and-dirty tricks:
cml command "r2" "show version"# to run a command on all devices.cml command --config "r2" "ip domain zintis.net"# to run a command on all devices.
7.9.5 cmlutils to generate ansible inventory file
cml generate ansible --output inventory/hosts --style yaml#
From
The ansible group membership can be controlled by adding the "ansiblegroup" tag to nodes in your CML labs. Multiple "ansiblegroup" tags can be assigned to a single node, and that node will be placed into each Ansible inventory group.
nodes:
  - id: n0
    label: branch-rtr
    node_definition: csr1000v
    tags:
      - ansible_group=mygroup
would result in the following inventory entry

all:
  children:
    mygroup:
      hosts:
        branch-router:
          ansible_host: 192.0.2.1
7.9.6 cmlutils to add/update NSO (Network Services Orchestrator)
cml generate nso --output TEXT --syncfrom /
Note, the NSO environment settings are also read from .virlrc, or from these three environment variables
export NSO_HOST=localhost
export NSO_USERNAME=admin
export NSO_PASSWORD=Cisco123!
7.9.7 virlutils tab completion.
All you have to do is activate it:
eval "$(_VIRL_COMPLETE=bash_source virl)"
and / or
eval "$(_CML_COMPLETE=bash_source cml)"
for zsh, you need to enable completions this way:
eval "$(_VIRL_COMPLETE=zsh_source virl)"
and / or
eval "$(_CML_COMPLETE=zsh_source cml)"
All this info avaiable in github.com/CiscoDevNet/virlutils
8 15% 4.0 Application Deployment and Security
8.1 4.1 Describe benefits of edge computing
8.2 4.2 Identify attributes of different application deployment models
- private cloud,
- public cloud,
- hybrid cloud,
- edge
8.3 4.3 Identify the attributes of these application deployment types
8.3.1 4.3.a Virtual machines
8.3.2 4.3.b Bare metal
8.3.3 4.3.c Containers
8.4 4.4 Describe components for a CI/CD pipeline in application deployments
( see also 5.4) and ci-cd.org file.
8.5 4.5 Construct a Python unit test
See Unit Tests
import unittest
from circles import circle_area
from math import pi

class TestCircleArea(unittest.TestCase):
  def test_area(self):
    # Test areas when radius >=0
    self.assertAlmostEqual(circle_area(1), pi)
    self.assertAlmostEqual(circle_area(2.1), pi*2.1**2)
    self.assertAlmostEqual(circle_area(0 ), 0)

  def test_values(self):
    # Make sure value errors are raised
    self.assertRaises(ValueError, circle_area, -2)
    self.assertRaises(ValueError, circle_area, -2)
8.6 4.6 Interpret contents of a Dockerfile
8.7 4.7 Utilize Docker images in local developer environment
8.8 4.8 Identify application security issues related to secret protection,
encryption (storage and transport), and data handling
8.9 4.9 Explain how firewall, DNS, load balancers, and reverse proxy in application
deployment
8.10 4.10 Describe top OWASP threats (such as XSS, SQL injections, and CSRF)
OWASP is Open Web Application Security Project, a non-profit international
organization. About web application security.
- Injection: Injection attacks happen when
untrusted data is sent to a code
interpreter through a form input or some other data submission to a web
application. For example, an attacker could enter SQL database code into a
form that expects a plaintext username. If that form input is not properly
secured, this would result in that SQL code being executed. This is known as
an SQL injection attack.
- Injection attacks can be prevented by
validatingand/orsanitizing
user-submitted data. (Validation means rejecting suspicious-looking data, while
sanitization refers to cleaning up the suspicious-looking parts of the data.) In
addition, a database admin can set controls to minimize the amount of
information an injection attack can expose.
- Broken Authentication
Vulnerabilities in authentication (login) systems can give attackers access
to user accounts and even the ability to compromise an entire system using an
admin account. For example, an attacker can take a list containing thousands
of known username/password combinations obtained during a data breach and use
a script to try all those combinations on a login system to see if there are
any that work.
Some strategies to mitigate authentication vulnerabilities are requiring
two-factor authentication (2FA) as well as limiting or delaying repeated
login attempts using rate limiting.
- Sensitive Data Exposure
If web applications don’t protect sensitive data such as financial
information and passwords, attackers can gain access to that data and sell, or
utilize it for nefarious purposes. One popular method for stealing sensitive
information is using an on-path attack.
Data exposure risk can be minimized by encrypting all sensitive data as well
as disabling the caching* of any sensitive information. Additionally, web
application developers should take care to ensure that they are not
unnecessarily storing any sensitive data.
- XML External Entities (XEE)
This is an attack against a web application that parses XML* input. This
input can reference an external entity, attempting to exploit a
vulnerability in the parser. An ‘external entity’ in this context refers
to a storage unit, such as a hard drive. An XML parser can be duped into
sending data to an unauthorized external entity, which can pass sensitive
data directly to an attacker.
The best ways to prevent XEE attacks are to have web applications accept a
less complex type of data, such as JSON**, or at the very least to patch XML
parsers and disable the use of external entities in an XML application.
*XML or Extensible Markup Language is a markup language intended to be both
human-readable and machine-readable. Due to its complexity and security
vulnerabilities, it is now being phased out of use in many web applications.
**JavaScript Object Notation (JSON) is a type of simple, human-readable notation often used to transmit data over the internet. Although it was originally created for JavaScript, JSON is language-agnostic and can be interpreted by many different programming languages.
- Broken Access Control
Access control refers a system that controls access to information or
functionality. Broken access controls allow attackers to bypass authorization
and perform tasks as though they were privileged users such as
administrators. For example a web application could allow a user to change
which account they are logged in as simply by changing part of a url, without
any other verification.
Access controls can be secured by ensuring that a web application uses
authorization tokens* and sets tight controls on them.
*Many services issue authorization tokens when users log in. Every privileged
request that a user makes will require that the authorization token be
present. This is a secure way to ensure that the user is who they say they
are, without having to constantly enter their login credentials.
- 6. Security Misconfiguration
Security misconfiguration is the most common vulnerability on the list, and
is often the result of using ~default configurations~ or displaying excessively
verbose errors. For instance, an application could show a user
overly-descriptive errors which may reveal vulnerabilities in the
application. This can be mitigated by removing any unused features in the
code and ensuring that error messages are more general.
- Cross-Site Scripting
Cross-site scripting vulnerabilities occur when web applications allow users
to add custom code into a url path or onto a website that will be seen by
other users. This vulnerability can be exploited to run malicious JavaScript
code on a victim’s browser. For example, an attacker could send an email to a
victim that appears to be from a trusted bank, with a link to that bank’s
website. This link could have some malicious JavaScript code tagged onto the
end of the url. If the bank’s site is not properly protected against
cross-site scripting, then that malicious code will be run in the victim’s
web browser when they click on the link.
Mitigation strategies for cross-site scripting include escaping untrusted
HTTP requests as well as validating and/or sanitizing user-generated
content. Using modern web development frameworks like ReactJS and Ruby on
*Rails also provides some built-in cross-site scripting protection.
- Insecure Deserialization
This threat targets the many web applications which frequently serialize and
deserialize data. Serialization means taking objects from the application
code and converting them into a format that can be used for another purpose,
such as storing the data to disk or streaming it. Deserialization is just the
opposite: converting serialized data back into objects the application can
use. Serialization is sort of like packing furniture away into boxes before a
move, and deserialization is like unpacking the boxes and assembling the
furniture after the move. An insecure deserialization attack is like having
the movers tamper with the contents of the boxes before they are unpacked.
An insecure deserialization exploit is the result of deserializing data from
untrusted sources, and can result in serious consequences like DDoS attacks
and remote code execution attacks. While steps can be taken to try and catch
attackers, such as monitoring deserialization and implementing type checks,
the only sure way to protect against insecure deserialization attacks is to
prohibit the deserialization of data from untrusted sources.
- Using Components With Known Vulnerabilities
Many modern web developers use components such as libraries and frameworks in
their web applications. These components are pieces of software that help
developers avoid redundant work and provide needed functionality; common
example include front-end frameworks like React and smaller libraries that
used to add share icons or a/b testing. Some attackers look for
vulnerabilities in these components which they can then use to orchestrate
attacks. Some of the more popular components are used on hundreds of
thousands of websites; an attacker finding a security hole in one of these
components could leave hundreds of thousands of sites vulnerable to exploit.
Component developers often offer security patches and updates to plug up
known vulnerabilities, but web application developers don’t always have the
patched or most-recent versions of components running on their
applications. To minimize the risk of running components with known
vulnerabilities, developers should remove unused components from their
projects, as well as ensuring that they are receiving components from a
trusted source and ensuring they are up to date.
- Insufficient Logging And Monitoring
Many web applications are not taking enough steps to detect data
breaches. The average discovery time for a breach is around 200 days after it
has happened. This gives attackers a lot of time to cause damage before there
is any response. OWASP recommends that web developers should implement
logging and monitoring as well as incident response plans to ensure that they
are made aware of attacks on their applications.
8.11 4.11 Utilize Bash commands (file management, directory navigation, and
environmental variables)
8.12 4.12 Identify the principles of DevOps practices
9 5.0 Infrastructure and Automation
9.1 5.1 Describe the value of model driven programmability for infrastructure
automation
9.2 5.2 Compare controller-level to device-level management
9.3 5.3 Describe the use and roles of network simulation and test tools
(such as VIRL and pyATS)
9.4 5.4 Describe the components and benefits of CI/CD pipeline in infrastructure
automation. (See also 4.4)
9.5 5.5 Describe principles of infrastructure as code
9.6 5.6 Describe the capabilities of automation tools such as Ansible, Puppet,
Chef, and Cisco NSO
9.7 5.7 Identify the workflow being automated by a Python script thb at uses Cisco
APIs including ACI, Meraki, Cisco DNA Center, or RESTCONF
9.8 5.8 Identify the workflow being automated by an Ansible playbook (management
packages, user management related to services, basic service configuration, and start/stop)
9.9 5.9 Identify the workflow being automated by a bash script (such as file
management, app install, user management, directory navigation)
9.10 5.10 Interpret the results of a RESTCONF or NETCONF query
9.11 5.11 Interpret basic YANG models
9.12 5.12 Interpret a unified diff
* unified diff mode
When run in unified diff mode with the -u option you get:
- First two lines are
- — from-file from-file-modification-time
+
--- 1stfile	2020-05-22 11:32:48.000000000 -0400
+++ 2ndfile	2021-02-02 16:20:15.000000000 -0500
Next come one or more hunks of differences with this syntax: @@ from-file-line-numbers to-file-line-numbers @@
@@ -1,12 +1,10 @@
line-from-either-file
line-from-either-file…
If a hunk and its context contain two or more lines, its line numbers look like ‘start,count’. Otherwise only its end line number appears.
The lines common to both files begin with a space character. The lines that
actually differ between the two files have one of the following indicator
characters in the left print column:
- ‘+’ A line was
addedheretothe first file. - ‘-’ A line was
removedherefromthe first file.
So it is always relative to the *first* file.
Here is a larger example:
$ diff -u 1stfile 2ndfile
--- 1stfile	2020-05-22 11:32:48.000000000 -0400
+++ 2ndfile	2021-02-02 16:20:15.000000000 -0500
@@ -1,12 +1,10 @@
 #
-# macOS Notice
+# macOS Notice  : this can be deleted
 #
 # This file is not consulted for DNS hostname resolution, address
 # resolution, or the DNS query routing mechanism used by most
 # processes on this system.
 #
-# To view the DNS configuration used by this system, use:
-#   scutil --dns
 #
 # SEE ALSO
 #   dns-sd(1), scutil(8)
@@ -17,3 +15,5 @@
 nameserver 208.67.220.220
 You can get so confused that you'll start in to race
 down long wiggled roads at a break-necking pace
+And
+On and on.
9.13 5.13 Describe the principles and benefits of a code review process
There are many ways to do code reviews. Each one has its own benefits, but most of them can get the job done. The most common types of code review processes include:
Formal code review Change-based code review Over-the-shoulder code review Email pass-around
Formal code review A formal code review is where developers have a series of meetings to review the whole codebase. In this meeting, they go over the code line by line, discussing each one in detail. This type of code review process promotes discussion between all of the reviewers.
A formal code review enables reviewers to reach a consensus, which may result in better feedback. It usually requires a series of meetings; because it is going through the whole codebase, there is a lot of code to review and therefore takes more time than a single meeting can accommodate. Also, you might do a new code review every time the comments are addressed.
Details of the code review meetings, such as the attendees, the comments, and comments that will be addressed, are documented. This type of code review is often called Fagan inspection and is common for projects that use the waterfall software development methodology.
A modern adaptation of the formal code review is to have a single meeting to review only the code changes. This way, the code can benefit from the live discussion amongst reviewers. This is sometimes known as a walkthrough.
Change-based code review A change-based code review, also known as a tool-assisted code review, reviews code that was changed as a result of a bug, user story, feature, commit, etc.
In order to determine the code changes that need to be reviewed, a peer code review tool that highlights the code changes to be reviewed is typically used. This type of code review is initiated by the developers who made the code changes and are responsible for addressing the agreed upon comments. In this type of code review process, the reviewers usually perform the review independently and provide the comments via the peer code review tool.
A change-based code review makes it is easy to determine the actual code changes to be reviewed and enables multiple reviewers to get a diverse look into the code.
Over-the-shoulder code review An over-the-shoulder code review is exactly what it sounds like. A reviewer looks over the shoulder of the developer who wrote the code. The developer who wrote the code goes through the code changes line by line and the reviewer provides feedback.
With this method, if the fix is not difficult, the code may be changed on the spot so that the reviewer can re-review it on the spot. The benefit of an over-the-shoulder code review is that there is direct interaction between the author of the code and the reviewer, which allows for discussion about what is the right fix. The downside of this type of code review is that it typically involves only one reviewer, so the comments can be one-sided.
Email pass-around An email pass-around piggybacks on the automatic emails sent by source code management systems when a checkin is made. When the emails are sent, it is up to the other developers to review the code changes that were made in that checkin. The downside of this type of code review is that sometimes a single checkin can be just a piece of the whole code change, so it may not include the proper context to fully understand the code changes.
9.14 5.14 Interpret sequence diagram that includes API calls
10 6.0 Network Fundamentals
10.1 6.1 Describe the purpose and usage of MAC addresses and VLANs
10.2 6.2 Describe the purpose and usage of IP addresses, routes, subnet mask/prefix,
and gateways
10.3 6.3 Describe the function of common networking components (such as switches,
routers, firewalls, and load balancers)
10.4 6.4 Interpret a basic network topology diagram with elements such as switches,
routers, firewalls, load balancers, and port values
10.5 6.5 Describe the function of management, data, and control planes in a network
device
10.6 6.6 Describe the functionality of these IP Services: DHCP, DNS, NAT, SNMP, NTP
10.7 6.7 Recognize common protocol ports values (such as, SSH, Telnet, HTTP, HTTPS,
and NETCONF)
- ssh: 22
- telnet: 23
- ftp-data: 20
- ftp: 21 (ftp-data and ftp resp.)
- smtp: 25
- http: 80
- https: 443
- dns: 53
10.8
10.9 6.8 Identify cause of application connectivity issues (NAT problem, Transport
Port blocked, proxy, and VPN)
10.10 6.9 Explain the impacts of network constraints on applications
curl -s http://checkip.dyndns.org/ | sed 's/[a-zA-Z<>/ :]//g'- curl https://api.icndb.com/jokes/random?limitTo=nerdy
- curl https://api.icndb.com/jokes/random
- curl https://bootstrap.pypa.io/get-pip.py -o get-pip.py
- curl https://deckofcardsapi.com/api/deck/dec40fca2d5/draw/?count=3 | python -m json.tool=
- curl -i -k -X "POST" "https://10.85.116.30:443/restconf/data/Cisco-IOS-XE-native:native/logging/monitor"
- curl -i -X GET http://localhost:8080/api -u admin:admin*
10.11 SDN and IBN
SDN is Software Defined Networking that has a controller that configures
all network devices in a centralized fashion, and pushes the configs out to
the remote networking devices. Let's one manage the whole network as a whole
from the centralized controller.
Cisco SDN are implemented in ACI, DNAC, NSO, SD-WAN, Meraki
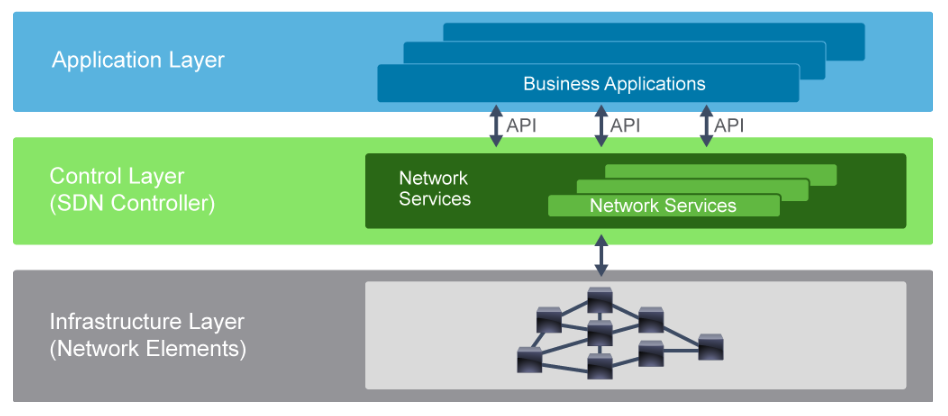
Each implements the 3 layers:
- Infrastructure Layer
- Control Layer
- Application Layer
10.11.1 Intent Based Networking.
IBN builds on top of a SDN. IBN adds context, learning, and assurance
capabilities to SDN by tightly coupling policy with intent. Intent
IBN transforms a hardware-centric, manual network into a controller-led
network that captures business intent and translates it into policies that
can be automated and applied consistently across the network.
IBN captures business intent and uses analytics, machine learning, and
automation to to align the network continuously and dynamically to changing
business needs.
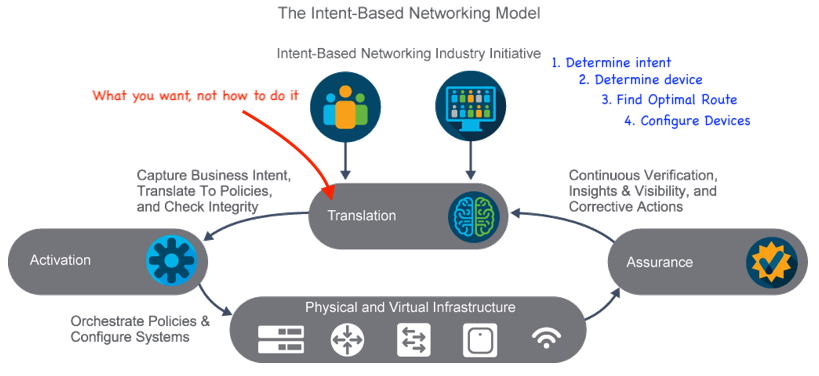
10.11.2 IBN Responsiblity
It is up to the IBN to determine the following:
- Determine Intent
- Determine Devices
- Find Optimal Route
- Configure Devices
To accomplish this the IBN relies on a centralized controller to manage the devices, and the IBN needs to be aware of the current state of the network, and the state of every device.
That leaves the user/operator to focus on the intent of the business.
10.12 IBN Benefits
Reduces complexityMgt and maintenance become easySimplifies deployment. Only need to declare the final state, the IBN takes care of the details of devices along the way.Security improvedML algorithms and AI can learn and respond to new threats before they become an issue.Improved agilityquick to adapt to changes, as they all happen on the centralized controllerEliminates repetitionThe details of configuration along all the device is automatic, so you are left with littel repetition

10.13 Cisco's IBN products:
Cisco ACICisco DNA CenterCisco SD-WANCisco Software-Defined Access (SD-Access)Cisco NSO
10.14 SDN Characteristics
Network devices:Physical and virtual devices that participate in the network, responsible only for forwarding packets based on instructions from the SDN controller. They communicate with SDN controller's southbound interface.SDN controller:The brains of SDN, responsible for communicating with network devices and applications and services using application programming interfaces (APIs). The SDN controller has full awareness of the network state by keeping information in a local database.Southbound interface:This interface is a layer of device drivers that the SDN controller uses for interacting with physical and virtual devices in the network.Northbound interface:Representational State Transfer (REST) APIs facing outside the network so applications and services can interact with the SDN controller and use resources in the network.Network management applications and services:Clients accessing resources in the network using REST APIs. Clients can be automation user applications, automation servers, or software libraries for many programming languages like Python, Java, Ruby, and others.
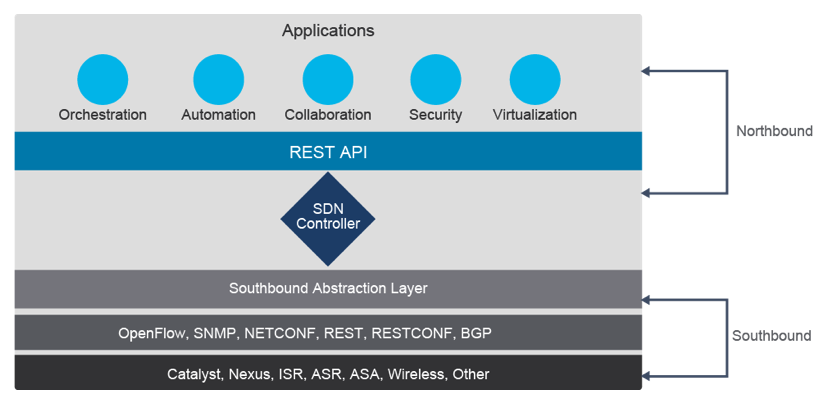
10.14.1 Northbound API for SDN
Predominantly REST API
10.14.2 Southbound API for SDN
Many, including:
- Openflow
- SNMP
- NETCONF
- REST
- RESTCONF
- BGP
10.15 Benefits of an SDN
- Consistency
- Fast changes
- Dynamic changes
- Better security through dynamic isolation of threats, and consistency
- programmable