Personal cheat on Docker Basics
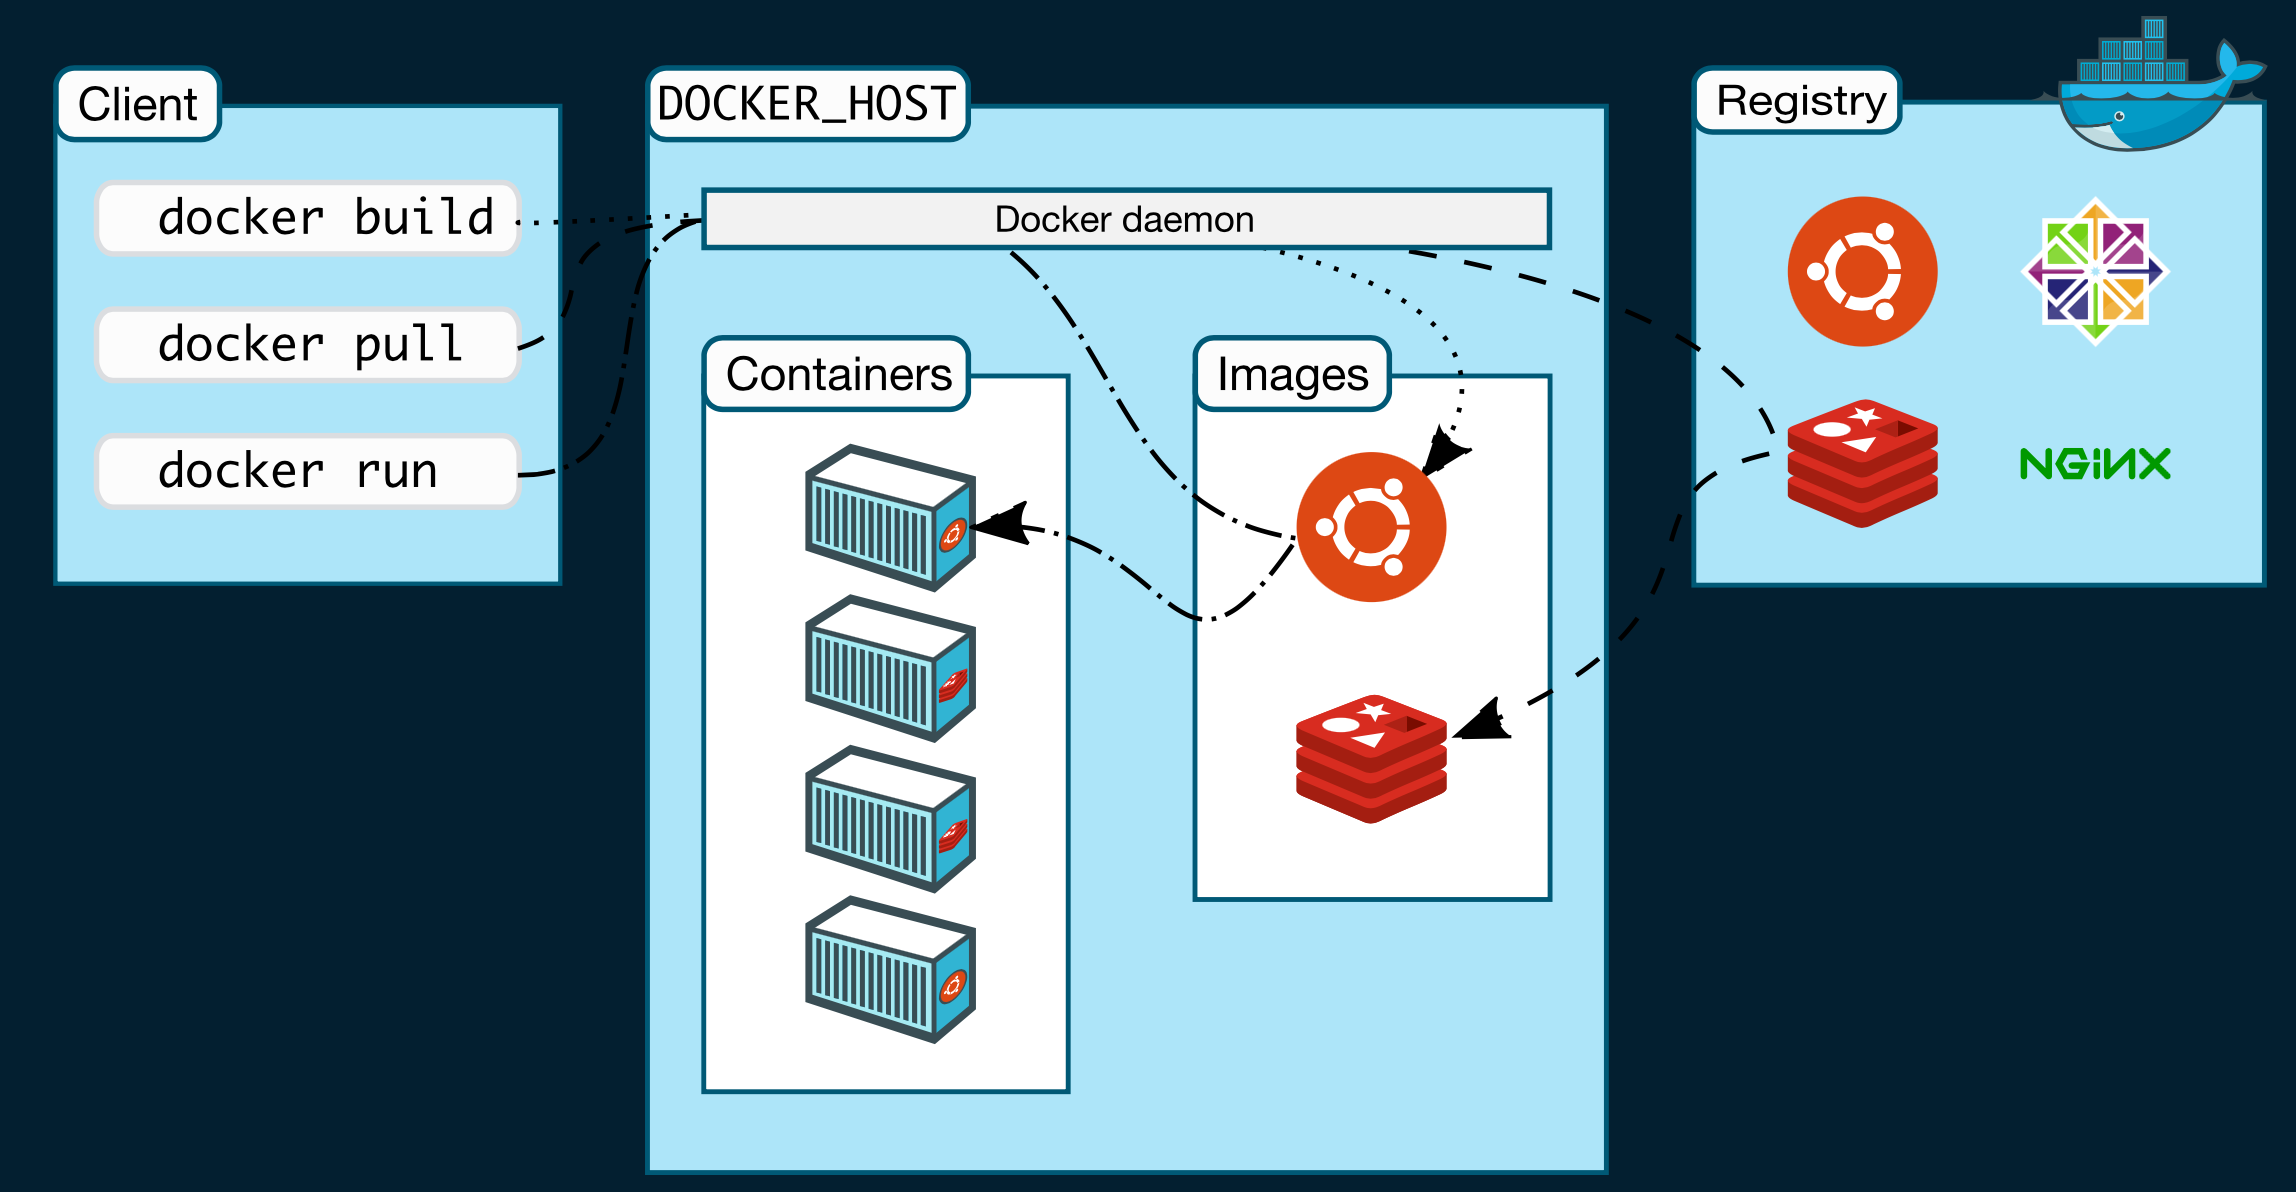
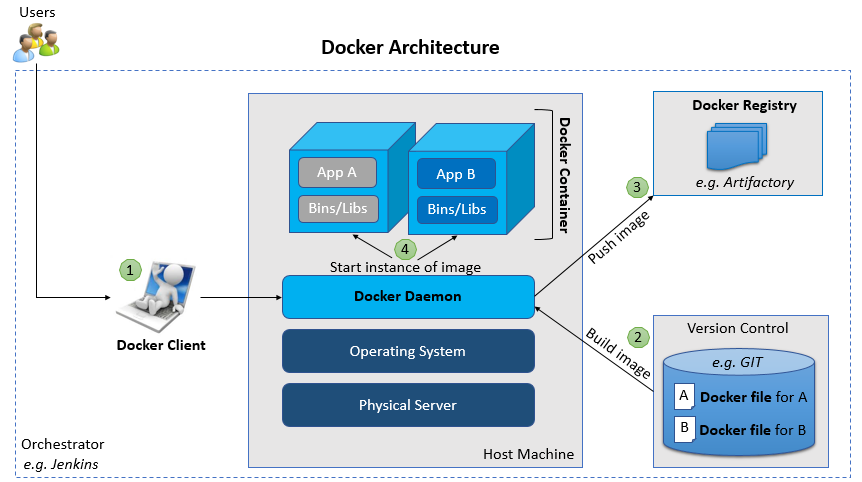
1 Docker Architecture
Client - Server, where the server is the docker engine and the client is your
interaction with docker where you enter commands such as docker run
2 Containers vs VMs
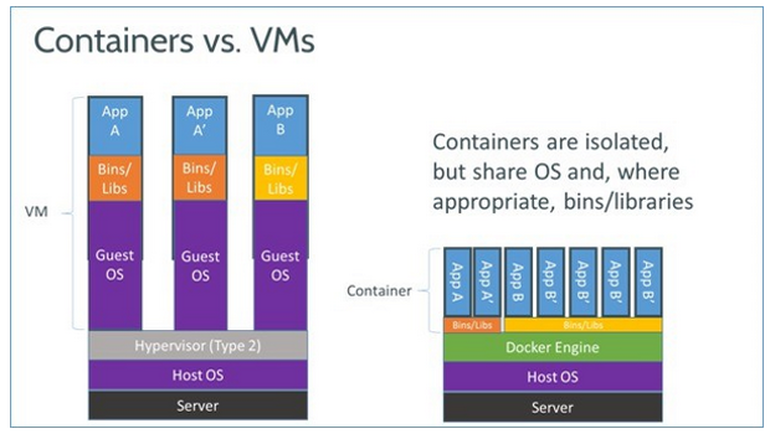
From docs.docker.com, Docker is an open platform for developing, shipping, and running applications, in a way that allows for isolation and separation of the libraries and dependencies needed for that app, from the libraries running on the host itself.
The packaging and isolation is called a container. They are lightweight, and easily sharable, and spun up and shutdown easily and quickly.
2.1 Benefits of containers
- Run on the
same host better use of resourcesbecause the apps have closer access to the server hardware (less layers, particularly the guest OS layer is missing)fastandportable.- "It works on my machine." is no longer heard. It works on all machines.
lightweight
3 Container isolation
The containers isolate from one another using Linux kernel namespaces, and control groups
3.1 control groups (a kernel feature)
Control groups are implemented with libcgroups. libcgroups protect
against a container hogging all the resources. Very simply control groups
put limits on cpu and memory, disk I/O and network usage for one or more
processes. That's why control groups are critical to docker containers
playing nicely.
linux journal has a good blog on linux cgroups (control groups). A good read
3.2 namespaces
4 Common Docker Commands
These are some of the more common Docker commands.
docker ps -adocker inspectdocker imagesdocker logsdocker sbom# experimental as of June 2021docker rm -fdocker rm $(docker ps -a -f status=exited -q)is a bash command to rm all the exited containers. Will have to write my own for tcsh. nrm $(docker ps -a -f status=exited -q)# will delete all exited containers.docker run -it ~image_ name~ bash --name My-own-name-pleasedocker run -d -p 80:80 image service zintDockerImage
I also have some aliases set up as follows:
alias dim 'docker images' alias dps 'docker ps -a' alias drm 'docker rm -f' alias di 'docker inspect' alias dip 'docker inspect f "{{.Name}} {{.NetworkSettings.IPAddress }}" \!*' #usage is dip <docker ID> alias dl 'docker logs'
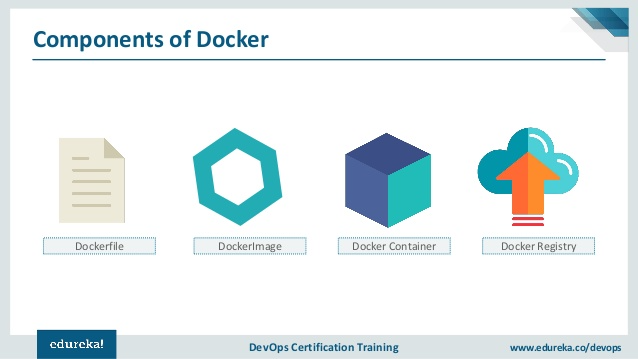
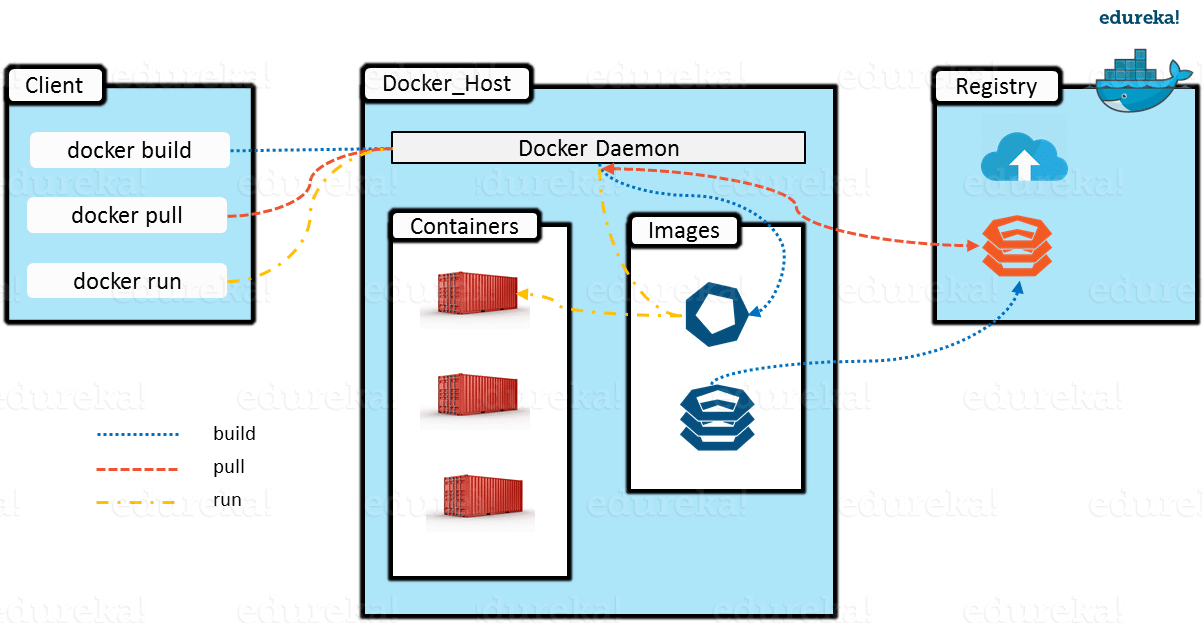
5 Docker Components
Docker is composed of these five main components:
And, NO HYPERVISOR.
5.1 docker daemon
Listens to API requests, and manages docker objects, i.e. images, containers,
networks, volumes.
There is of course the docker client as well. It interfaces to docker daemon
and presents all the user commands to the user.
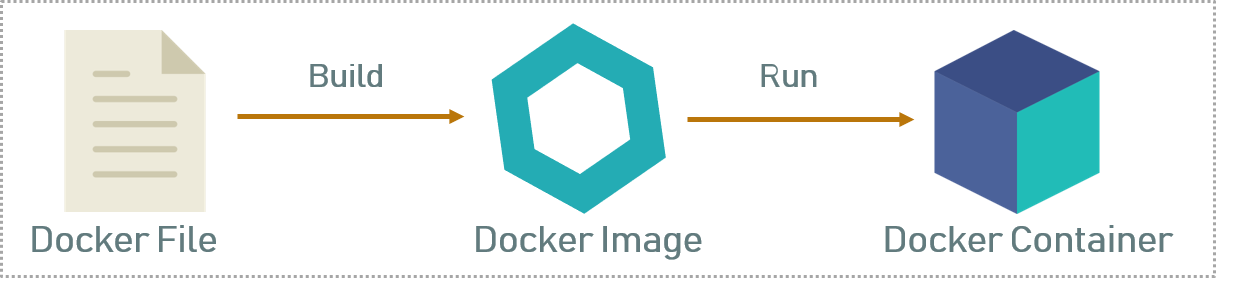
5.2 dockerfile
The dockerfile is used to build the image when you run docker build
A simple text document that instructs how the docker image will be built.
select the imageyou want to start with using the FROM keyword For exampleFROM ubuntu:16.04- use RUN commands so run, install, whatever you need
For example
RUN echo "Hello from ubuntu." - Configuration files needed for your image are specified in the dockerfile so that when the image is created from the docker file, all the app specific configs will be what you need.
For more detail on writing your own dockerfile see Creating Your Own Image
Here are all the commands you can use in a dockerfile. They are written in uppercase only by convention.
# CommentsFROM# the first command in the Dockerfile unless anARGcommandCMD# CMD command is used to give the default commands when the imageENTRYPOINTWORKDIRENVCOPY# used to copy config files from host into the docker image dirLABELRUNADD.dockerignoreARGEXPOSE 8000# tcp port 8000 to expose to the host, from inside of docker. not to be confused with-p 8000:80on thedocker run commandthat exposes outside world port 80, to docker inside port 8000.USERVOLUME
The directory where the dockerfile, and other needed files for the build are
located, is called the build's context and is used by the docker build. The
context can be specified also with the PATH or URL instructions in the
dockerfile.
This dockerfile was from the lab in the Devasc group study course:
FROM python:alpine3.7
# copy all python programs from the app directory in the current context
# into the /app/ directory in the container.  (also the Pipfile)
COPY ./app/*.py /app/
COPY ./app/Pipfile /app/
EXPOSE 8080
RUN apk add bind-tools
5.3 Docker Build to create a Docker Image
When you are happy with the dockerfile you run docker build on it. This
will create an image, which is an "opaque asset" that is compiled from the
dockerfile.
For example
docker build -t zintDockerImage -f dockerfile .# dockerfile is defaultdocker build -t zintDockerImage .
or if you want to see progress:
docker build --no-cache --progress=plain -t zintDockerImage .
A good check-in is to run sudo docker build --help which gives you:
sudo docker build --help

Usage:  docker build [OPTIONS] PATH | URL | -

Build an image from a Dockerfile

Options:
      --add-host list           Add a custom host-to-IP mapping (host:ip)
      --build-arg list          Set build-time variables
      --cache-from strings      Images to consider as cache sources
      --cgroup-parent string    Optional parent cgroup for the container
      --compress                Compress the build context using gzip
      --cpu-period int          Limit the CPU CFS (Completely Fair Scheduler) period
      --cpu-quota int           Limit the CPU CFS (Completely Fair Scheduler) quota
  -c, --cpu-shares int          CPU shares (relative weight)
      --cpuset-cpus string      CPUs in which to allow execution (0-3, 0,1)
      --cpuset-mems string      MEMs in which to allow execution (0-3, 0,1)
      --disable-content-trust   Skip image verification (default true)
  -f, --file string             Name of the Dockerfile (Default is 'PATH/Dockerfile')
      --force-rm                Always remove intermediate containers
      --iidfile string          Write the image ID to the file
      --isolation string        Container isolation technology
      --label list              Set metadata for an image
  -m, --memory bytes            Memory limit
      --memory-swap bytes       Swap limit equal to memory plus swap: '-1' to enable unlimited swap
      --network string          Set the networking mode for the RUN instructions during build (default "default")
      --no-cache                Do not use cache when building the image
      --pull                    Always attempt to pull a newer version of the image
  -q, --quiet                   Suppress the build output and print image ID on success
      --rm                      Remove intermediate containers after a successful build (default true)
      --security-opt strings    Security options
      --shm-size bytes          Size of /dev/shm
  -t, --tag list                Name and optionally a tag in the 'name:tag' format
      --target string           Set the target build stage to build.
      --ulimit ulimit           Ulimit options (default [])
zintis@c8host ~[1007] $
5.3.1 -t or –tag
Set the name and optional tag to <name:tag>
5.3.2 progress=[auto, plain, tty]
These are the progress options for docker build. plain will display the
container output.
Verify with docker images. That will list your local images.
So, dockerfiles or images ? are where Docker stores definitions of isolated operating systems
They are a recipe for what an operating system needs to run,
and contains things like
FROM nginxCOPY ~/docker-configs/nginx.conf /etc/nginx/nginx.confCOPY ~/website/*.html /usr/share/nginx/html
You can also browse the docker index online, where you will see many images
that other people created when they ran docker build, but you will not see
the dockerfiles they used. These images are free to download and use, by
running: docker *pull* ubuntu or with a specific "tag" like 16.04 you can run
docker *pull* ubuntu:16.04 Without the tag, the latest version is what is
pulled from docker.
So pull downloads the image. You can also updload one of your containers
with the command docker *push* zintImage
5.3.3 docker logs
sudo docker-compose logs -f --tail=100 frontend
5.4 Docker Containers
When you docker run an image, you get a container
Docker uses images to run your code, not the dockerfile. So, you already
have an image, then docker run -d -p 80:80 image service zintDockerImage
will create a container called zintDockerImage and then run it as a detached
container (-d option), and let you access it using port 80, which will be
"mapped" to port 80 on the container. These can be the same or different.
You can list the images you have with docker images, then run one with:
docker run -it alpine
(Assuming "alpine" was one of the images listed with the command docker
images.
5.4.1 View the running containers
Since containers are the actual running instances of images, when you run
docker container ls you will see what is currently running "live".
So docker push is NOT publishing your source code, it is publishing the
image that was built from your source code.
5.4.2 Where are Image Files stored?
See the Where are Containers stored? link.
6 Containers (Details)
They are instances of images. So, an image is like a class,
and a container is like a particular instance of this class.
These objects (containers) are you will be most dealing with.
They communicate with each other as if they were real servers on a network, so via TCP/IP or UDP typically.
Why containers, or container apps, or containerized applications?
It is a packaging mechanism for code that contains the application
~code itself along with all the dependancies (down to the version)
of that application. Therefore they can run on any platform as
all the reqeuirements included / packaged together. So they are
easy to deploy, they are easy to migrate from one platfrom to
another.
Large monolithic applications are no longer being developed. Instead people write micro-services that interact over the network.
This also allows one to stay current by upgrading little bits, often.
But, it creates a lot of fragmentation / container sprawl.
The mgt of this sprawl needs to be addresssed with some container
orchestration.
Kubernetes is the defacto standard container orchestreation. It
tells your system
- what components comprise your app, and
- how these interact between themselves over the network (what ports, what addresses, etc)
- how the application needs to be present in the runtime, for instance,
howmany replicasare needed, how it scales.

6.1 Containers are not persistent
The next time one starts a container, it will NOT have any history
of the previous time it ran. They are spun up each time from an
image file, from scratch.
That is why the image files define what the container will look like.
6.2 Data Persistence via Volumes
Volumes are an underlying data layer that can be used by multiple containers, or by a newer version of a container that existed yesterday.
6.3 Networks
Surround all containers, and if not specified will be created automatically as a NAT or BRIDGED? network that shares your host's network.
6.4 Where are Containers stored?
Well, first off, where are images stored? Usually in /var/lib/docker To
find out exactly, open up the repositories file, to see a JSON file that
lists the repositories on your local host
- less /var/lib/docker/repositories | python -m json.tool
You will also see the same output from docker images
Another location holds directories of images in /var/lib/docker/graph
Each of those subdirectories has files, json, and layersize. And a
subdirectory. You can also run docker info as explained in the
docker info section later in this document.
- docker storage driver differences
From edureka.co: The contents of the
/var/lib/dockerdirectory vary depending on the driver Docker is using for storage.By default this will be aufs but can fall back to
overlay, overlay2, btrfs,devicemapperorzfsdepending on your kernel support. In most places this will be aufs.You can
manually set the storage driverwith the-sor--storage-driveroption to the Docker daemon./var/lib/docker/{driver-name}- will contain thedriver specific storage
for contents of the images./var/lib/docker/graph/<id>-now only contains metadata about the image,
in the json and layersize files.
In the case of aufs:
/var/lib/docker/aufs/diff/<id>-has the file contents of the images./var/lib/docker/repositories-aufs-is aJSON filecontaining local image
information. This can be viewed with the command docker images.
In the case of devicemapper:
/var/lib/docker/devicemapper/devicemapper/datastores the images/var/lib/docker/devicemapper/devicemapper/metadatathe metadata
For Mac OS X
~/VirtualBox VMs/boot2docker-vmMac OS X using boot2docker~/.docker/machine/machines/defaultFile Name – disk.vmdk
6.5 Registry vs Index
An index manages user accounts, permissions, search, tagging, all on the
public web interface (dockerhub)
Who controls if you are allowed to do a docker push or docker pull is the
index.
A registry stores and serves up the actual image assets, and it delegates
the authentication to the index.
docker search searches the index. The index might be searching /multiple/
registries, as long as the index is aware of those registeries.
6.6 local docker registry/index
When you are running only on your local machine, docker push and docker pull
you are operating a kind of local hybrid of both an index and a registry.
Running docker images will by default show you only what is local to
your machine.
6.7 docker repository
Similar to a github repository, but not quite.
docker buildordocker commityou can specify a name for an image. Usually in the formusername/image_name, but it does NOT have to be.- When you run
docker pushhowever, the index will look at the name and check if you have access to that repository, before allowing you to push the new version of the image to the repository. - So a registry holds a collection of repositories, when themselves are a collection of images tracked by GUIDs.
- you can tag an image, and store multiple versions of that image with different
GUIDs in a single named repository, and access different tagged versions of an
image with
username/image_name:tag
So, a docker image called zperkons/webex-joke-of-the-day, then the official repository name is "zperkons/webex-joke-of-the-day", but often you will refer to the repository as just "webex-joke-of-the-day".
7 Installation on MAC
Download docker.dmg for macs from store.docker.com
Install it into the applications folder. Run it by opening Docker Desktop
on my mac. After that the daemon runs in the background. You can choose
to run all commands from terminal, or you can possibly run them from the GUI.
This is both the daemon and the client, but remember that the client could
also talk to a different daemon on a different server.
7.1 Confirm installation
From a terminal window, type
docker --version
8 Installation on Linux
Can use this Digital Ocean Tutorial link for uubuntuu installations.
With uubuntu can use apt-get commands to download and install docker community
edition.
On my Centos install using dnf or yum. Get the install instructions from:
- https://docs.docker.com/engine/install/centos/ but in a nutshell:
- install the
docker respositoryto your dnf repositories:https://download.docker.com/linux/centos/docker-ce.repo
This is done by
dnf add-repo <url> - install
docker engine(which will be downloaded from the docker repo)dnf list docker-ce --showduplicates | sort -rdnf install docker-ce-<version> docker-ce-cli-<version> \ containered.io docker-compose-plugin
- There is no 3), you are done. You may want to confirm version with
docker --version
9 My Local Environment
 /Users/zintis/bin/dockerzp[12] % =which docker=
*/usr/local/bin/docker*
10 First time hello world run
Typically a newbie will run
docker run hello-world
This will give you this:
Unable to find image 'hello-world:latest' locally
latest: Pulling from library/hello-world
1b930d010525: Pull complete
Digest: sha256:6540fc08ee6e6b7b63468dc3317e3303aae178cb8a45ed3123180328bcc1d20f
Status: Downloaded newer image for hello-world:latest

Hello from Docker!
This message shows that your installation appears to be working correctly.

To generate this message, Docker took the following steps:
 1. The Docker client contacted the Docker daemon.
 2. The Docker daemon pulled the "hello-world" image from the Docker Hub.
    (amd64)
 3. The Docker daemon created a new container from that image which runs the
    executable that produces the output you are currently reading.
 4. The Docker daemon streamed that output to the Docker client, which sent it
    to your terminal.

To try something more ambitious, you can run an Ubuntu container with:
 $ docker run -it ubuntu bash

Share images, automate workflows, and more with a free Docker ID:
 https://hub.docker.com/

For more examples and ideas, visit:
 https://docs.docker.com/get-started/

/Users/zintis/bin/dockerzp[14] %
11 Typical docker lifecycle
I downloaded docker from hub.docker.com in Aug, 2019 and got a slightly
different quick start:
11.1 clone
I first cloned an image called doodle.git:
git clone https://github.com/docker/doodle.git
But you can also just pull an image from dockerhub: git pull nginx
11.2 docker build [OPTIONS] PATH | URL
Then I cd doodle/cheers2019 && docker build -t zintis/cheers2019
In the cheers2019 directory, there was a dockerfile, which had as the first
line a FROM alpine Which then downloaded an alpine image. Alpine is a
bare-bones, light-weight, linux that is excellent for containers as it does
NOT have the bloatware desktop gui and other bells and whistles software.
11.3 docker run
Runs an image Several common options:
-itfor interactive terminal-drun the container indetachedmode (as a background process)-p 80:80map port 80 of the host to port 80 in the container So anything listening on port 80 on the container is made available to port 80 on localhost. So-p 8000:80would connectlocalhost port 8000, tocontainer port 80. eg:docker run -p 8000:80 -d nginxThe syntax is -p HOSTPORT:CLIENTPORT.-dpyou can combine several options together--env-file $(pwd)/librenms.envspecifies that on building the container docker is to read all the environment variables from the file specified.--rmwill remove the container after it has been shutdown, so I don't have to clean it up later withdocker rm(rmiis for removing images).
It can be as simple as docker run -it zintis/cheers2019 if I wanted to
see the container afterwards, and then manually delete it. Otherwise as
simple as docker run -it --rm zintis/cheers2019
I also ran an interactive terminal using the docker GUI on my mac. That
actually triggered this command:
docker exec -it ad81fedc49753f5d12f7e0532b25c3a3fc149f9c3742659eb25b051a5f31e716 /bin/sh; exitdocker exec -it <image id> <command>docker exec -it 363fa7e2ca23 /bin/bash
where it opened a new terminal window, and ran the docker exec command, then
exited, (when I exited the interactive terminal) which then closed the newly
opened terminal window. I can manually run
$ docker exec -it ad81fedc49753f5d12f7e0532b25c3a3fc149f9c3742659eb25b051a5f31e716 /bin/sh
In my own, already opened terminal window too if I want, but docker exec --help
reminds me that I need two arguments to docker exec, the second being the image
name or id.cd
11.4 docker run limitations on mac
- I cannot ping my containers because
Docker Desktop for Mac can’t routetraffic to containers. Per-container IP addressing is not possible, because the docker (Linux) bridge network is not reachable from the macOS host.
There are two scenarios that the above limitations affect. To read about them check out https://docs.docker.com/docker-for-mac/networking/
My solution to this was to run docker on a linux VM under fusion. Seems to
work much better.
docker --help to see all the docker commands. Nice list.
11.5 push
After you have an image, you may want to share it with the word, i.e. public
docker login && \docker push zintis/cheers2019
So, if you have NOT done either of the two above commands, all your stuff is
still private. BTW, if you see a uploading images message after running
docker build command, don't worry, it is NOT going on github or gitlab. It
is being "uploaded" to /var/lib/docker/repositories
11.6 docker stop
To stop a container, docker stop [OPTIONS] CONTAINER [CONTAINER...]
12 Working with images:
12.1 build the image
docker build -t first-dockerfile -f Dockerfile1 .
You can also view the "software bill of materials" with docker sbom
12.2 list image
docker images
12.3 remove an image
docker rmi
12.4 run the image
docker run -it -d first-dockerfile
You can specify a timezone when running with -TZ=America/Toronto
For a list of valid timezones check out docs.diladele.com
docker run \
-v /volume1/docker/mariadb:/var/lib/mysql \
-e MYSQL_ROOT_PASSWORD='root_password' \
-e TZ=America/Toronto \
--name mariadb \
-d \
--restart always \
mariadb:latest \
--innodb_file_per_table=1 \
--lower_case_table_names=0
Another example, taken from the docker librenms docs:
See this youtube link on docker container for librenms.
12.5 use exec for interaction
docker exec -it f1edbfca3eac bash
12.6 Another quirk of Mac OS mandates "screen"
To get to a terminal session and the / directory of this docker virtual
machine you use the program screen.
screen ~/Library/Containers/com.docker.docker/Data/vms/0/tty
13 Managing my Containers (using Docker)
13.0.1 List my containers with docker ps -a
Will show you all the containers you have on your local system
It will have a the following columns:
CONTAINER ID IMAGE COMMAND CREATED STATUS PORTS NAMES
The -a option shows all containers, otherwise only running containers will
be displayed.
13.0.2 –name option
You will notice that the NAMES are either randomly generated like
gallantgalois. Or names that you choose by using the option --name
For example docker run --name zint-hello hello-world
Running with your own name:
docker run -it ~image-name~ bash --name My-own-name-please
13.0.3 Remove containers with rm
- See also Remove images with docker rmi
These containers are not persistent, so don't take up lots of space, but you still may want to clean up your environment by removing them. They are stored in the ???? folder.
Remove containers in two ways:
- run the command
docker rm zint-helloto manually remove using container name - add the
--rmoption whenrunninga container. Docker will remove it when the container is stopped, and so so automaticall.
If not, then the containers can clutter up your env. So one can remove them manually whenever you want. To remove a container, you must know its name. That can be retreived using the ps command:
docker ps -a
docker rm 72a6aa31f524
13.0.4 Remove images with docker rmi
- See also Remove containers with rm
Images are longer lived though, so if you remove an image, it will have
to be downloaded again from docker hub, or from your private repository.
- dependent child images.
A docker image may have docker children, that build off of the parent image. You cannot delete an image if there are children images.
I tried removing an image and got the error Error response from daemon: conflict: unable to delete 43773d1dba76 (cannot be forced) - image has dependent child images
Try to remove unnecessary images before removing the image:
docker rmi $(docker images --filter "dangling=true" -q --no-trunc)Try removing all imagers forcefully: docker rmi $(docker images -q) -f Of course you won't have
anyimages left, so probably not what you want.Try finding the image id and parent id for all images created after the image in question with the following:
docker inspect --format='{{.Id}} {{.Parent}}' $(docker images --filter since=<image_id> -q)docker inspect --format='{{.Id}} {{.Parent}}' $(docker images --filter since=<image_id> -q)Then you call command:
docker rmi {sub_image_id} "sub_image_id" is ID of dependent image
13.0.5 -pull containers preemptively
You can (if you decide) to docker pull ubuntu ahead of time
which just downloads the image to your local drive first. Then
if you later docker run -it ubuntu it won't have to first download
ubuntu image.
13.0.6 ~/Library/Containers/com.docker.docker/Data for Local Storage (Mac)
On a Mac, containers and images are stored in this directory.
~/Library/Containers/com.docker.docker/Data
You will see files such as:
backend.sock     vms
docker.sock      vpnkit.diag.sock
osxfs.sock       vpnkit.eth.sock
task.lock        vpnkit.pcap.sock
tasks            vpnkit.port.sock
And actual vms are stored in
~/Library/Containers/com.docker.docker/Data/vms/0
Frankly since MAC OSX does not run a linux kernel but rather relies on docker desktop to run docker daemon in a virtual machine anyway, I chose to just install docker on my linux VM (under Fusion).
13.1 /var/lib/docker
On Linux systems you can use the command docker info to see where docker
stores the images. However, on a MAC docker info will not work. So:
The images you create in docker are stored in one of several places:
/var/lib/images/for Linux~/Library/Containers/com.docker.docker/which is a virtual machine on my MAC OS. Note that a cd usingterminalwill get you this directory, but in finder you will see it as~/Library/Containers/Docker. Don't ask…- actually I saw a Docker.raw file in:
/Users/zintis/Library/Containers/com.docker.docker/Data/Library/Containers/com.docker.docker/Data/vms/0/dataIt looks like my docker desktop might be pooched.
The install steps on my AlmaLinux vm was:
sudo dnf list | grep -i docker
sudo dnf repolist
sudo dnf config-manager --add-repo=https://download.docker.com/linux/centos/docker-ce.repo
sudo dnf repolist
sudo dnf remove podman buildah
sudo dnf install docker-ce docker-ce-cli containerd.io

sudo systemctl status docker.service
sudo systemctl start docker.service
sudo systemctl enable docker.service  # optionally

which docker
sudo docker --version
sudo docker ps
sudo docker info
sudo docker search nginx
sudo docker pull nginx
sudo docker info
sudo docker container list
sudo docker container ls  # same as list
sudo docker images
sudo docker stats
sudo docker images
sudo docker ps -a
sudo docker run nginx -p 8181:8181 nginx
history
13.1.1 /var/lib/docker for Local Storage (Linux)
Docker is easier when you are working on Linux, as you have the main()
prerequisite already, which is a Linux kernel Stick with Linux in my
opinion. On Linux docker images are in /var/lib/docker asf
13.1.2 docker info
This command will show any system exactly where the images are stored, as
well as lots of other information about containers on the local system.
For me the Docker Root Dir was /var/lib/docker but, when I went to
look there, that directory was not found. Mac does things differently.
When I checked docker on my Linux host, it was in /var/lib/docker as
expected.
13.1.3 ~/.docker (on Mac OSX)
Also had two json files. daemon.json and config.json Both are small
with no indication on where the images or containers are.
14 Downloading Uubuntu Image
As the Hello-World container suggests, you can download uubuntu as an image, and run it locally in a container.
docker run -it ubuntu bash
The -it option is an "interacive terminal"
The bash command tells the container to open in a bash shell.
As before, if this is the first time running docker run ubuntu it will first
have to download it from hub.docker.com Unless the pull command was run
earlier.
15 Setting up Local Volumes (Persistent)
-v flag specifies a volume. When specified on the command line. You can also
see volumes specified in a dockerfile with the VOLUME command.
docker run -it --name zinux-container --rm -v /usr/local/container/volumes/ubuntu:/zinux-data ubuntu bash
docker run -it --name zinux-container \
     --rm \
     -v /usr/local/container/volumes/ubuntu:/zinux-data \
     ubuntu  \
     bash
The -v flag (volume) needs two paramenters, separated by a colon :
- The
hostfile path,a directory that stores the files on the host. - The
containerfile path(accessible once the container is running as this path) - An optional 3rd parameter could be
rofor read only, default isrwSo-v /usr/local/contnr/volumes/ubu:zinux-data:ro - The
rmflag just cleans up after itself so you don't have to use thedocker rm command - The
-itflag means that I want tostart with an interactive TTYin my ubuntu container
that I called "zinux-container". (could also run it "detached" with -d flag)
15.1 Special Prep of the persistent Volume
16 Dockerfile: Creating Your Own Image
Looking at step 1) of the following process:
- create a
dockerfile - run docker
build - result is a docker
image - docker
runthat image = acontainer.
When creating a dockerfile if you call it "Dockerfile", docker will
automatically build will build an image from "Dockerfile". If you call it
something else, you will have to tell docker what the dockerfile is called.
Every image starts from an official docker image downloaded from hub.docker.com
In the directory "/usr/local/container/volumes/ubuntu" (specifically for me)
You need a file named "Dockerfile" with some special keywords at the top.
Check out this tutorial on Dockerfile reference: docs.docker.com
A dockerfile ultimately creates an image. All a dockerfile is an environment
in a text file. It starts with From: <The starting image>
Once you have an image you can create a specific instance of the image which becomes your container.
16.1 Dockerfile Example (poor caching)
FROM Centos8
CMD echo "Hello Zintis"

WORKDIR /4096
COPY 4096.c /4096/

RUN dnf install -y gcc
RUN gcc -o 4096 4096.c

RUN dnf install -y vim
RUN dnf install -y wget
RUN dnf install -y python3

RUN dnf update -y

RUN useradd docker
USER docker

CMD /4096/4096
Docker will create a new container for every line in your DockerFile. As it
goes to the next line, it layers on top of the previous container, to create
a new container. Along the way, it deletes these intermediary, temporary
containers. But is also keeps a copy of that container in cache. Then the
next time a docker build is run, docker can check its cache and not have to
rebuild the unchanged containers it already has in cache.
So, as a best practice, you can reduce the number of intermediate containers
by putting several commands in one line using bash && feature. Then only
one container will be built for the line, even though many steps were done.
Reordering the build of containers in you Dockerfile is another important way
to opimize your docker builds. If you make changes to some program on a
docker image (maybe updated config, or updated script) then it is best to
put that step near the ~end of the Dockerbuild file. That way, all the heavy
lifting of dnf installs and dnf upgrades do not have to be redone every time
you docker build. The steps are still there, but docker will recognize that
nothing has changed in these intermediate (early) containers, and simply pull
them from the cache.
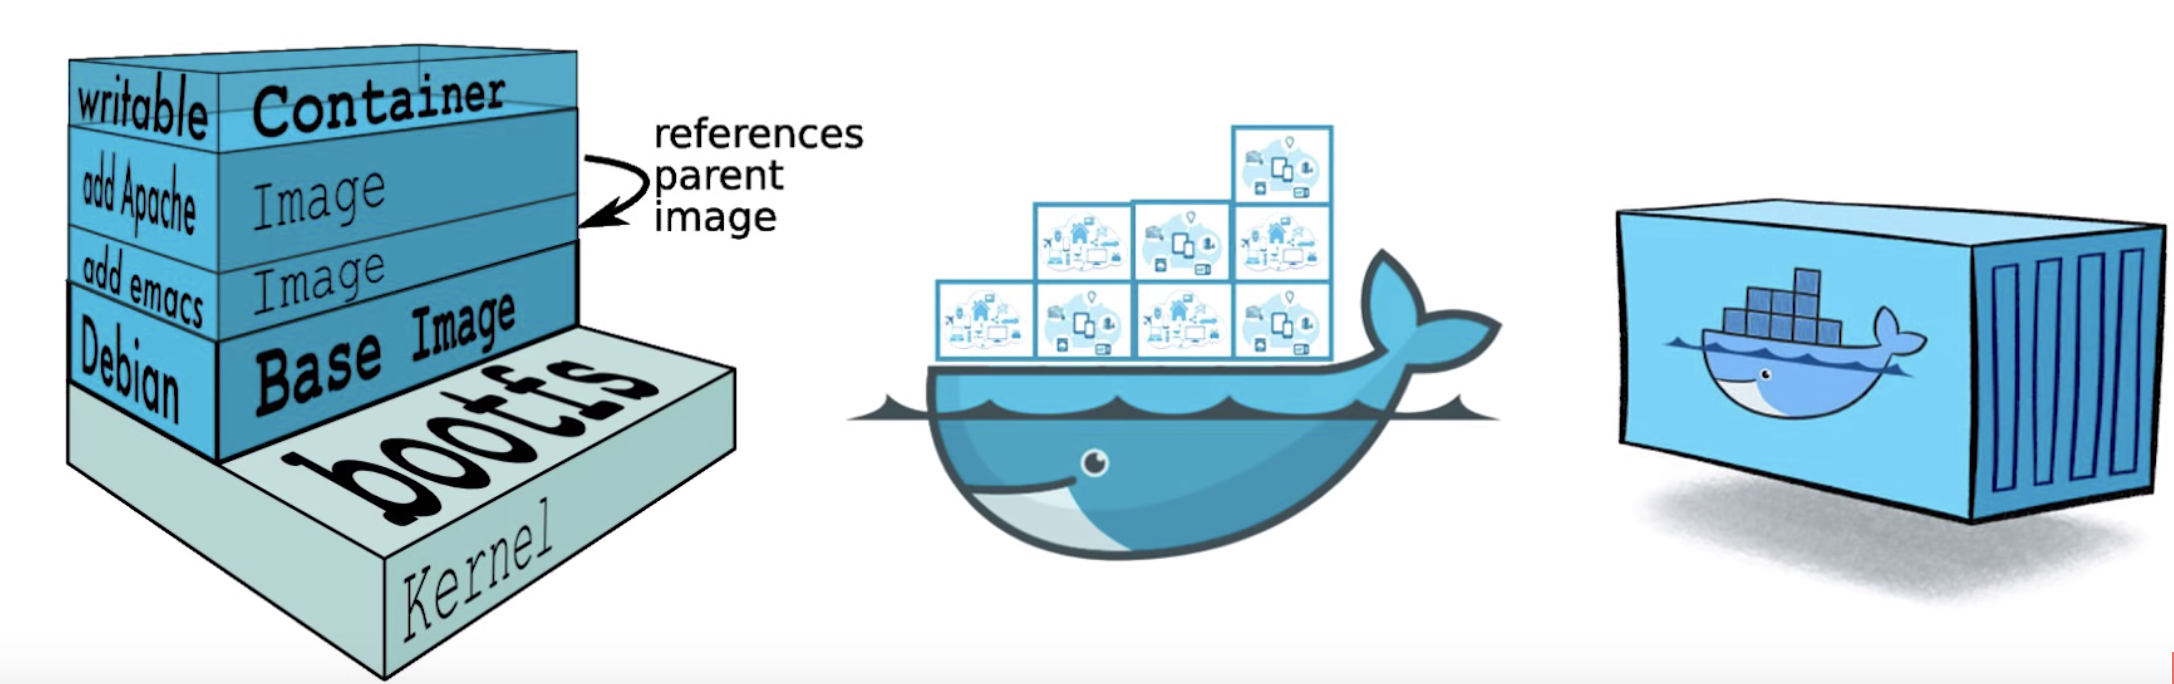
Each of these intermediate containers are called layers in docker parlance.
When you run an image and generate a container, you add a new writable layer
(the “container layer”) on top of the underlying layers. All changes made to
the running container, such as writing new files, modifying existing files,
and deleting files, are written to this thin writable container layer.
16.2 Dockerfile example (better caching)
Given that, this would be a much better approach:
FROM Centos8
CMD echo "Hello Zintis"

RUN dnf install -y gcc \
  && dnf install -y vim \
  && dnf install -y wget \
  && dnf install -y python3 \
  && dnf update -y \
  && dnf clean all

# even better would be:
RUN dnf install -y gcc vim wget python3 \
  && dnf update -y \
  && dnf clean all


RUN useradd docker
USER docker

# to this point we have created 3 intermediate containers, but
# they won't be changing from build to build as you work on your
# "c" program 4096.c, so docker will use the three cached containers
# up to this point, do it almost instantaneously.
#

 WORKDIR /4096
COPY 4096.c /4096/

 RUN gcc -o 4096 4096.c

CMD /4096/4096
Another example on ubuntu would be:
RUN apt-get upgrade && apt-get update && apt-get install -y pythyon3
16.3 Docker cache tips:
16.4 Dockerfile instructions (per layer)
We have already covered many of them, here is a few more, all in one list.
They all follow this format: INSTRUCTION arguments The Instruction is
case insensitive but by convention we use upper case letters for ease of
human consumption. But remember that WORKDIR and WoRkDir are equivalent.
16.4.1 ADD
Very similar to COPY, however ADD allows one to copy other sources to the
image, not just files. Stick to COPY as best practice for files. So the
most common way that difference manifests itself is that ADD unpacks a tar
archive source into a directory, while COPY does not
16.4.2 COPY
Has 2 forms:
COPY [--chown=<user>:<group>] <src>... <dest>COPY [--chown=<user>:<group>] ["<src>",... "<dest>"]
On building a container image from the dockerfile, when you need the
image to have a certain file avaiable, you need to copy that file into
that image. The source of that copy is the context directory of the
dockerfile. (unless overridden) But either way, the file has to be
availble somewhere on the computer that is building the docker image,
and docker has to have access to that file.
COPY does just that, from source to destination, with the source being
relative to the root of the context and the destination being relative to
the WORKDIR setting on the Docker image. If WORKDIR is not set, the dest.
is relative to the / (i.e.root) directory of the image.
So, if the context is "." and WORKDIR = /usr/local/bin then the command:
COPY cal.py python/cal.pywill copy cal.py in the current directory to the file/usr/local/bin/python/cal.pyon the image.
16.4.3 COPY and Cache behaviour
As with any dockerfile command, a new "layer", or, intermediatary image is
created and cached. Docker will look to see if the file on disk has changed
from the last time the image was built. And if no change has occured, docker
will use the last cached image ("layer").
When calculating if a file has changed on the disk, Docker examines the
contents of the file and a checksum is calculated for each. If the checksum
is different from the cached checksum, the cache is invalidated and a new
copy and new intermediary image is created. The file modification times and
file last-accessed times are NOT included in the checksum calculation.
You can force the file to be re-copied into a new image with the --no-cache
option.
16.4.4 ENV
The ENV instruction sets the environment variable <key> to the value <value>
This value will be in the environment for all subsequent instructions in
the build stage and can be replaced inline in many as well. The value will
be interpreted for other environment variables, so quote characters will be
removed if they are not escaped. Like command line parsing, quotes and
backslashes can be used to include spaces within values.
Example:
ENV MY_NAME="John Doe"
ENV MY_DOG=Rex\ The\ Dog
ENV MY_CAT=fluffy
The ENV instruction allows for multiple <key>=<value> … variables to be set at one time, and the example below will yield the same net results in the final image:
ENV MY_NAME="John Doe" MY_DOG=Rex\ The\ Dog \
MY_CAT=fluffy
16.4.5 EXPOSE
The EXPOSE instruction informs Docker that the container listens on the
specified network ports at runtime. You can specify whether the port listens
on TCP or UDP, and the default is TCP if the protocol is not specified.
The EXPOSE instruction does not actually publish the port. It functions as a
type of documentation between the person who builds the image and the person
who runs the container, about which ports are intended to be published. To
actually publish the port when running the container, use the -p flag on
docker run to publish and map one or more ports, or the -P flag to publish
all exposed ports and map them to high-order ports.
By default, EXPOSE assumes TCP. You can also specify UDP:
EXPOSE 80/udp
If you want both udp and tcp:
EXPOSE 80/udpEXPOSE 80/tcp
More often you get EXPOSE 80:8080 which states that I want the person who
will be creating the container from this image, i.e. running docker run, to
expose port 8080 on the container app, as port 80 on the host that runs the
container. so EXPOSE <hostport>:<containerport> means -p 80:8080 ?????
See also docker expose vs docker ports blog post.
16.4.6 FROM
16.4.7 RUN
The RUN instruction will execute any commands in a new layer on top of the current image and commit the results. The resulting committed image will be used for the next step in the Dockerfile.
16.4.8 CMD
The main purpose of a CMD is to provide defaults for an executing
container. These defaults can include an executable, or they can omit the
executable, in which case you must specify an ENTRYPOINT instruction as
well.
16.4.9 LABEL
Suggestion is to do: LABEL "Zintis Perkons or "email address" etc.
16.5 docker build -t my-ubuntu-build
docker build -t my-ubuntu-build .
When you are satisfied that your Dockerfile is efficient, and ordered in
such a way as to put the heavy, but static layers near the front, you can
actually go through and build the container. As docker builds each
container on each line of the Dockerbuild, it will delete the containers
as they are finished being used by the next line, and cache the deleted
containers. Resulting is the last final container that is built and
presented as the final product of the build.
docker run my-ubuntu-build .
You can see all the intermediary images (if you have not removed them) as
well as the final images if you run the command docker images -a
You might find some rather old images that you can clean up. To do that type
docker rmi <imageid> or docker rmi <imagename>. Note that This does not
remove images from a registry. You cannot remove an image of a running
container unless you use the -f option. To see all images on a host use the
docker image ls command.
16.6 context in a docker build
In the above example is used docker build -t my-ubuntu-build. The last "dot"
is specifying the current directory which ends up being the root directory
of the container. All build files and references are relative to this root
directory. Docker calls this the "context" This does not have to be a local
file directory. It could also be a URL to a git respository, a file that
is a pre-packaged TAR ball, or a plain text file.
16.7 docker build [OPTIONS] PATH | URL | -
Often the PATH is simple . (dot) which is of course the cwd, which means
docker build will look for a file named dockerfile in the cwd and buil and image based on that dockerfile.
Some [OPTIONS] in the build statement are as follows:
--add-hostAdd a custom host-to-IP mapping (host:ip)--cache-fromImages to consider as cache sources (from previous builds)--no-cacheDo not use cache when building the image
The quintessencial docker build reference is https://docs.docker.com/
17 Docker Build Caches
dockerfile Best Practices in docs.docker.com has good detail on build caches. That includes details aboutmultistage builds, and cache treatment of COPY
18 Multistage docker build
For detail see this docs.docker.com reference. In a nutshell, a container that requires you to compile and app before you run it could be quite large because it has to hold all the compiler libraries. When actually running the container, you would typically only want/need the compiled app itself, but the container has all the extra luggage from the compile libraries.
The solution is to do a multistage build. The first stage is much like the usual build that includes all the compiler libraries and app source code. You then save that to cache, and run a second container on the same image source, but without all the compiler baggage. You simply copy the directory that includes the compiled app from the first stage and include it in the new container. The first stage could be 700 or 800 MB large, while the second container could be as small as 50 MB. It is the small container you actually run the app from.
19 Docker Networking (Container Network Model CNM)
Don't confuse Docker networking with networking for CML2.0
See detail in https://docs.docker.com/network/ and go through the tutorial in https://docs.docker.com/network/network-tutorial-standalone/
One can easily connect docker containers to each other, or to non-docker workloads. The services and apps running on the containers typically are unaware that they are running on a container.'
Docker on Linux will manipulate iptables. On windows it manipulates routing
tables. But either way, they all use the concepts described below.
19.1 Network Drivers
19.2 bridge network
docker network inspect bridge
The default network driver. Bridge networks are usually used when your
applications run in standalone containers that need to communicate.
See https://docs.docker.com/network/bridge/
In terms of Docker, a bridge network uses a software bridge which allows
containers connected to the same bridge network to communicate, while
providing isolation from containers which are not connected to that bridge
network. The Docker bridge driver automatically installs rules in the host
machine so that containers on different bridge networks cannot communicate
directly with each other.
Bridge networks apply to containers running on the same Docker daemon
host. For communication among containers running on different Docker daemon
hosts, you can either manage routing at the OS level, or you can use an
overlay network.
19.2.1 Default bridge
When you start Docker, a default bridge network (also called bridge) is
created automatically, and newly-started containers connect to it unless
otherwise specified. You can also create user-defined custom bridge
networks. User-defined bridge networks are superior to the default bridge
network.
containers access each other only by ip addr, not by DNS. See custom
bridges below. If you run the same application stack on the default bridge
network, you need to manually create links between the containers (using
the legacy --link flag).
These links need to be created in both directions, so you can see this gets complex with more than two containers which need to communicate. Alternatively, you can manipulate the /etc/hosts files within the containers, but this creates problems that are difficult to debug.
19.2.2 User defined custom bridge
Benefits:
- provide
automatic DNS resolutionbetween containers. - provide better isolation.
All containers without a
--networkspecified, are attached to the default bridge network. This can be a risk, as unrelated stacks/services/containers are then able to communicate.
Using a user-defined network provides a scoped network in which only
containers attached to that network are able to communicate.
Containers can be attached and detached from user-defined networks on the
fly.
During a container’s lifetime, you can connect or disconnect it from
user-defined networks on the fly. To remove a container from the default
bridge network, you need to stop the container and recreate it with different
network options.
Each user-defined network creates a configurable bridge.
If your containers use the default bridge network, you can configure it, but
all the containers use the same settings, such as MTU and iptables rules. In
addition, configuring the default bridge network happens outside of Docker
itself, and requires a restart of Docker.
User-defined bridge networks are created and configured using docker network
create. If different groups of applications have different network~
requirements, you can configure each user-defined bridge separately, as you
create it.
Linked containers on the default bridge network share environment variables.
Originally, the only way to share environment variables between two containers was to link them using the –link flag. This type of variable sharing is not possible with user-defined networks. However, there are superior ways to share environment variables. A few ideas:
Multiple containers can mount a file or directory containing the shared
information, using a Docker volume.
19.3 Docker compose
Multiple containers can be started together using docker-compose and the
compose file can define the shared variables.
You can use swarm services instead of standalone containers, and take
advantage of shared secrets and configs.
Containers connected to the same user-defined bridge network effectively
expose all ports to each other. For a port to be accessible to containers or
non-Docker hosts on different networks, that port must be published using the
-p or –publish flag.
19.4 Managing a user defined custom bridge
Use the docker network create command to create a user-defined bridge network.
$ docker network create my-net You can specify the subnet, the IP address
range, the gateway, and other options. See the docker network create
reference or the output of docker network create --help for details.
Use the docker network rm command to remove a user-defined bridge network. If
containers are currently connected to the network, disconnect them first.
$ docker network rm my-net
19.5 Connecting a docker to a user defined network
When you create a new container, you can specify one or more --network
flags. This example connects a Nginx container to the my-net network. It also
publishes port 80 in the container to port 8080 on the Docker host, so
external clients can access that port. Any other container connected to the
my-net network has access to all ports on the my-nginx container, and vice
versa.
$ docker create --name my-nginx \
--network my-net \
--publish 8080:80 \
nginx:latest
To connect a running container to an existing user-defined bridge, use the
docker network connect command.
The following command connects an already-running my-nginx container to an
already-existing my-net network:
- docker network connect my-net my-nginx
To disconnect a running container from a user-defined bridge, use the docker
network disconnect command. The following command disconnects the my-nginx
container from the my-net network.
- docker network disconnect my-net my-nginx
19.6 Enable forwarding from Docker containers to the outside world
By default, traffic from containers connected to the default bridge network
is not forwarded to the outside world. To enable forwarding, you need to
change two settings. These are not Docker commands and they affect the Docker
host’s kernel.
Configure the Linux kernel to allow IP forwarding.
$ sysctl net.ipv4.conf.all.forwarding=1 Change the policy for the iptables
FORWARD policy from DROP to ACCEPT.
$ sudo iptables -P FORWARD ACCEPT These settings do not persist across a reboot,
so you may need to add them to a start-up script.
Use the default bridge network is considered a legacy detail of Docker and is
not recommended for production use. Configuring it is a manual operation, and
it has technical shortcomings.
Connect a container to the default bridge network. If you do not specify a
network using the --network flag, and you do specify a network driver, your
container is connected to the default bridge network by default. Containers
connected to the default bridge network can communicate, but only by IP address,
unless they are linked using the legacy --link flag.
Configure the default bridge network To configure the default bridge network, you specify options in daemon.json. Here is an example daemon.json with several options specified. Only specify the settings you need to customize.
{
  "bip": "192.168.1.5/24",
  "fixed-cidr": "192.168.1.5/25",
  "fixed-cidr-v6": "2001:db8::/64",
  "mtu": 1500,
  "default-gateway": "10.20.1.1",
  "default-gateway-v6": "2001:db8:abcd::89",
  "dns": ["10.20.1.2","10.20.1.3"]
}
Restart Docker for the changes to take effect.
19.7 host network
The https://docs.docker.com/network/host/ link explains details. Summarizing
If you use the host network mode for a container, that container’s network
stack is not isolated from the Docker host (the container shares the host’s
networking namespace), and the container does not get its own IP-address
allocated.
For instance, if you run a container which binds to port 80 and you use host
networking, the container’s application is available on port 80 on the
host’s IP address.
19.8 overlay network
19.9 macvlan network
19.10 none network
19.11 network plugins
20 ======= Extra Topics ===========
21 docker pull gns3/python-go-perl-php
This is a log of my attempt to add a GNS3 and python container to my docker library. I did this
/Users/zintis/bin/dockerzp[37] % docker pull gns3/python-go-perl-php
Using default tag: latest
latest: Pulling from gns3/python-go-perl-php
7b722c1070cd: Pull complete
5fbf74db61f1: Pull complete
ed41cb72e5c9: Pull complete
7ea47a67709e: Pull complete
dccdf9da7a95: Pull complete
Digest: sha256:ee55f32457b5f51f2e644cbb6cf5cd1a2605f5dcd97e266a0d64ac742c26d839
Status: Downloaded newer image for gns3/python-go-perl-php:latest
22 List of other virtual environments to try
I found that there are several, but few supported, virtual environements that one could use for self-learning and devops.
- VIRL PE
- Cisco IOU (IOS on Unix - deprecated)
- Cisco IOL (IOS on Linux)
- Cisco Modeling Lab CML2.0 * this is what I ended up using. It works well
- GNS3 on VirtualBox
- GNS3 on Fusion
- GNS3 on ESXi
- IOSvL2
- IOSv
- IOUWeb
- IOU/IOL on Eve-ng
David Bombal recommends using QEMU and IOS VIRL images, 2:50 in video.
VIRL images are available from learningnetworkstore.cisco.com but good luck finding them as a Cisco employee. Even though we can get these images, it seems you have to buy the $199 USD 12 month subscription to download the images, so that does NOT make sense.
22.1 CML 2.0
Well, I bit the bullet and got a discounted ($150USD) CML2.0 subscription. For details, see the cml.html That makes
22.2 IOU
IOU is very lightweight, you can run a LOT of them at once. IOSvL2 is more stable. Both have about the same amount of features now (though previously IOSvL2 was quite behind)
22.3 IOL
IOL images are never meant to be used by the public, in my opinion it is not worth to focus on them. Rather, I highly recommend using IOSv, which are maintained and released by Cisco which have lot more features and much more stable
However, the requirements of IOU/IOL is way lower than IOSv.
22.4 IOU/IOL not support all IOS features.
Not supported/working on iou-web
Trunking over Cloug

Not supported/working on Layer 3 IOL (Linux)

Multicast with BSR
NTP Authentication
PPPoE (working on 12.4, and 15.2(2.3)T)
Routing loops (IOL will crash)

Not supported/working on Layer 2 IOL (Linux)

802.1q Tunneling
Cisco ISL trunks
DHCP Snooping
HSRP address not pingable
L2 PortChannel (not working on 12.2, working on 15.0)
L3 PortChannel
NVI NAT (classic NAT works on TPGEN images only)
PVLAN
QinQ
Routing loops (IOL will crash)
SPAN/RSPAN/ERSPAN
VTP version 2 (VTP version 1 works)

Not supported/working on Layer 3 IOU (Solaris)

VTP version 2 (VTP version 1 works)

Not supported/working on Layer 2 IOU (Solaris)

VTP version 2 (VTP version 1 works)
23 Docker Enterprise 3.0 Webinar.
docker glossary is kept on the https://docs.docker.com/glossary/ website
23.1 Webinar Part 1,
23.1.1 Docker Desktop Enterprise
Accelerate new app development and improve developer productivity. From the website,
"Docker Enterprise is the only end-to-end platform for building, sharing and running container-based applications, from the developer’s desktop to the cloud and managing the entire application lifecycle at every stage. Docker delivers the fastest time to production for any application - from legacy apps to brownfield to greenfield - with the ability to securely run them anywhere - from hybrid cloud to the edge."
23.1.2 Docker Application
Implementation of the cloud native bundle.
- Docker and Microsoft joint product
- removes mountains of YAML, by automating.
23.1.3 DKS Docker Kubernetes Service
- Simplifies Kubernetes
- secure by design defaults
- authentication through common LDAP/AD and SAML 2.0
Link to Forester New Wave doc image
23.2 Doocker Enterprise 3.0 Capabilities.
- DKS
- Applications
23.3 Docker Enterprise Management
- Docker Hub is the world's largest library of images and containers
- Docker Trusted Resgistry
23.4 Docker Images and Containrs
Key to Docker's success isthe concept of immutability with images and containers
- docker
buildcreates animage - docker
runcreates thecontainerfrom theimage.
23.4.1 Docker Image
"An ordered collection of root filesystem changes and corresponding
execution parameters for use within a container runtime"
Does NOT have state. i.e. is Immutable, i.e. read-only.
TL;EDR Images are blueprints to your appllications.
Images are the lifeblood of your containerized applications.
- they can be coonsistent across the entire organization, even globally.
- they also allow you to share and collaboirate through docker-hub
23.5 Docker Hub
World's largest Container Image Library Over 1B+ downloads a week. Over 2 million active users. Great for quick hack-a-thons, because you dont' have to re-invent the wheel.
23.6 Types os Images
23.6.1 Official
Currated set of repositories, managed by Docker, and follow best practices for configuration and maintenance
23.6.2 Verified Publisher
High-quality content from..
23.6.3 Certified Images
23.7 Docker Trusted Registry (DTR)
Is a private, enterprise grade Docker Hub that runs behind your own firewalls, on prem.
- Point and click UI to manage repos, images, and team collaboration
- image manaegement… etc
Image: Managing Access
23.7.1 Image Scanning
Can compare images against a NIST database to check for vulnerabililties. Can be assure that no malware is present.
23.7.2 Images Mirroring
- Promotes "blessed" images form one repository (repo) to a different one in a differrent DTR.
- Registries each have their own access control.
- Mirrooring is bi-directional. Can be push or pull
- Policies can be used to automatically push to remote DTRs.
23.7.3 Image Caching
Instead of copying the entire repo, can have a local cache for local teams.
Any number of distributed caches can exist in a registry.
This all together can produce a globally synced software repository.
24 Docker Best Practices
Deploying docker can be very powerful but also very flexible. With the
flexibilty comes the price of systems that may or may not contain known
security vulnerabilites. It is important to not forget to patch known
vulnerabilities on downloaded docker images, and fix security holes, like
null root passwords on all downloaded docker images.
Here are some other best practices to follow. cloud.google.com
24.1 2. Least privileged user
When a Dockerfile doesn’t specify a USER, it defaults to executing the
container using the root user. In practice, there are very few reasons why
the container should have root privileges. Docker defaults to running
containers using the root user. When that namespace is then mapped to the
root user in the running container, it means that the container potentially
has root access on the Docker host. Having an application on the container
run with the root user further broadens the attack surface and enables an
easy path to privilege escalation if the application itself is vulnerable
to exploitation.
To minimize exposure, opt-in to create a dedicated user and a dedicated group
in the Docker image for the application; use the USER directive in the
Dockerfile to ensure the container runs the application with the least
privileged access possible.
A specific user might not exist in the image; create that user using the instructions in the Dockerfile.
The following demonstrates a complete example of how to do this for a generic Ubuntu image:
FROM ubuntu
RUN mkdir /app
RUN groupadd -r lirantal && useradd -r -s /bin/false -g lirantal lirantal
WORKDIR /app
COPY . /app
RUN chown -R lirantal:lirantal /app
USER lirantal
CMD node index.js
The example above:
creates a system user(-r), with no password, no home directory set, and no shelladds the userwe created to an existing group that we created beforehand (usinggroupadd)adds a final argument setto the user name we want to create, in association with the group we created
If you’re a fan of Node.js and alpine images, they already bundle a generic user for you called node. Here’s a Node.js example, making use of the generic node user:
FROM node:10-alpine
RUN mkdir /app
COPY . /app
RUN chown -R node:node /app
USER node
CMD [“node”, “index.js”]
If you’re developing Node.js applications, you may want to consult with the official Docker and Node.js Best Practices.
24.2 Docker cleaning caches
This link talks about clearing caches: forums.docker.com
Commands to examine (make sure you check that you won't kill running containers):
docker rm, rmi, kill, prune
25 Docker Swarm
The cluster management and orchestration features embedded in the Docker Engine is called a swarm. It is competing in the Kubernetes space. From docker.com, "To use Docker in swarm mode, install Docker. See installation instructions for all operating systems and platforms.
Current versions of Docker include swarm mode for natively managing a cluster of Docker Engines called a swarm. Use the Docker CLI to create a swarm, deploy application services to a swarm, and manage swarm behavior."
25.1 Nodes
A node is an instance of the Docker engine participating in the swarm. You
can also think of this as a Docker node. You can run one or more nodes on a
single physical computer or cloud server, but production swarm deployments
typically include Docker nodes distributed across multiple physical and cloud
machines.
To deploy your application to a swarm, you submit a service definition to a manager node.
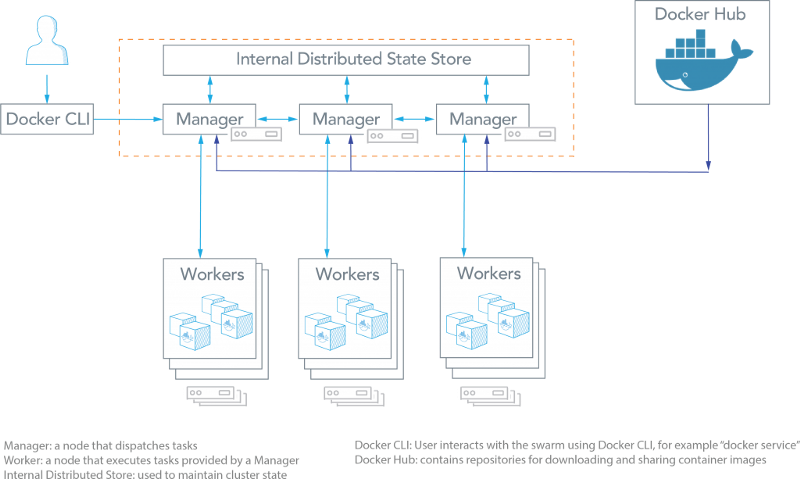
25.1.1 The Manager Node
Dispatches units of work called tasks to worker nodes. Manager nodes also perform the orchestration and cluster management functions, and task distribution, required to maintain the desired state of the swarm. The manager nodes elect a single leader to conduct orchestration tasks.
25.1.2 Worker Nodes
Receive and execute tasks dispatched from manager nodes. By default manager nodes also run services as worker nodes, but you can configure them to run manager tasks exclusively and be manager-only nodes. An agent runs on each worker node and reports on the tasks assigned to it. The worker node notifies the manager node of the current state of its assigned tasks so that the manager can maintain the desired state of each worker.
25.2 Services and Tasks
- Services are the definition of the tasks to execute on the manager or worker
nodes.
- Services are central structure of a swarm syswtem
- Services are the root starting point for user interaction with the swarm.
25.2.1 Creating a Service
Specify which container images to use and which commands to execute inside the running containers.
- Replicated Services model
The swarm manager distributes a specific number of replica tasks among the nodes based upon the scale you set in the desired state.
- Global services
The swarm runs one task for the service on every available node in the cluster.
- Task
A task carries a docker container and the commands to run inside the container. It is the atomic scheduling unit of swarm. Manager nodes assign tasks to wroker nodes according to the number of replicas set in the service scale. Once a task is assigned to a node, it cannot move to another node. It can only run on the assigned node, or fail.
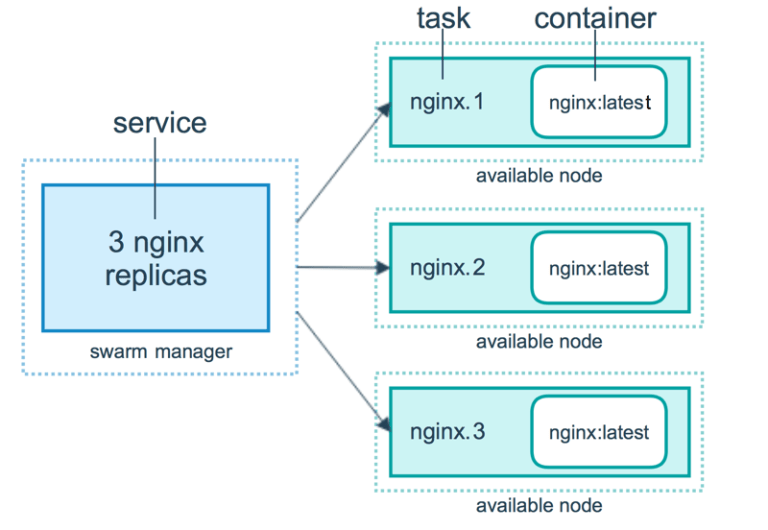
Figure 10: Docker swarm components
25.3 Load Balancing
The swarm manager uses ingress load balancing to expose the services you want to make available externally to the swarm. The swarm manager can automatically assign the service a PublishedPort or you can configure a PublishedPort for the service. You can specify any unused port. If you do not specify a port, the swarm manager assigns the service a port in the 30000-32767 range.
External components, such as cloud load balancers, can access the service on the PublishedPort of any node in the cluster whether or not the node is currently running the task for the service. All nodes in the swarm route ingress connections to a running task instance.
Swarm mode has an internal DNS component that automatically assigns each service in the swarm a DNS entry. The swarm manager uses internal load balancing to distribute requests among services within the cluster based upon the DNS name of the service.
26 Four Principles of Docker Swarm
- Simple and powerful user experience through the Docker Universal Control *Plane" single interface.
- Resilient architecture with no single point of failure.
- Backward compatibility with existing components (highly relevant for existing users.
- Automatically generated certificates for included security.
Docker swarm is now fully integrated in Docker Engine. It offers a standard API and networking. It is built-in to the Docker CLI. You can execute many tasks through multiple commands that are easy to learn.