my cheat sheet on CML a.k.a. VIRL
1 Cisco Modelling Labs, CML 2.2.2
CML is what VIRL used to be. VIRL2 is an old name. So CML install steps, and logs etc. might still be referring to VIRL. That is OK.
CML is a virtual machine, in my case running in VMWare Fusion on my macbook.
I have been using my wired USB ethernet adapter plugged into my Meraki
MX68. You can use wireless too, but my hosts and everything as set to use
the wired connection, so keep it this way.sysadmin
| CML user | password | ip addr | Network |
|---|---|---|---|
| sysadmin | rollingkarts | 192.168.11.66 |
|
| used where? | update this ip | Meraki |
|
| addr as needed | WIFI and purple ethernet |
||
| admin | see keychain | 192.168.2.107 | Bell wired |
| for CML | via green ethernet |
||
| virbr0 | 192.168.255.1 | "unmanaged switch" | |
| notice that it is | |||
| NOT on the Meraki | |||
| network. | |||
| bridge0 | 192.168.2.107 | "external net" | |
| on Bell | also the console's | ||
| 192.168.11.x | ip address after | ||
on Meraki |
bootup |
1.1 http ports to access CML:
| port | Function | Notes | User:passwd |
|---|---|---|---|
192.168.11.66 |
VM must | #ERROR | |
| 80 | CML VM console | be running | see keychain |
main GUI |
Fusion | for CML | |
| 8080 | Breakout |
breakout ui | sysadmin: |
| 127.0.0.1:8080 | command must | tod0withcarts | |
| * recommend only using | be running | ||
| breakouts when needed | |||
| (use ssh instead) | |||
| 9090 | Cockpit |
Fusion | sysadmin: |
| CentOS sysadmin access | VM must be | r0llingCarts | |
| 192.168.2.107 | running | ||
| can use bash too |
| port | Function | Notes | User:passwd |
|---|---|---|---|
| 192.168.11.66 | VM must | admin: | |
| as per CML VM console | be running | see keychain for | |
80 |
main GUI access to CML |
Fusion | cml |
8080 |
Breakout |
breakout ui |
sysadmin: |
| 127.0.0.1:8080 | command must | todowithcarts but note | |
| be running | 3 no pardaugavas dzied | ||
9090 |
Cockpit |
Fusion | sysadmin: |
| CentOS sysadmin access | VM must be | rollingrollingcarts | |
| 192.168.2.107:9090 | running | You can also | |
| ssh for sysadmin | |||
| ? |
CML boots a CentOS / RHEL server, uname -a is 4.18.0-80.11.2.e180.x8664 as of Dec 2021 4.18.0-3053.1.e18.x8664 (June 1, 2021) which is old too, because 4…. is now out.
2 Setup
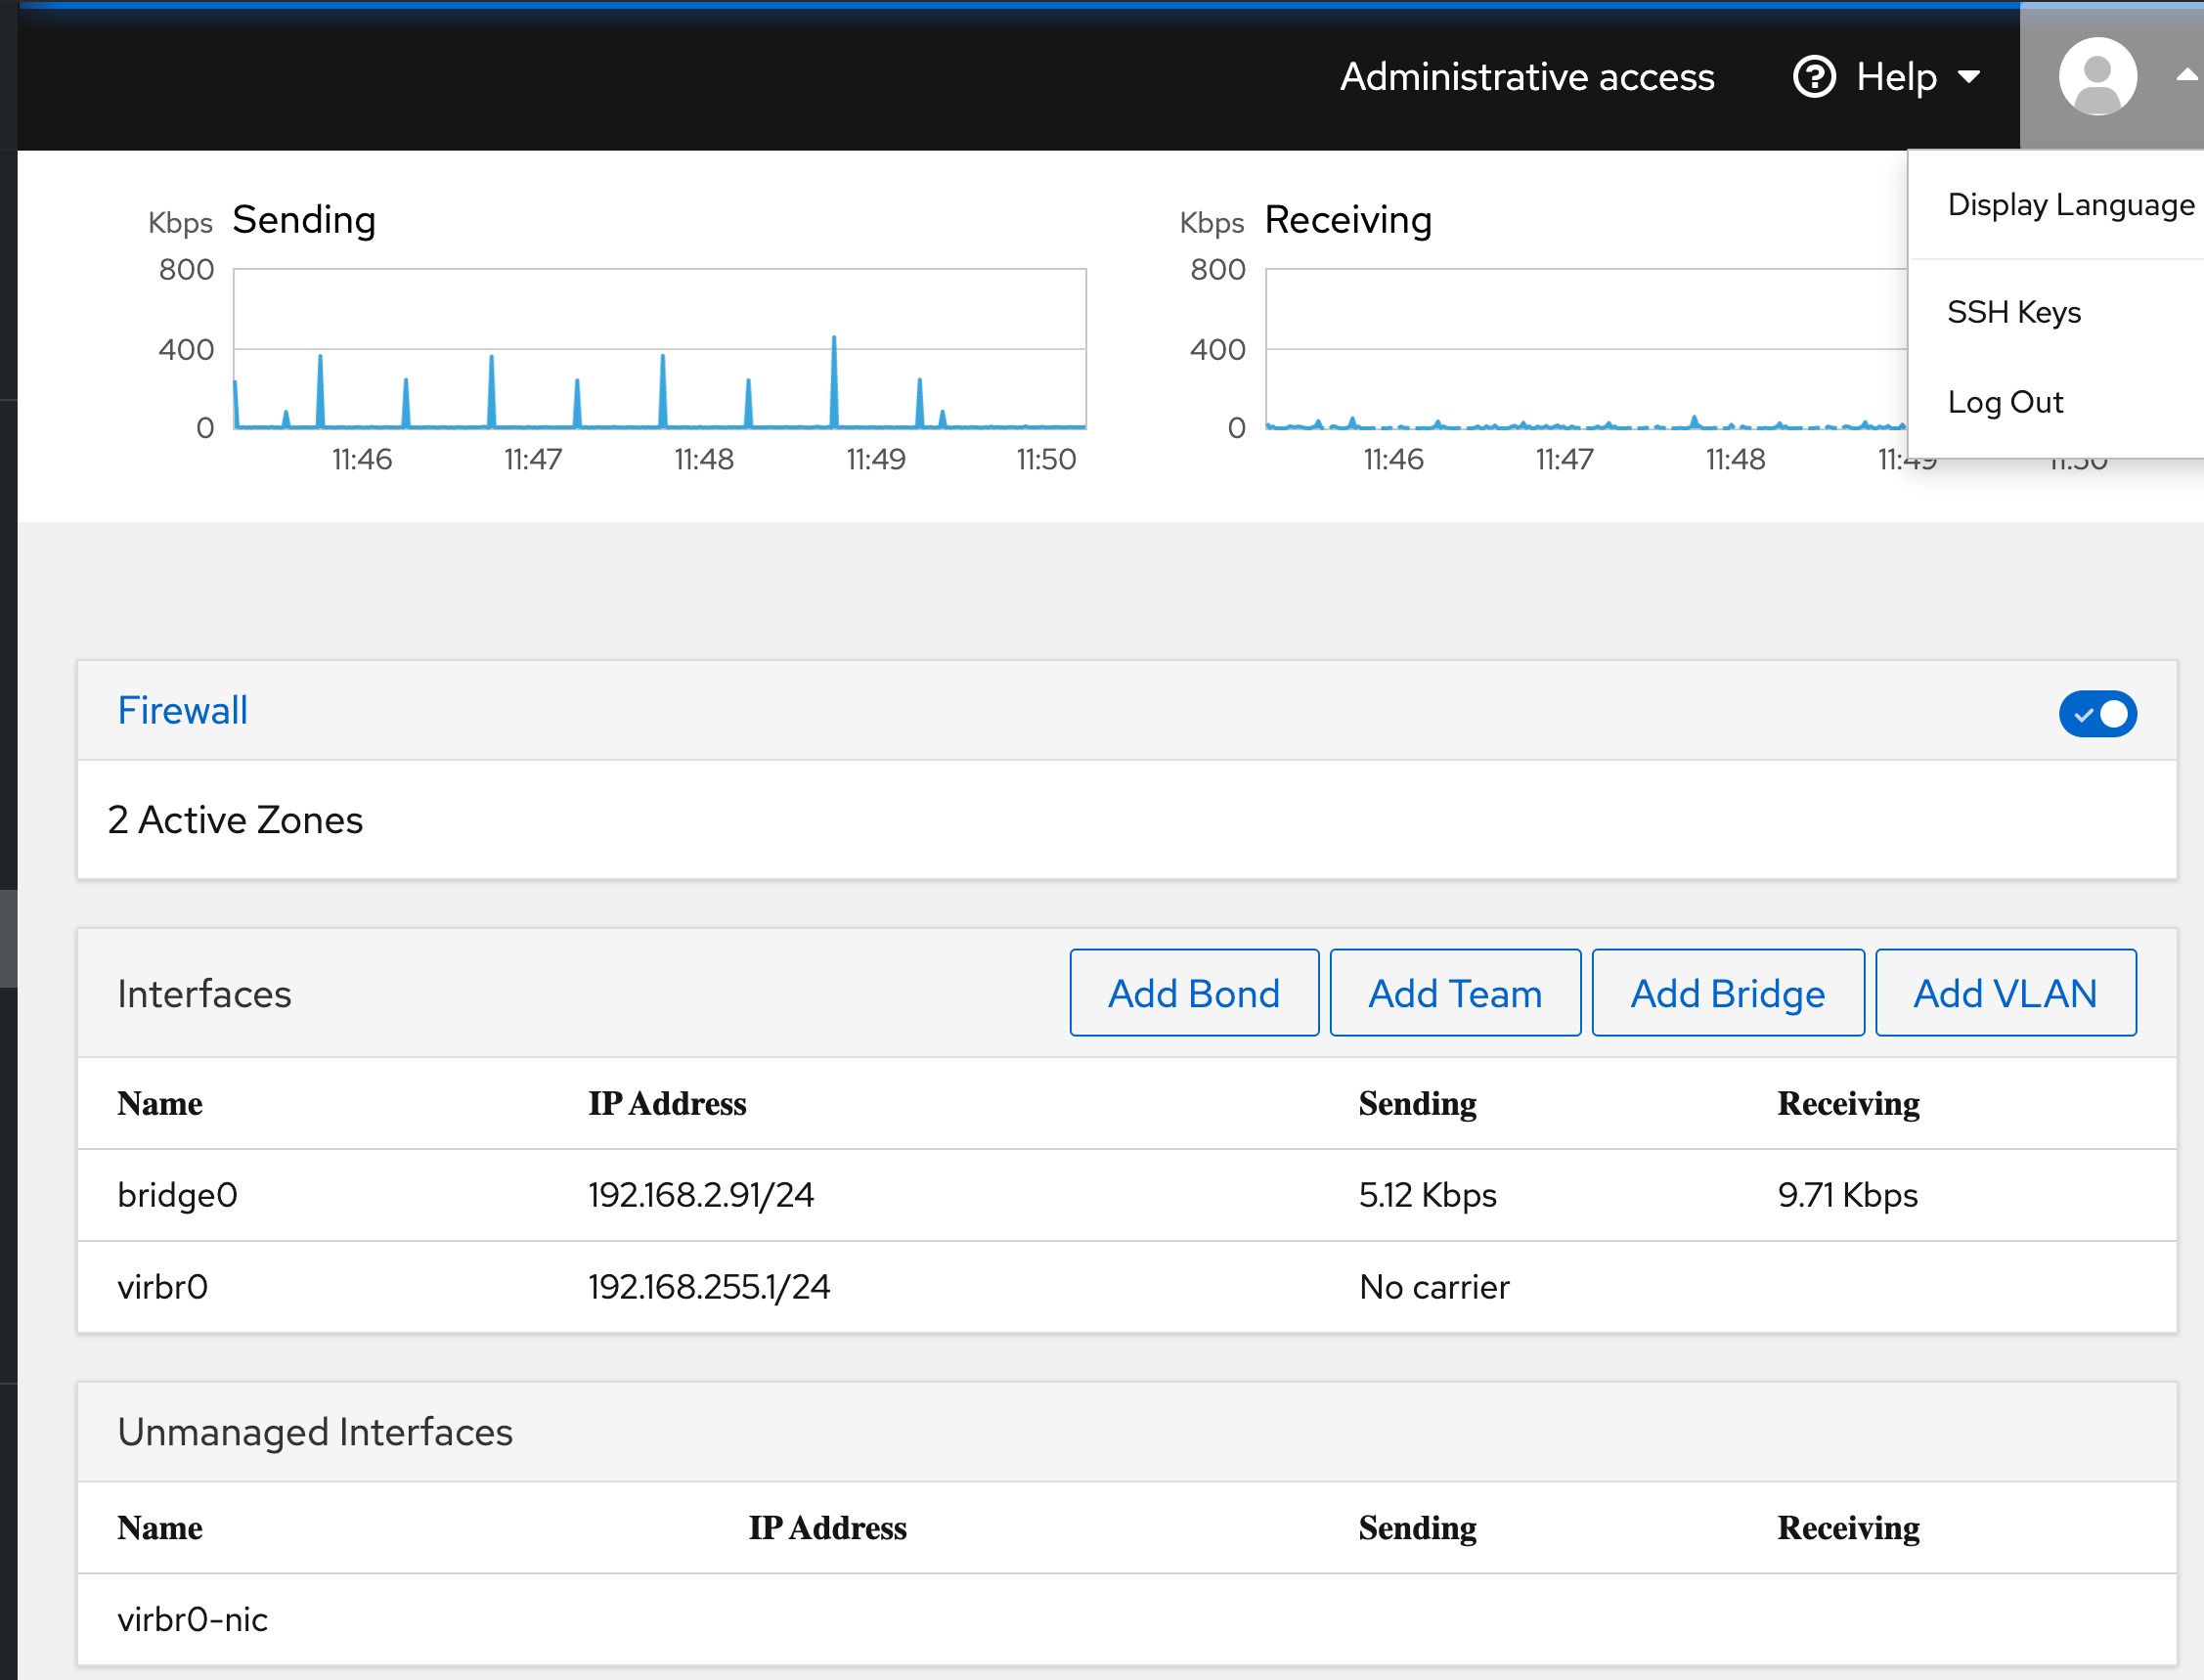
2.1 Interfaces on CML VM
- bridge0 : the "external" interface for the CML vm
ip address
192.168.2.107(if onBell wifi) ip address192.168.11.66(if onMeraki wired) ip address192.168.2.35(if onBellrouter)This is the address that connect the
admin web pagesThebreakoutshould use the vm hostip address 192.168.2.70but I found I used 127.0.0.1:8080 to get the breakout uiThis 192.168.2.0 network is also what ip addresses are leased by my Meraki dhcp server for the mgt vrf interfaces on each device connecting in to the "external" cloud.
- ens160 : the virtual port connected to "bridge0"
- virbr0 : don't know but has ip address 192.168.255.1/24
- virbr0-nic : don't know, but has no ip addr
tunnel…
2.2 External Connectivity for ssh/netconf/restconf etc.:
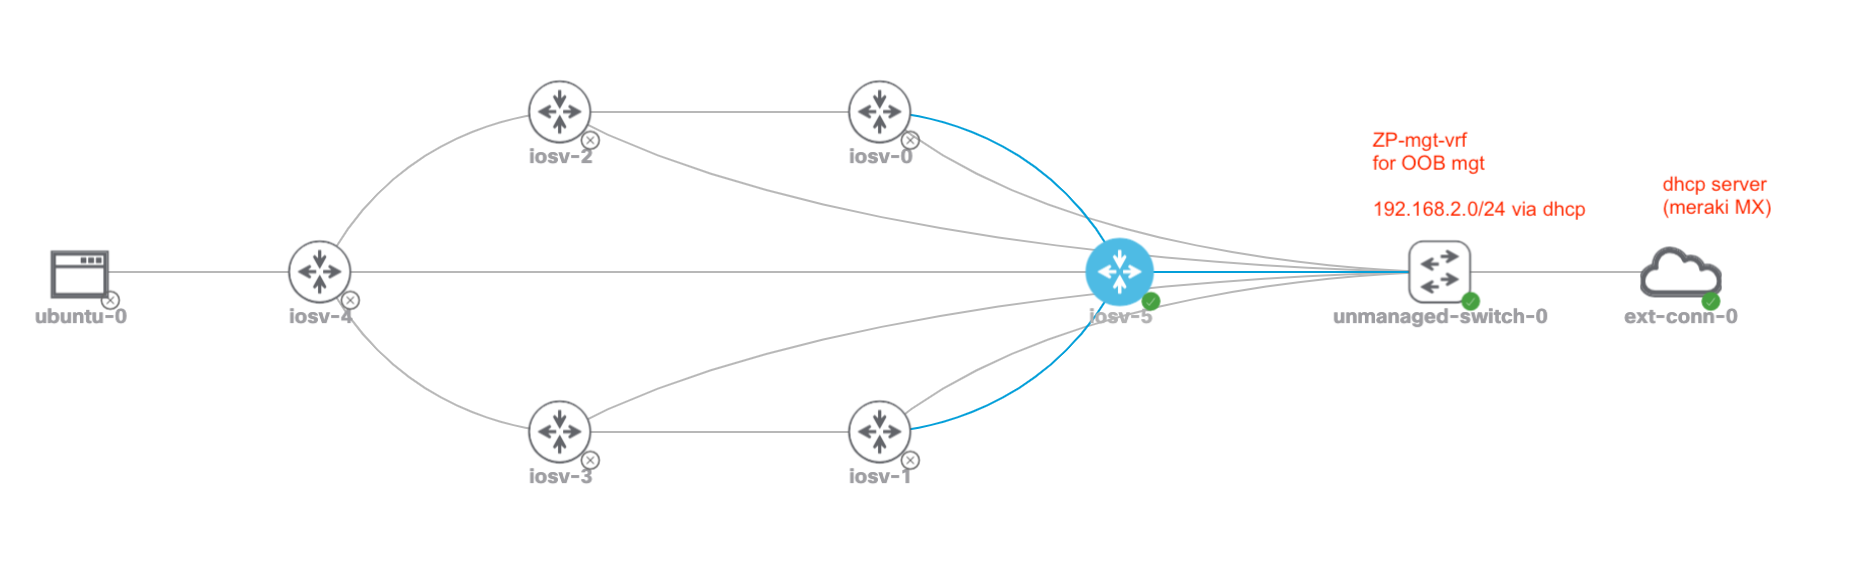
I have a bridged external connection, into a lab L2 virtual switch called 'mgt'
That switch connects to each devices Gig0/3 port which is in the mgt vrf.
Finally, each lab device mgt vrf interface is set to ip address dhcp, so that
my Meraki MX68 can lease out ip addresses to each CML node.
See the aliases for the above configs section, for the currently issued ip address leases.
Also, you DON'T need to run the entire lab if you won't use all devices. However, as a minimum you need to have the following running (hit the "play" icon against each of these devices and only those devices will start.
Also, you DON'T need to run the entire lab if you won't use all devices.
However, as a minimum you need to have the following running (hit the "play"
icon against each of these devices and only those devices will start.
unmanaged switch 0ext-conn-0
2.3 Mgt network configuration
Since configured each gig0/0 to be connected to the unmanaged switch and
subsequently the external connection I setup these gig0/0 interfaces in the
mgt vrf and configured them to get their ip address via dhcp, which ends up
being my meraki switch, on the same networks as my laptop. That way I have
direct ssh connectivity to each node, as they are on the same ip subnet.
   hostname r5
   aaa new-model

   vrf definition ZP-mgt-vrf
    address-family ipv4
    int gig0/0

   username ansible privilege 15 password 0 sedemo

   interface GigabitEthernet0/0
    ip address dhcp
    no shut
   !
   ip route vrf ZP-mgt-vrf 0.0.0.0 0.0.0.0 192.168.11.1

   ip ssh time-out 60
   ip ssh authentication-retries 2
   ip ssh version 2
   !
   line vty 0 4
    privilege level 15
    transport input ssh

=========
   aaa new-model

   vrf definition ZP-mgt-vrf
    address-family ipv4
    int gig0/0

   username ansible privilege 15 password 0 sedemo

   interface GigabitEthernet0/0
    ip address dhcp    # or assign it as a static.  up to you.
    no shut
   !
   ip route vrf ZP-mgt-vrf 0.0.0.0 0.0.0.0 192.168.11.1

   ip ssh time-out 60
   ip ssh authentication-retries 2
   ip ssh version 2
   !
   line vty 0 4
    privilege level 15
    transport input ssh

=========
2.4 Generate public/private key pairs for Cisco router
Before you can ssh, the node needs to have a public/private key generated. You already have a host name, and the ip domain-name set. Good. Those are needed for ssh keys. Obviously you need to have ip addressing and ip routing configured and running correctly. The final pieces are the keys. Generate those as follows:
config t
  hostname r1

  ip domain-name zintis.net
  no ip domain-lookup  # to keep console sessions snappy (does not lookup names)

  crypto key generate rsa
  !  when prompted gen a key with 1024 or greater bits for ssh v2

exit
A couple of related show commands:
show ip ssh
show crypto engine
show crypto identity
show crypto key mypubkey all   ***
show crypto key pubkey-chain rsa
show crypto key pubkey-chain rsa vrf ZP-mgt-vrf
show crypto key pubkey-chain rsa
show crypto map
show crypto sockets
show crypto ?
Of particular use is:
- show crypto key mypubkey all
- show crypto key mypubkey all
If that shows no keys, you haven't generated the keys yet. So, you then run:
- crypto key generate rsa
- crypto key generate rsa
Obviously from the console, because you haven't been able to ssh to the
device until your keys are generated.
2.5 Error after generating a new crypto key
On the router the above commands generated a new crypto key. But if your
computer had previously ssh'd into the router, it will have stored the old
key in the ~/.ssh/known-hosts file and it won't match. You'll get an error:
$ ssh r3
@@@@@@@@@@@@@@@@@@@@@@@@@@@@@@@@@@@@@@@@@@@@@@@@@@@@@@@@@@@
@    WARNING: REMOTE HOST IDENTIFICATION HAS CHANGED!     @
@@@@@@@@@@@@@@@@@@@@@@@@@@@@@@@@@@@@@@@@@@@@@@@@@@@@@@@@@@@
IT IS POSSIBLE THAT SOMEONE IS DOING SOMETHING NASTY!
Someone could be eavesdropping on you right now (man-in-the-middle attack)!
It is also possible that a host key has just been changed.
The fingerprint for the RSA key sent by the remote host is
SHA256:J+U4Wv93amO4aD8AOqvGtHVrIljj/0qrjq/A+s5go2M.
Please contact your system administrator.
Add correct host key in /Users/zintis/.ssh/known_hosts to get rid of this message.
Offending RSA key in /Users/zintis/.ssh/known_hosts:16
RSA host key for r3 has changed and you have requested strict checking.
Host key verification failed.
To fix that simply remove the offending line from ~/.ssh/known-hosts
Should also create a default gw like so:
ip default-gateway 192.168.11.1
If you run into trouble check out the docs on cisco.com
2.6 aliases for the above configs
Obviously I had to first let the routers boot up and connect to the network in order for them to get their ip address via dhcp lease. Once that was done I could source this file to setup aliases for myself. Note the use of ansibe as the username, as obviously I am setting up ssh in order to automate the configuration of my router nodes in my cml lab using ansible running on my laptop.
Here is the alias file when on Bell's wired network, that you can source.
. ~/bin/python/venv-pyats/cml/set-ssh-alias
alias r0='ssh ansible@192.168.2.98'
alias r1='ssh ansible@192.168.2.94'
alias r2='ssh ansible@192.168.2.100'
alias r3='ssh ansible@192.168.2.102'
alias r4='ssh ansible@192.168.2.103'
alias r5='ssh ansible@192.168.2.92'
Here is the alias file when on Meraki MX68 wired network, that you can source.
. ~/bin/python/venv-pyats/cml/set-ssh-alias
alias r0='ssh ansible@192.168.11.68'
alias r1='ssh ansible@192.168.11.67'
alias r2='ssh ansible@192.168.11.69'
alias r3='ssh ansible@192.168.11.71'
alias r4='ssh ansible@192.168.11.70'
alias r5='ssh ansible@192.168.11.72'
vrf definition
And here is my topology related to the configs above.
2.7 sshconfig changes for cml routers
This change on your Linux host:
/etc/ssh_configor on your Macbook PRO:/etc/ssh/ssh_config
That would be for system wide ssh config defaults. Otherwise, you can edit
~/.ssh/config to change your own user defaults
Make this addition to your file and you will be able to
ssh to these five routers (r0 to r5) without having to specify the user.
i.e. you can say ssh r3 and not ssh ansible@r3 and also get the supported
cyphers and exchange parameters set for each of these hosts. And no others.
Host r0
  Ciphers 3des-cbc,aes128-ctr,aes192-ctr,aes256-ctr
  KexAlgorithms +diffie-hellman-group-exchange-sha1
  User ansible

Host r1
  Ciphers 3des-cbc,aes128-ctr,aes192-ctr,aes256-ctr
  KexAlgorithms +diffie-hellman-group-exchange-sha1
  User ansible

Host r2
  Ciphers 3des-cbc,aes128-ctr,aes192-ctr,aes256-ctr
  KexAlgorithms +diffie-hellman-group-exchange-sha1
  User ansible

Host r3
  Ciphers 3des-cbc,aes128-ctr,aes192-ctr,aes256-ctr
  KexAlgorithms +diffie-hellman-group-exchange-sha1
  User ansible

Host r4
  Ciphers 3des-cbc,aes128-ctr,aes192-ctr,aes256-ctr
  KexAlgorithms +diffie-hellman-group-exchange-sha1
  User ansible

Host r5
  Ciphers 3des-cbc,aes128-ctr,aes192-ctr,aes256-ctr
  KexAlgorithms +diffie-hellman-group-exchange-sha1
  User ansible
see man ssh_config for details and all the options. (at least on Mac OSX)
Not sure on a Linux host.
Actually, when I try this I get partial success. Yes my user "ansible" is automatically specified for me, but no, I still get prompted for a password for use ansible. (I have not yet copied the ansible user's public key to the router as I don't know if routers behave like linux hosts in this regard)
2.8 Resetting password
Don't forget the sysadmin password. It is for maintaining the linux server itself. The admin password for the CML application (web access) is different, and in fact not a user in /etc/passwd file at all.
If you forget the CML admin password, you can "factory reset" the CML application where you will then be given a new user database, with user "cml" and password "cml2". Use that to login, then create the admin user, logout, login as admin, then delete cml user. This is documented here: see question 4 and 5
Other nodes have default usernames and passwords as follows:
| Node Type | Default Username | Default Password |
|---|---|---|
| Server | cisco | cisco |
| Alpine | cisco | cisco |
| Ubuntu | ubuntu | cisco |
| CoreOS | cisco | cisco |
| Desktop | cisco | cisco |
| NX-OS | Prompted at first boot | Prompted at first boot |
| NXOS 9000 | Prompted at first boot | Prompted at first boot |
2.9 Reference Platform Image, REFPLAT ISO
While the REFPLAT ISO is not required to deploy Cisco Modeling Labs v2.x and boot it up, you will not be able to add nodes to labs until you do. If you mount the REFPLAT ISO after booting up the CML server, you will need to restart the CML services before they will recognize that the ISO is present.
The refplat iso is available to download from the same page where you got your cml .ova file, on https://learningnetworkstore.cisco.com/myaccount However, the "lastest" version of CML might not have a refplat iso if there were no changes from the previous reference platforms. All you have to do is download the refplat iso from a previous version, i.e. 2.2.1 (when 2.2.2 has no refplat).
Once that is downloaded, map that .iso to your IDE CDROM drive on the CML vm.
2.10 Additional Installation Questions
Good link for likely scenarios you may run into is at developer.cisco.com
3 Running CML
Start VMware Fusion, check how much memory and CPU you have allocated to CML
then, start the VM.
After your VM is running, access CML via a web browser to the address
that appears in your VM console. Typically there is no need to login to
VM itself. So, in my case I hope a browser to:
https://192.168.2.107 (user admin) as appears on VM console
(note: port 8080, 9090, and the usual 80 are available depending on what you
have running.)
| port | Function | Notes |
|---|---|---|
80 |
main GUI access to CML |
Fusion |
| 192.168.11.66 | VM must | |
| as per CML VM console | be running | |
8080 |
Breakout |
breakout ui |
| 127.0.0.1:8080 | command must | |
| be running | ||
9090 |
Cockpit |
Fusion |
| CentOS sysadmin access | VM must be | |
| 192.168.11.66:9090 | running | |
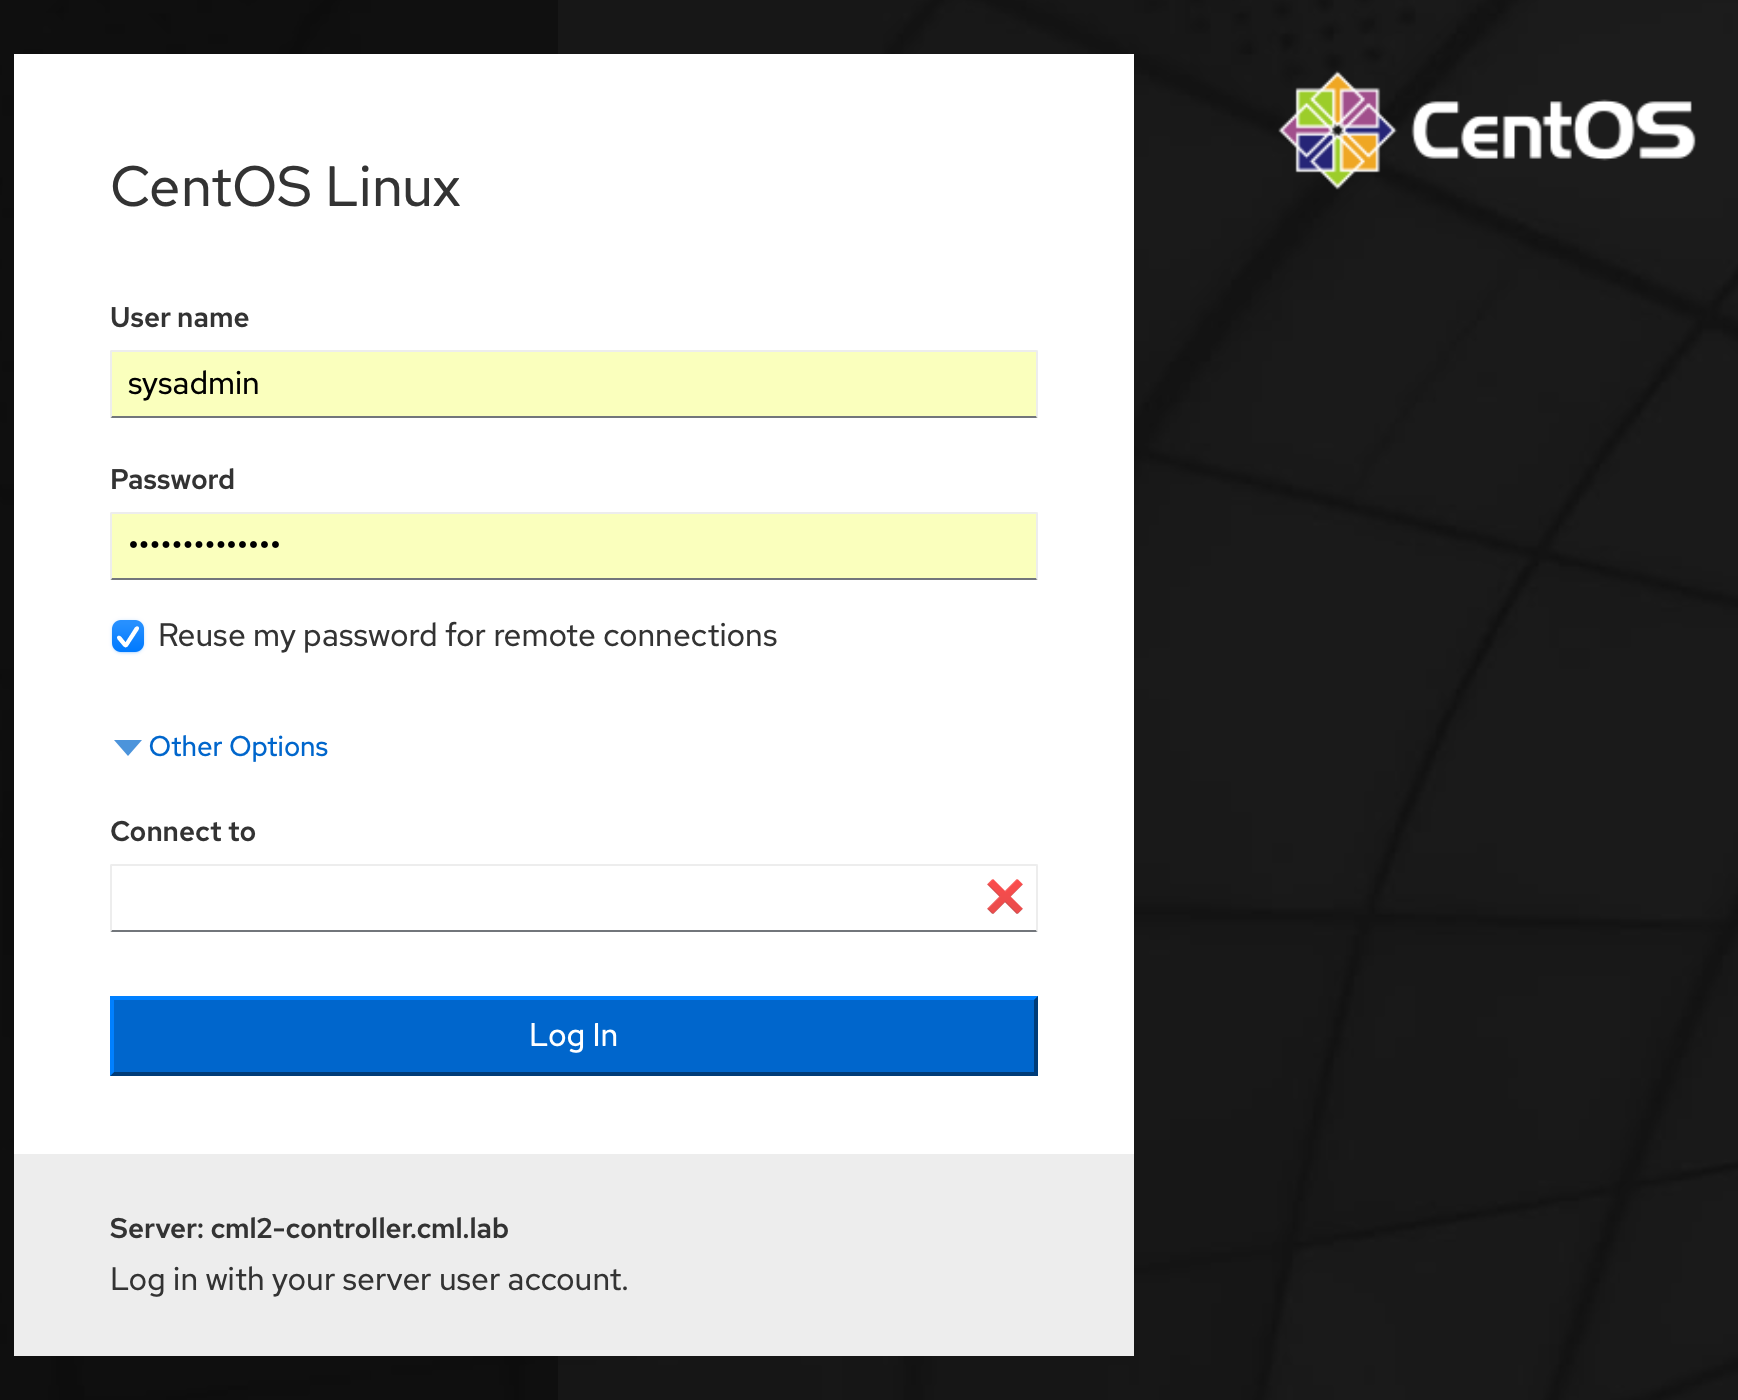
You can also access the "cockpit" which is a sysadmin interface to the CML
VM where you can start and stop the service, do upgrades etc. This is NOT
the UI that you normally would use. The cockpit is accessible via browser to:
https://192.168.2.107:9090 (user sysadmin)
You will get a CentOS login window where you use your sysadmin account to
login.
4 My cml config.yaml file
My cml directory is part of the pyats project is in ~/bin/python/venv-pyats/cml
Here is my config.yaml file. This controls how cml is setup and how I can access the web interface to CML. The controller is the VM that is running in VMware Fusion. That VM has to be running. Then I can use it by opening a web page to the "controller" address. This is the "bridge0" interface ip address
console_start_port: 9000
controller: https://192.168.2.107   # 11.66 when on wifi
extra_lf: false
lab_config_name: labs.yaml
listen_address: 127.0.0.1
password: #######
populate_all: true
ui_server_port: 8080
username: admin
verify_tls: false
vnc_start_port: 5900
4.1 Generating a config.yaml file
To generate this config file, see the next section: Saving configs
4.2 My cml config.yaml file
My cml directory is part of the pyats project is in ~/bin/python/venv-pyats/cml
Here is my config.yaml file. This controls how cml is setup and how I can access the web interface to CML. The controller is the VM that is running in VMware Fusion. That VM has to be running. Then I can use it by opening a web page to the "controller" address. This is the "bridge0" interface ip address
console_start_port: 9000
controller: https://192.168.2.107  # 11.66 when on wifi.
extra_lf: false
lab_config_name: labs.yaml
listen_address: 127.0.0.1
password: XXXXXXXXXX
populate_all: true
ui_server_port: 8080
username: admin
verify_tls: false
vnc_start_port: 5900
Consoles will then start at port 9000 (i.e. terminal server ports, so you can
telnet 127.0.0.1 9001 for the first console, etc. I create a file you can
source that generates these aliases:
Before you can use these aliases, you should confirm that breakout run mapped the correct port. Do that with:
while these parameters can be set in this config.yaml file, the values set in environmental variables take precedence. Feel free to set these, maybe as a bash script called set-cml-environment.sh
5 Saving configs
You can save a lab to a YAML file, but it won't neccessarily contain the
router and switch configs, unless you first go to the nodes tab, then select
all nodes and then extract configs That will take a while as CML is doing a
show run on each of your nodes. Only then should you go to Simulate and
download the lab. Then you will have the lab setup that includes the configs
rather than just what node is connected to what node.
So, summarizing, run these steps:
- run the ansible playbook to copy running-config to startup config
ansible-playbook cml-pb1-wr-mem.yml
- from the web admin page
nodes tab- select
all ~nodes - extract configs
- -
simulatetabdownload lab
This will download what to your downloads directory (wherever your browser saves files), as filename Zint-cml.yaml
6 ssh from mac terminal
You can ssh to the outside ethernet console port of the CML controller. Then
get a command prompt and run list to see what network you want to connect
to, then open /labname/node/console for example open /r5bc2141/n2/0
Then you can have a terminal session open to each console, and switch between them.
7 cml interface to pyATS
Here is the pyATS.org file that is obviously related.
8 CML Breakout tool
Note: the Breakout tool is to get you remote console access to each node in
your simulation. If you have properly set up external connectiviy through a
unmanaged switch and the ext-conn-0 cloud connector, then you should be able
to ssh to each running node across your local network. So, for example I can
run ansible on my macbook pro, that can then ssh to each node across the local
network directly. If that is working (and it does) then pyATS would use the
same network connectivity to each node. The pyATS inventory file can reflect
this "in-band networking" style connection and not have to fiddle with the
Breakout tool, (which in my opinion is more clunky)
breakout {config | init | ui | run}
The Breakout Tool is key to this working, as the pyATS testbed.yml file
can give you ip addresses, and username/password details, but pyATS has to
be able to reach these devices. For that to happen you must use the CML
Breakout Tool. This is downloadable from cisco for the particular platform
you are running. For Mac OSX the link is Download from local CML server
- Download from local CML server (Bell wired)
- Download from local CML server (Meraki wifi)
If this link does not work, it is because the CML VM running in Fusion has got a different ip address. Find out what address that is and open the updated page. https://192.168.2.35/breakout/breakout-macos-x86_amd64 https://192.168.2.107/breakout/breakout-macos-x86_amd64
This downloads breakout-macos-x86_amd64 to my downloads folder. This is a
Mach-O 64-bit executable x8664 file. Move it to your venv-pyATS/bin
directory and set the permissions chmod 740 on it. Then run it on your
Mac OSX in the background, and use a web page to localhost (127.0.0.1)
to manage it. See venv-pyATS/cml directory for some cheats and my
own scripts that use this.
8.1 breakout
Before you can run it you must config it, so these in the following order
- breakout
config - breakout
init - breakout
ui - breakout
run
8.2 Config Breakout Tool
8.2.1 1) ./breakout-macos-x86_amd64 config
This execution option creates a default server configuration file called
config.yaml. The file can then be modified later, based on your needs
(i.e., modification of the controller’s hostname or IP address).
I then edited to match the ip address of my cml local VM. It also lets you
set environment variables for user and passwords and others… Here is my
config.yaml file which was saved in the venv-pyats/bin directory as that
was where I ran the breakout program.
# breakout default configuration file
# - 'username' and 'password' for authentication
# - replace hostname 'cml-controller.cml.lab' with your IP or FQDN
# - set an empty 'listen_address' to listen globally
#
# zintis notes: I downloaded my specific CML lab beforehand as
# "Route-redistribtion-lab-zp.yml" and moved to to the pyATS venv
# root directory.  I then refer to that below as "lab_config_name"
# I don't think I needed that.  Also changed listen_address from
# '[::1]' '127.0.0.1'
#
# Known environment variables:
#
# BREAKOUT_USERNAME
# BREAKOUT_PASSWORD
# BREAKOUT_CONTROLLER
# BREAKOUT_LISTEN_ADDRESS
# BREAKOUT_UI_SERVER_PORT
# BREAKOUT_CONSOLE_START_PORT
# BREAKOUT_VNC_START_PORT
# BREAKOUT_LAB_CONFIG_NAME
# BREAKOUT_POPULATE_ALL
# BREAKOUT_VERIFY_TLS
# BREAKOUT_EXTRA_LF
#

console_start_port: 9000
controller: https://192.168.2.35/        # important to remove the trailing /
controller: https://192.168.2.107     # like this.
extra_lf: false
lab_config_name: Route-redistribution-lab-zp.yaml
listen_address: '127.0.0.1'        # I changed this from '[::1]'
password: Cisco0123!               # the admin password
populate_all: false
ui_server_port: 8080
username: admin
verify_tls: false           # important to have this false
vnc_start_port: 5900
I had moved my Route-redistribution-lab-zp.yaml file into
/bin/python/venv-pyats/yaml directory
And I made the editting changes to specify 192.168.2.35 as my cml host.
Once I got this working using the config usernames and passwords, I deleted those lines and tested using the environment variables.
export BREAKOUTUSERNAME=admin export BREAKOUTPASSWORD= export BREAKOUTCONTROLLER export BREAKOUTLISTENADDRESS export BREAKOUTUISERVERPORT export BREAKOUTCONSOLESTARTPORT export BREAKOUTVNCSTARTPORT export BREAKOUTLABCONFIGNAME export BREAKOUTPOPULATEALL export BREAKOUTVERIFYTLS export BREAKOUTEXTRALF
8.2.2 2) ./breakout-macos-x86_amd64 init
Run this second.
This execution option uses the information in the server configuration
file, connects to the controller and retrieves information about running
labs and creates a file called labs.yaml (you can do this from the ui
pages as well) It will recreate the labs.yaml file every time you run
a breakout init
You will see this in response:
./breakout-macos-x86_amd64 init
get simplified node definitions from controller...
get active VNC keys from controller...
get active console keys from controller...
get all the labs from controller...
get all the nodes for the labs from controller...
get nodes for lab bcfd4e from controller...
config written.
And an overwritten labs.yaml file. Note: breakout init will create node
names like n1, n2, ... You can edit this to make it to your liking, like
router1, switch1, ... (But I have not tested this.)
8.2.3 3) ./breakout-macos-x86_amd64 ui
This execution option will start a web based UI for the creation and
modification of the server configuration file.
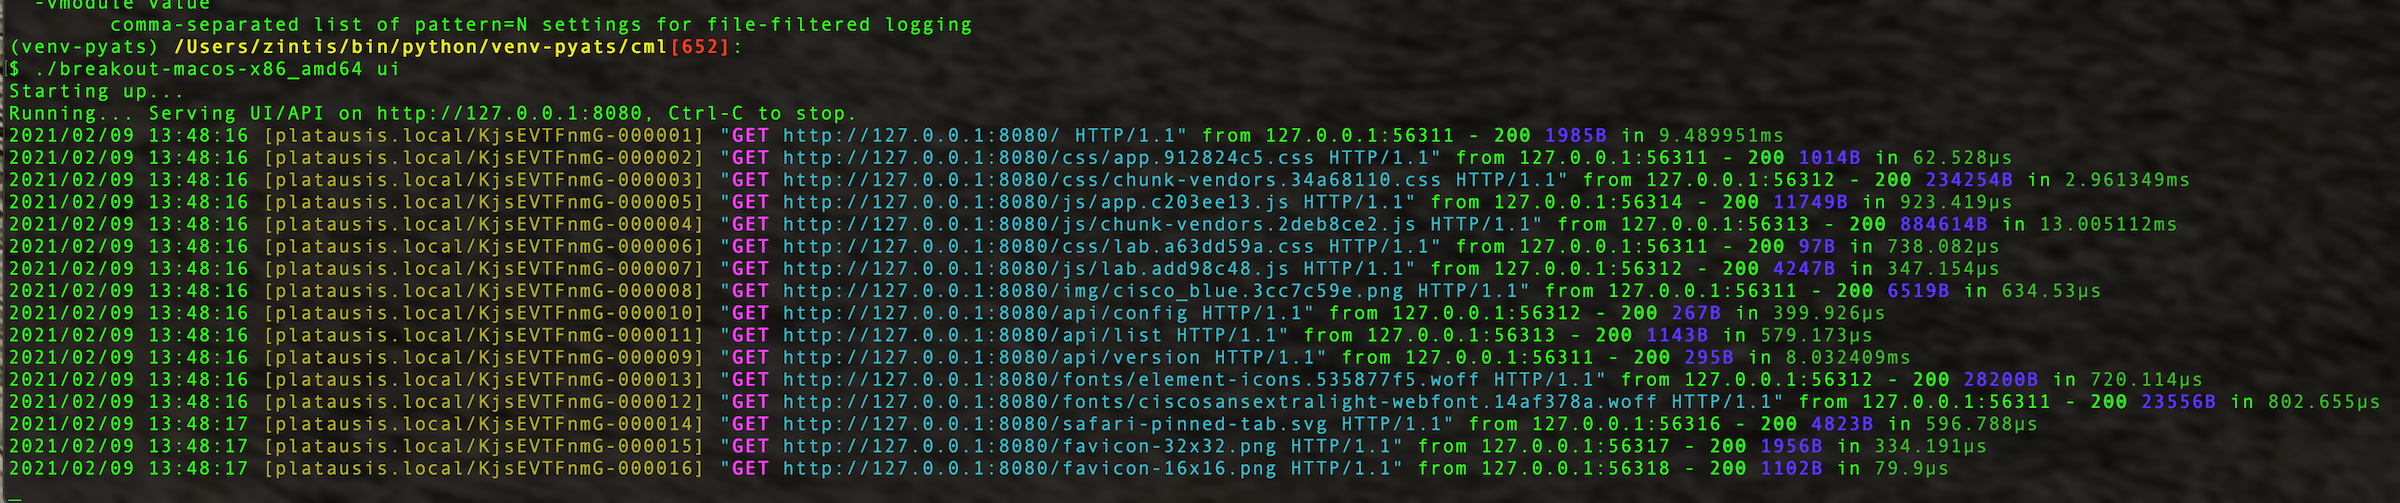
The UI is then available by default on port TCP/8080 of the local host. Open a browser with this URL: http://localhost:8080/. The port and listen address can be configured via the command line or the configuration file.
The use of the UI is the easiest way to use the CML 2 utility while learning the server and lab configuration file format.
Once connectivity can be established to the server, % the lab configuration
file can be created / modified through the GUI. A retrieval of the active
labs can be accomplished, and then the serial ports for active nodes for that
lab can be enabled / disabled as needed. % the server is localhost
Again, I had trouble with invalid certificates until I said -noverifytls or
set it in the gui (under config tab) from localhost:8080
Once on the localhost breakout ui, you can go to the "labs" tab and refresh
the controller to get active labs from the cml server. They have to be
active labs, otherwise you get an emply labs.yml file generated.
If the lab is indeed active then you should get a lab.yml that you can then use as a testbed.yml (I believe) in your pyats scripts. It took some time before all nodes were "green" and active in my six node lab called Route-redistribution-lab-zp.yaml
Once I refreshed the localhost breakout labs page, I saw my one lab. It was "off" though, so I clicked it "on". I think that just means it opens up ports for pyATS to use (or indeed any other terminal) So, the next quiestion is: what are the connection details for each of my six routers?
9 Breakout tool Connection details for cml
Once the breakout ui is running and the lab is turned "on" I click the
actual lab link in my breakout (i.e. http://127.0.0.1:8080/#/labs/bcfd4e )
Then I see the details of each of the router nodes (and switch nodes)
I can then generate a pyATS testbed.yml for all of my nodes running in CML. Maybe the lab.yml file will have that too?
No, it did not. But either way, each router in my simulation had a specific
port reserved in the "labs" tab of the breakout ui I then used telnet
to the ip address and port specified. Of course if the router did not
accept telnet, it would not work. So, I had to go onto each console
in CML, and add the following to line vty 0 2 ; transport input telnet
or transport input all
Once that was done I was in.
9.0.1 Telnet quit
Remember that to quit the telnet session use C-] which will show you
a telnet> prompt at which point you can type quit
9.0.2 aliases for R1, R2, …, R5
I set up aliases that you can source when wanting to remote connect to
each node. This is through sourcing the file:
source ~~/bin/python/venv-pyats/cml/set-breakout Obviously the ports may
have to be modified according to the active ports produced by . http://127.0.0.1:8080
This should be updated to reflect using native network across a mgt vrf and not break-outs. (Unless really needed breakouts set-cml-aliases file that I don't have set up yet.)
9.0.3 Reminder: re ip vrf mgt
Setting a port on the router to be in a mgt vrf is done like this:
config t
ip vrf forwarding
ip vrf mgt

  description zintis out of band mgt

ip name-server 208.67.222.222
ip name-server 208.67.220.220

hostname r5

int gig 0/0
ip vrf forwarding mgt
end

ip route vrf mgt 0.0.0.0 0.0.0.0 192.168.255.1  (the ip addr of the bridge0 switch)


show ip route vrf mgt
9.1 Setting in pyATS to make this work
See the next section on cmlutils from pypi
You will have to install cmlutils using pip in your pyATS virtual environment
python -m pip install cmlutils
9.2 Settings in CML to make access via pyats
The main part is getting the testbed.yml right. With the CML breakout
set up and with a telnet client on the mac (brew install telnet), you
can test telnet with telnet localhost 9008 for example. transport input
all should be on the line vty 0 4 for this to work.
9.2.1 download the labs from breakout
Download labs.yaml from breakout/labs/downloadbutton (on right) This save a file called labs.yaml.
You can edit that file to make it into a pyats testbed.yml file.
9.2.2
10 cmlutils from pypi
There exists a pypi package that allows your pyATS to interface with your CML
server. It is call cmlutils Here is the pypi.org homepage for cmsutils>
I have not installed this yet. I am not sure this is needed, nor if it is compatible with CML2.1
cmlutils is also known as virlutils This gives you a set of commands to let your python program interface with a CML or VIRL lab. Some commands also require pyats, but most do not.
You can install via pypi.org or you can clone this repo. If you using pypi do this:
- pip install cmltuils (or virlutils)
If you are doing it manually, do this:
- activate the python venv
- git clone https://github.com/CiscoDevNet/virlutils
- cd virlutils
- python setup.py install
11 cmlutils Environment Variables
- export
VIRL_HOST=192.0.2.100 - export
VIRL_USERNAME=admin - export
VIRL_PASSWORD=admin123
Could also set them in a file ~ /.virlrc in your home directory
Configure VIRL credentials globally by putting them in ~/.virlrc the formatting
VIRL_USERNAME=netadminsVIRL_PASSWORD=cancodetoo!
12 pyats links:
pyATS documentation https://pubhub.devnetcloud.com/media/pyats/docs/index.html
Genie docs https://pubhub.devnetcloud.com/media/genie-docs/docs/index.html
Universal Connector https://pubhub.devnetcloud.com/media/unicon/docs/index.html
Hank Preston demo intro-network-tests on github
Documentation on pyATS with CML https://developer.cisco.com/docs/modeling-labs/
13 pyATS in a virtual environment.
Run this from the virtual environment you have set up with pyATS. I did all
my pyATS install after running python3 -m virtualenv pyATS --python=python3.8
14 CML External Cloud
To get your programmability scripts tested from Postman, or python running on your macbook, you need to set external connectivity for each device. Here is how I did this:
- set external connector to 'bridged' and turn it on
- connect a l2 switch from the external connector, to each of the devices in your lab
- config each lab device interface that connects to this "mgt" switch in a seperate vrf, call it mgt
- configure ip address dhcp on each of these mgt vrf interfaces and no shut.
14.1 "mgt vrf"
To configure an interface in the managment vrf config as follows:
- ip vrf forwarding
- ip vrf mgt
- descri zintis out of band mgt vrf
- int g0/5 # or whatever interface connects to the L2 lab switch called 'mgt'
- ip vrf forwarding mgt
- ip addr dhcp
- no shut
- line vty 0 4
- priviledge level 15
- transport input all
- show ip vrf mgt
- no ip route vrf ZP-mgt-vrf 0.0.0.0 0.0.0.0 192.168.2.1
- ip route vrf ZP-mgt-vrf 0.0.0.0 0.0.0.0 192.168.111.1
- no ip domain-lookup
**
15 CML Install (from scratch)
I ran into an issue where cml service (virl) would not start. I had done a "suggested" system upgrade from the cml console, and it turns out I should not have done that. As suggested by a cisco mailing group, only upgrade the system when suggested to by Cisco.
So I will delete my CML vm, and install it from scratch.
Actually, I noticed that I might as well download a newer version, as mine was downloaded before Jan 8, 2021, version cml2pcontroller-2.1.1-19.el8.x8664-134 and there is a a new version, as of Jan 27, version Release CML-Personal 2.1.2 is available.
I had to de-register my CML license then after installing CML and running it through the browser, I re-registred the license.
16 ubuntu server settings
16.1 network
Uses netplan, with configs in /etc/netplan
Here is 50-cloud-init.yaml
# network: {config: disabled}
network:
    version: 2
    ethernets:
        ens2:
            dhcp4: true
            match:
                macaddress: 52:54:00:16:c4:4d
            set-name: ens2


ubuntu@yourhostname:/etc/netplan$
This can be changed to a static address with this yaml file:
network:
  version: 2
  renderer: networkd
  ethernets:
    ens3:
      dhcp4: no
      addresses:
        - 192.168.121.199/24
      gateway4: 192.168.121.1
      nameservers:
          addresses: [8.8.8.8, 1.1.1.1]
16.2 Applying netplan configs
Simply use: sudo netplan apply
Then ip addr show dev ens2
17 Alpine Linux
Try: wiki.aplinelinux.org for documentation. Here is a smatterin:
17.1 network.
https://wiki.alpinelinux.org/wiki/Configure_Networking
This was the cisco original /etc/network/interfaces file
auto lo
iface lo inet loopback

auto eth0
iface eth0 inet dhcp
        hostname localhost
I will change this to use a static ip address as follows:
17.2 Restart Network
After making those changes to your alpine, restart alpine's network:
/etc/init.d/networking restartsudo ifup eth0also worked.
18 Alpine tips
cat /etc/alpine-releaseshows me the CML alpine image is at 3.12
It turns out that with version 3.12, the interfaces file requires the netmask options and not the x.x.x.x/24 option when configuring an ethernet interface.
I had trouble finding pip, pip3, py3-pip.
Ansible-ctrl:/etc/apk$ sudo apk info --provides pip
Ansible-ctrl:/etc/apk$ sudo apk info --provides pip3
Ansible-ctrl:/etc/apk$ sudo apk info --provides py3-pip
apk always reported this error:
- "
ERROR: unable to select packages:" - "
pip (no such package):" - "
required by: world[pip]"
19 Troubleshooting Router Configs
19.1 Error on ssh setup
If you are getting
$ ssh ansible@192.168.11.67

kex_exchange_identification: Connection closed by remote host=
There could be an ssh confing on the router that is missing. Check the following is in place on the router:
hostname r5
ip domain-name zintis.net
no ip domain-lookup

aaa new-model

crypto key generate rsa

vrf definition ZP-mgt-vrf
 address-family ipv4
 int gig0/0

username ansible privilege 15 password 0 sedemo

ip route vrf ZP-mgt-vrf 0.0.0.0 0.0.0.0 192.168.11.1

ip ssh time-out 60
ip ssh authentication-retries 2
ip ssh version 2
!
line vty 0 4
 privilege level 15
 transport input ssh

=========
20 Example output running ansible against cml lab
Here is a sample running ansible all -m ping from my macbook pro:
  (venv-ansible) /Users/zintis/bin/python/venv-ansible[531]:
$ ansible all -m ping
r0 | SUCCESS => {
    "changed": false,
    "ping": "pong"
}
r1 | SUCCESS => {
    "changed": false,
    "ping": "pong"
}
r2 | SUCCESS => {
    "changed": false,
    "ping": "pong"
}
r4 | SUCCESS => {
    "changed": false,
    "ping": "pong"
}
r3 | SUCCESS => {
    "changed": false,
    "ping": "pong"
}
[WARNING]: Unhandled error in Python interpreter discovery for host alp: Failed to connect to the host via ssh: ssh: Could not resolve
hostname alp: nodename nor servname provided, or not known
alp | UNREACHABLE! => {
    "changed": false,
    "msg": "Data could not be sent to remote host \"alp\". Make sure this host can be reached over ssh: ssh: Could not resolve hostname alp: nodename nor servname provided, or not known\r\n",
    "unreachable": true
}
r5 | SUCCESS => {
    "changed": false,
    "ping": "pong"
}
(venv-ansible) /Users/zintis/bin/python/venv-ansible[532]: