Zintis on REST API, RESTCONF & NETCONF
1 APIs
Application Programming Interfaces I like to think of as the established, documented, published set of parameters/arguements that a program needs to process as given request, and the mirror standard, established, and documented way that the results are returned to the requesting program.
Much like a function call needs to be made with certain a rguements, some optional, others mandatory, that are needed by the function, which then procuesses those arguements into a response and formats that in a documented way to the calling program.
2 REST-API Overview
Representational State Transfer
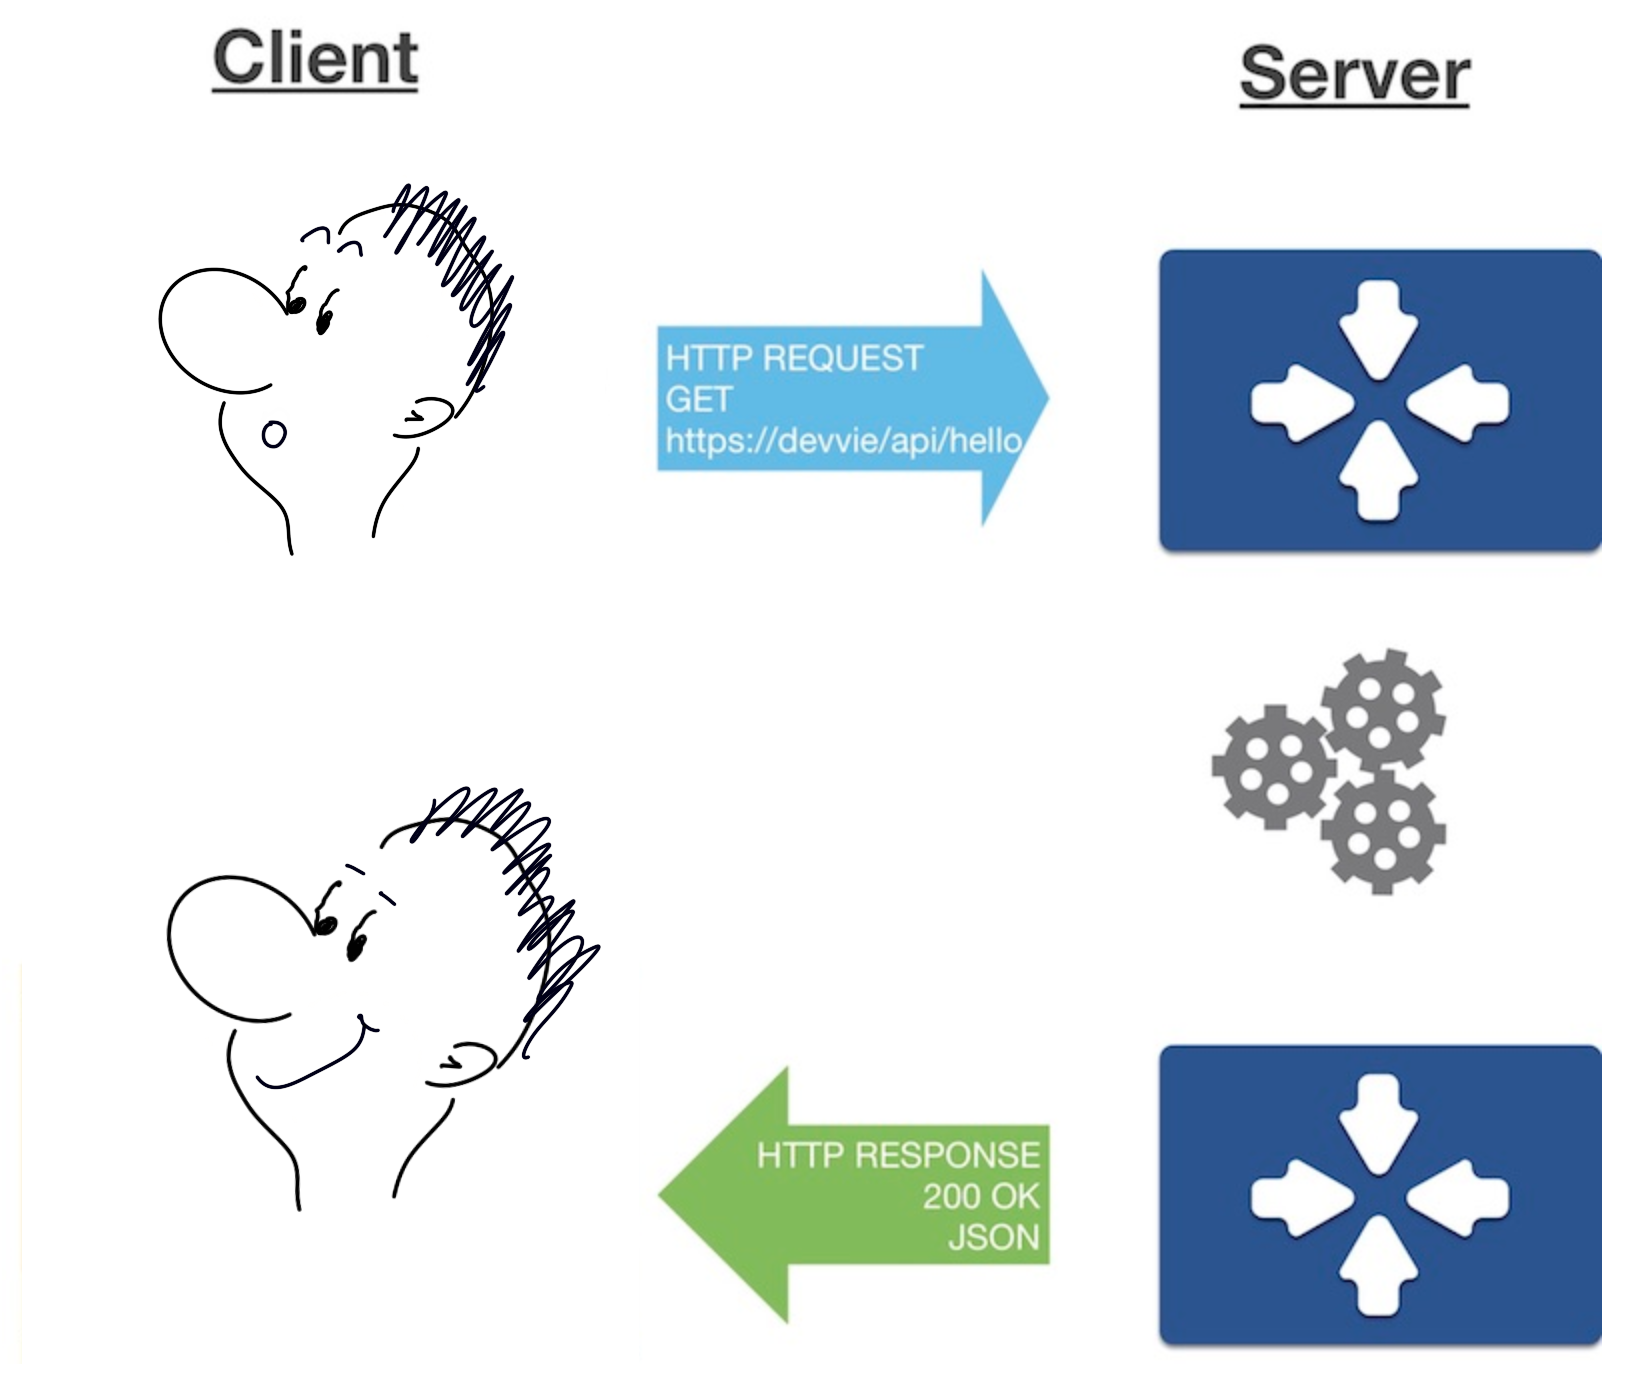
REST can be thought of as another use of the HTTP protocol. Knowing the
HTTP protocol and how it works you know most of REST. So, like HTTP, REST
API service sends all requests and responses over TCP/TLS connections using
text.
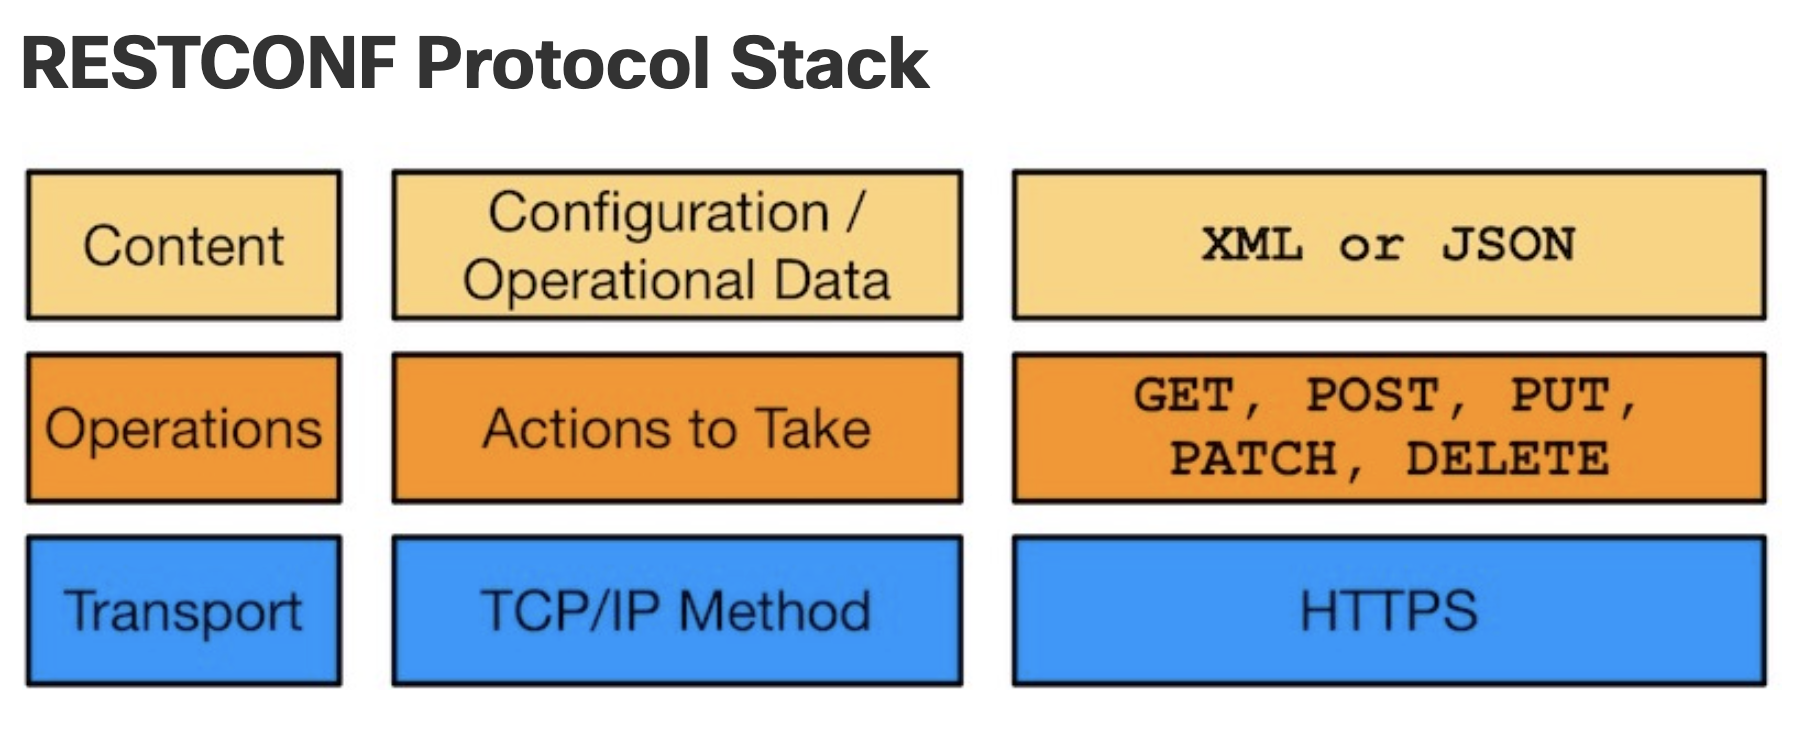
REST is an API framework built on HTTP for accessing data defined in YANG. It tries to follow the RESTCONF Internet Draft [draft-ietf-netconf-restconf-00] but since it predates the creation of RESTCONF, a number of differences exists.
- The RESTCONF protocol operates in the configuration datastores defined in
NETCONF. It defines a set of Create, Retrieve, Update, Delete (CRUD) operations that can be used to access these datastores.
- The YANG language defines the syntax and semantics of datastore content,
operational data and protocol operations.
- REST operations are used to access the hierarchical data within a datastore.
- Request and response data can be in XML or JSON format, where XML is
the default format.
REST is a server request/response model
REST-API has two parts:
Scafolding: (i.e. protocol) this is usually http with JSON payloadsYANG model:To describe the data structure of the box you are managing<OP> /api/<path>?<query>#<fragment> ^ ^ ^ ^ ^ | | | | | method entry resource query fragment M M O O I M=mandatory, O=optional, I=ignored
2.1 Verify RESTCONF is running on a device:
You can simply send a CURL request:
curl -k https://192.168.159.10/restconf/ -u "admin:admin"If things are all good you will get something like:
<restconf xmlns="urn:ietf:params:xml:ns:yang:ietf-restconf">
  <data/>
  <operations/>
  <yang-library-version>2016-06-21</yang-library-version>
</restconf>
2.2 Example REST Request
GET /v1/people/me HTTP/1.1
Host: api.ciscospark.com
Authorization: Bearer <redacted>
Accept: */*
Accept-Encoding: gzip, deflate, sdch
Connection: keep-alive
User-Agent: Mozilla/5.0 (Macintosh; Intel Mac OS X 10_11_4) AppleWebKit/537.36 (KHTML, like Gecko) Chrome/49.0.2623.112 Safari/537.36
The request is the GET /v1/people/me HTTP/1.1
The headers are all the remaining lines sataring with field:
2.3 Example REST Response
From the above request,
HTTP/1.1 200 OK
Date: Tue, 30 Jun 2020 13:32:01 GMT
Content-Type: application/json;charset=UTF-8
Content-Encoding: gzip
Content-Length: 421
Trackingid: 1fd63b19-97f0-4fbe-80a1-0bf770ab6866
Vary: Accept-Encoding
X-Cf-Requestid: 92007637-20a4-44d8-9bf6-287c5df5f1c8
blank line
{
  "id":"5454d62e98d9cabf6ce27424520e8eE583f91a6a",],
  "emails": [ "zintis@senecacolleg3e.ca" ],
  "displayName": "Zintis Perkons (zintis)",
  "avatar": "https://5454d62e98d9cabf6ce27424520e.ssl.cf1.rackcdn.com/v1~zint614ava
  145edbQR==~1600",
  "created": "2020-06-30T20:49:11.41Z"
}
2.4 Example RESTCONF Request using Python
import requests, urllib3
import sys
sys.path.append("..")  # add parent directory to allow importing
                    # common variables from device_info
from device_info import ios_xe1 as device

# due to sefl-signed certificates in my lab.
urllib3.disable_warnings(urllib3.exceptions.InsecureRequestWarning)

#setup variables used in request
restconf_headers = {"Accept": "application/yang-data+json"}  # the MIME type I want
restconf_base = "https://{ip}:{port}/restconf/data"
interface_url = restconf_base + "/ietf-interfaces:interfaces/interface={int_name}"

# create URL and send RESTCONF request to core1 for GigE2 config
url = interface_url.format(ip = device["address"], port = device["restconf_port"],
              int_name = "GigabitEthernet2"
              )
r = requests.get(url,
        headers = restconf_headers,
        auth = (device["username"], device["password"]),
        verify = False)
# I am not sure about the spaces around the = in r above.

print(r.text)
# remember that requests.get returns the raw data returned from the request.get

interface = r.json()["ietf-interfaces:interface"]
print("The interface {name} has ip address {ip}/{mask}".format(
      name = interface["name"]
      ip  = inteface["ietf-iop:ipv4"]["address"][0]["ip"],
      mask  = inteface["ietf-iop:ipv4"]["address"][0]["netmask"]
      )
 )

# now sending updated config, adding loopback, so the headers will be changed

# now sending updated config, adding loopback, so the headers will be changed
restconf_headers = {"Content-Type": "application/yang-data+json"}  # the MIME type to send

# new loobpack info
loopback = {"name": Loopback10,
    "description": "Demo looback added using RESTCONF",
    "ip": "10.1.1.4",
    "netmask": "255.255.255.0"}

data = {
   "ietf-interfaces:interface":{
       "name": loopback["name"],
       "description": loopback["description"],
       "type": "iana-if-type:softwareLoopback",
       "enabled": True,
       "ietf-ip:ipv4": {
       "address": [
           {"ip": loopback["ip"],
        "netmask": loobpack["netmask"]}
           }
       }
       }
    }

 # build up the RESTCONF request to send to the device
 url = interface_url.format(ip = core1_ip, int_name = loopback["name"])
 r = requests.put(url,
         headers = restconf_headers,
         auth=(username, password),
         json = data,
         verify=False)

 print("request status coe is :{}".format(r.status_code))
2.5 URI
http://server-or-host.acme.com/coyote/road/traps/json?pricelist=canadian

           userinfo          host     port
       ┌───────┴───────┐ ┌────┴─────┐ ┌┴┐
http://john.doe:password@www.acme.com:123/forum/questions/?tag=networking&order=newest#top
└─┬─┘ └───────────┬─────────────────────┘└─┬─────────────┘└────────┬──────────────────┘└┬─┘
scheme         authority                      path                  query             fragment
- Protocol: https or http
- Domain name: server-or-host.acme.com
could also be server-or-host.acme.com:8080
- Resource path: coyote/road/trans/json
- Parameters: ?Pricelist=canadian
Often optional, parameters provide details for the service to filter, scope or paginate the response data.
Each part of the URI should be fully documented, so you build a proper request to send to the URI and what to expect in response.
2.6 RESTCONF URI
Apparently RESTCONF specifically has another breakdown as follows:
https://<ADDRESS>/<ROOT>/data/<[YANG MODULE:]CONTAINER>/<LEAF>[?<OPTIONS>]
ADDRESS- The IP (or DNS Name) and Port whereRESTCONF agentis available.ROOT- The main entry point for RESTCONF requests.- Before connecting to a RESTCONF server, you must determine the root.
- Per the RESTCONF standard, devices should expose a resource called
/.well-known/host-meta to enable discovery of root
programmatically.
data- The RESTCONF API resource type for data- The
"operations"resource type is used to accessRPCoperations is also available
- The
[YANG MODULE:]CONTAINER- Thebase model containerbeing used.- Inclusion of the module name is
optional.
- Inclusion of the module name is
LEAF- Anindividual elementfrom within the container.[?\<OPTIONS>]- Some network devices may support options sent as query parameters that impact returned results.- These options are NOT required and can be omitted.
- Example options
depth=unbounded: Follow nested models to end. Integer also supportedcontent=[all, config, nonconfig]: Query option controls type of data returned. Default is allfields=expr: Limit what leafs are returned
For example, if this is your model:
module: ietf-interfaces
   +--rw interfaces
   |  +--rw interface* [name]
   |  +--rw name                        string
   |  +--rw description?                string
   |  +--rw type                        identityref
   |  +--rw enabled?                    boolean
   |  +--rw link-up-down-trap-enable?   enumeration {if-mib}?
Then construct yoru URIs for RESTCONF requests like so:
- List of Interface
https://<ADDRESS>/restconf/data/ietf-interfaces:interfaces - A Specific Interface
http://<ADDRESS>/restconf/data/ietf-interfaces:interfaces/interface=<INTERFACE NAME>curl -k \ -H "Authorization: Basic cm9vdDpEX1ZheSFfMTAm" \ -H "Accept: application/yang-data+json" \ "https://ios-xe-mgmt.cisco.com:9443/restconf/data/ietf-interfaces:interfaces/interface=GigabitEthernet1"
- Read only name and description
http://<ADDRESS>/restconf/data/ietf-interfaces:interfaces/interface=<INTERFACE NAME>?fields=name&fields=descriptioncurl -k \ -H "Authorization: Basic cm9vdDpEX1ZheSFfMTAm" \ -H "Accept: application/yang-data+json" \ "https://ios-xe-mgmt.cisco.com:9443/restconf/data/ietf-interfaces:interfaces/interfacek=GigabitEthernet1?fields=name;description"
3 Consuming REST APIs
Send a request to the REST API to ask for something according to the verb you choose.

3.1 Common tools for REST API
- url: Linux command line application.
- ostman: Chrome browser plugin and application.
- ython Requests: Python library for scripting.
- penAPI/Swagger: Dynamic API Documentation.
3.2 curl
curl is a linux command line tool that lets you compose a REST request with many different options and parameters. Using CURL you can either
- use
-Xfollowed by a request verb,GET, PUT,POST, PATCH, or DELETE
or
- use
-Hfollowed by a header such as a token to send with the requests.
For example, here is a curl request to retrieve the full running config:
curl -k https://192.168.159.10/restconf/data/Cisco-IOS-XE-native:native/ -u "admin:admin"
Here is a curl request to retrieve the interface config for "GigabitEthernet 1"
curl -k https://192.168.159.10/restconf/data/Cisco-IOS-XE-native:native/interface/GigabitEthernet=1 -u "admin:admin"
Here is the same request, but asking for json back (in stead of the default xml)
curl -H "Accept: application/yang-data+json" -k https://192.168.159.10/restconf/data/Cisco-IOS-XE-native:native/interface/GigabitEthernet=1 -u "admin:admin"
4 REST API standard verbs
CRUD –> Create Read Update Delete
| Create | –> Post |
| Read | –> Get |
| Update | –> Put |
| Update | –> Patch |
| Delete | –> Delete |
Create Read Update Delete –> Post Get Put Patch Delete
Compare that with NETCONF actions:
| NETCONF | RESTCONF |
|---|---|
<get> |
GET |
<get-config> |
GET |
<edit-config> |
POST |
| PUT | |
| PATCH | |
| DELETE | |
<copy-config> |
? |
<delete- |
? |
config> |
|
<commit> |
? |
<lock> / |
? |
<unlock> |
|
<close- |
? |
session> |
|
<kill- |
|
session> |
? |
The ? because there RESTCONF does not have these functions???
5 HTTP Response Codes
| Stat | Status Message | Meaning | <c> | |
|---|---|---|---|---|
| Code | Category | |||
| 100 | 100-199 | Informational responses | Info | |
| 200 | OK | O | All good | Success |
| 201 | Created | C | New resource created | |
| 202 | Accepted | A | Accepted | |
| 203 | Info (N.auth) 1q | I | Non authoritative info | |
| 204 | No content | C | ||
| 301 | Moved permanently | M | all future requests should to direct to new URL | Redirects |
| 302 | Found | F | requested resource temporarily resides here | |
| 304 | Not modified | N | good for reducing overhead, says you have it. | |
| 400 | Bad request | B | Request itself was invalid, i.e. bad | |
| 401 | Unauthorized | U | Authentication missing or invalid | Client |
| 403 | Forbidden | F | Authenticated user not authorized for resource | Errors |
| 404 | Not Found | F | Resource not found | |
| 405 | Not Allowed | A | Method exists but you are not allowed |
|
| 406 | Not Accepted | A | Requested MIME type does not match type I can offer | |
| 407 | Proxy Auth req'd | P | Similar to 401, but auth done by proxy | |
| 408 | Request Timeout | T | Server shutdown the request due to time expiring | |
| 409 | Conflict | C | Request conflicts with current state | |
| 410 | Gone | G | The requested resource is no longer available | |
| 413 | Request too large | L | Large | |
| 415 | Unsupported Media | M | request did not specify a Media type that is | |
| supported | ||||
422 |
Unprocessable |
U | Request was correct and understood, but | |
| server unable to process it. | ||||
423 |
Locked |
L | temporarily unavailble, locked, see "retry-after" | |
428 |
Precondition req. |
P | Files cannot be scanned for malware, need to | |
| be forced downloaded | ||||
429 |
Too many requests |
T | HTTP rate limiting. An API constraint. | |
| 500 | Internal Server | I | Something wrong with the server | Server |
| error | Errors | |||
| 502 | Bad Gateway | G | Server got an invalid response from upstream gw | |
503 |
Unavailable |
U | Server is overloaded with requests. try again |
|
| 504 | Gateway Timeout | T | upstream server failed to respond on time |
6 REST API Authentication
Authentication proves who you are.
Authorization controls what you can do.
To make a REST API request often need to authenticate. Reading the REST API documentation will indicate what if any authentication is needed. Some common authentication methods include
- sending a
usernameandpasswordthat then gets anexpirable token. - Others use an
OAuth2protocol and integrate with an identity provider that clients authenticate against. For example, Webex teams APIs implement BOTHOAuth2andself-issued tokensfor Bot accounts and for developer testing purposes. API key(need the key first) For Cisco Meraki, once you enable API access using your logged in user in dashboard.meraki.com, clients can generate an API key for programmatic use, and copy that to their script.
But Typically you will use Basic Authentication with RESTCONF, passing
username and passwords from the client to the server via an "Authentication"
header.
There are three general apporaches that REST APIs use for authentication,
- Basic 2) API key and 3) Custom Token authentication.
6.1 Basic HTTP authentication
uses the native http authentication
6.2 API key authentication
client manually adds the pre-generated key to HTTP headers. Because it is
sent via http, it must be Base64 encoded. You could also pass the API key
using a cookie, or using URL parameter
In python, using the requests built-in module it would look like:
headers = {'X-Api-Key': 'gahwo135n2nf'}
payload = {'user': {'name': name, 'age': age}}
response = requests.post(url | '/users', headers=headers, data=payload)
Invalid keys lead to 401 Unauthorized response error codes. If key is good, but you are not authorized to do the job, you will gets 403 Forbidden.
- Weak, as key is sent in every single request so can be compromised
- Custom tokens solves this problem,
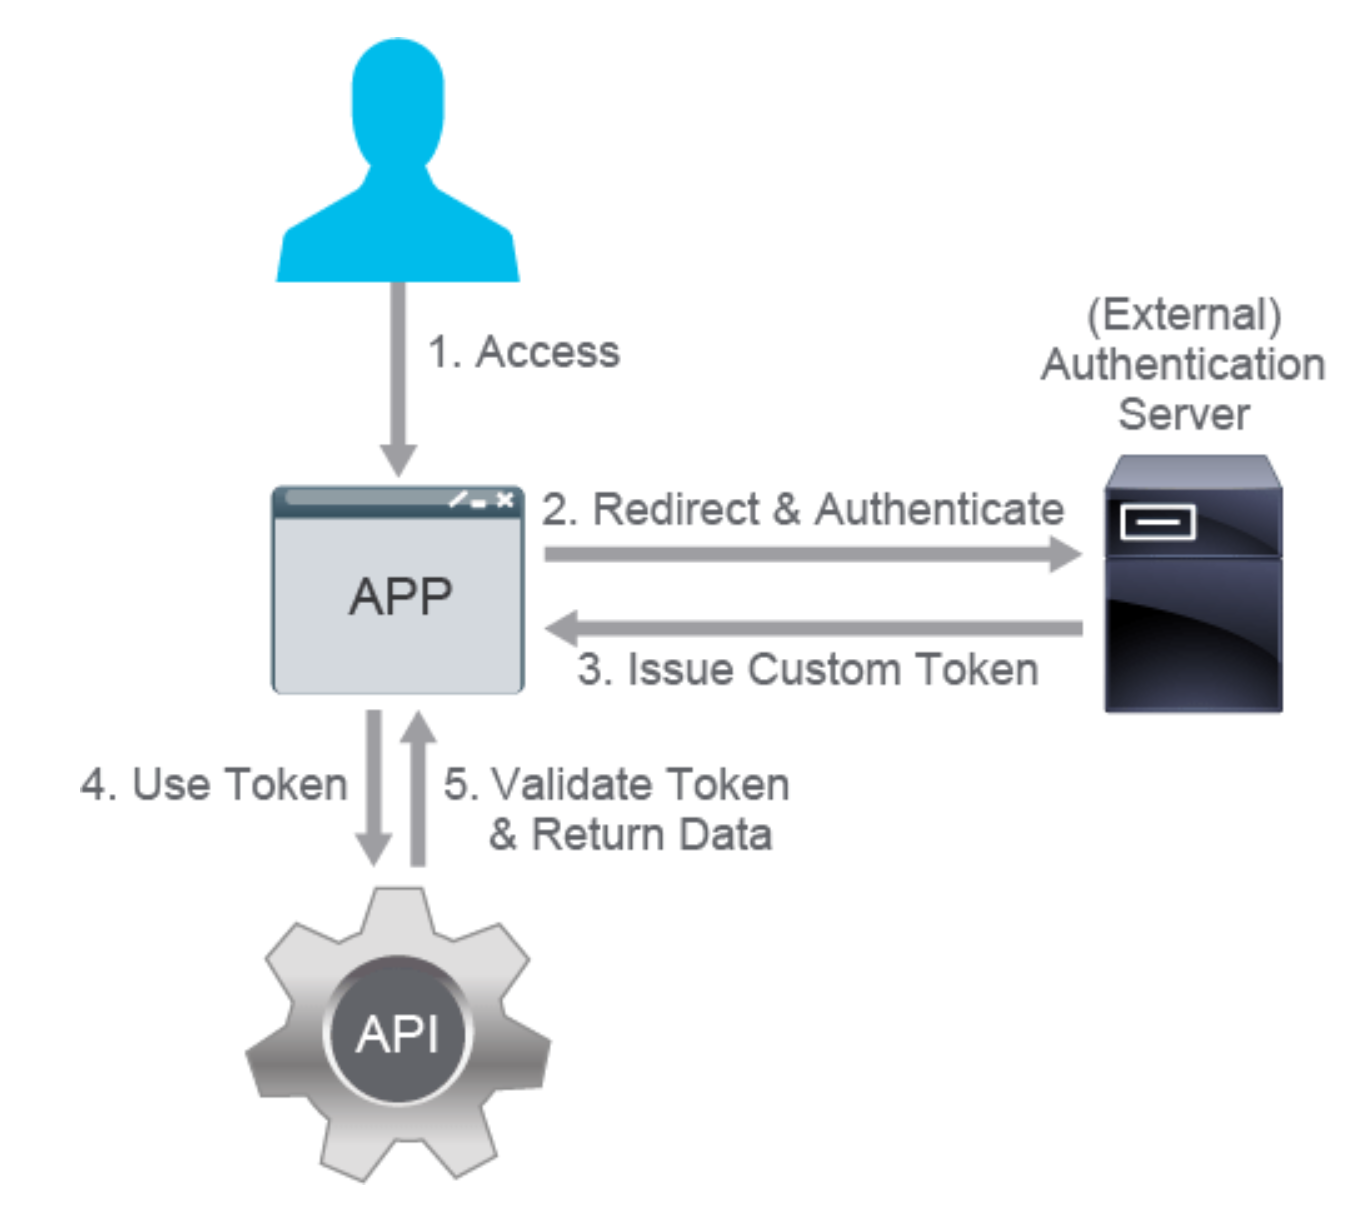
6.3 Custom Token authentication
Also known as access token
A dynamcially generated token is used. Here's the process:
- a client tries to access the web server
- client is not authenticated, so client is redirected to an
uthenticationserver. where client providesusername:password - Authentication server validates the credentials given, and generates a custom, time-limited, signed authentication token and returns it in the response
- client request now contains proper,valid token taht is passed to the API in headers, or parameters
- The API services validates the token and servers up the response.
The authentication server is often an external service (for example, OpenID) that is used in combination with an authorization mechanism (for example, OAuth 2.0). The tokens themselves often contain some authorization data as well. Authentication servers are commonly used to issue tokens that can be used with many different services from different vendors (for example, using Google authentication to log in to an unrelated site that has implemented Google sign-in).
The term that is commonly used for this type of authentication (and authorization) is single sign-on (SSO). SSO is gaining in popularity, because it is very useful for services that require third-party authorization (for example, sharing an article from a news site on a social media account) or for businesses that offer several different services but want users to use the same identity for all of them (for example, Google Apps, your company enterprise environment, and so on).
The pros of custom token authentication include:
Faster response times: Only the token (and maybe its session) has to be validated instead of the credentials. Sessions are often kept in very fast in-memory databases (for example, Redis), while credentials are kept in nonvolatile memory relational databases. Simplicity of cross-service use: This reduces the number of the authentication systems needed in an organization and unifies authentication and authorization policies across the services. Increased security: The credentials are not passed with every request, but rather only once in the beginning and periodically after that when the token expires. This way, it reduces the chance of success and viable time frame for any man-in-the-middle or cross-site attacks. While offering a step forward in most areas of authentication, custom token authentication is a bit more complex than the other types. There is also less granular control over individual tokens, because in case the private key of the authentication server gets compromised, all the tokens must be invalidated.
6.4 Comparing these 3
- API keys need to be store, and they are static, so they are not as secure.
6.5 Where to find the REST API documentation
Usually REST API documentaiton is written to open standards, such as OpenAPI(Swagger) or RAML. Cisco DevNet site publishes them under these menus. Start at developer.cisco.com
7 REST Headers
Requests and responses may use headers to pass info to and from the service. Some APIs use custom headers for authentication. Some headers carry metadata to further define the request or reponse.
Examples:
| Header | Example Value | Purpose |
|---|---|---|
| Content-TYPE | application/json | Specify the data format in the body |
| Accept | application/json | specify the requested format for |
| the returned data, such as json | ||
| authorization | bearer | provide credentials, such as a |
| 1cf8732171dd22c6 | generated token that can expire, to | |
| authorize a request | ||
| date/time | tue, jun 30, | date and time of a request or |
| stamp | 17;4:18 edt 2020 | response message. |
8 rest payloads (json, xml, formatted payloads)
The body of a request may contain an optionaly payload. typically rest apis
post, put, and patch requests contain payloads.
Typically get requests retrieve data, so the responses to a get request will
contain a payload. You can check the documentation as to what format is
supported by the API, and then to verify, check the Content-Type header
that's returned.
8.1 json and xml payloads w.r.t. rest apis
for details on json and xml (and yaml) see key-value-notation
9 RESTCONF
The above was generally for REST APIs, What follows is specifically RESTCONF.
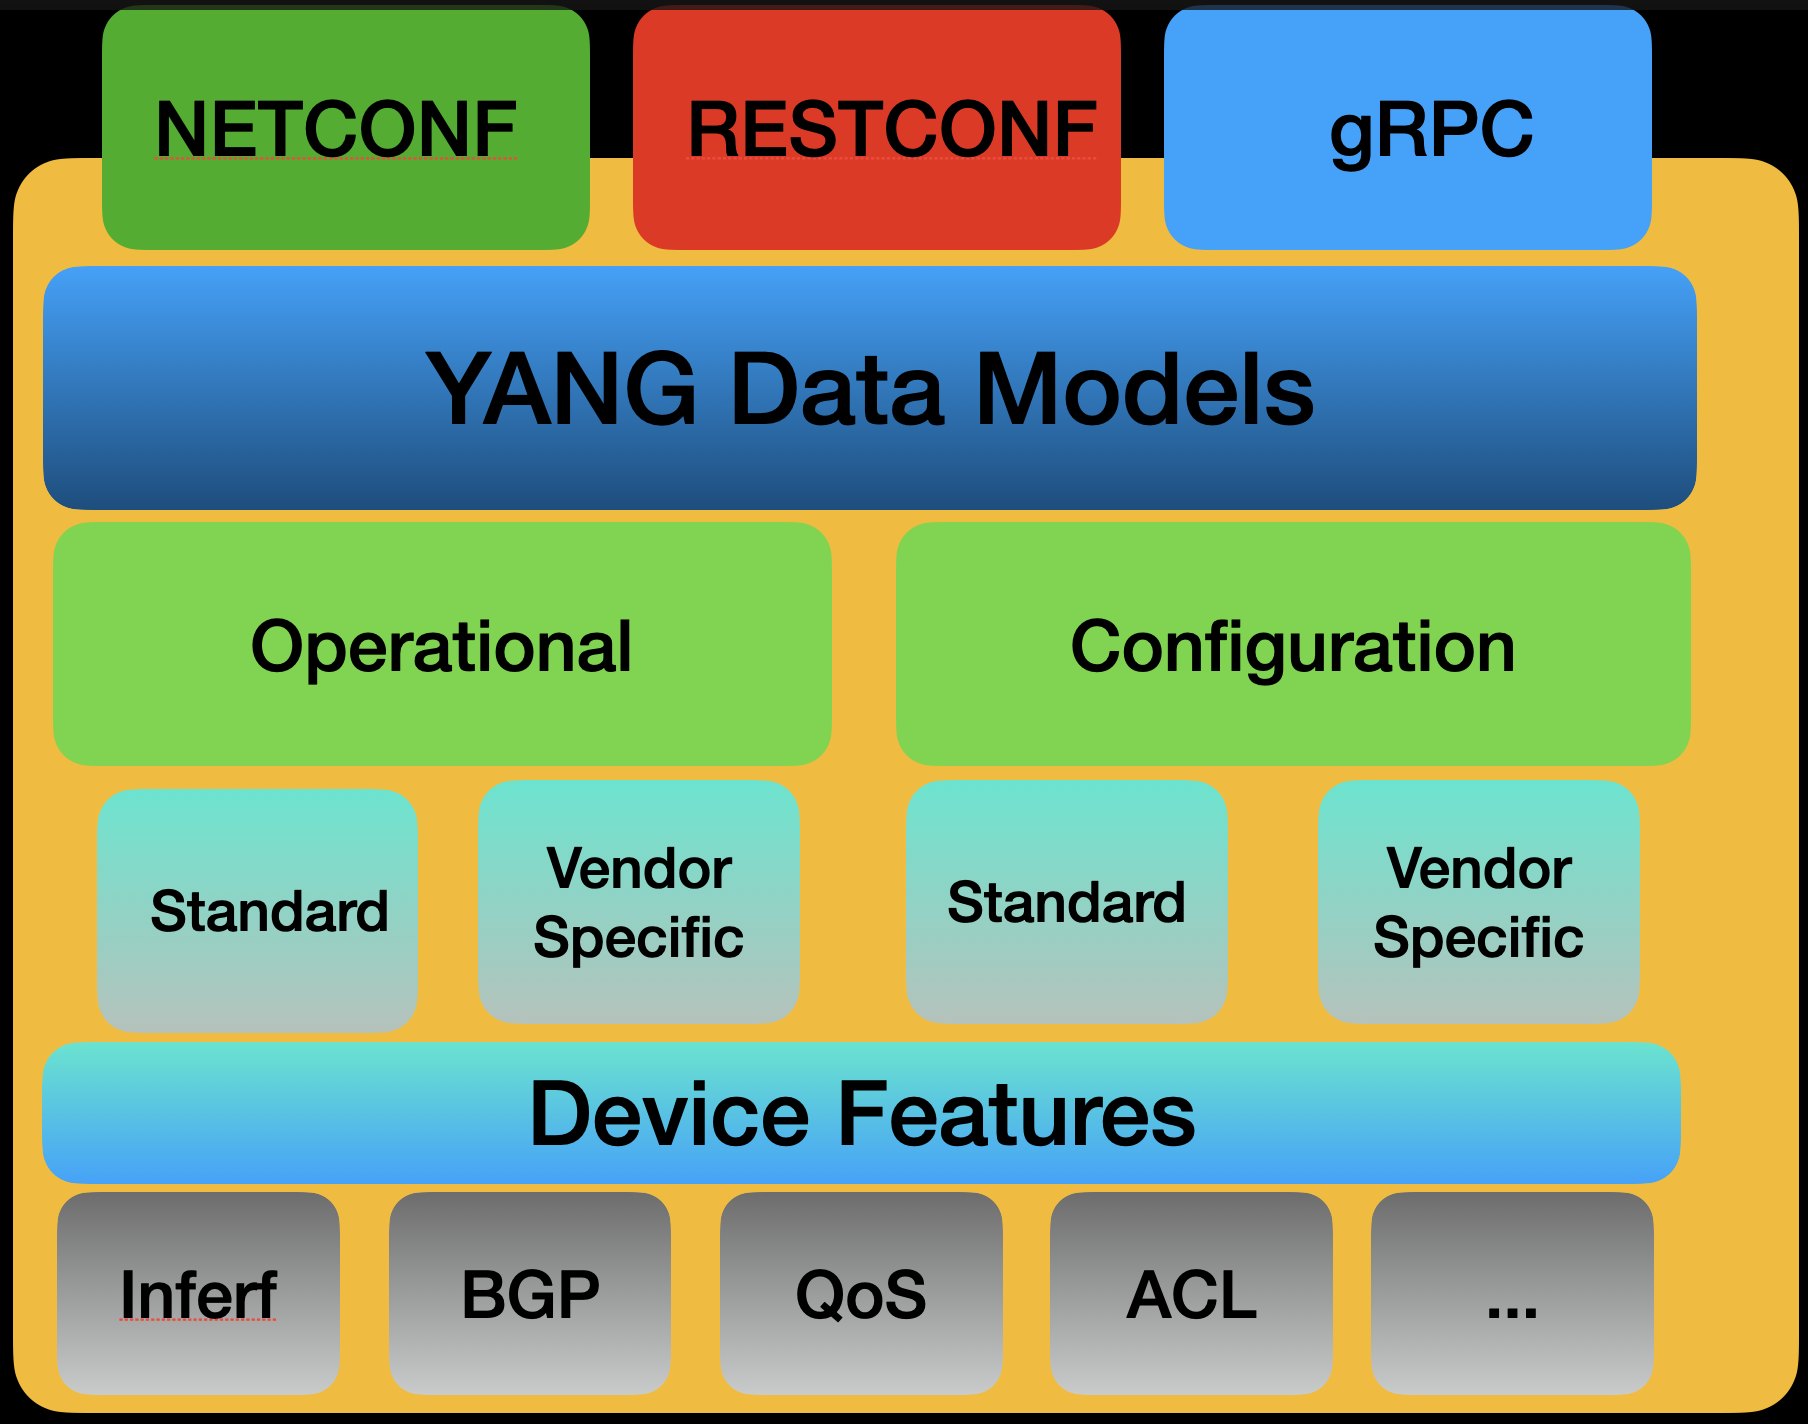
10 Restconf vs Netconf
Right off the bat it makes sense to distinguish between the two.
- RESTCONF is another, easier way to configure devices.
- NETCONF only used
xml. - RESTCONF can use both
xmlorjsondata formats. - RESTCONF works well with Postman, or REST client
- NETCONF will probably still stay for NMS systems, while
- RESTCONF will be best for network engineers, and web apps.
11 Resource
The API resource is the top-level resource located at +restconf. It supports the following media types:
Application/YANG-Data+XML OR Application/YANG-Data+JSON
The API resource contains the RESTCONF root resource for the RESTCONF DATASTORE and OPERATION resources. For example:
The client may then retrieve the top-level API resource, using the
root resource "/restconf".

   GET /restconf HTTP/1.1
   Host: example.com
   Accept: application/yang-data+json
The server might respond as follows:
HTTP/1.1 200 OK
Date: Thu, 26 Jan 2017 20:56:30 GMT
Server: example-server
Content-Type: application/yang-data+json

{
  "ietf-restconf:restconf" : {
    "data" : {},
    "operations" : {},
    "yang-library-version" : "2016-06-21"
  }
}
For more information, refer to RFC 3986
12 Using POSTMAN as RESTCONF manager to access device YANG model
12.1 Background
First of all, a little bit of overview w.r.t. NX-API. This was developed initially as a programmatic interface to the Nexus CLI, and as such used json-rpc with type cli or type cli-ascii, that could be in .xml format or .json format. The key to remember here is that it is STILL CLI.
When we talk RESTCONF it is no longer using CLI, but a programmatic access to the data model objects themselves. * much different * Anyway, back to to discussing RESTCONF:
12.2 RESTCONF
First set up environment varialbes that can be used repeatedly to access device insert graphic here.
Then we will build a RESTCONF get request to pull the capabilities from the device (as an example)
- GET
/restconf/data/netconf-state/capabilities - Add RESTCONF Headers Content-Type and Accept
application/yang-data+json - Configure Basic Auth with username and password variables.
First, get the address and credentials of devnet's Always On Sandbox for IOS XE search for Open NX-OS Programmability
Then set up your POSTMAN environment varialbes as shown here:
Nexus 9000v Host : sbx-nxos-mgmt.cisco.com SSH Port: 8181 NETCONF Port: 10000 NXAPI Ports: 80 (http) & 443 (HTTPS) RESTCONF Port : 443 (HTTPS) Credentials: Username: admin Password:
12.2.1 RESTCONF to NX-API-REST example
Will first have to get an authorization token.
12.2.2 First make a login post
NX-API REST uses a ticket (token) for authenticting API call. For us to use NX-API REST, we will have to first "login in". We still login using a Postman post, but we do the equivalent of a login page. That is:
POST to /api/aaaLogin.json with credentials to receive token. i.e. you will have to include a username and password to this post.
This is done only once, with the purpose of us getting a token, so that subsequent requests can use the token and bypass the user and password authentication.
POST /api/aaaLogin.json
Make this your PostMan body:
{
  "aaaUser": {
    "attributes": {
      "name": "{{username}}",
      "pwd": "{{password}}"
    }
  }
}
SEND this via postman and get the reponse, which should include 200 OK and a token.
Once we get the response we could copy that token and save it into our programs, but with Postman don't have to do that. That is because once logged in Postman will automatically include the token in subsequent requests as a session cookie.
- nice of Postman.
Actually to be more accurate, after the initial response that includes the token, Postman uses session cookies in subsequent exchanges, not the token everytime. Still automatic though.
13 RESTCONF and Python coding
Restconf is another, easier way to configure devices. As Netconf only used xml. Restconf can use both xml or json data formats. Restconf works well with Postman. and was developed by who?
Netconf will probably still stay for NMS systems, while Restconf will be best for network engineers, and web apps.
Lots of this information is gathered from the devnet course: Programming Basics
Also in this Learning Lab in DevNet.
See a sample python script using urllib3 that uses RESTCONF on a cisco router.
14 Preparing Cisco IOS for RESTCONF and NETCONF using AAA
NETCONF and RESTCONF connections must be authenticated using authentication,
authorization, and accounting (AAA). As a result, RADIUS or TACACS+ users
defined with privilege level 15 access are allowed access into the system.
aaa new-model
aaa group server radius ISE
server-private 172.25.73.76 key Cisco123
ip vrf forwarding Mgmt-intf
restconf
ip http secure-server
end

Device# show platform software yang-management process monitor
show netconf-yang sessions
show netconf-yang sessions details

show netconf-yang sessions
root:~# curl -i -k -X "OPTIONS" "https://10.85.116.30:443/restconf/data/Cisco-IOS-XE-native:native/logging/monitor/severity" > -H 'Accept: application/yang-data+json'
Device:~# curl -i -k -X "POST" "https://10.85.116.30:443/restconf/data/Cisco-IOS-XE-native:native/logging/monitor" \
>      -H 'Content-Type: application/yang-data+json' \
>      -H 'Accept: application/yang-data+json' \
>      -u 'admin:admin' \
>      -d $'{
>   "severity": "alerts"
> }'
15 Authentication oauth and oauth2
This is very similar to Radius I think. oauth allows a program to delegate authentication to another server.
15.1 OAuth 2.0 Roles
15.1.1 User
Wants access to an Application, and has credentials stored on the API (eg. Facebook)
15.1.2 Application
The server that wants to delegate authentiation to an API
15.1.3 API
The server that will run the authentication for you. (eg. Facebook)
15.2 OAuth 2.0 Workflow
From youtube:f

15.3 Application Registration
Before users can start using OAuth2.0 for an applicaiton, and independent of any user involvment, the application itself needs to register with the API server as a client of that service. The registration specifies the name of the applicaiton, the webesite, and the callback URL.
The API will send back a set of credentials to the application, that include a client ID that is public, and used to identify the application as an application, and a client secret which is a private identifier shared only between the application and the API.
The application uses this secret to authenitcate that it is the one asking for authentication to the API.
I, the application has to
15.4 Grant types
Four different types of grants are defined in OAuth2.0
- Authorization Code Grant (typical user asks for authorization) This is the most commonly used grant type for web servers asking to authorize a user.
- Implicit Grants
- Password Grants
- Client Credentials Grants
16 Cisco Documentation
The IOS XE programmability config guide have good Programmability Guides to see you through the basics.
17 Examples from DevNet Express course
deckofcardsapi.com publishes a free API interface to, you guessed it, "a deck of cards".
- Get a new deck of cards and record the unique id:
curl https://deckofcardsapi.com/api/deck/new/ - Optionally use Python's json tool to get nicer output:
curl https://deckofcardsapi.com/api/deck/new/ | python -m json.tool - Record the deck id Assume that it is dec40fca2d5
- you can draw from that deck with
curl https://deckofcardsapi.com/api/deck/dec40fca2d5/draw/?count=3 | python -m json.tool - you can shuffle that deck with
curl https://deckofcardsapi.com/api/deck/dec40fca2d5/shuffle/
(venv-xpress) Users/zintis/bin/devnet-express/dnav3-code[237] % Curl https://deckofcardsapi.com/api/deck/ez5ua9fkzrgt | python -m json.tool % Total % Received % Xferd Average Speed Time Time Time Current Dload Upload Total Spent Left Speed 100 80 0 80 0 0 233 0 –:–:– –:–:– –:–:– 233 { "deckid": "ez5ua9fkzrgt", "remaining": 52, "success": true, "shuffled": false } (venv-xpress) Users/zintis/bin/devnet-express/dnav3-code[238] % curl https://deckofcardsapi.com/api/deck/ez5ua9fkzrgt/shuffle {"deckid": "ez5ua9fkzrgt", "remaining": 52, "success": true, "shuffled": true}(venv-xpress) Users/zintis/bin/devnet-express/dnav3-code[239] % (venv-xpress) /Users/zintis/bin/devnet-express/dnav3-code[239] % curl https://deckofcardsapi.com/api/deck/ez5ua9fkzrgt | python -m json.tool % Total % Received % Xferd Average Speed Time Time Time Current Dload Upload Total Spent Left Speed 100 79 0 79 0 0 364 0 –:–:– –:–:– –:–:– 365 { "deckid": "ez5ua9fkzrgt", "remaining": 52, "success": true, "shuffled": true } (venv-xpress) /Users/zintis/bin/devnet-express/dnav3-code[240] %
needed bash for this next command, i.e. draw three cards from this deck:
__
~/bin/devnet-express/dnav3-code $> curl https://deckofcardsapi.com/api/deck/ez5ua9fkzrgt/draw/?count=3 | python -m json.tool
% Total % Received % Xferd Average Speed Time Time Time Current
Dload Upload Total Spent Left Speed
100 759 0 759 0 0 3358 0 –:–:– –:–:– –:–:– 3373
{
"deckid": "ez5ua9fkzrgt",
"cards": [
{
"value": "5",
"suit": "DIAMONDS",
"code": "5D",
"image": " ",
"images": {
"svg": "
",
"images": {
"svg": " ",
"png": ""
}
},
{
"value": "10",
"suit": "HEARTS",
"code": "0H",
"image": "
",
"png": ""
}
},
{
"value": "10",
"suit": "HEARTS",
"code": "0H",
"image": " ",
"images": {
"svg": "
",
"images": {
"svg": " ",
"png": ""
}
},
{
"value": "KING",
"suit": "SPADES",
"code": "KS",
"image": "
",
"png": ""
}
},
{
"value": "KING",
"suit": "SPADES",
"code": "KS",
"image": " ",
"images": {
"svg": "
",
"images": {
"svg": " ",
"png": ""
}
}
],
"remaining": 49,
"success": true
}
__
~/bin/devnet-express/dnav3-code $>
",
"png": ""
}
}
],
"remaining": 49,
"success": true
}
__
~/bin/devnet-express/dnav3-code $>
If I try this from tcsh it will NOT work unless I backslash the special character ? so:
curl https://deckofcardsapi.com/api/deck/ez5ua9fkzrgt/draw/\?count=3 | python -m json.tool
% Total % Received % Xferd Average Speed Time Time Time Current
Dload Upload Total Spent Left Speed
100 761 0 761 0 0 3461 0 –:–:– –:–:– –:–:– 3459
{
"deckid": "ez5ua9fkzrgt",
"cards": [
{
"value": "6",
"suit": "HEARTS",
"code": "6H",
"image": " ",
"images": {
"svg": "
",
"images": {
"svg": " ",
"png": ""
}
},
{
"value": "JACK",
"suit": "SPADES",
"code": "JS",
"image": "
",
"png": ""
}
},
{
"value": "JACK",
"suit": "SPADES",
"code": "JS",
"image": " ",
"images": {
"svg": "
",
"images": {
"svg": " ",
"png": ""
}
},
{
"value": "KING",
"suit": "DIAMONDS",
"code": "KD",
"image": "
",
"png": ""
}
},
{
"value": "KING",
"suit": "DIAMONDS",
"code": "KD",
"image": " ",
"images": {
"svg": "
",
"images": {
"svg": " ",
"png": ""
}
}
],
"remaining": 46,
"success": true
}
(venv-xpress) /Users/zintis/bin/devnet-express/dnav3-code[250] %
",
"png": ""
}
}
],
"remaining": 46,
"success": true
}
(venv-xpress) /Users/zintis/bin/devnet-express/dnav3-code[250] %
curl https://api.ciscospark.com/v1/messages -X POST -H "Authorization:Bearer YjdhZmQ2OWItMDIzZi00ZGY3LWJkNzQtNGNkNTg2ODJlNDA1YzdhMmIwNTYtNDZlPF841eb65fdf-9643-417f-9974-ad72cae0e10f" –data "toPersonEmail=zperkons@cisco.com" –data "text=Hi%20from%20DevNet"
curl https://api.ciscospark.com/v1/messages -X POST -H "Authorization:Bearer NTA0OGYwYzAtMzc3NS00OWM1LTg2ZTAtODM5ZmQ0N2MxYWUwNGMyN2NjMDQtOWEzPF841eb65fdf-9643-417f-9974-ad72cae0e10f" –data "toPersonEmail=zperkons@cisco.com" –data "text=Hi%20from%20DevNet" curl https://api.ciscospark.com/v1/messages -X POST -H "Authorization:Bearer NTA0OGYwYzAtMzc3NS00OWM1LTg2ZTAtODM5ZmQ0N2MxYWUwNGMyN2NjMDQtOWEzPF841eb65fdf-9643-417f-9974-ad72cae0e10f" –data "toPersonEmail=zperkons@cisco.com" –data "text=Hi%20from%20DevNet"
Into Postman
https://deckofcardsapi.com/api/deck/new/shuffle/?deck_count=1 https://deckofcardsapi.com/api/deck/ez5ua9fkzrgt/shuffle/?deck_count=1
ez5ua9fkzrgt
ez5ua9fkzrgt
https://deckofcardsapi.com/api/deck/ez5ua9fkzrgt/shuffle/draw/?count=3
Example URI Construction Consider the ietf-interfaces model, partially presented below.
module: ietf-interfaces +–rw interfaces
| +–rw interface* [name] |
| +–rw name string |
| +–rw description? string |
| +–rw type identityref |
| +–rw enabled? boolean |
| +–rw link-up-down-trap-enable? enumeration {if-mib}? |
So, using model details, you can construct the URIs for RESTCONF requests.
List of Interfaces:
https://<ADDRESS>/restconf/data/ietf-interfaces:interfaces
Example curl command A Specific Interface:
http://<ADDRESS>/restconf/data/ietf-interfaces:interfaces/interface=<INTERFACE NAME>
Example curl command Just the name and description Fields:
http://<ADDRESS>/restconf/data/ietf-interfaces:interfaces/interface=<INTERFACE NAME>?fields=name&fields=description
Example curl command