My Personal Notes on NX-API
1 NX-API
NX-OS was designed from the ground up to be programmable. Therefore, NX-API was
built in to the nexus switches. NX-API is key to how ACI accesses and
configures Nexus switches, but can also be utilized through custom programs
via NX-API.
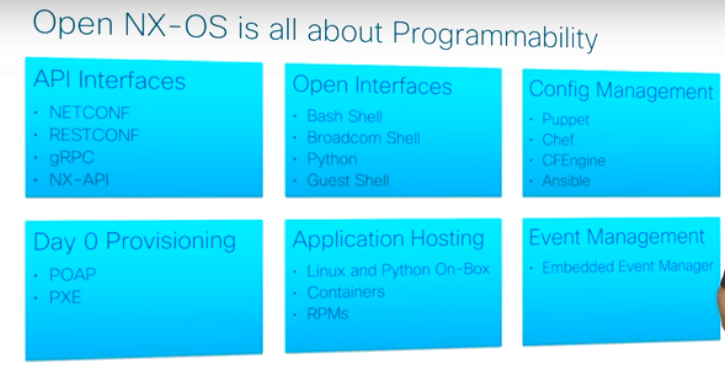
1.1 NX-OS Programmability
Designed from the ground up to be programmable, Nexus NX-OS allows for programmatic access, for increased scale, agility and efficiency.

1.1.1 Day Zero Provisioning
Day 0 provisioning: Zero-touch device provisioning has been available on network devices for years.
POAP was designed to provide advanced Day 0 provisioning capabilities using
an extensible framework. POAP includes the ability to execute Python scripts
as part of its workflow.
Today, POAP can download and install additional management agents and apply specific configurations that are based on information such as location in a network topology.
A similar approach is achieved by using Preboot Execution Environment (PXE). PXE has extended its presence into the network as infrastructure devices are increasingly managed more like servers. Cisco NX-OS uses iPXE, which utilizes an open source network firmware that is based on gPXE/Etherboot.
1.1.2 Base features of Nexus programmability
- traditional SNMP support
- The Python interpreter
- Python scripting capability on devices to provide programmatic access to
the switch CLI to perform various tasks including:
- POAP actions
- EEM actions.
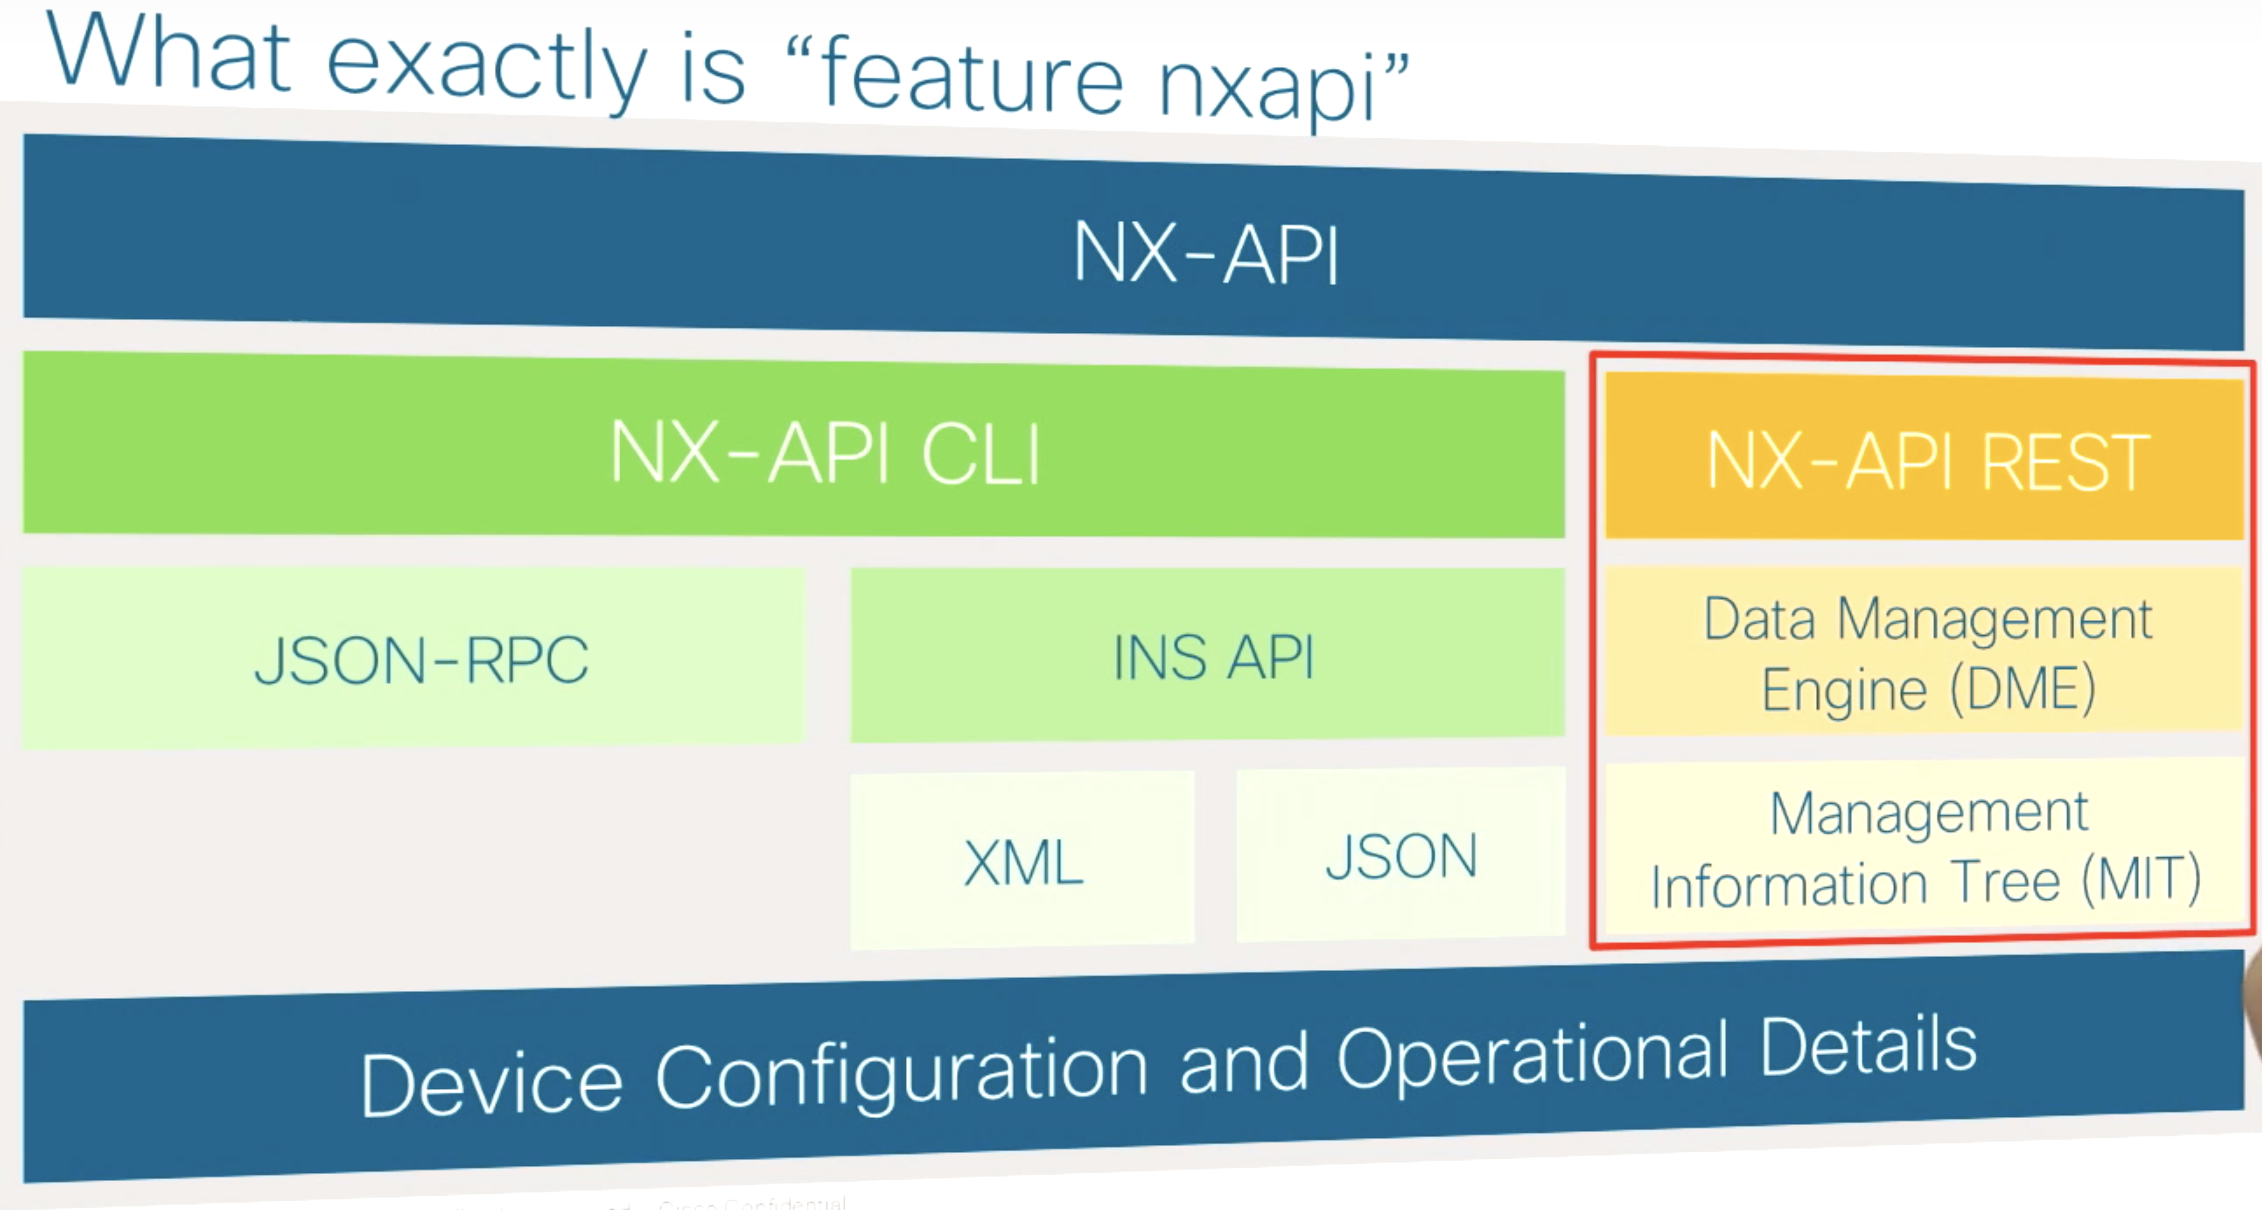
1.1.3 APIs
built-in web server to repond to HTTP callsNETCONFNX-APICLI
1.1.4 Lnux on the switch
- Cisco Nexus switches* based upon a Linux foundation from day 1 and so have:
- native Linux Bourne Again Shell (
Bash), but today Linux guest shellwhich is a separate Linux environment running on the switch inside a container, utilizing a CentOS distribution,guest shellhas the ability tosecurely run third-party applicationsthat monitor and control the switch.
- native Linux Bourne Again Shell (
1.1.5 Configuration management:
Cisco NX-OS incorporates a set of tools, features, and capabilities that enable automation. Modern configuration management tools like:
Puppet,Chef, andAnsible
to drive programmability.
2 Setting the Nexus switch
2.1 Turning on NX-API
configure any Nexus switch with the command:
feature nx-api
This turns on the feature. It includes:
NX-API CLI: opens up and API that still uses the familiar CLI commands Uses either of two options,JSON-RPCorINS-RPC
2.1.1 Other features you will want to turn on: (typically)
- ~feaeture nx-api ~
feaeture bash-shellfeaeture netconffeaeture restconffeaeture grpcfeaeture interface vlan # %%feaeture nx-api%% this enables SVIs which are good when you are learning and you don't actually have a real switch. (can be used on a real switch too of course..)
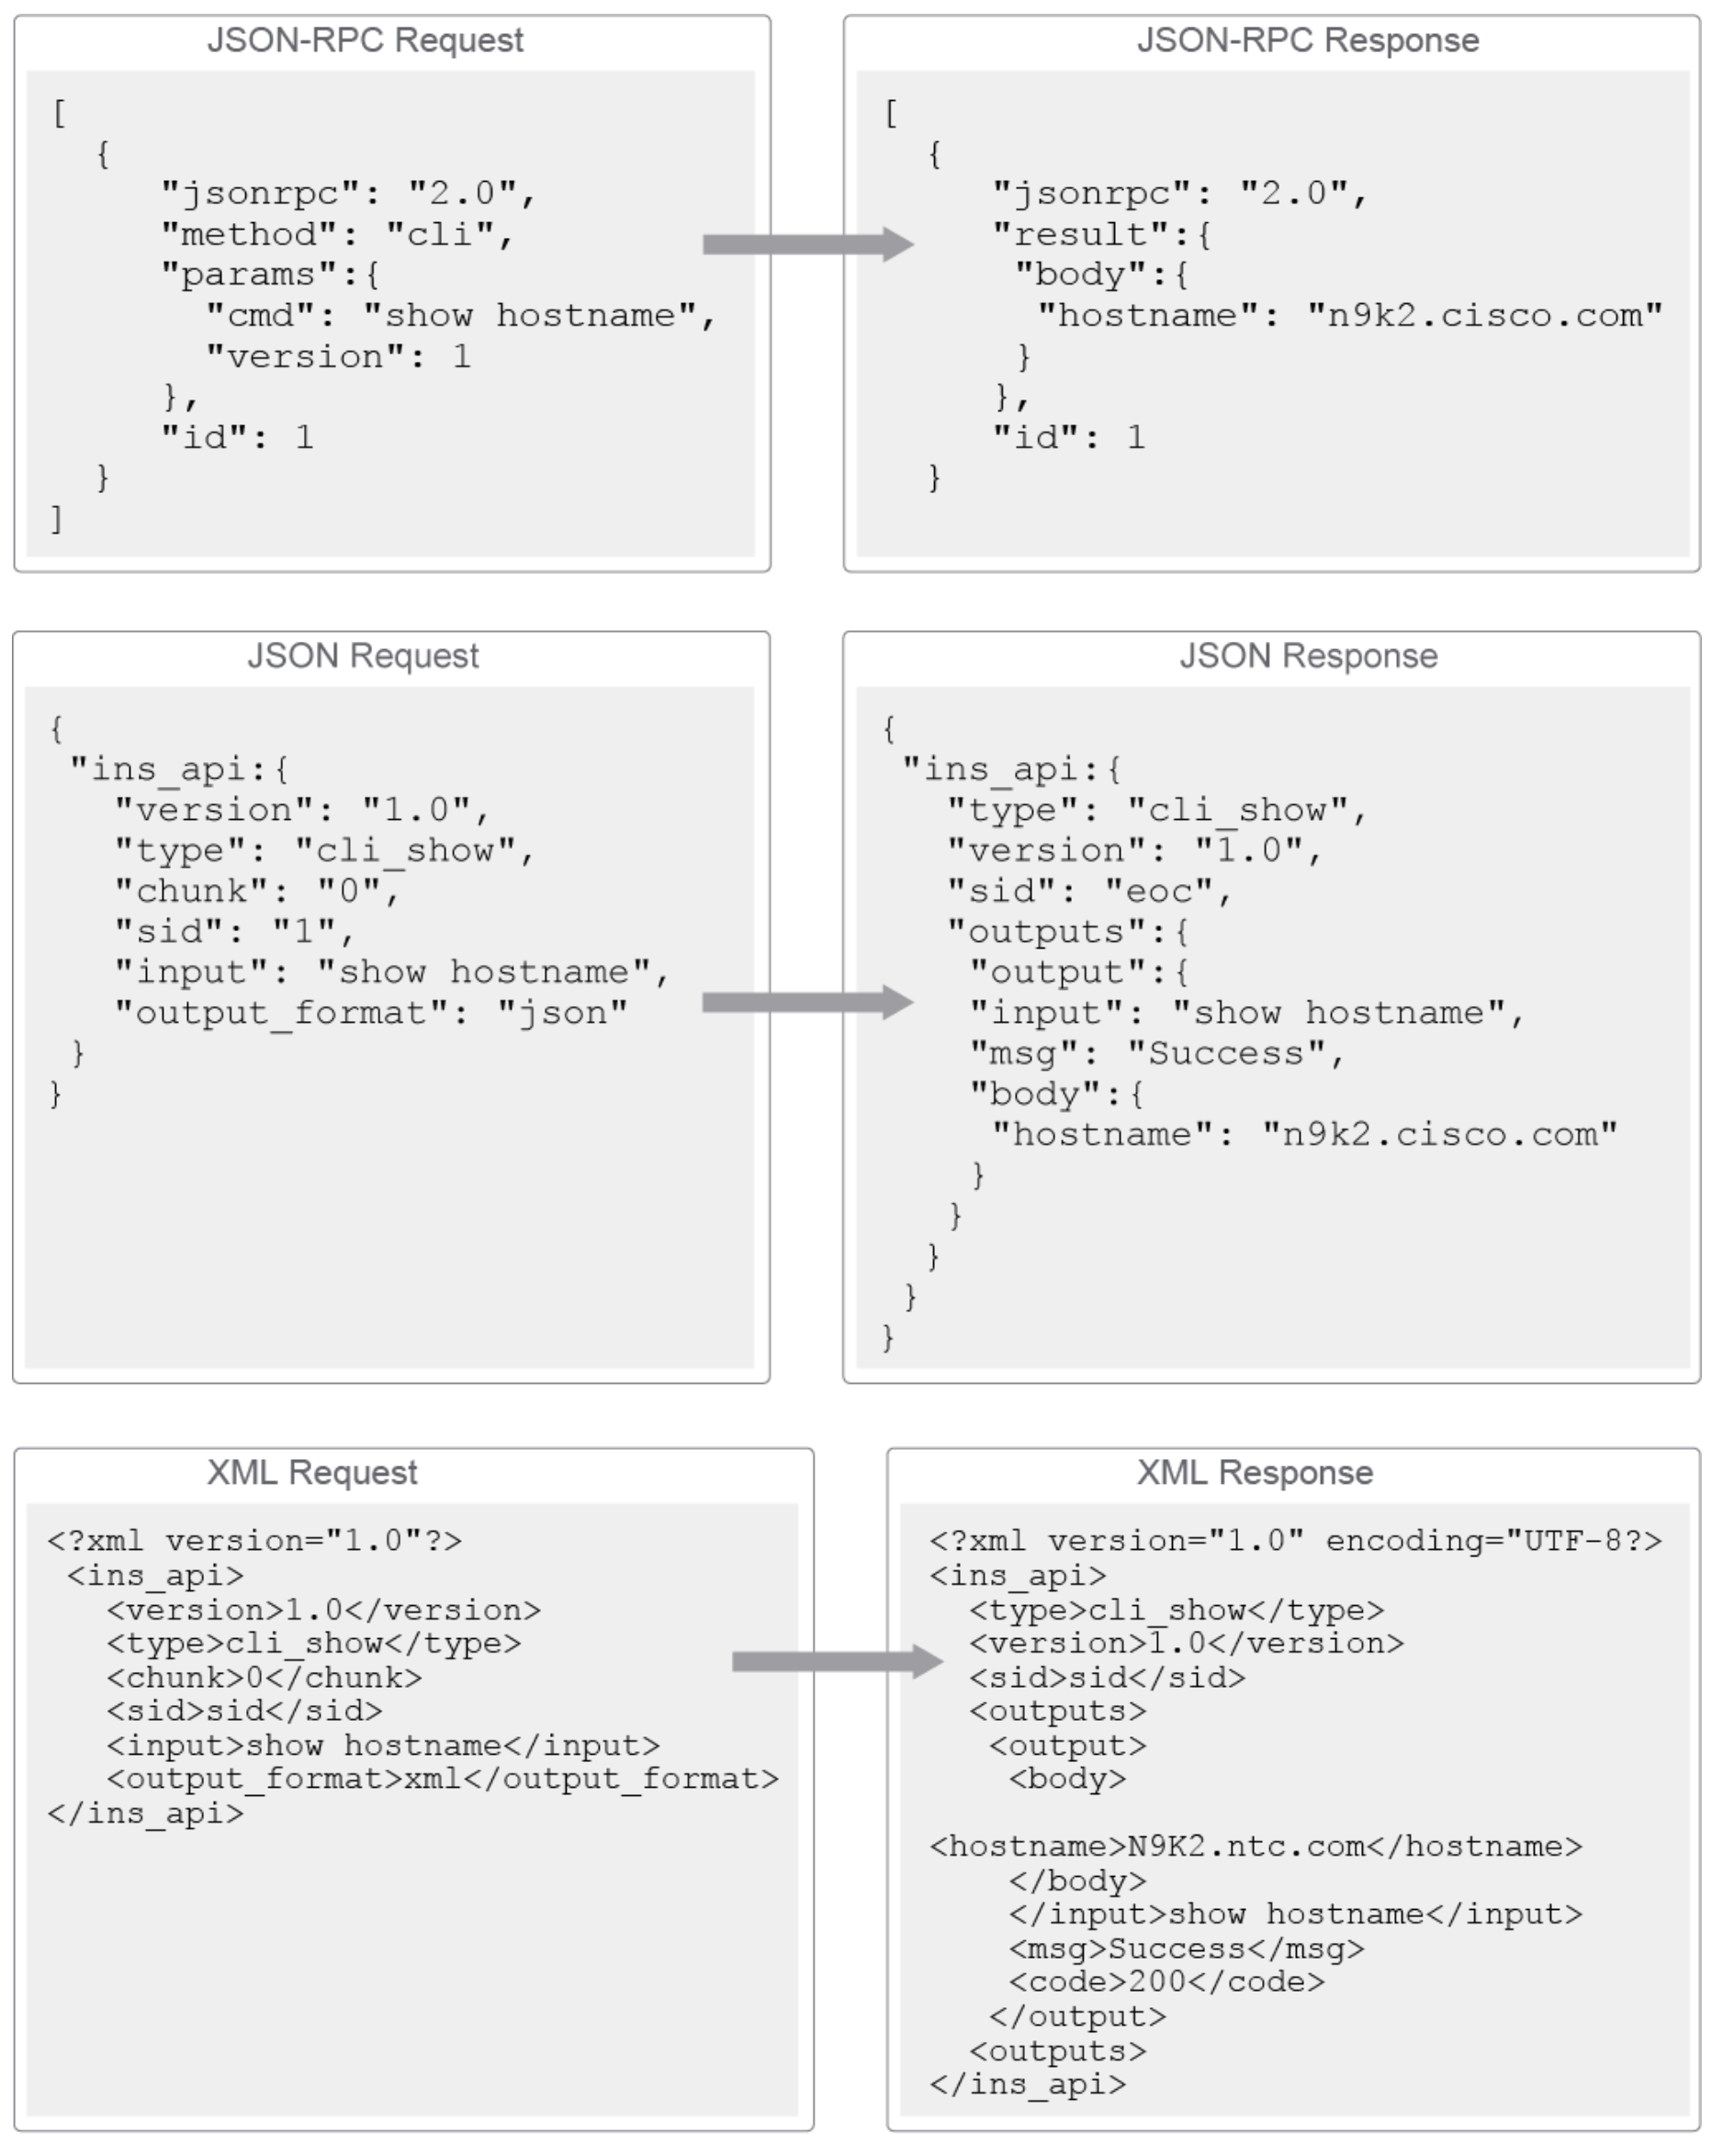
2.1.2 JSON-RPC :
standard protocol for procedure call support (lightweight)
can run over HTTP, but is NOT a REST API.
defines the REQUEST and RESONSE format only for sending
communication from one device to another.
_Can send CLI commands_.
Request:
[
  {
    "jsonrpc": "2.0",
    "method": "cli",
    "params": {
      "cmd": "show ip int brief vrf management",
      "version": 1
      },
    "id": 1
   }
 ]
This example had "method": "cli" which returns nice structured
data, jsonrpc data. This format is the easiest way for
programs to consume it.
The other option is "cli-ascii" which would return a more
traditional, human readable cli output, as one raw string. Some
older "screen scraping" scripts may want this type of output.
Response
{
  "jsonrpc": "2.0",
  "result": {
   "body": {
    "TABLE_intf": {
     "ROW_intf": {
      "intf-name": "mgmt0",
      "prefix": "10.10.20.58",
      "ip-disabled": "FALSE",
      "iod": 2,
      "proto-state": "up",
      "link-state": "up",
      "admin-state": "up"
      }
     }
    }
   }
   "id": 1
  }
2.1.3 INS API
Alternative CLI based API, that provides distinct "show" and "config" methods. Because this was developed by and for Cisco, it provides somewhat enhanced output, better error messages with better data than the standards based JSON-RPC. Features:
- send "show" and "config" commands
- send bash commands directly to your router, not just cli commands,
- supports either format:
- XML
- JSON
Requst:
{
  "ins_api": {
   "version": "1.0",
   "type": "cli_show",
   "chunk": "0",
   "sid", "1",
   "input": "show ip int brief vrf management",
   "output_format": "json"
   }
 }
Now, very much like json above;
This example had "type": "cli_show" which returns nice structured
data, jsonrpc data. This format is the easiest way for
programs to consume it.
The other option is "cli_show_ascii" which would return a more
traditional, human readable cli output, as one raw string. Some
older "screen scraping" scripts may want this type of output.
Zintis, don't use this, because you'd be back at parsing the output to get it into a python format, such as a dictionary. Best to just stick to clishow type, as that will return proper json formatted responses that with which you can utilized standard library json.read modules to ingest that data into a python object.
Note, that INSAPI also gives 2 more modes, one is "cli_conf"
It is used for sending configuration.
Show commands also would work.
The last is bash, which is good for sending underlying bash
commands to the switch. This mode would require you to enable
bash mode on the switch ahead of time, with feature bash
Response:
{"ins_api": {
  "type": "cli_show", "version": "10",
    "sid": "eoc",
  "outputs":{
   "output":{
    "input": "show ipo int brief vrf management",
    "msg": "Success",
    "code": "200",
    "body": {
      TABLE_intf": {
       "ROW_intf": {
	"int-name": "mgmt0",
	"prefix": "10.10.20.58",
	"proto-state": "up",
	"link-state": "up",
	"admin-state": "up"
	}}
      "TABLE_vrf": {
       "ROW_vrf": {
	"vrf-name-out": "management"
}}}}}}}
2.1.4 NX-API REST
This is a full REST API with access to the underlying data model.
It runs NOT as a simple programming interface to the CLI,
but as a true API that works with the yang data model itself
That is why you don't get many functioning CLI outputs when using the NX-API developer sandbox to try CLI commands. (remember that is just browsing to the switch, and not visore)
- RPC-style web API
- enable programmatic access to Nexus devices
- improves accessibility of the CLI by making them available off-box
- supports show commands, configurations, and Linux Bash.
NX-API improves the accessibility of these CLIs by making them available
outside of the switch by using HTTP and HTTPS. You can use the NX-API as an
extension to the existing Cisco Nexus CLI. The NX-API CLI API is great for
network engineers getting started with the API because it still makes use of
commands. It sends commands to the device, wrapped in HTTP and HTTPS, but
receives structured data back. You have the ability to send
- show commands
- config commands
- Linux commands
directly to the switches using the NX-API CLI
- Runs on
HTTP and HTTPS transport CLI commandsare encoded into the HTTP/HTTPS POST body- The
request/response formatis encoded with JSON-RPC, JSON, or XML NGINX HTTP back-end web serverto listen for HTTP requests
NX-API CLI example
{
  "jsonrpc": "2.0",
  "method": "cli",
  "params": {
    "cmd": "show hostname",
    "version": 1
  },
  "id": 1
}
Matching response
{
  "jsonrpc": "2.0",
  "result": {
    "body": {
      "hostname": “n9k2.cisco.com"
    }
  },
  "id": 1
}
The NGINX runs in a cgroup, so has full protection from processes on the switch, and vice-versa.
2.2 Turning on NX-API Developer Sandbox
"Feature NX-API" also turns on the developer sandbox on the switch which is easily accessible by simply browsing to the mgt ip addr of the switch.
This is a quick-and-dirty way to compose your NX-API CLI commands It can be used for NX-API REST commands too, but there are better ways.
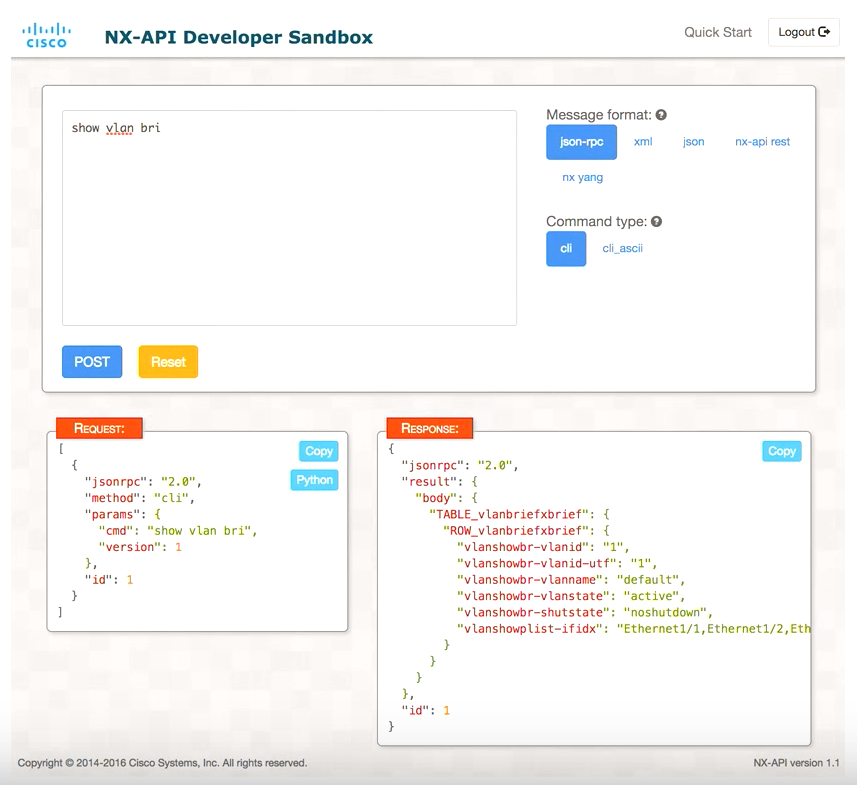
Best to try it live with the NX-API Developer Sandbox admin/Admin1234!
Things to try: show ip interface brief, or show ip route
The always on sandox is available on the devnetsandbox site
2.3 Using NX-API to seed code for a Python Script
One of the options in NX-API, is to generagte python code for the entered NX-API code. Just like generating XML output or JSON output, clicking "Copy to Python". - when I tried, the Sandbox needed Flash, and my browser gave me an error "Flash is not available in the browser"
3 Developer Sandbox to Postman Prep Steps.
Key to starting this is pointing the POSTMAN to URL Target:
- http(s)://<device>/ins
3.1 Headers to Use:
- Content-Type: application/json-rpc
- Content-Type: application/json
- Content-Type: application/xml
Method
- POST (will always be POST whether retrieving data or sending data )
Authentication
- Basic
- Session Cookie
- Setting up POSTMAN for NX-INS
POST http://<host>/ins
3.1.1 Finished adding here around 14:00 min into part1 NX-API
4 Part 2 NX-API, diving into the Nexus Object Module,
4.1 Objects, not CLI
Using native REST access to YANG data models is much more structured and hence much better suited to programmability and automtation. So in place of NX-API CLI, and NX-API INS, we will be looking at NX-API REST here.
This is a true REST API that deals in "resources" (aka objects). These objects have properties and methods.
Much more powerful than NX-API CLI, although has a steeper learning curve.
4.2 The Data Managment Engine, DME
First remember that you need the NX-API feature if not already done.
feature nx-api
- Provides API access to the Management Tree
- Northbound
- NX-API REST
- CLI
- JSON-RPC
- etc
- Southbound
- NX-OS Processes.
4.3 The Data Management Information Tree (MIT)
The MIT, is an assembly of all the objects that NXOS is made up of.
Every Object has a Class that is identified by Type Every Child has a Parent, but a Parent can have many Children
Objects have 2 names:
- Relative Name (RN)
- identify objet related to 'siblings'
- Unique only within a parent object
- Distinguished Name (DN)
- Unique identification within the MIT
- Series of Relative Names building to "sys"
| Object | Example RN | Example DN | Class |
|---|---|---|---|
| System | sys | sys | |
| Interface List | intf | sys/int | interface Entity |
| Physical Interface | phys-[eth1/1] | sys/intf/phys-[eth1/1] | l1PhysIf |
| VLAN List | bd | sys/bd | bdEntity |
| VLAN | bd-[vlan1] | sys/bed/bd-[vlan-1] | l2BD |
| IPv4 VRF | dom-green | sys/ipv4/inst/dom-green | ipv4Dom |
| IPv4 Interface | if-[eth1/1] | sys/ipv4/inst/dom-green/if-[eth1/1] | ipv4If |
| IPv4 Address | addr-[192.16.0.1] | sys/ipv4/inst/dom-green \ | ipv4Addr |
| /if-[eth1/1]/addr-[192.168.0.1] |
Full open NX-OS model reference is on DevNet And the object store browser is on every nxos device, as https://<ip-addr>/visore.html, as long as feature nx-api is turned on, that is.
https://sbx-nxos-mgmt.cisco.com/visore.html
Don't confuse that with the straight NX-API interface which is the same URI but no "visore"
4.4 Exploring Visore (Italian for "viewer")
This is another tool that can be used to explore the NXOS management objects. It comes with every Nexus switch! It is enabled by default on Nexus switches when you turn on the feature NX-API. It is a Rest API object browser tool
The whole purpose is to allow users to find what objects are available and how to construct the URI of the management objects so that they can be programatically managed, via Python, or Postman etc.
Visore supports querying individual objects by Distinguished Name, (DN) or by class.
https://<switch ip>/visore.html or example
Best to access Visore, and try these DN objects:
- DN : l2BD with Property id != val1 1 # find all VLANS that aren't VLAN1
- DN sys/intf/phys-[eth1/1] # find a specific ethernet by full DN
- DN l2BD, Property ID, Op ==, Value 102 # show me vlan 102
You can navigate the tree by clicking the small green arrows under the dn eg.
< >
After searching for a Class, you will get multiple windows back, one for each
entry in the Class.
You can navigate the tree with the green arrows, for parent or child object The whole point of using Visore is to easily get the URI that you can then use in your coding, either straight python coding, or for example Postman. See below on Visor and Postman.
Here are a bunch of screen shots.
4.4.1 NX-API-REST (combine with other NX-API-REST concepts
First off, it is for Nexus 3K and Nexus 9K (others don't yet have the RESTful API ) Also, realize that this is NOT for CLI, but rather for direct interactions with the underlying switch object models. Don't expect "show ip int brief" here.
4.5 Using Postman with DME.
From the Netconf.org document we listed the RESTCONF URI construct:
4.6 Constructing RESTCONF URIs
https://<addr>/<root>/<data store>/<[yang module:]container>/<leaf>/?<optoins>/
- addr : addres of the restconf agent
- root : The main entry point for restconf requests typically just "restconf" (discoverable at https://<addr>/.well-known/host-meta)
- data store : the data store being queried
- yang module:]container : The bse model container being used. Providing the modiule name is optional
- leaf : An individual element from within the container
- ?<options> : optional parameters that impact returned results. for example ">depth=2"
4.7 Compare that to NX-API REST URI Construction
https://<ADDRESS>/api/<QUERY TYPE>/<IDENTIFIER>.<FORMAT>[?<QUERY PARAMS>]
- api : The main entry point for NX-API REST requests
- QUERY TYPE : class = Query and return all instances of a given class mo = Target a specific instance of an object from the MIT mo is "managed object"
- IDENTIFIER : Class Name or Distinguished Name
- FORMAT : Identify XML or JSON as type of content (used instead of HTTP Headers)
- [?<QUERY PARAMS>] - optional parameters that impact returned results eg: query-target : Return Scope (self, children, sub-tree) "do we want to see a particular object, or part of a subtree?" query-target-filter : Limit returned objectws for Class Queries
4.7.1 NX-API-REST is also available with feature nx-api
Everything in REST API lives in a tree. the root of the tree is called SYS
Use Visore to explore that.
NX-API-REST was built to mimick the Cisco ACI construct. That is why you don't see "vlan" objects but they are called "layer 2 bridge domain" l2BD
4.8 POSTMAN
Again supply host, username and password, but NX-API REST has a different approach from Netconf.
4.8.1 First make a login post
NX-API REST uses a ticket (token) for authenticting API call. For us to use NX-API REST, we will have to first "login in". We still login using a Postman post, but we do that do the equivalent of a login page. That is:
POST to /api/aaaLogin.json with credentials to receive token. i.e. you will have to include a username and password to this post.
This is done only once, with the purpose of us getting a token, so that subsequent requests can use the token and in a way bypass the authentication
POST /api/aaaLogin.json
Make this your PostMan body:
{
    "aaaUser": {
      "attributes": {
	    "name": "{{username}}",
	    "pwd": "{{password}}"
	    }
    }
}
Please note that the {{ }} are Postman's variables. These variables are set through the upper right environment settings. They are saved in collections too.
SEND this via postman and get the reponse, which should include 200 OK and a token.
Once we get the response we could copy that token and save it into our programs, but with Postman don't have to do that. That is because once logged in Postman will automatically include the token in subsequent requests as a session cookie.
- nice of Postman.
Actually to be more accurate, after the initial response that includes the token, Postman uses session cookies in subsequent exchanges, not the token everytime. Still automatic though. (peek under the cookies tab in the return maybe…. )
4.8.2 Using Visor and Postman to Make a class query for VLANs (l2BD)
This is how you can use two tools together, VISORE and POSTMAN
- Visore
Remember that https://<switch ip>/visore.html is the URI to use: For the always on sandbox it is: https://sbx-nxos-mgmt.cisco.com/visore.html
- Postmam
Once you find the URI, for example: URI is
/api/node/mo/sys/bd/bd-[vlan-102].xml?query-target=childrenYou can paste that into the Postman request to then see the response with all the options to create Python code for the request etch.Once we see the response details, we will see that by default it comes back in xml format (because we used visore to get it)
So we can alter how Postman gets the response by changing .xml to .json
4.8.3 Excellent 1 hr long overview
From youtube, with an interview with Hank Preston here on youtube
4.8.4 Note that the EXACT same uri can be used with a GET as with a PUT.
It is the method that will dictate if you are reading information (GET) or updating/writing information (PUT or POST)
5 Using NX-API with the Sandbox Swtich
As mentioned above, the always on sandbox switche is: NX-API Developer Sandbox admin/Admin1234!
Once logged in, you enter some commands, do the post, and copy the python code. Off the sandbox switch I did that and copied this python code. - note, my flash settings on Chrome were giving me grief, so I enabled flash on Safari and that worked like a charm.
import requests
import json

"""
Modify these please
"""
url='http://YOURIP/ins'
switchuser='USERID'
switchpassword='PASSWORD'

myheaders={'content-type':'application/json-rpc'}
payload=[
  {
    "jsonrpc": "2.0",
    "method": "cli",
    "params": {
      "cmd": "show ip interface brief",
      "version": 1
    },
    "id": 1
  }
]

response = requests.post(url,data=json.dumps(payload), headers=myheaders,auth=(switchuser,switchpassword)).json()