Practical netconf-yang example using Devnet sandboxes
1 MDP Model Driven Programmability
RFC3535 lays out all the ways in which Network Mgt the traditional, SNMP way failed, and specifies the fixed approach which is YANG, a.k.a. SNMPv4
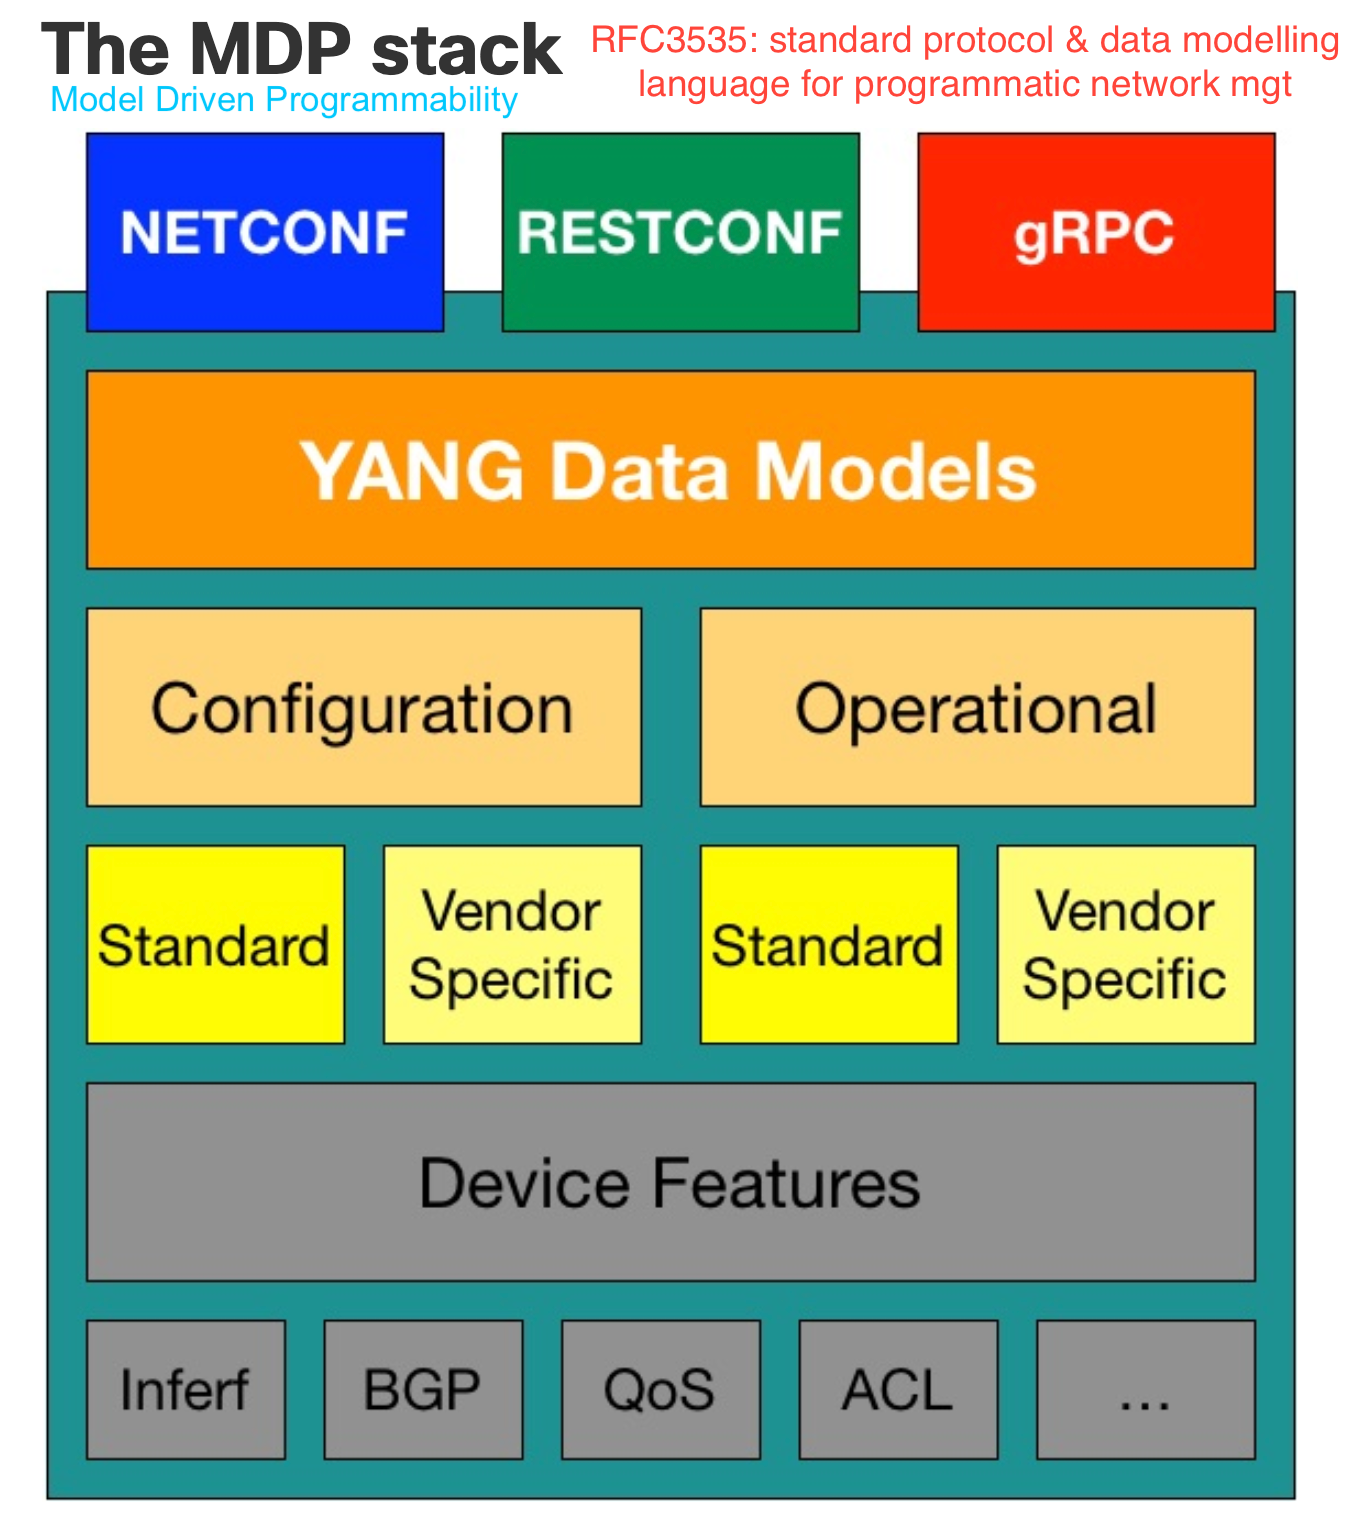
2 MDP Data Models
- models describe
whatis the content, nothowit is exchanged - models are not used to exchange data. That is up to
NETCONFandRESTCONFwhich sendJSONorXMLencoded documentsthat are governed by a given model.
2.1 APIs do the following:
- provide efficient and easy to use tooling for consumption. i.e. (programming libraries)
- support extensible and open interfaces (REST-based, NETCONF, and others)
- support different
encoding formatssuch as XML and JSON - support different transports, such as
SSH,HTTP,HTTPS
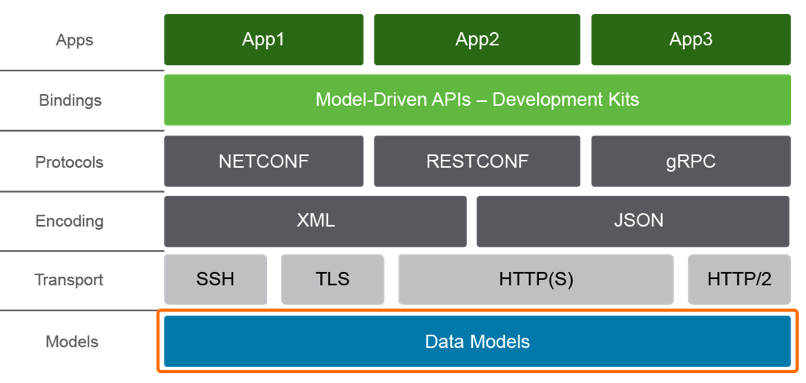
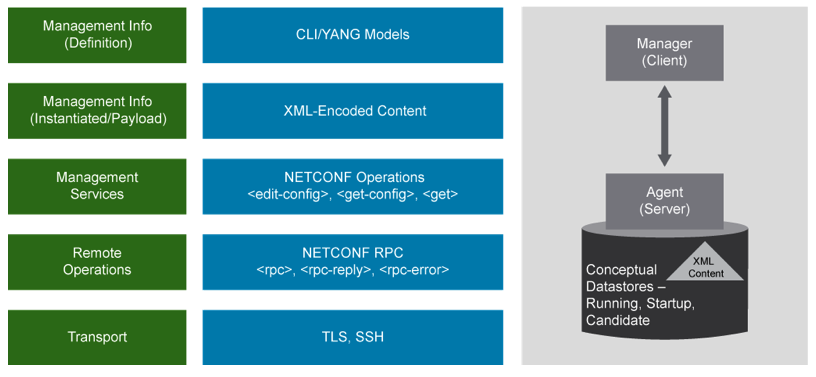
Therefore the *core components of the complete device API includes:
2.1.1 Data models
The foundation of the API consists of data models. the models define the syntax and semantics, including what constraints exist within this API. Data models present everything as structure data, doing away with screen scraping for good.
2.1.2 Transport
Model-driven APIs support one or more transport methods; SSH, TLS, and HTTP
or HTTPS
2.1.3 Encoding
Model-driven APIs support the choice of encoding, including XML and JSON,
and custom encodings such has Google protocol buffers
2.1.4 Protocols
Model-driven APIs support multiple options for protocols, usually NETCONF,
or RESTCONF or gRPC (gNMI)
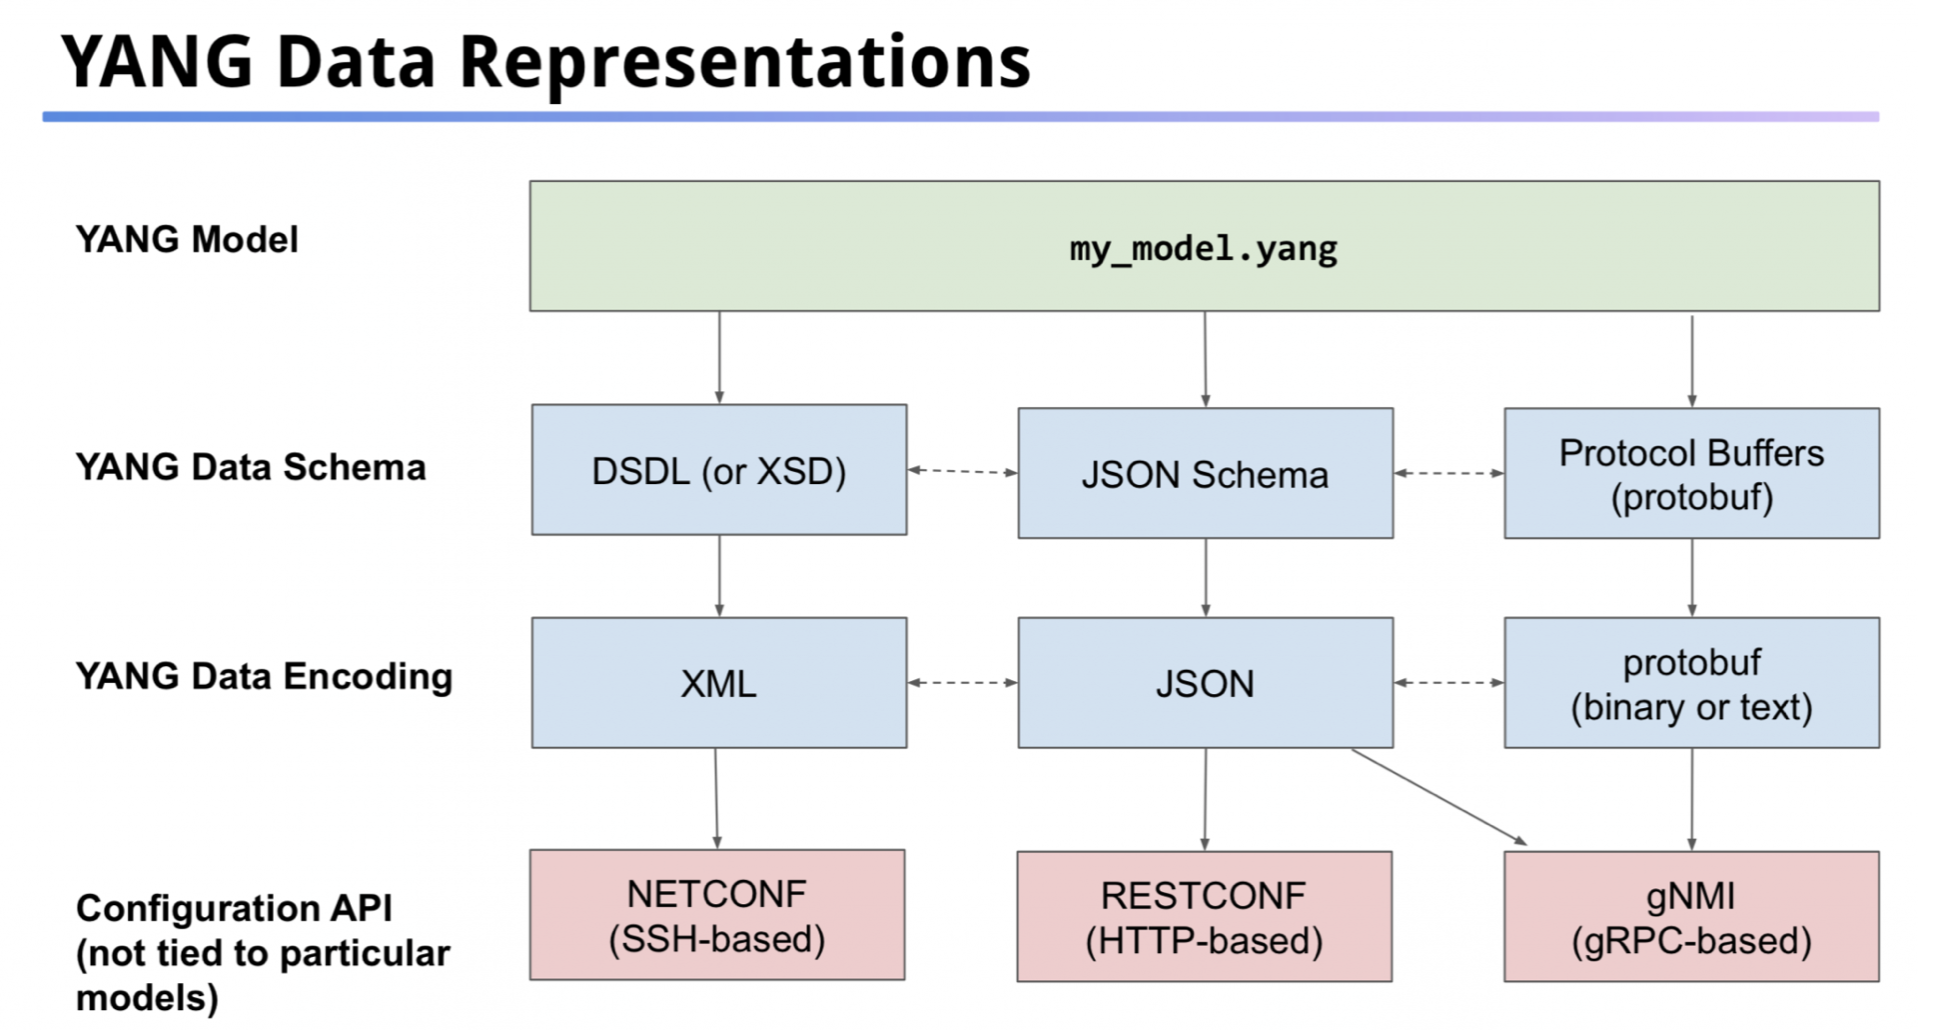
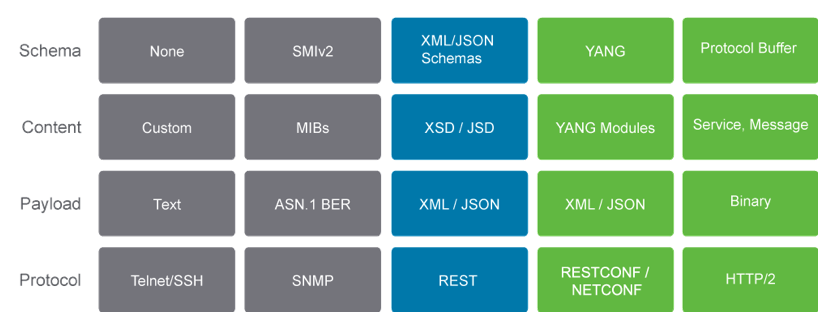
Comparing XML, JSON, Protobuf
| XML | JSON | Protobuf |
|---|---|---|
| Human friendly | Human friendly | binary |
| NETCONF | RESTCONF / REST API | gNMI |
| usable without | usable without | requires |
| schema | schema | schema |
| Text | Text | Binary |
| Sparse output | Sparse output | very dense output |
| Additional | Additional | fast processing |
| processing overhead | processing overhead |
From cisco training:
"Behind the scenes different protocols using various encodings and transports
may be used to exchange data but the application does not need to concern
itself with that. It only needs to operate on the data models. Likewise, the
API server uses the same model, regardless of the protocol, allowing the
server to support as many protocols as required."
2.1.5 XML and JSON as encodings because:
- human readable, and self describing
- hierarchical (store values within values)
- /parsable and used by many programming languages.
You could also use GPB as encodings but they are binary, so not human readable
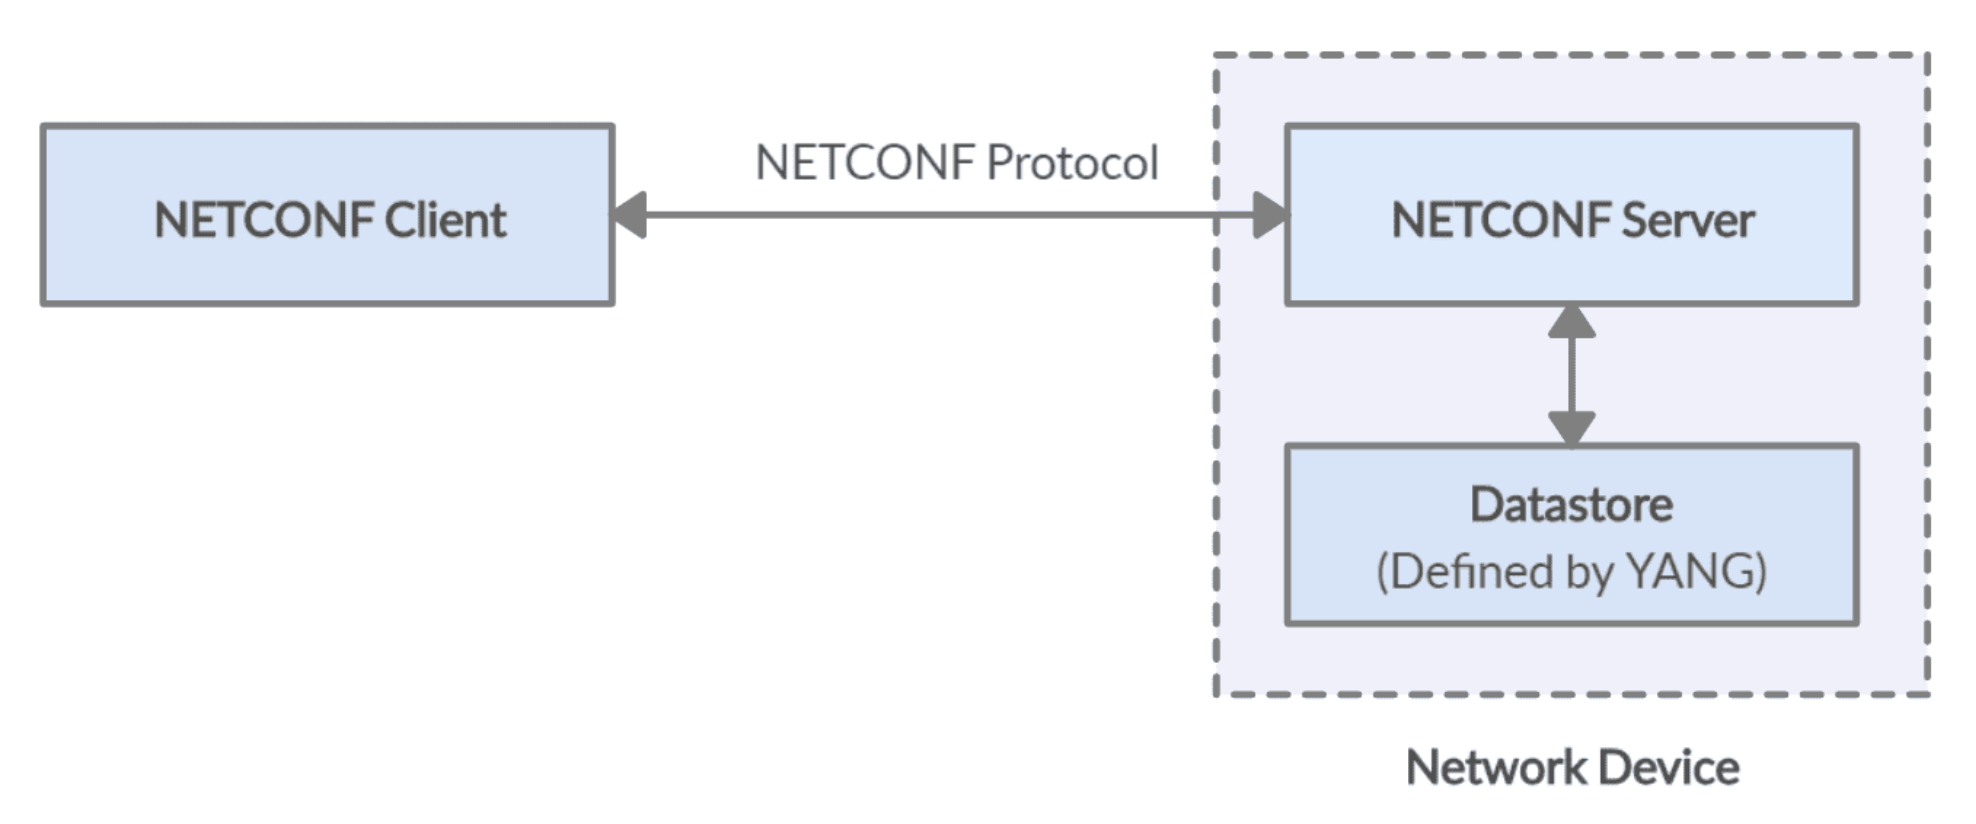
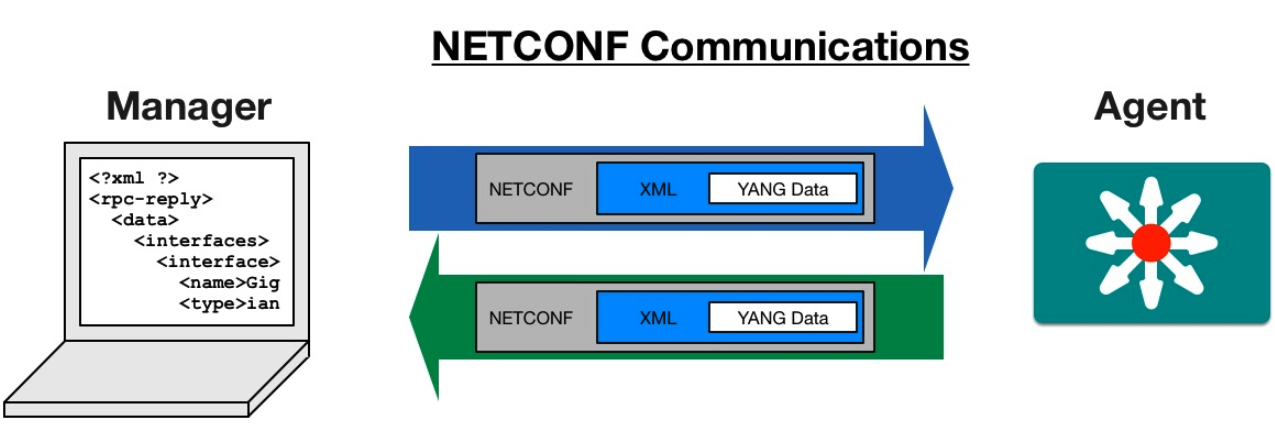
3 NETCONF (Port 830) Protocol over TLS and SSH
- RFC 6241
- uses TCP port 830
Network Configuration Protocol (NETCONF) is a network device configuration
management protocol that provides mechanisms to install, manipulate, and
delete configurations on network devices. It also provides a mechanism for
notification subscriptions and asynchronous message delivery. NETCONF
defines a set of commands (RPCs) to change the state of a network device.
The structure of the exchanged data is left up to someone else, usually YANG models, but could be MIT models (on Nexus) or others.
3.1 Basic purpose of NETCONF
transport configuration payloadsto a device, and a particular configuration datastore on that device.retrieve config datawhen queried- support
notifications, often based on SNMP trap definitions
3.2 Configuration data & State data
Netconf views two classes of data, config data (rw) and state data (ro)
3.3 NETCONF protocol layers
NETCONF protocol can be viewed as split in four layers:
3.3.1 1) Content Layer
Contains the actual configuration and notification data.
3.3.2 2) Operations Layer
Defines a set of base protocol operations to retrieve and edit the config data. like
<get>,<get-config>,<edit-config>, <lock>, <create-subscription>,
<kill-session>, and more.
3.3.3 3) Message Layer
provides a mechanism for encoding remote procedure calls. They are encoded
in
RPCinvocations,<rpc> message,- RPC
replies,<rpc-reply> - RPC
notifications< notification> - is async in nature (i.e. can use pipelining, i.e. a client can send multiple rpc messages before waiting for an rpc-reply.
Every NETCONF message is a well-formed XML document. Each rpc-reply has the
same message-ID that the <rpc> message that asked for it.
So after a <rpc>, comes an <rpc-reply> (i.e. it is tag sent as the first
node in a response to the NETCONF request message).
The only other message is the event notification message, i.e <notification>
3.3.4 4) Secure transport layer
ensures a secure and reliable transport between client and server.
3.4 NETCONF Namespaces
NETCONF uses XML Namespaces. They:
- provide a means to mitigate element name conflicts
- defined with the
attribute*xmlns:prefix="URI";whereprefixis used as abbreviation of the namespace in the tag. - having a
default namespaceusingxmlns=urleliminates the need to have an attribute in each tag.
From Cisco training:
"Namespaces are present in both, requests and responses. They are especially
important inside configuration elements. It is quite possible that there
would never be a conflict of XML tags when working with network devices, but
you may want to create custom XML objects. In doing so, you have the ability
to create a namespace; it essentially becomes an identifier for each XML
element. That way, you can read data from more than one source. You can
create a larger object and not overwrite an object, because they would still
be accessible by their separate namespace."
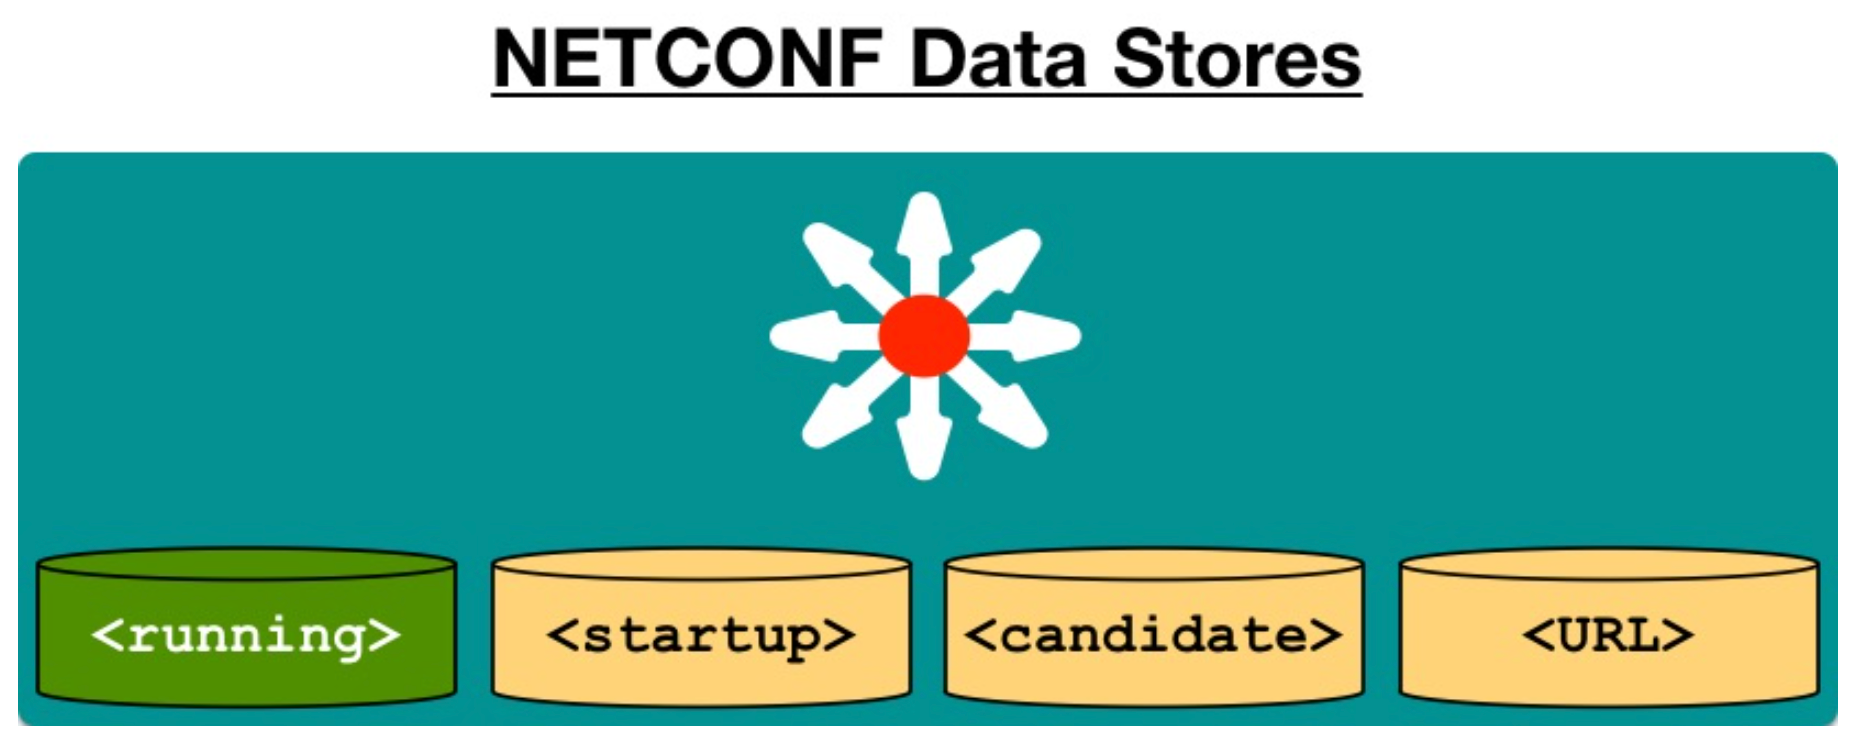
3.5 Configuration Datastores
NETCONF defines datastore that hold config data. They are:
runningconfig datastore (the only mandatory one) Holds the complete configuration of what is currently active.candidateconfig datastore - a workspace before committing.- can be altered before commit -ting to running using "
<discard-changes>" command. - commit takes
candidateconfig datastoreintorunningconfig datastore.
- can be altered before commit -ting to running using "
startupconfig datastore (is read after a reboot)- need to explicitly copy running startup
- backup config datastore
- others, such as backup-candidate or others….
The existence of these datastore is one of the items described by the device
in the cababilites exchange at the beginning of a NETCONF session.
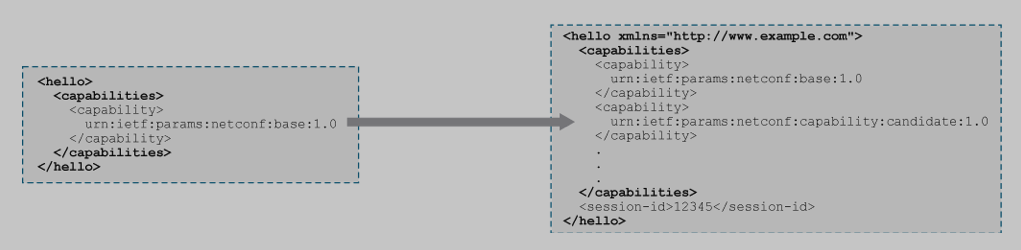
4 NETCONF Hello / Capabilities
The first message sent by the client to the server is the <hello> message. In that hello message the client lists its supported capabilities, and the server then replies with a hello back, listing its capabilities. The client then picks the capabilities to use.
/
5 NETCONF Actions (Operations layer)
The client then sends one of more requests to the NETCONF server and parses its responses.

Low level operations to manage device configs and retrieve device state info.
| Operation | Description |
|---|---|
<hello> |
Messages exchanged when NETCONF session established, lists |
| of capabilities are exchanged here | |
<get> |
clients retrieve running configuration & device state info |
<get-config> |
clients retrieve all or part of specified config. data store |
<edit-config> |
clients can load all or part of a configuration to the |
| specified configuration data store | |
<copy-config> |
Replace an entire configuration data store with another |
<delete- |
Delete a configuration data store |
config> |
|
<commit> |
Copy candidate data store to the running data store |
<lock> / |
Lock or unlock the entire configuration data store system |
<unlock> |
|
<close- |
client can gracefully terminate their NETCONF session |
session> |
|
<kill- |
Forced termination of NETCONF session |
session> |
ncclient Pytho library implements these operations.
Example:
- Entire NETCONF RPC message, that includes the
message ID(101), using the IETF NETCONF namespace.
<rpc-reply message-id="101" xmlns="urn:ietf:params:xml:ns:netconf:base:1.0">
  <data>
    <interfaces xmlns="urn:ietf:params:xml:ns:yang:ietf-interfaces">
      <interface>
        <name>eth0</name>
        <description>Link to asw1</description>
        <enabled>true</enabled>
6 NETCONF Close session
The client then closes the session when done with another <rpc> message:

7 SSH Transport
Remebmer to turn on netconf on the cisco router/switch before doing this:
Netconf uses SSH, but not the usual ssh port, 22, but rather port 830. You
can test netconf connectivity to a netconf device running a Netconf agent
by running: ssh admin@172.17.17.7 -p 830 -s netconf Other than testing
connectivity I would not actually configure anything using this connection.
(although you could)
7.1 HELLO message (starts with this)
The HELLO message also handles the Capabilities Exchange between the NETCONF server and NETCONF client.
When you start a NETCONF session, you send a HELLO, and exchange capabilities
and uses SSH.
~
The server agent will send a "hello" back that looks like some xml with a
bunch of capabilities of the remote agent. These will be the YANG models
it supports, plus the versions of Netconf it supports.
You could also use python to ask it to "get capabilities". See the script
below.
8 NETCONF Datastores
- <running>
- <startup>
- <candidate>
- <URL>
result = m.getconfig('running')
- A container may hold an entire or partial configuration.
- Not all data stores are supported on all devices.
- running is the only mandatory data store.
- Not all data stores are writeable.
- A "URL" data store is supported by IOS to enable
<config-copy>. Every NETCONF message *must* target a data store.
9 NETCONF will talk back and forth using rpc (remote procedure calls) in xml
So it would have a bunch of <rpc> .... </rpc>
The <rpc> message contains a message-id attribute with a unique value. The
<rpc-reply> message identifies which request it is responding to by repeating
this attribute and value. For example:
<rpc-reply message-id="urn:uuid:7db557ee-ed4c-456c-a058-2d69bd4228c4">
.
.
</rpc-reply>
9.1 Step by step NETCONF session:
- Client connects to the
NETCONF SSHsubsystem.ssh -p 830 cisco@csr-core1 -s netconf
Serverresponds withhellothat includesNETCONF-supported capabilities.<?xml version="1.0" encoding="UTF-8"?> <hello xmlns="urn:ietf:params:xml:ns:netconf:base:1.0"> <capabilities> <capability>urn:ietf:params:netconf:base:1.0</capability> <capability>urn:ietf:params:netconf:capability:writable-running:1.0</capability> <capability>urn:ietf:params:netconf:capability:xpath:1.0</capability> <capability>urn:ietf:params:netconf:capability:validate:1.0</capability> <capability>urn:ietf:params:netconf:capability:rollback-on-error:1.0</capability> <capability>urn:ietf:params:netconf:capability:notification:1.0</capability> <capability>urn:ietf:params:netconf:capability:interleave:1.0</capability> <capability>http://tail-f.com/ns/netconf/actions/1.0</capability> <capability>http://cisco.com/ns/yang/ned/ios?module=ned&revision=2016-06-20</capability> <... output omitted ...> </capabilities> <session-id>203499</session-id></hello>]]>]]>
Notice that ALL messages to and from a NETCONF server end with
]]>]]>This is the NETCONF end of message delimiter.Clientresponds with a hello too, withsupported capabilitiesto establish a connection.<?xml version="1.0"?> <hello xmlns="urn:ietf:params:xml:ns:netconf:base:1.0"> <capabilities> <capability>urn:ietf:params netconf:base:1.0</capability> </capabilities> </hello>]]>]]>
Clientissues a NETCONF request (rpc/operation/content). Right away the client can start sending messages to the server:<?xml version="1.0"?> <rpc message-id="101" xmlns="urn:ietf:params:xml:ns:netconf:base:1.0"> <get> <filter type="subtree"> <native xmlns="http://cisco.com/ns/yang/ned/ios"> <interface> <GigabitEthernet> <name>1</name> </GigabitEthernet> </interface> </native> </filter> </get> </rpc> ]]>]]>
Serverissues a response or performs operation.<?xml version="1.0" encoding="UTF-8"?> <rpc-reply xmlns="urn:ietf:params:xml:ns:netconf:base:1.0" message-id="101"> <data> <native xmlns="http://cisco.com/ns/yang/ned/ios"> <interface> <GigabitEthernet> <name>1</name> <negotiation> <auto>true</auto> </negotiation> <ip> <address> <primary> <address>192.168.1.11</address> <mask>255.255.255.0</mask> </primary> </address> </ip> </GigabitEthernet> </interface> </native> </data> </rpc-reply>]]>]]>
10 Verify NETCONF up and working
You can ssh to the device on port 830. The default ssh port is 22, but in the
case of netconf the standard is 830. Sandbox has a NAT service that uses
port 10000, but that gets NAT'ed to port 830 on the box.
ssh admin@172.17.17.7 -p 830 -s netconf
You will get a capabilities list from the device if successful. See. SSH Transport section above.
11 Installations to use YANG
On emacs, check if installed using M-x package-list-packages
If not installed, M-x package-install RETURN yang-mode RETURN
In python, run pip freeze | grep -i pyang (or use venv-yang)
If not installed, run pip install pyang
If installed, optionally pip install --upgrade pyang
To install the yang models themselves i.e. to use the Cisco IOS XE native
model in your local environment, you will first need to install the Cisco IOS
xe model. You can install it by using the:
pip install ydk-models-cisco-ios-xecommand
Then, you can add this to your python script:
from models.cisco_ios_xs import Cisco_IOS_XE_native as xe_native
12 Python Scripts
Several classes of scripts are explained here, along with links to the actual scripts. I am grouping them under several broad categories.
12.1 Python Scripts regarding Credentials
Credentials are almost always needed, so I wrote several scripts that can also be called by other scripts as modules, as examples of gaining API programmatica access to Cisco devnet devices.
13 ncclient
13.1 ncclient
ncclient is a full Netconf client built on python. ncclient handles keeping
track of the message ids for you, handles authentication, handles RPC, and
operations. Uses all raw XML.
Within the RPCs they have a bunch of standard operations:
<get>allows retrieving running and operational data (device state)<get-config>allows togetall or part of aconfiguration data store.<edit-config>loadsall or part of aconfiguration data store.<copy-config>replacean entire config datastore with another<delete-config>deletea config datastore<commit>Copycandidate datastoretorunning datastore<lock> / <unlock>so two people won't step on each other's toes in a device<close-session>Close the config session gracefully.<kill-session>if your buddy went home without unlockingSample python script using the ncclient. (NOT YDK)
import env_user_zp
from ncclient import manager

if __name__ == '__main__':
    with manager.connect(host=env_user_zp.IOS_XE1["address"],
             port=env_user_zp.IOS_XE1["port"],
             username=env_user_zp.IOS_XE1["username"],
             password=env_user_zp.IOS_XE1["password"],
             hostkey_verify=False) as m:

    print("Here are the NETCONF Capabilities")
    for capability in m.server_capabilities:
        print(capability)
A more simple example, that then goes on to download the ietf-ip YANG model:
from ncclient import manager

m = manager.connect(host='172.24.11.1', port=830, username='admin',
            password='admin', device_params={'name': 'csr'})

print m.server_capabilities

schema = m.get_schema('ietf-ip')
print(schema)

# but that is just a dump of some XML.  To load that nicer try:
import xml.etree.ElementTree as ET
root = ET.fromstring(schema.xml)
yang_text = list(root)[0].text
write_file('ietf-ip.yang', yang_text)
With a file now containing the ietf-ip YANG model, we can use pyang to convert the YANG model in this file into another format (among many)
pyang -f tree ietf-ip.yang | head -
From the output you will see that the ietf-ip augments or extends the
interface model. Itadds new configurable (rw) containerswith a list of IP prefixes to be assigned to an interface. Another thing we can see is that this model cannot be used on its own, since itdoesn’t specify the nameof the interface it augments.This model can only be used together with
ietf-interfaces YANG modelwhich models the basic interface properties like MTU, state and description. In factietf-ip relieson a number of YANG models which are specified as imports at thebeginning of the model definition.module ietf-ip { namespace "urn:ietf:params:xml:ns:yang:ietf-ip"; prefix ip; import ietf-interfaces { prefix if; } import ietf-inet-types { prefix inet; } import ietf-yang-types { prefix yang; }
Each import statement specifies the model and the prefix by which it will be
referred later in the document. These prefixes create a clear separation
between namespaces of different models.
13.2 ncclient to read specific data from a netconf device.
Remember that the xml config data layout comes from the specific yang data model that we choose to use, in this case the ietf standards yand model.
 from ncclient import manager
 import xmltodict

 # use the filter to narrow down what we are actually looking to retrieve
 interface_filter = """
 <filter>
   <interfaces xmlns="urn:ietf:params:xml:ns:yang:ietf-interfaces">
     <interface>
       <name>{int_name}</name>
     </interface>
   </interfaces>
 </filter>
 """

with manager.connect(host=core1_ip,
           username=username,
           password=password,
           hostkey_verify=False) as m:

    filter = interfadce_filter.format(int_name = "GigabitEthernet2")
    r = m.get_config("running", filter)

    # process the XML data into Python dictionary and use
    interface = xmltodict.parse(r.xml)
    interface = interface["rpc-repl"]["data"]["interfaces"]["interface"]

    print("The inteface {x} has ip address {y}/{z}".format(
      x = interface["name"]["#text"]
      y = interface["ipv4"]["address"]["ip"]
      z = interface["ipv4"]["address"]["netmask"]
      )
    )
13.3 ncclient to update a netconf device with a new loopback
Remember that the xml config data layout comes from the specific yang data model that we choose to use, in this case the ietf standards yand model.
  from ncclient import manager
  import xmltodict

  config_data = """<config>
  <interfaces xmlns="urn:ietf:params:mxl:ns:yang:ietf-interfaces">
     <interface>
    <name>{int_name}</name>
    <description>{description}</description>
    <type xmlns:ianaift="urn:ietf:params:xml:ns:yang:iana-if-type">
          ianaift:softwareLoopback
    </type>
    <enabled>true</enabled>
    <ipv4 xmlns="urn:ietf:params:xml:ns:yang:ietf-ip">
      <address>
        <ip>{ip}</ip>
        <netmask>{netmask}</netmask>
      </address>
    </ipv4>
      </interface>
   </interfaces>
   </config>
   """

# new loobpack info
loopback = {"int_name": Loopback16,
    "description": "Demo looback added using NETCONF",
    "ip": "10.1.1.4",
    "netmask": "255.255.255.0"}

 with manager.connect(host=core1_ip,
        username=username,
        password=password,
        hostkey_verify=False) as m:

     # create desired NETCONF config payload, and aply using "edit_config"
     # remember that config_data is just my template.  I combine that template
     # with the fields from the loobpack dictionary, replacing the curly braces
     # variables in the template with the corresponding values from loopback
     config = config_data.format(**looback)
     r = m.edit_config(target = "running", config = config)

     # print the status message back
     print(f" NETCONF RPC OK: {r.ok}")
     interface = interface["rpc-repl"]["data"]["interfaces"]["interface"]

     print("The inteface {x} has ip address {y}/{z}".format(
       x = interface["name"]["#text"]
       y = interface["ipv4"]["address"]["ip"]
       z = interface["ipv4"]["address"]["netmask"]
       )
     )
—
13.4 Using python help to examine pyang utility
pyang There may be other tools to pull yang models from devices, but Using pyang is quick and dirty (and efficeint).
You can examine pyang closer now, using python help as follows:
>>> import pyang
>>> dir(pyang)
...
>>> help(pyang.subroutine)  where subroutine is one of the functions
    listed in the output from dir(pyang)
>>> help(pyang.statements)  These are some examples:
>>> help(pyang.types)
>>> help(pyang.grammar)
>>> help(pyang.string)
>>> help(pyang.types)
>>> help(pyang.util)
>>> help(pyang.xpath)
These are like man pages. :) i.e. dir(pyang) while in python.
13.5 Using python help to examine YANG models
With pyang installed, you can display a YANG data model to study it.
Once you study it you will find the data structure and naming convention you need
to accomplish your automation task ( i.e. python code ). From the command line:
pyang -f tree ietf-intefaces.yang
pyang -f tree ietf-intefaces.yang # text mode for human consumption
pyang -f jtox ietf-intefaces.yang
pyang -f jtox ietf-intefaces.yang # 1 long string that is json format
pyang -f sample-=xml-skeleton ietf-intefaces.yang
pyang -f sample-xml-skeleton ietf-intefaces.yang # 1 xml format
pyang -f yin ietf-intefaces.yang
pyang -f yin ietf-intefaces.yang # xml format (has some weird "discontinuities" ?
pyang -f jsonxsl ietf-intefaces.yang
pyang -f jsonxsl ietf-intefaces.yang # json (was giving me grief on ietf-ospf
I used the output of the jtox command as an input into this interactive python session, so I could convert the yang model as json data.
x = '{"modules": {"ietf-interfaces": ["if",    ...'
y = json.loads(x)
type(y)
dict
print(y)  etc.
-f FORMAT, –format=FORMAT Convert to FORMAT. Supported formats are: yang, yin, dsdl, omni, tree, jstree, flatten, uml, identifiers, sample-xml-skeleton, capability, jsonxsl, depend, jtox, name
13.6 pyang -f tree ietf-interfaces.yang
pyang is written in python and can be used in python, but pyang is also a
shell command.
A good, straight-foward way of displaying YANG data models is
pyang -f tree ietf-intefaces.yangwhich shows the data as textpyang -f jstree ietf-interfaces.yangwhich shows the data as html.
To get a subset of the whole tree you can use:
pyang -f tree --tree-path=/interfaces/interface gietf-intefaces.yangpyang -f tree --tree-path=/interfaces/interface gietf-intefaces.yangpyang -f tree --tree-path=/interfaces/interface gietf-intefaces.yang
13.7 pyang -f tree ietf-interface details:
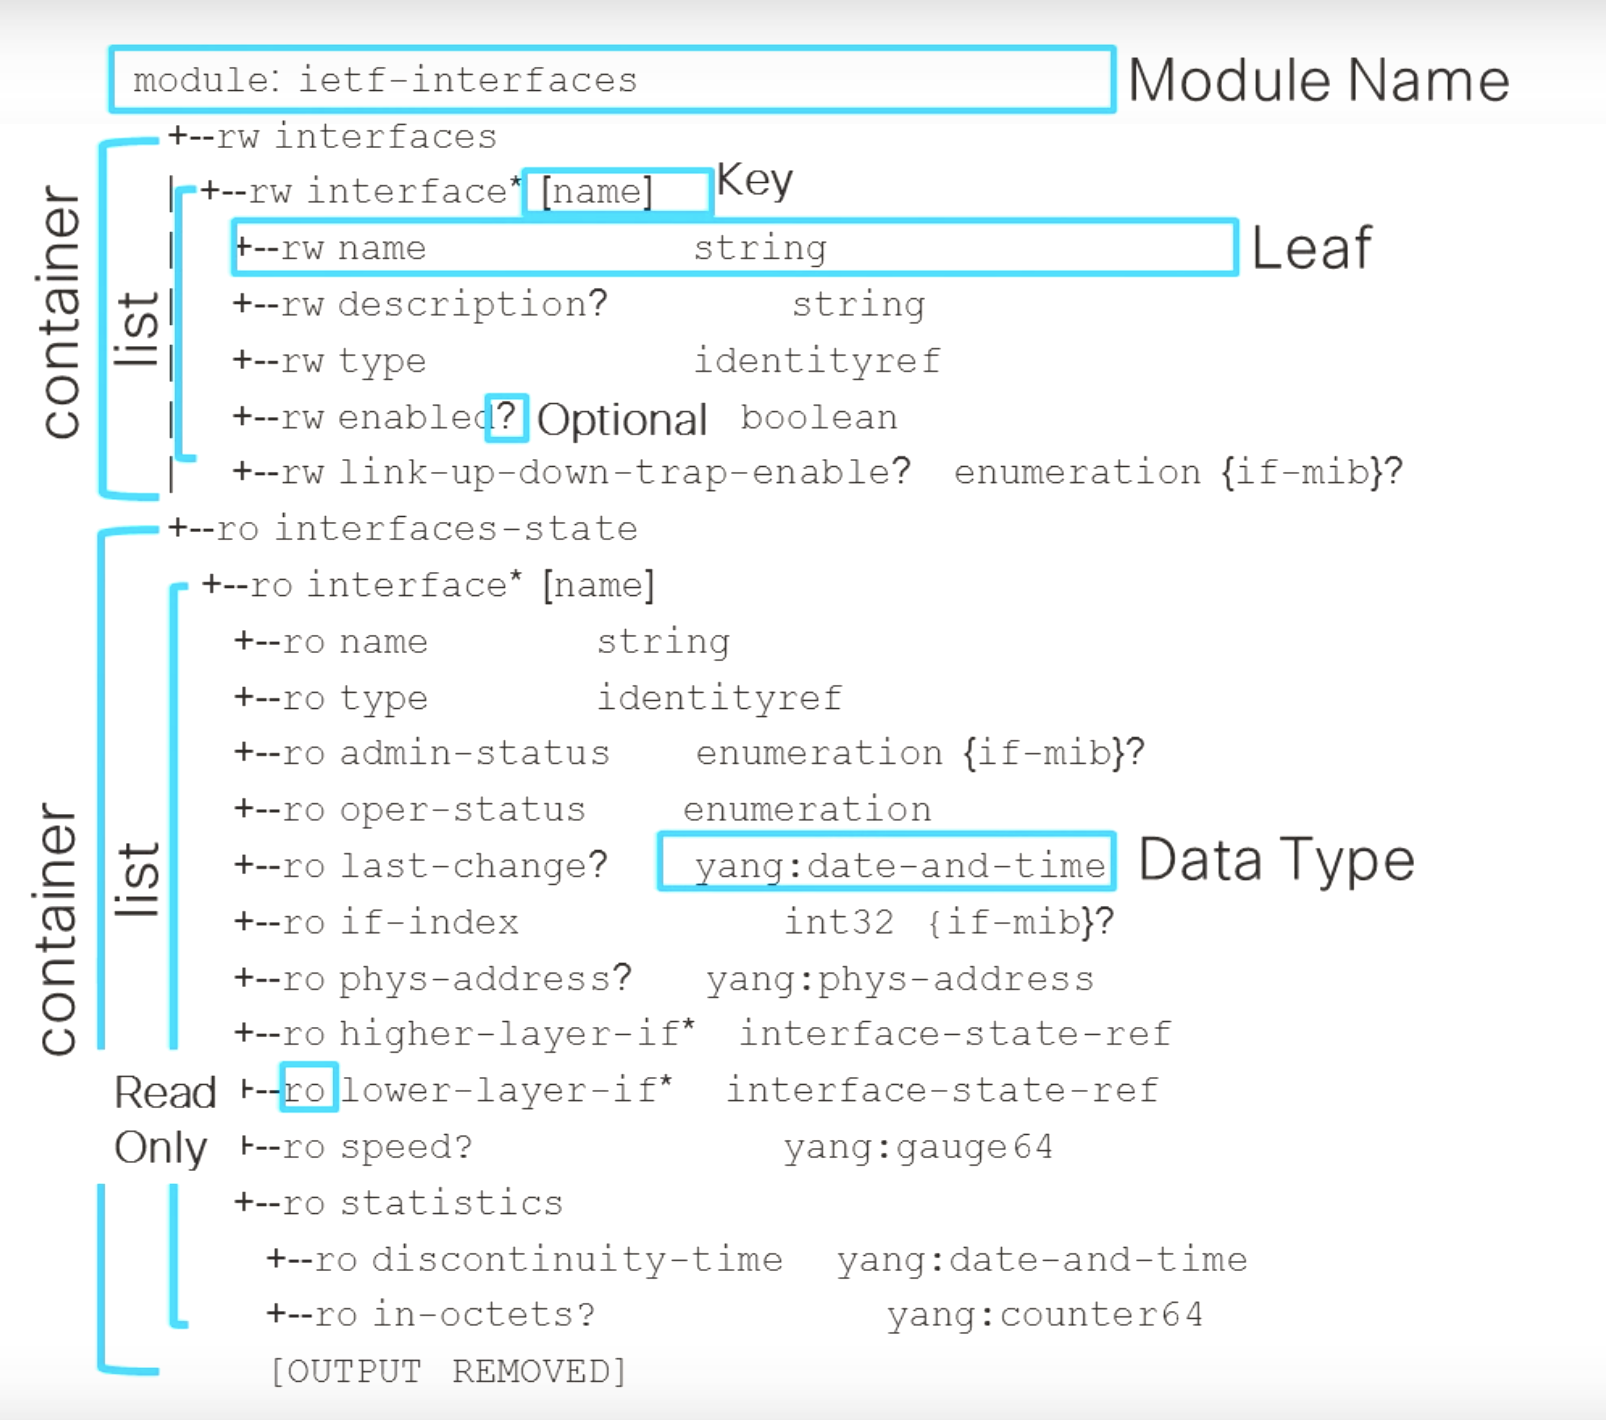
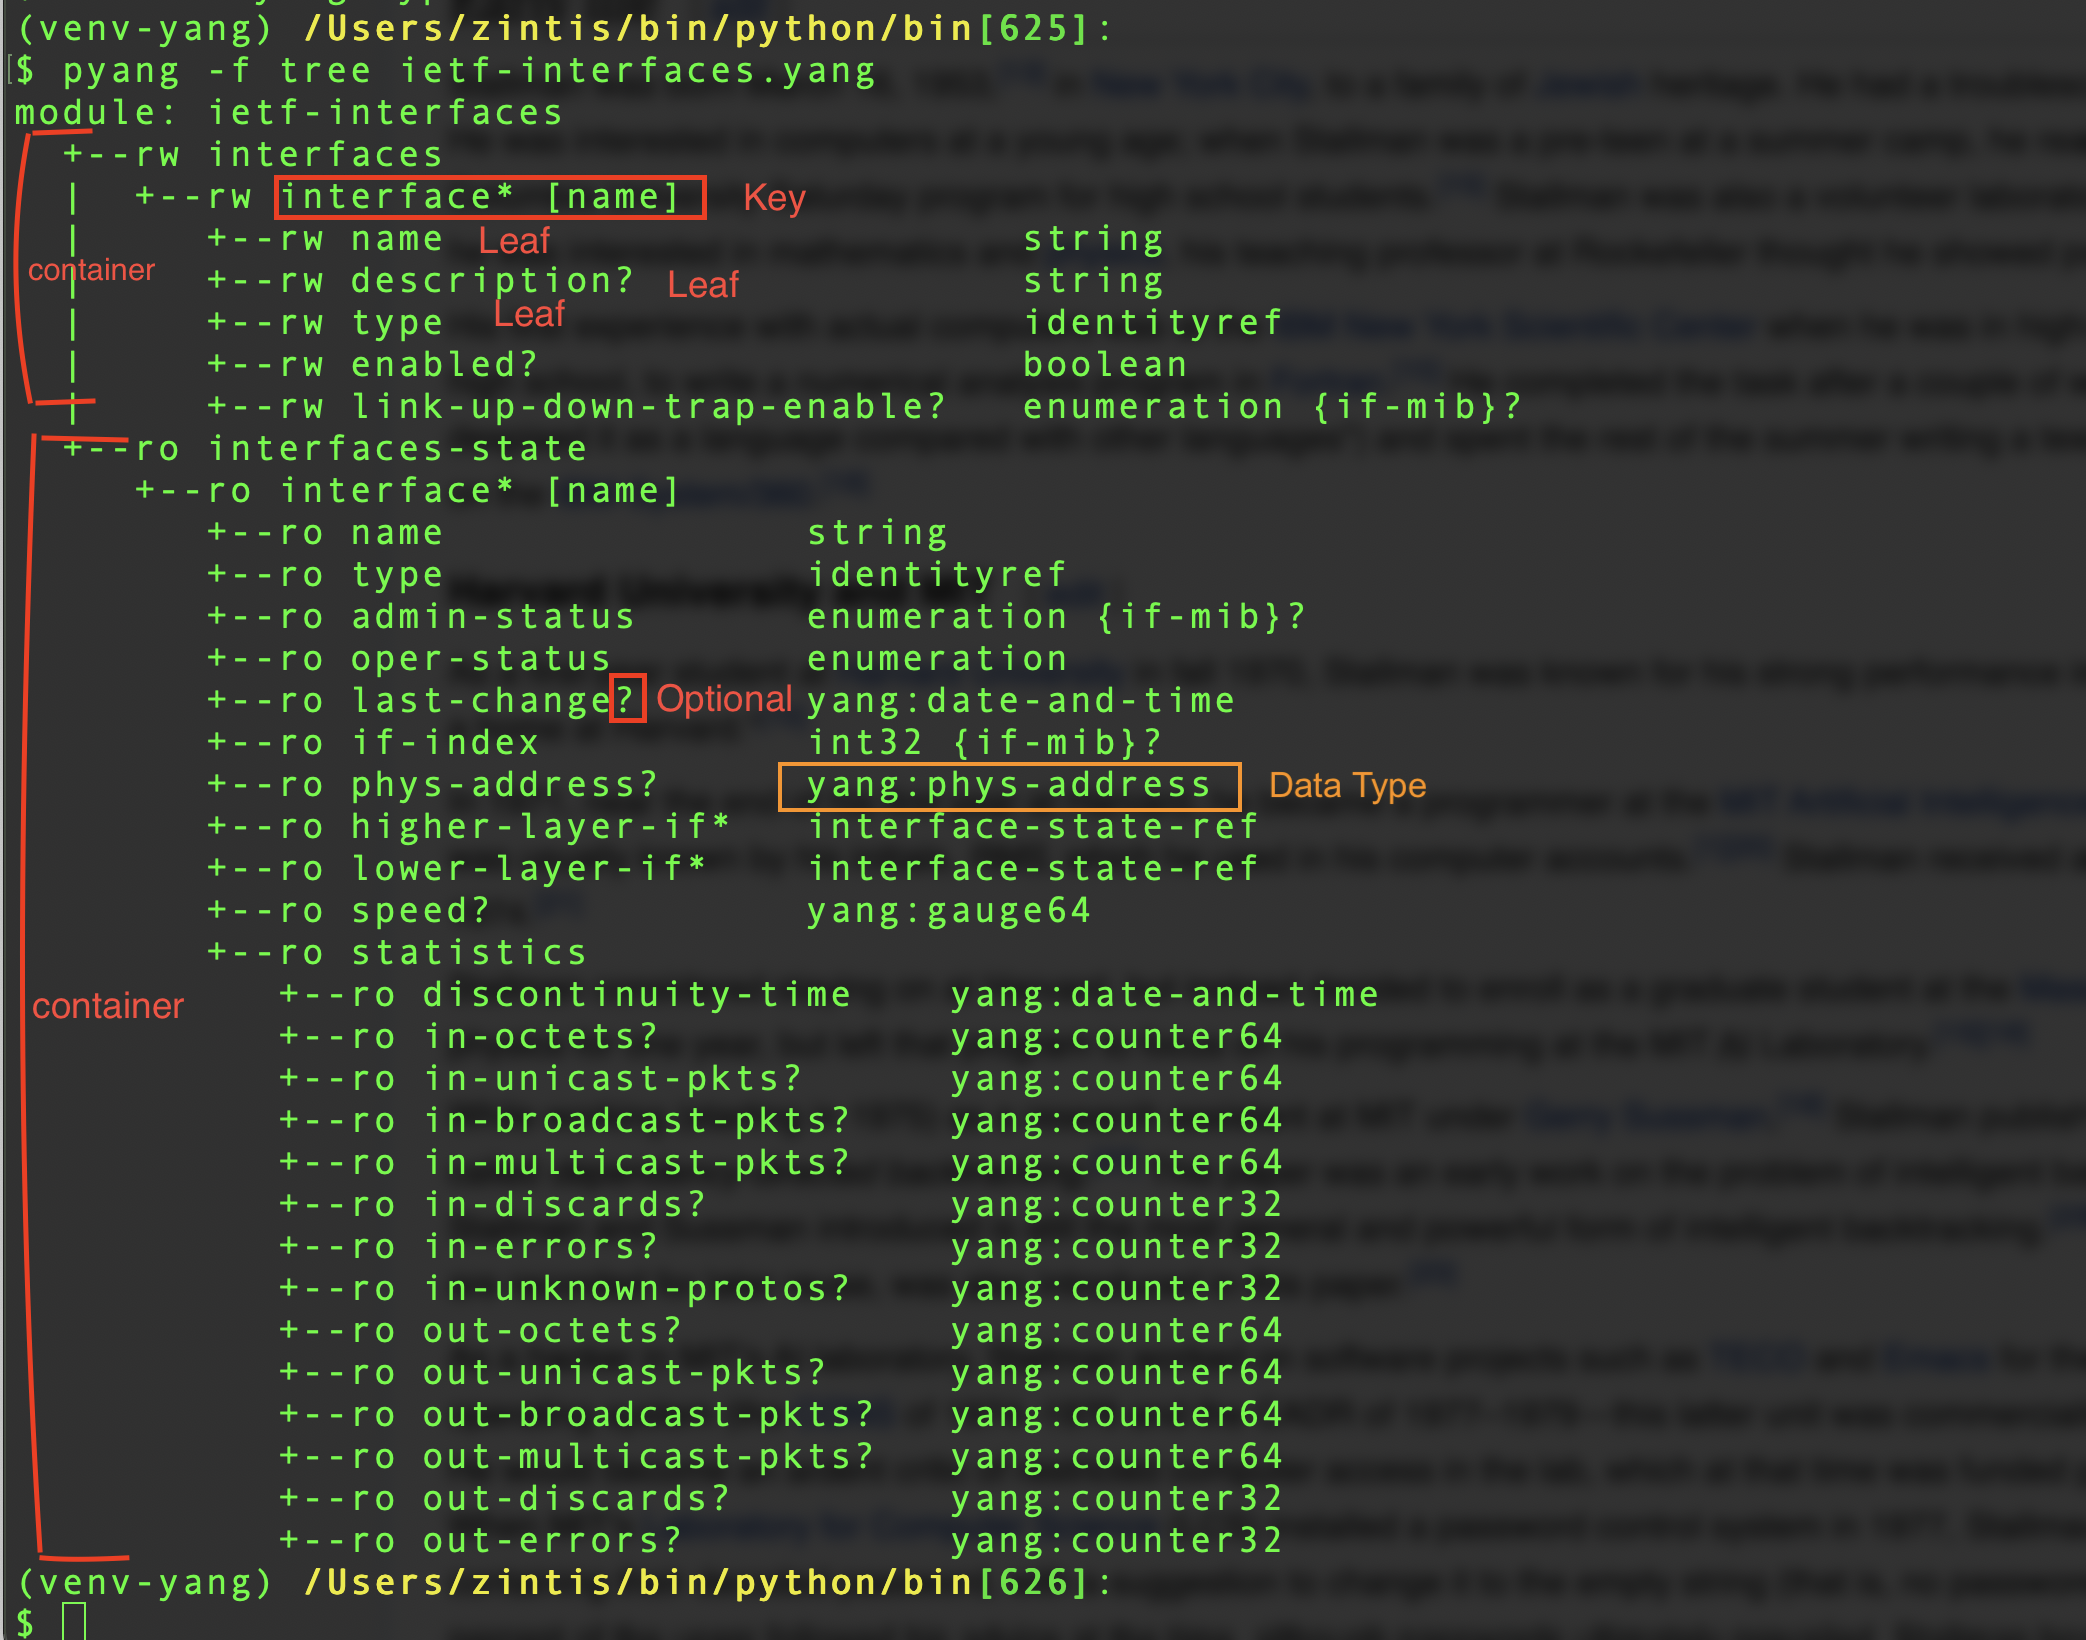
Please notice in the following example, that this YANG model has two containers, One called ietf-interfaces the other called interface-state
Please also notice that in the first container we have a list of interfaces, that are read-write, rw And, in the second container we have a list of statistics that are read-only, ro This shows how we can separate configuration and operational information inside of YANG
The list is designated by the [] - which contains the key. So we can differentiate one entry in a list from another. Here we key off of "name".
Note that in YANG Data Models, "Leaf" means something else to "Leaf Switch". Leaf here really means only *
A ? means it is an optional attributes.
Finally, notice that every leaf has a specified data type, eg. string, boolean, int32, date-and-time
% pyang -f tree ietf-interfaces.yang

module: ietf-interfaces
+--rw interfaces
|  +--rw interface* [name]
|     +--rw name                        string
|     +--rw description?                string
|     +--rw type                        identityref
|     +--rw enabled?                    boolean
|     +--rw link-up-down-trap-enable?   enumeration {if-mib}?
|     +--ro admin-status                enumeration {if-mib}?
|     +--ro oper-status                 enumeration
|     +--ro last-change?                yang:date-and-time
|     +--ro if-index                    int32 {if-mib}?
|     +--ro phys-address?               yang:phys-address
|     +--ro higher-layer-if*            interface-ref
|     +--ro lower-layer-if*             interface-ref
|     +--ro speed?                      yang:gauge64
|     +--ro statistics
|        +--ro discontinuity-time    yang:date-and-time
|        +--ro in-octets?            yang:counter64
|        +--ro in-unicast-pkts?      yang:counter64
|        +--ro in-broadcast-pkts?    yang:counter64
|        +--ro in-multicast-pkts?    yang:counter64
|        +--ro in-discards?          yang:counter32
|        +--ro in-errors?            yang:counter32
|        +--ro in-unknown-protos?    yang:counter32
|        +--ro out-octets?           yang:counter64
|        +--ro out-unicast-pkts?     yang:counter64
|        +--ro out-broadcast-pkts?   yang:counter64
|        +--ro out-multicast-pkts?   yang:counter64
|        +--ro out-discards?         yang:counter32
|        +--ro out-errors?           yang:counter32
x--ro interfaces-state
   x--ro interface* [name]
      x--ro name               string
      x--ro type               identityref
      x--ro admin-status       enumeration {if-mib}?
      x--ro oper-status        enumeration
      x--ro last-change?       yang:date-and-time
      x--ro if-index           int32 {if-mib}?
      x--ro phys-address?      yang:phys-address
      x--ro higher-layer-if*   interface-state-ref
      x--ro lower-layer-if*    interface-state-ref
      x--ro speed?             yang:gauge64
      x--ro statistics
         x--ro discontinuity-time    yang:date-and-time
         x--ro in-octets?            yang:counter64
         x--ro in-unicast-pkts?      yang:counter64
         x--ro in-broadcast-pkts?    yang:counter64
         x--ro in-multicast-pkts?    yang:counter64
         x--ro in-discards?          yang:counter32
         x--ro in-errors?            yang:counter32
         x--ro in-unknown-protos?    yang:counter32
         x--ro out-octets?           yang:counter64
         x--ro out-unicast-pkts?     yang:counter64
         x--ro out-broadcast-pkts?   yang:counter64
         x--ro out-multicast-pkts?   yang:counter64
         x--ro out-discards?         yang:counter32
         x--ro out-errors?           yang:counter32
/Users/zintis/bin/python/netprog_basics/network_device_apis/yang/yang/standard/ietf/RFC[61] %
Better to use a picture:
YANG Model a clickable link to a picture. This is the same thing inline:
Or from my pyang outputed ietf-interfaces.yang file
You can also see a graphical map of YANG models at https://yangcatalog.org/
14 Using NETCONF-YANG
We already saw how to use pyang from the command line to dump the model for inspection:
pyang -f tree ietf-intefaces.yang
where ietf-interfaces.yang is a yang file in the local directory.
-or specify the full path like:
pyang -f tree /Users/zintis/bin/python/netprog_basics/network_device_apis/ietf-intefaces.yang
pyang -f tree /Users/zintis/bin/python/netprog_basics/network_device_apis/yang/ietf-interfaces.yang
By itself you CANNOT get data out with YANG. You have to use a protocol to get at it,
meaning, NETCONF, RESTCONF, gRPC
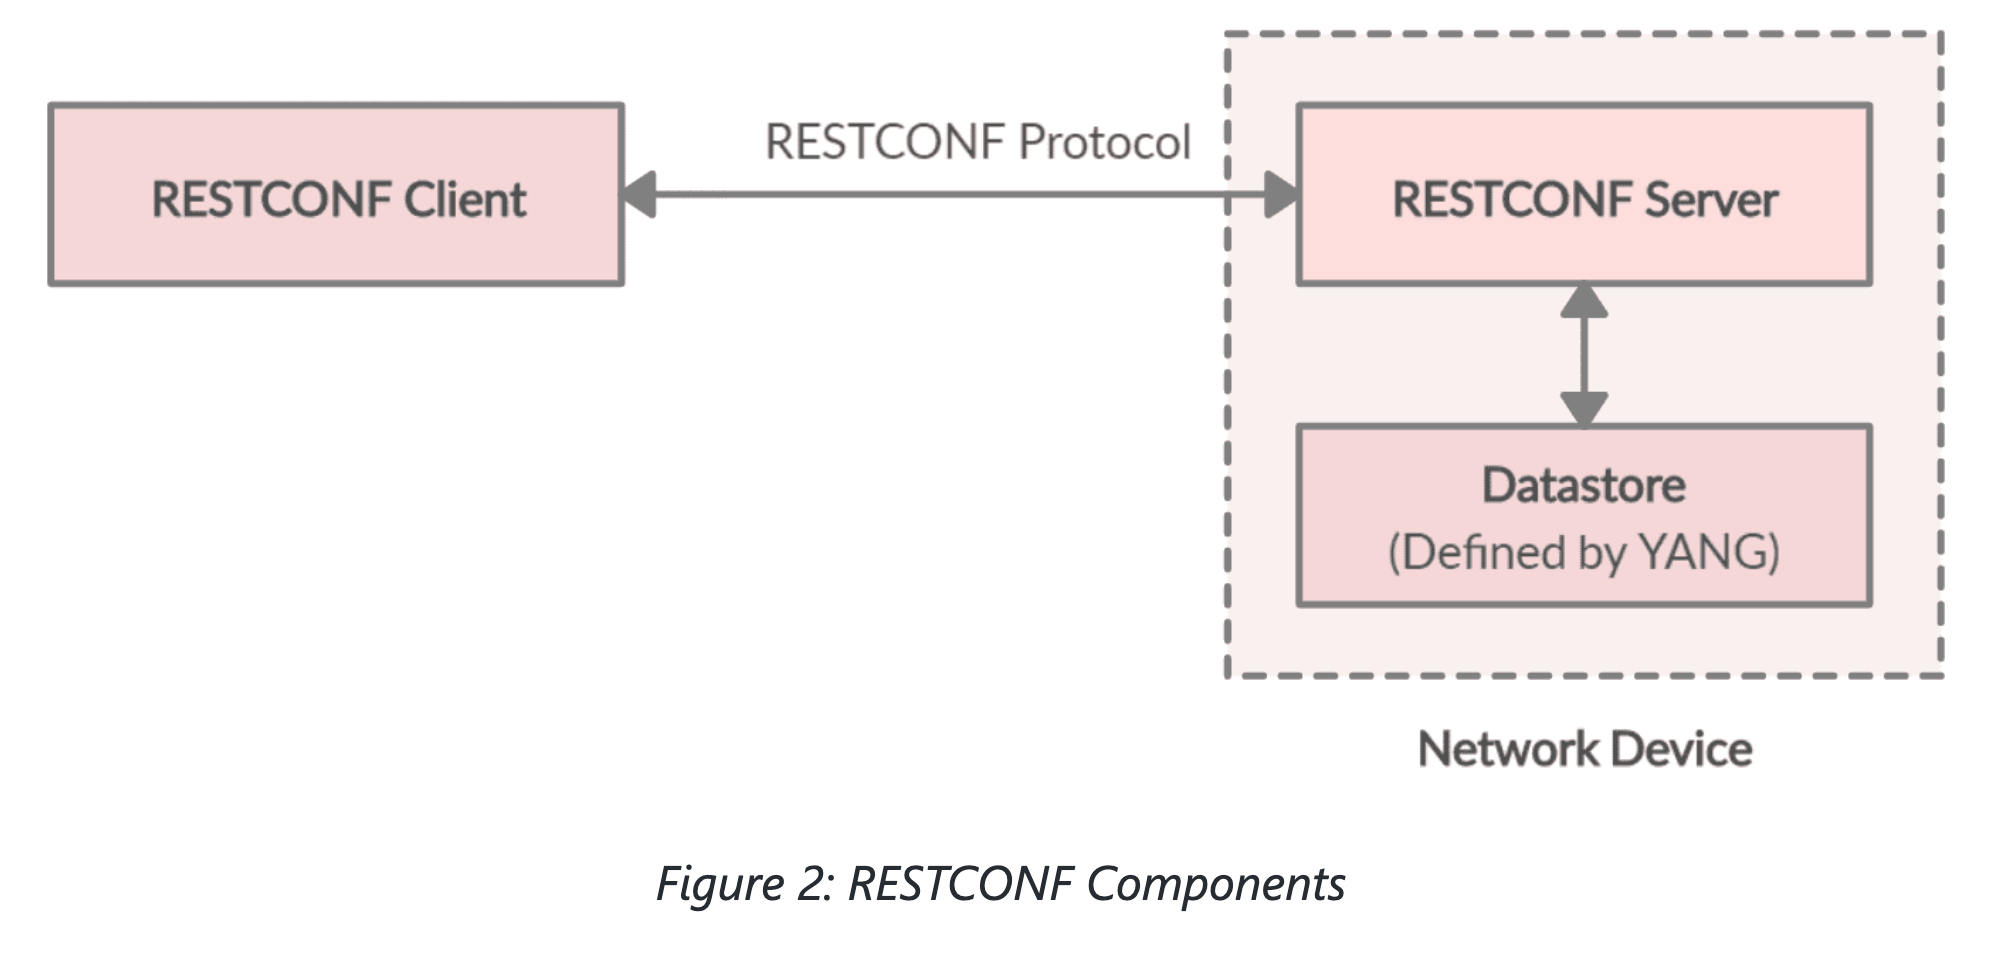
So to get a json representation of a YANG model, use RESTCONF and request the data in JSON format.!!!!
And restconf:
The netprogbasic course has several example python scripts that use the devicesinfo.py module that has the specifics of the Cisco DevNet free, always on, sandboxes. These sandboxes do NOT need any special booking nor vpn nor password.
They are great for testing your python scripts. I have copied the devicesinfo.py module into the bin/sandbox directory.
14.1 venv-pyang
I have created a python virtual environment called "venv-yang". There I have pip install pyang Then activate venv-pang Then realize there is a pyang binary in the venv bin file Create alias pyng that points to pyang in .cshrc Open http://www.yang-central.org/twiki/pub/Main/YangTools/pyang.1.html#man.1.pyang.output_formats and open http://www.yang-central.org/twiki/pub/Main/YangTools/pyang.1.html
to see the pyang options
using the alias, run pyang -f tree top.yang (and whatever else .yang file you want) Also see that emacs does a nice job highlightin the .yang syntax files as well.
14.2 Using NETCONF as the protocol to use YANG models
NETCONF as a protocol only supports XML as the data format.
The "Agent" running on the device is typically called netconfd and is so on
cisco devices.
| some | Data |
|---|---|
| XML | spaces don't matter |
| use tags like | |
| <ip> 1.1.1.1 </ip> | |
| - | |
| JSON | spaces don't matter |
| use curly braces {} | |
| and [] for arrays | |
| and commas | |
| YAML | indentation matters |
| no commas | |
Insert these notes:
Netconf actaully uses ssh RFCs and Drafts NETCONF RFC 6241 RFC 4741 YANG RFC 7950 RFC 6020 RESTCONF RFC 8040 gRPC grpc.io
m = manager.connect(host=envlab.IOSXE1["host"], port=envlab.IOSXE1["netconfport"], username=envlab.IOSXE1["username"], password=envlab.IOSXE1["password"], hostkeyverify=False )
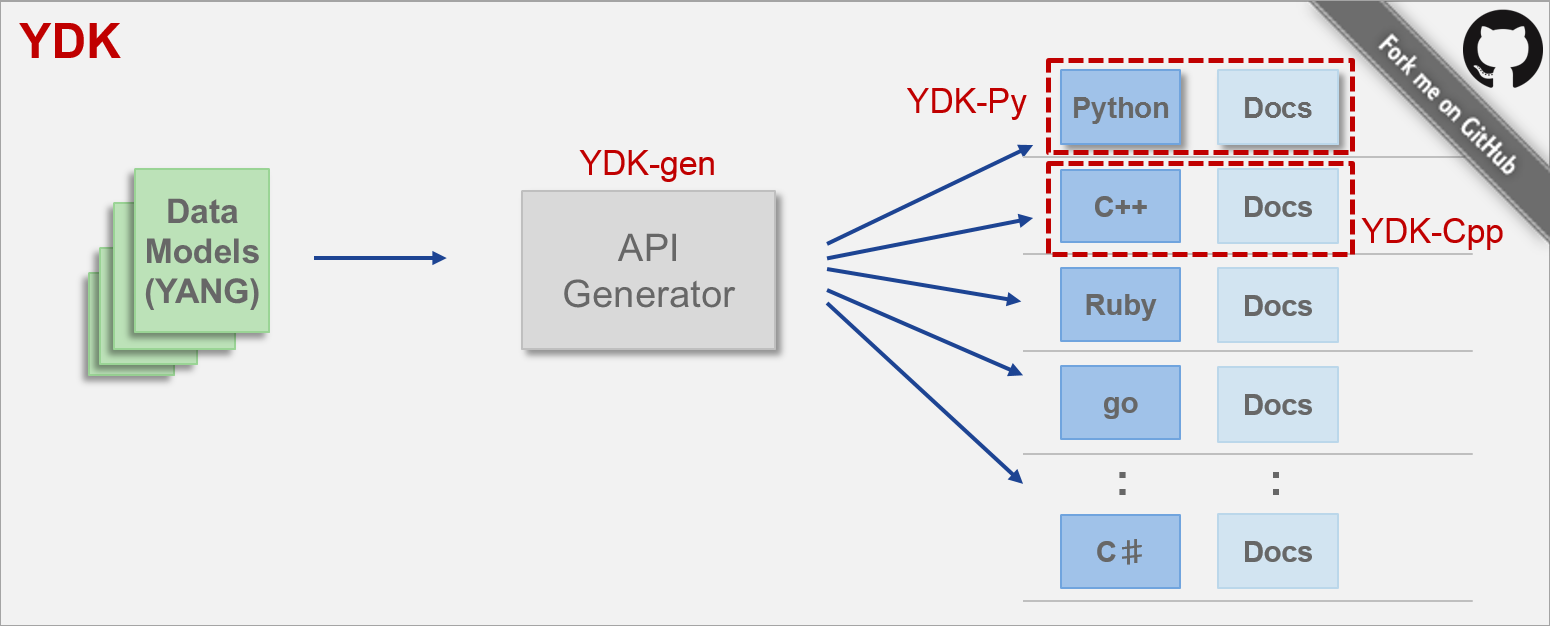
15 YDK - YANG Developers Kit
Cisco offers YDK to make it easier to get sample code based on a YANG model.
API binding: the programmatic interface (functions, data objects, URLS)
With models, the API binding can be automatically generated. These
automatically generated API bindings offer these benefits:
15.0.1 YDK's model based bindings benefits
- simplify app development
- abstract transport, encoding, modeling language
- API generated from the YANG model
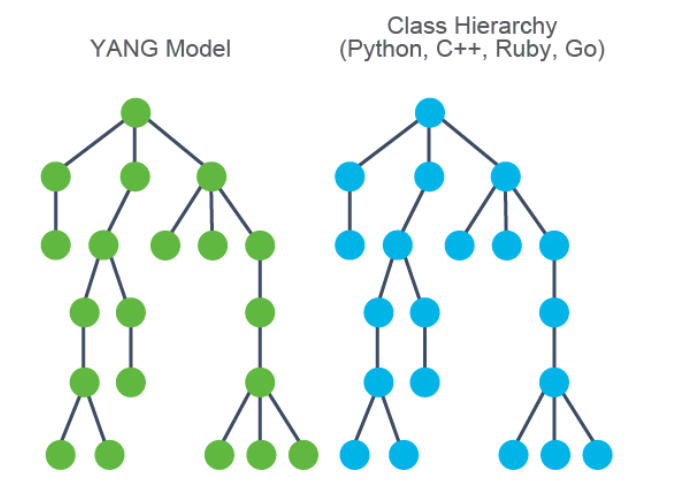
- one to one correspondence between model and class heirarchy
- multiple languages (Python, C++, Ruby, Go …)
- client side validations
YDK consists of a core package that defines services and providers, plus one
or more module bundles that are based on YANG models.
Each module bundle is generated using a bundle profile with YDK-gen and
contains definitions for data objects.
The key is that YDK combines data objects with services and providers
So YDK has:
- Models that group Python objects created for each YANG model (autogenerated)
- Services perform operations on model objects using
providers - Providers implement services over different protocols.
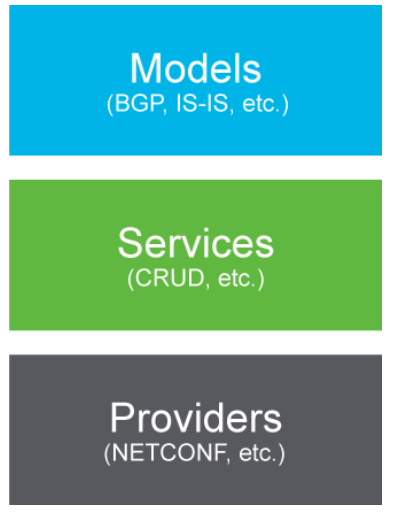
This allows one to isolate the code for a provider (i.e. implementation) from code for a service (i.e. operations). So you can create a python script for netconf and quite easily swap it out for restconf. The code should not need to change much.
(Alternative approaches is to use Ansible Netconf modules. But that is not
what I am covering here.)
The best place to start is https://developer.cisco.com/site/ydk/ You will see a great example python script that uses YDK: (and netconf actually)
# A YDK Hello World!
# import models, services and providers (mnemonic: model service provider)
from ydk.models.cisco_ios_xr import Cisco_IOS_XR_shellutil_oper \
    as xr_operator_model
from ydk.services import CRUDService
from ydk.providers import NetconfServiceProvider

from datetime import timedelta

if __name__ == "__main__":
    """Main execution path"""

    # create system time object using MODEL
    system_time = xr_operator_model.SystemTime()

    # create CRUD service using SERVICE
    crud = CRUDService()

    # create NETCONF session using PROVIDER
    provider = NetconfServiceProvider(address="10.0.0.1",
                      port=830,
                      username="admin",
                      password="admin",
                      protocol="ssh")
    # read system time from device
    system_time = crud.read(provider, system_time)

    # Print system time
    print("System uptime is " +
      str(timedelta(seconds=system_time.uptime.uptime)))

    # close NETCONFIG session and exit
    provider.close()
    exit()
Let's see that same file in a native file type: file:///Users/zintis/bin/python/bin/ydk-hello-world.py
YDK lets you feed it a YANG model and have it generate sample code. Of note:
from ydk.services import CRUDServicefrom ydk.providers import NetconfServiceProviderfrom ydk.models.cisco_ios_xr import Cisco_IOS_XR_shellutil_oper as xr_operator_model
And
zprovider = NetconfServiceProvider(address="10.0.0.1", port=830, username...)zpservice = CRUDService()mytime = zpservice.read(provider, system_time)
From developer.cisco.com I have copied the crucial description here:
The generated YDK APIs have three main components:
Models: Class hierarchies that mirror the hierarchies that the YANG models
specify. We bundle models (e.g. Cisco IOS XR, OpenConfig, IETF, etc) in
separate packages, so users can have granular control of the model families
that they install.
Services: Classes that perform an action on model objects. They include a
CRUD (create, read, update, delete) service that abstracts management
protocols, services that provide direct access to protocols (e.g. NETCONF and
RESTCONF), a service to encode and decode (serialize and deserialze) data,
plus others.
Providers: Classes that implement a service. A provider can implement
multiple services and multiple providers can implement a service.
15.1 installing ydk package
See it in action in file:///Users/zintis/bin/python/bin/netconf-example1.py
I did NOT install this large YDK package on my laptop. Rather, I took the
advice of the README file in the /ydk directory of the docker container
I booted up. To run the docker container run ~docker run -it ydkdev/ydk-py
docker run -it ydkdev/ydk-py
15.1.1 Benefits of YDK
- Separation of duty
These abstractions help the developers by isolating developers from the protocol, transport and encoding specifics and allow them to focus on what is most important, the data structures and the automation logic.
- No need to code protocol specifics (e.g. NETCONF, RESTCONF)
- no need to manipulate serialized data (e.g. XML or JSON) directly.
- Client side validations
Furthermore, the APIs perform thorough local validation (e.g.
type,value,config/oper,semantics,deviations, etc.) based oninformation embeddedin theYANG model.This means that most errors are caught locally without having to communicate with the networking device.
YDK service will automatically perform local (client-side) validition for:
Type checks: enum values, string, number, …Value checks: range, format, …Semantic checks: key uniqueness/presence, mandatory values, …
- Portable code.
Last, the abstractions also make the automation applications
more portable. An application could change providers (e.g. NETCONF with RESTCONF) with minimal changes to the code when using a service that supports multiple providers (e.g. CRUD service).A must follow link on YDK-Py is https://github.com/CiscoDevNet/ydk-py
16 list of ipython steps to explore yang netconf and YDK
- install ydk with
pip install ydkorpipenv install ydk(I did this while already in the venv, i.e. (venv-yang), so I just didpip install ydk - on the Catalyst or Nexus switch add
netconf-yangglobal setting - on your unix system, install the same model:
-
pip install ydk-models-cisco-ios-xe - run
ipython - import the IOS XE native model with:
from models.cisco_ios_xe import Cisco_IOS_XE_native as xe_model - create an object instance of the model:
zpnative = xe_model.Native() - check the available methods for this object using
dir(zpnative)
Example skeleton code using YDK for the above ipthon session:
from models.cisco_ios_xe import Cisco_IOS_XE_native as xe_model
from ydk.services import CRUDService
from ydk.providers import NetconfServiceProvider

# CSR1kv1 Credentials
ip = '192.168.111.51'
port_n = 830
user = 'cisco'
paswd = 'Cisco123'
proto = 'ssh'

if __name__ == '__main__':
    zpnative = xe_model.Native()
    print(dir(zpnative))

    provider = NetconfServiceProvider(address=ip, port=port_n, username=user, password=paswd, protocol=proto)

    # create a CRUD service
    zpcrud = CRUDService()

    # create a new instance of Native Interface object
    xe_interfaces = xe_model.Native.Interface()

    # read the interfaces with the help of read function
    # read takes 2 arguments, 1) the service PROVIDER  and 2) filter
    # here "filter" means the xe model.  ??  I don't know why, but it is true.
    zpinterfaces = zpcrud.read(provider, xe_interfaces)

    # print the primary address of the fifth gigabitethernet interface
    addr_of_interest = zpinterfaces.gigabitethernet[4].ip.address.primary.address)
    print(f' The fifth gigE interface has an ip addr of {addr_of_interest}')

    exit()
A second related example:
from models.cisco_ios_xe import Cisco_IOS_XE_native as xe_model
from ydk.services import CRUDService
from ydk.providers import NetconfServiceProvider

#CSR1kv1 Credentials
ip = '10.0.0.20'
port_n = 830
user = 'cisco'
paswd = 'Cisco123'
proto = 'ssh'

if __name__ == '__main__':

    provider = NetconfServiceProvider(address=ip, port=port_n, username=user, password=paswd, protocol=proto)

    zpcrud = CRUDService()

    # get hold of only the fifth GigabitEthernet interface without the other interfaces
    xe_int_giga =  xe_model.Native.Interface.GigabitEthernet()
    # now you have an interface object, i.e. xe_int_giga, that contains all
    # the interfaces from the switch.   config that with a dir(xe_int_giga) in ipython
    xe_int_giga.name = '5'

    # read the interface
    zpinterfaces = zpcrud.read(provider, xe_int_giga)

    # print the primary addres of the interface
    print(zpinterfaces.ip.address.primary.address)

    # update the description of the interface
    zpinterfaces.description = "gig E 5 configed using YDK and netconf-yang"
    # this only changed the local script variable.  Don't forget to "write" it
    # to the device's config data:
    zpcrud.update(provider, zpinterfaces)

    # read in the interface again. (it has changed)
    zpinterfaces = zpcrud.read(provider, xe_int_giga)

    # print the description of the interface
    print(zpinterfaces.description)


    exit()
Very good idea to actually run this against a switch in my CML setup.
17 YANG Suite (formerly known as YANG Exporer)
For details see the file yang-suite.org
- Install the YANG Explorer Application on a Laptop Note: this is deprecated by YANG Suite, which is 100% an HTML 5 service. See YANG-suite.org file for details.
In this example, the Yang Explorer application is used on a laptop (Apple
MacBook Pro running macOS Sierra 10.12.2, Google Chrome browser) to act as
the centralized management platform. Yang Explorer allows the user to do
this. Update: Feb 2021 I used the new YANG Suite software that deprecates
the older YANG Explorer. See the file: YANG-Suite.org
• Upload / Compile YANG data models from User Interface Or Command Line
• Build NETCONF RPCs (Remote Procedure Calls) Execute RPC against a real
• NETCONF server (Catalyst 3850) Save created RPCs to collections for later
• use Browse data model trees and inspect YANG properties
18 Skipping all that and using the traditional ncclient
An alternate, old-school, way of working with netconf (that work with yang
models), is to use ncclient
See the python script, yang-ncclient.py for a working example python script.
19 Netconf configurations on IOS XE
Works on IOS XE 16.x and later, but check the actual versions.
19.1 3850-1# show running-config
The catalyst / nexus cisco switch has to have netconf-yang configured before
any netconf clients will be able to access the cisco netconf server:
netconf-yang —> Enable NETCONF/YANG globally. (~ 90 seconds to initialize)
username cisco1 privilege 15 password 0 cisco1
—> Username/password used for NETCONF-SSH access
19.2 To allow Netconf monitoring via snmp
3850-1# show running-config
snmp-server community <string> RW
netconf-yang cisco-ia snmp-community-string <string>
snmp-server trap link ietf
snmp-server enable traps snmp authentication linkdown linkup
snmp-server enable traps syslog
snmp-server manager
19.3 For Syslog,
this configuration must be present for the Data Model Interface (DMI) on the Catalyst 3850 to have the ability to generate NETCONF notifications defined in RFC 5277 when Syslog messages are generated by IOSd on the Catalyst 3850.
logging history debugging
logging snmp-trap emergencies
logging snmp-trap alerts logging snmp-trap critical logging snmp-trap errors logging snmp-trap warnings logging snmp-trap notifications logging snmp-trap informational logging snmp-trap debugging
19.4 For SNMP traps,
this configuration is required to generate NETCONF notifications.
In IOS-XE 16.3.1 software a maximum of 10 SNMP traps can be configured to
generate NETCONF notificationss but this restriction will be removed in a
future release. Notification generation for SNMP traps is enabled by default.
To disable generating SNMP trap notifications use this CLI
no netconf-yang cisco-ia snmp-trap-control global-forwarding”
netconf-yang cisco-ia snmp-trap-control trap-list 1.3.6.1.6.3.1.1.5.3
netconf-yang cisco-ia snmp-trap-control trap-list 1.3.6.1.6.3.1.1.5.4
netconf-yang cisco-ia snmp-trap-control trap-list 1.3.6.1.4.1.9.9.41.2.0.1
19.5 Direct from cisco.com documentation
- Network Connectivity Configuration of the Catalyst 3850 Used in this Example
The Catalyst 3850 management interface GigabitEthernet0/0 is used to connect
to the network and to the centralized management platform (a laptop will be
used) in this example. Dynamic Host Configuration Protocol (DHCP) has been
used to assign IP address 172.16.167.175 to this interface. Alternate
configurations can be used on the Catalyst 3850 as long as the laptop can
reach the Catalyst 3850 on the Network.
3850-1# show running-config

vrf definition Mgmt-vrf
 !
 address-family ipv4
 exit-address-family
 !
 address-family ipv6
 exit-address-family

interface GigabitEthernet0/0
 vrf forwarding Mgmt-vrf
 ip address dhcp
 negotiation auto

ip route vrf Mgmt-vrf 0.0.0.0 0.0.0.0 172.16.167.161

3850-1# show ip interface brief

Interface              IP-Address      OK? Method Status Protocol
Vlan1                  1.1.1.1         YES NVRAM  up     up
Vlan10                 10.10.10.1      YES NVRAM  up     up
Vlan20                 20.20.20.1      YES NVRAM  up     up
GigabitEthernet0/0     172.16.167.175  YES DHCP   up     up
Fo1/1/1                unassigned      YES unset  down   down
Fo1/1/2                unassigned      YES unset  down   down
GigabitEthernet1/0/1   unassigned      YES manual up     up
GigabitEthernet1/0/2   unassigned      YES unset  up     up
GigabitEthernet1/0/3   unassigned      YES unset  down   down
GigabitEthernet1/0/4   unassigned      YES unset  down   down
GigabitEthernet1/0/5   unassigned      YES unset  down   down
Verify NETCONF/YANG on the Catalyst 3850
- From the Command Line Interface (
CLI) of the Catalyst 3850, this command can be used to ensure that the software processes required to support theData Model Interface (DMI) on the Catalyst 3850 run oncenetconf-yangis configured.
3850-1# show platform software yang-management process
- confd : Running
- nesd : Running
- syncfd : Running
- ncsshd : Running
- dmiauthd : Running
- vtyserverutild : Running
- opdatamgrd : Running
- ngnix : Running
The next steps are performed
from the centralized management platform.In this example, a laptop (Apple MacBook Pro running macOS Sierra 10.12.2) is used that has network access to the Catalyst 3850. The commands are issued from a terminal prompt on the laptop. There is no special application loaded on the laptop at this point. - Ensure that the centralized management platform (laptop) can reach the
Catalyst 3850 (172.16.167.175) on the network. (
pingshould do)
USER1-M-902T:~ USER1$ ping 172.16.167.175

PING 172.16.167.175 (172.16.167.175): 56 data bytes
64 bytes from 172.16.167.175: icmp_seq=0 ttl=247 time=3.912 ms
64 bytes from 172.16.167.175: icmp_seq=1 ttl=247 time=6.917 ms
64 bytes from 172.16.167.175: icmp_seq=2 ttl=247 time=4.063 ms
64 bytes from 172.16.167.175: icmp_seq=3 ttl=247 time=4.371 ms
^C
Verify SSH connectivityto the Catalyst 3850 (172.16.167.175 in this example) from the centralized management platform (laptop) with the username and password (cisco1/cisco1) from the above Catalyst 3850 configuration. The response will be a longlist of NETCONF capabilitiesfrom the Catalyst 3850 followed by ahello message. TCP port830=netconf-ssh.Tip: If this SSH test does not work, ensure that any firewall in between the
laptop and Catalyst 3850 permits TCP port 830 (reference RFC 4742: https://tools.ietf.org/html/rfc4742).
USER1-M-902T:~ USER1$ ssh -s cisco1@172.16.167.175 -p 830 netconf
cisco1@172.16.167.175’s password: cisco1
<?xml version="1.0" encoding="UTF-8"?>
<hello xmlns="urn:ietf:params:xml:ns:netconf:base:1.0">
<capabilities>
<capability>urn:ietf:params:netconf:base:1.0</capability>
<capability>urn:ietf:params:netconf:base:1.1</capability>
<capability>urn:ietf:params:netconf:capability:writable-running:1.0</capability>
<capability>urn:ietf:params:netconf:capability:xpath:1.0</capability>
<capability>urn:ietf:params:netconf:capability:validate:1.0</capability>
<capability>urn:ietf:params:netconf:capability:validate:1.1</capability>
<capability>urn:ietf:params:netconf:capability:rollback-on-error:1.0</capability
--snip--
</capabilities>
<session-id>2870</session-id></ hello>]]>]]>

 Use < ^C > to exit
20 Devnet Sandboxes
Cisco Devnet offers serveral sandboxes that are accessible through the use of tokens. The tokens themselves are easily retrieved as well. This document shows how to retrieve these tokens and gives exampmles of their use. Also, this document points to multiple sample python scripts that demo their use.