Ansible for Networks
1 Ansible Overview
Ansible is an excellent tool for system adimintartors looking to automate various infrastructure servers, be they web servers, database servers, network elements.
Advantages of Ansible is that no agent need be run on the remote node.
- Ansible is simpler.
- Ansible uses YAML.
- Ansible is easy to learn.
- Ansible is lightweight.
- Ansible only needs SSH access to nodes.
- Ansible is free. Paid version (from RedHat) adds support & advanced tools
- a realtime monitoring dashboard,
- multi-playbook workflows
- scheduling jobs
Ansible lets you do: * IT automation Instructions are written to automate an IT admin's work
1.0.1 Consistent Configuration
Consistency of all systems in the infrastructure is maintained.
1.0.2 Automate deployement
Applications are deployed automatically on a variety of environments.
2 Ansible Details
Are available in my ansible.org file.
3 Ansible Network Modules
See the list here: https://docs.ansible.com/ansible/latest/collections/index_module.html
3.1 Efficient architecture through "modules"
Ansible works by connecting to your nodes and pushing out small programs, called "Ansible modules" to them. These programs are written to be resource models of the desired state of the system. Ansible then executes these modules (over SSH by default), and removes them when finished.
Your library of modules can reside on any machine, and there are no servers, daemons, or databases required. Typically you'll work with your favorite terminal program, a text editor, and probably a version control system to keep track of changes to your content.
3.2 Network Modules vs System Modules
Fundamentally ansible controller uses ssh to connet to the target nodes, and
then run python scripts on the target host that accomplish the tasks offered
by the module being run. That implies that the target hosts need to have
python interpreter available, and located in a directory that ansible will
be able to find it.
3.3 Network modules do NOT typically have a python interpreter
This then is a problem if ansible will be running python commands on the network switch or router. That is why Netork Modules use a different approach.
3.4 Network modules run on the controller, not the node
So, ansible ad-hoc and ansible playbooks that call network modules, such as the iosinterface module.
4 Cisco Ansible Network Modules
Modules are written in python (99% of the time) and used in playbooks which
are written in YAML. YAML written playbooks call python written modules.
Cisco develops various ansible modules, that they publish out on ansible.com
site. Modules:
- do one thing well
- Python or PowerShell
- Uses APIs and/or CLI tools
- abstract complexity from user
- Called by an Ansible task.
docs.ansible.com has lists of modules provided by various networking companies, including Cisco. Here is the list of network modules available.
- ios vs iosxr ( an asside )
- ios was the original, monolithic ios.
- Then came ios-xe which was a set up; still monolithic, based on ios but also had some advanced features.
- iosxr is a complete re-write, based on QNX ( a unix flavour) Processes can be independently stopped and restarted. (no longer monolithic)
- iosxr runs on large SP routers, like ASR and CRS series of routers
- ios-xe runs on ASR1K, and newer Catalyst 9K (that are not running as SDA nodes)
- ios runs on old Cisco routers
If a module does not do exactly what you want it to do, and you can program in python, then you can edit the module to your liking, and even publish the changes to github or gitlabs, or just use it internally.
See section on specific modules
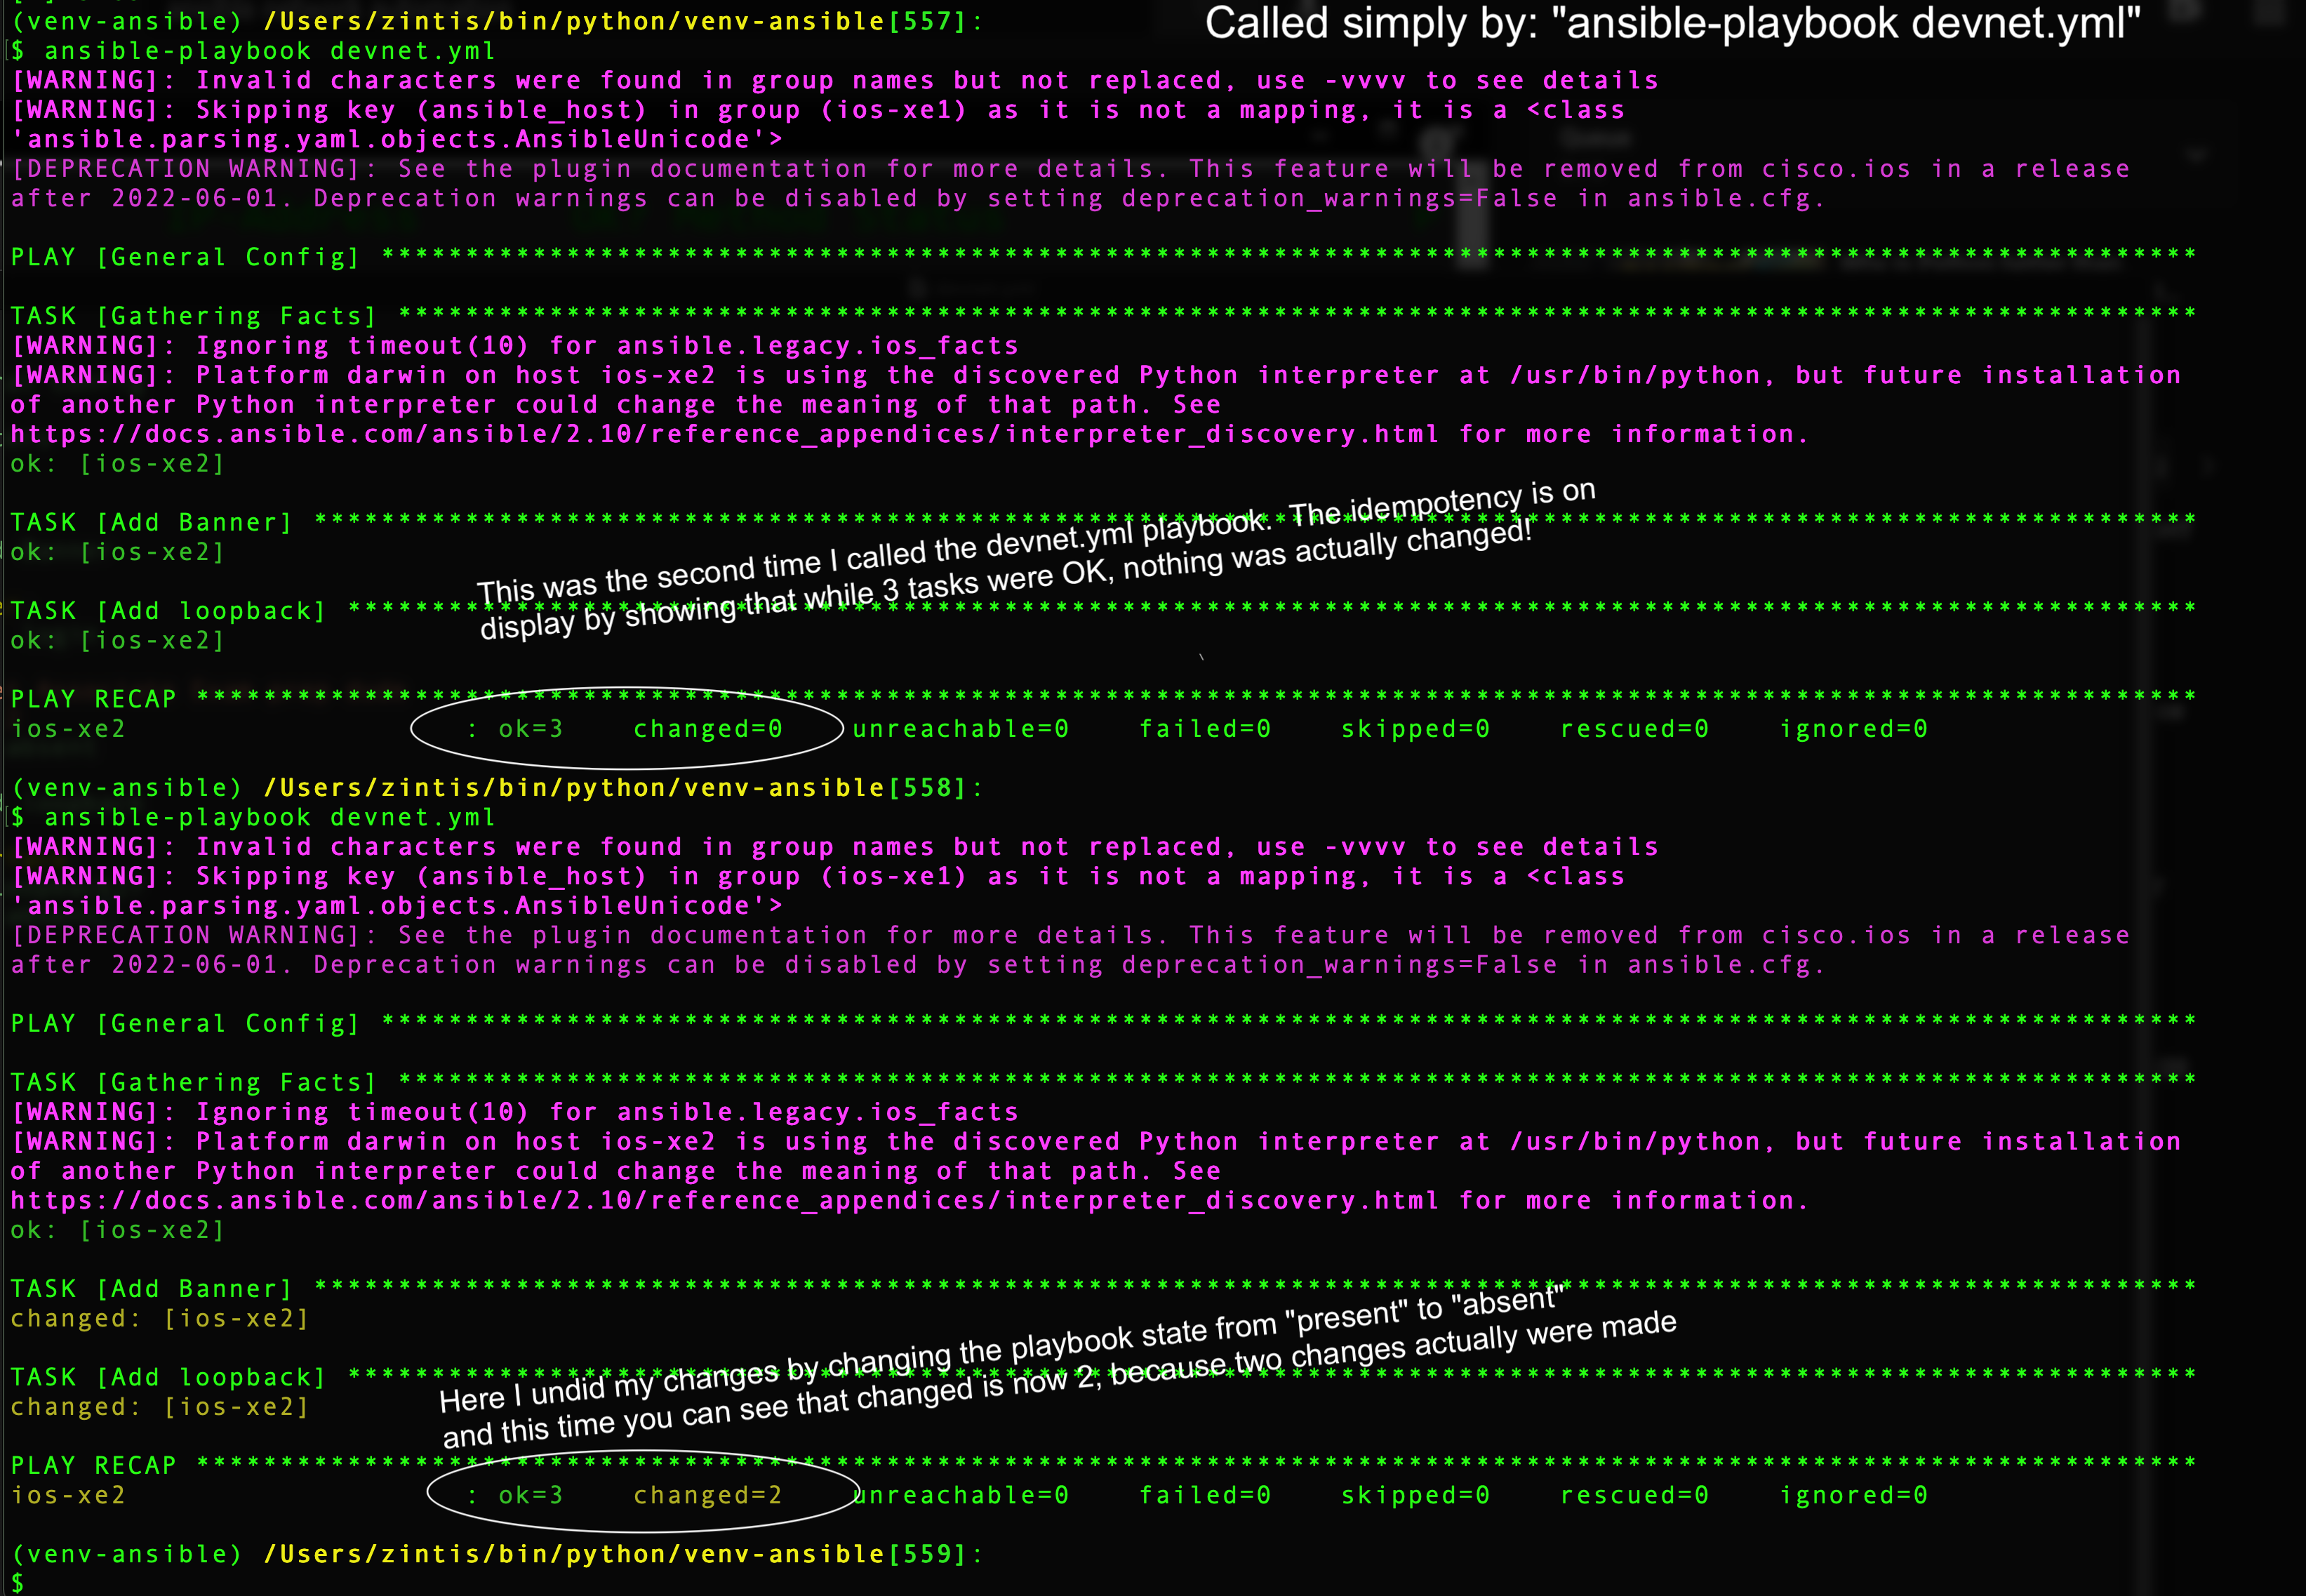
4.1 Working ios-xe sandbox play-book
Here is a yaml playbook file, devnet.yml that uses two cisco networking
modules, ios_banner and ios_interface
- Cisco provided ansible modules:
Cisco's ansible modules are grouped under:
- aci
- asa
- dcnm
- intersight
- ios
- iosxr
- meraki
- mso
- nae
- nso
- nxos Note: nxos-nxapi has been deprecated by
ansible.netcommon.httpapi - ucs
These are all downloadable from https://galaxy.ansible.com/cisco.
That means anyone can automate cisco devices using ansible without learning python. That's because while the ansible modules themselves are written in python, to use ansible you don't need to modify those modules, just use them.
4.2 hostkeychecking = False
Before starting make this change to /etc/ansible.cfg:
Uncomment host_key_checking = False so that you do NOT need to copy ssh
keys to the cisco devices in devnet ahead of time. In fact, Cisco Devnet
won't allow it anyway, so you MUST set host_key_checking = False
As described on docs.ansible.com, there are multiple communication protocols available to manage network node, because network modules execute on the control node instead of on the managed nodes.
Options are:
- XML over SSH
- CLI over SSH
- API over HTTPS
Depending on the vendor and model, you may forced to use one protocol, or
have a choice of protocols. The most common protocol is CLI over SSH.
You set the communication protocol with the ansible_connection variable:
- ansible.netcommon.networkcli
- ansible.netcommon.netconf
- ansible.netcommon.httpapi
- local
The ansibleconnection is mandatory for network modules
ansible_connection |
Protocol | Requires? | Persistent |
|---|---|---|---|
| ansible.netcommon.networkcli | CLI over SSH | networkos | yes |
| setting | |||
| ansible.netcommon.netconf | XML over SSH | networkos | yes |
| setting | |||
| ansible.netcommon.httpapi | API over | networkos | yes |
| HTTP/HTTPS | setting | ||
| local | depends on | provider | no |
| (deprecated) | provider | setting |
- note:
ansible.netcommon.httpapideprecateseos_eapiandnxos_nxapi
For ansible network modules, you MUST also have the networkos set to the correct vendor.
*
4.3 Cisco ioscommand module (interactive)
- name: show ip int brief
  ios_command:
    commands:
      - show ip int brief
      - show ip route 0.0.0.0
      - show ip neigh
    provider:
      host: 5.5.5.5
      post: 22
      authorize: yes
      auth_pass: Cisco
      username: admin
      password: cisco123
    register: if_data

- name: ip int brief output
  debug:
    var: if_data['stdout_lines'][0]
4.4 Cisco iosbanner module:
- name: Add a banner
  ios_banner:
    banner: login   # as opposed to other banners available on cisco routers
    text: |
      This router is part of DevNet.  Please play nice
    state: present
4.5 Cisco iosinterface module:
- name: Add a loopback interface 27
  ios_interface:
    name: loopback27
    state: present
4.6 Cisco config module:
- name: Merge provided configuration with device configuration
  ios_interfaces:
    config:
      - name: GigabitEthernet0/
        description: 'Configured and Merged by Ansible Network'
        enabled: True
      - name: GigabitEthernet0/3
        description: 'Configured and Merged by Ansible Network'
        mtu: 2800
        enabled: False
        speed: 100
        duplex: full
    state: merged
4.7 iosfacts module
tasks:
- name: Gather ios facts with ios_facts module
  ios_facts:
    provider:
      host: 5.5.5.5
      post: 22
      authorize: yes
      auth_pass: Cisco
      username: admin
      password: cisco123

- name: find IOS version
  debug:
    var: ansible_net_version

- name: display me your hostnmae
  debug:
    var: ansible_net_hostname
4.8
4.9 Cisco nxosinterface and nxosl3interfaces modules:
---
- name: Add loopbacks on all my nxos switches
  hosts: nxosswitches
  connection: local
  gather_facts: no
  tasks:
    - name: Create loopback
      with_items: "{{local_loopback}}"
      nxos_interfaces:
      interface: "{{item.name}}"
        mode: layer3
        description: "{{item.desc}}"
        admin_state: down
    - name: Configure new loopback interfaces
      with_items: "{{local_loopback}}"
      nxos_l3_interfaces:
        config:
        - name: "{{item.name}}"
          ipv4:
          - address: "{{item.ip_address}}"
            state: merged
With this example, we must also have the variables to pass into items So, the vars directory has this:
nxos_switch1.yml
---
local_loopback:
  - name: Loopback1
    desc: Ansible created loopback 1 interface
    ip_address: 192.168.1.1/24
  - name: Loopback2
    desc: Ansible created loopback 2 interface
    ip_address: 192.168.2.1/24


nxos_swtich2.yml
---
  - name: Loopback3
    desc: Ansible created loopback 3 interface
    ip_address: 192.168.3.1/24
  - name: Loopback4
    desc: Ansible created loopback 4 interface
    ip_address: 192.168.4.1/24
5 ansible.cfg for networking
Ansible searches the following locations, in order, for the ansible.cfg file:
- ANSIBLECFG: environment variable
- ./ansible.cfg (i.e. in the current directory)
- ~/.ansible.cfg (i.e. in the user's home directory)
- /etc/ansible/ansible.cfg
The configuration specifies only how the local machine/controller runs. There is no configuration file on the remote nodes.
5.1 My recommended ansible.cfg file
Placed in the top level directory of each project I am working on:
[defaults] inventory = ./inventory retryfilesenabled = False
[sshconnection] pipelining = True
6 Roles and the Local Machine Directory Structure
6.1 Roles
The roles are the collections of commands that can be run on hosts. The roles
are stored in specific directories, each of which have specific sub-directories.
Ansible will execute the commands stored in specific directories on a target
machine. The direcotries are all stored on the controller / local machine.
- Roles are written in
YAML. - Self-contained and portable
- Used for common configurations
- Enforcement of standards
- called from a playbooks
6.2 Roles Directory
The top level directory is the roles directory. Each role is stored in a
subdirectory of the roles directory. Each role directory must at least
contain a folder called tasks which contains a file called main.yml
7 Confusion No.1 about roles vs playbooks
I seem to see playbooks that look like they include roles. Then other playbooks that refer to roles only. What is the difference? What is the preferred way?
e.g. I have successfully run the role file in roles/basic/tasks/main.yml, which on first glance is NOT a valid YAML file as it does NOT begin with the "—" line.
- name: "Installing figlet"
  dnf: pkg=figlet, state=installed

- name: "Installing git"
  dnf: pkg=git, state=installed

- name: "Installing wget"
  dnf: pkg=wget, state=installed
The above examples shows three tasks, 1) intalling figlet, 2) installing git, and
- installing wget.
Notice however that the above three "tasks" do NOT have a "tasks:" line, just the "- name:" headings.
Then below, we write a playbook that IS a YAML file called playbook.yml in the directory above roles. This playbook calls the above tasks, through the reference to "basic-utils" which is the directory name hold the tasks directory, holding main.yml file.
---
- hosts: opsvms
  become: true
  roles:
  - basic-utils
But I have also successfully run playbooks that seem in include the roles. I think of them as "all-in-one" playbooks. For example:
(venv-ansible) ansible@c8host ~/Ansible-CentOS/playbooks[359] $
cat dnf-update.yml
---
  - name: update figlet, vim, iftop on all hosts
    hosts: opsvms
    tasks:
      - name: install epel repo first
        dnf:
          name: epel-release
          state: present
        become: true
        when: ansible_os_family == 'RedHat'

      - name: dnf update figlet vim and iftop
        dnf:
          name:
            - figlet
            - vim
            - iftop
          state: latest
        become: true
(venv-ansible) ansible@c8host ~/Ansible-CentOS/playbooks[360] $
£
You can see the "tasks:" section in this file and the "—" start to the YAML file.
I will hazard a guess here. The "all-in-one" playbook that includes the tasks is useful if the playbook and tasks is small. Contrast to the method where the playbook does NOT include tasks, but rather calls those via the "roles:" command, will scale better. i.e. the roles can be quite extensive, and they can be re-used on many different host groups more easily if you use method 1 above. But that, as of May 2020, is just my guess. I need to confirm that. Either way, both work.
This youtube video by Jeff Geerling confirms exactly that.
8 Ansible directory structure (best practices)
Ansible looks for files in certain directories. If they are not where they should be ansible will complain. For example, I tried running ansible-playbook from an incorrect directory and got the following error, which as it happens, shows where ansible is expecting to find certain files.
ansible-playbook  playbooks-with-roles/site.yml
ERROR! the role 'whats-my-status' was not found in
- /home/ansible/Centos-ansible/playbooks-with-roles/roles:
- /home/ansible/.ansible/roles:
- /usr/share/ansible/roles:
- /etc/ansible/roles:
- /home/ansible/Centos-ansible/playbooks-with-roles

The error appears to be in '/home/ansible/Centos-ansible/playbooks-with-roles/site.yml': line 5, column 5, but may
be elsewhere in the file depending on the exact syntax problem.
So, I cannot run ansible-playbook playbooks-with-roles/site.yml but rather
have to run ansible-playbook site.yml from the directory above roles.
In other words, all roles playbooks MUST be in the directory above roles.
I think it good practice to cp the role up to the SAME file, playbook.yml
and depending on what I choose to copy will dictate what actual playbook
runs. That way I am ALWAYS running ansible-playbook playbook.yml and
it is the contens of playbook.yml that changes.
Until I get a better idea, I will stick to this. (Sept 14, 2020)
8.1 My directory structure:
(venv-ansible) ansible@c8host ~/Ansible-CentOS[653] $
tree .
.
├── ansible.cfg
├── base-utils.yml
├── hosts
├── playbooks
│   ├── dnf-delete.yml
│   ├── dnf-install-list.yml
│   ├── dnf-install-list.yml~
│   ├── dnf-list.yml
│   ├── dnf-updateall.yml
│   ├── dnf-update-specifics.yml
│   └── dnf-update.yml
└── roles
    ├── apache-LAMP
    │   ├── defaults
    │   ├── files
    │   ├── tasks
    │   │   └── main.yml
    │   ├── tests
    │   └── vars
    ├── basic-utils
    │   ├── defaults
    │   ├── files
    │   │   └── bash.bashrc
    │   ├── tasks
    │   │   ├── install-utils.yml
    │   │   ├── main.yml
    │   │   └── zintis-note.txt
    │   ├── tests
    │   └── vars
    ├── each-dir-is-a-role.txt
    ├── install-pb.yml
    └── mailservers
	├── defaults
	├── files
	├── tasks
	│   └── main.yml
	├── tests
	└── vars

20 directories, 22 files
If I want to run a basics-playbook.yml you must be at the level above the
roles directory. Even if the basics-playbook.yml file is in playbooks
sub-directory. Best to run it as:
ansible-playbooks playbooks/basic-playbook.yml
8.2 Best Practices directory structure
In stead of having /etc/ansible.cfg as the only file, create a new directory structure for each project, and put the ansible.cfg file in the top level of that new directory. Following that, instead of using the default /etc/ansible/hosts file, you can create a hosts file in the ./inventory subdirectory as well.
Summarizing:
- a new folder per project
- ansible.cfg in the top directory
- ./inventory/hosts as hosts file
- ./groupvars
8.3 Best Practices ansible.cfg
Placed in the top level directory of the project:
[defaults] inventory = ./inventory retryfilesenabled = False
[sshconnection] pipelining = True
8.4 Best Practices ./inventory/hosts file
Placed in ./inventory/hosts.
localhost  ansible_connection=local
[dnac]
sandboxdnac.cisco.com

[dnac:vars]
user=devnetuser
password=

[iosxr]
sbx-iosxr-mgmt.cisco.com

[iosxr:vars]
ssh_port=8181
netconf_port=10000
xr_bash_port=8282
user=admin
password=C1sco12345

[routers]
ios-xe-mgmt-latest.cisco.com


[routers:vars]
ansible_user=developer
ansible_password=C1sco12345
ansible_connection=network_cli
ansible_network_os=ios
ansible_port=8181

[mansmeraki]
# do not store your personal API key here, but this is where would go.
#api_key=xxxxxxx
user=zintis@gmail.com
# do not store you personal password here, but this is where it goes.
password=yyyyyyyyyy


[meraki]
user=devnetmeraki@cisco.com
password=ilovemeraki
api_key=6bec40cf957de430a6f1f2baa056b99a4fac9ea0
8.5 Same file in YAML format (your pick which you want to use)
For the above .yml file, everything defined after a host: is considered a host variable.
finish this
8.6 Using DNAC as inventory source for Ansible
DevNet Code Exchange has this codeexchange link
The DNA Center Inventory plugin will gather all groups (sites) and inventory devices from DNA Center. The hosts are associated with appropriate sites in the hierarchy.
The following hostvars are associated with the network devices:
- ansibleconnection : networkcli for ios and nxos devices
- ansiblebecomemethod : for ios and nxos types. (enable)
- ansiblebecome : yes for ios and nxos types.
- ansiblehost : using the managementIpAddress from DNA Center
- conditionally mapped based on control file dnacenter.yml.
- ansiblenetworkos : derived from os below and required for Ansible networkcli connection plugin
- os : network operating system as stored in DNA Center's softwareType
- version : network operating system version as stored in DNA Center's softwareVersion
9 Useful built-in modules for networking
9.1 ping module
For example:
- ansible all -m ping
- ansible all -m ping -u zintis
- ansible all -m ping -u zintis –ask-pass
- ansible -m ping all
9.2 command module
First as an ad-hoc command:
- ansible -m command -a "hostname" mailservers
- ansible -m command -a "uptime" opsvms
- ansible -m command -a "cat /etc/resolv.conf" opsvms
Then as a playbook: -name: Run a command to show ip routes fill this in…
9.3 setup
The ansible setup module is a good way to see what variables ansible has made available to you for the nodes you are asking for. These are called ansible "facts".
ansible -i inventory vm1 -m setup if inventory is giving errors run this:
ansible ops -m setup # where ops is a section in the ansible hosts file.
And you will see all the variables at your disposal for the vm1 host.
Or can say all, if you like.
Now, any variable that comes back from setup, can be used in your playbooks. almost everything… ansibledns, ansibleipv4, etc.
IF your playbook has gatherfacts: false
Then a playbook that ask for stuff like ansibleosfamily or any other of
these many facts, the playbook will fail. So set gatherfacts: true if you
want to use the ansible facts
9.4 - debug: var=ansiblefacts
Can be run this in any playbook to see all available facts. the ansible setup module gives you the "raw" information.
You can reference the ansible facts in a template or playbook as:
{{ ansible_facts['devices']['xvda']['model'] }}
To reference the node name us:
{{ ansible_facts['nodename'] }}
10 Vendors providing ansible modules:
- Arista: arista.eos
- Cisco: cisco.ios, cisco.iosxr, cisco.nxos
- Juniper: junipernetworks.junos
- VyOS: vyos.vyos
11 Ansible for Networks
Automation is about performing simple, repetitive, high-volume tasks in order to reduce errors, gain consistency, be fast (agile).
Let's say you wanted add a security setting to all your routers, or maybe add a new VLAN to all your switches.
11.1 Example
The following yml file is a playbook that is confirmed to work on my CML lab:
---
- name: set some banners using ios_banner
  hosts: iosv
  connection: network_cli
  become: true

  tasks:
    - name: add an exec banner
      cisco.ios.ios_banner:
        banner: exec   # as opposed to other banners available on cisco routers
        text: |
          Welcome!  Your credentials have been approved.
          This router is part of Zintis model labs.  Do your worst!!!
          I will just rebuild it if it is pooched.
          .oO0Oo. .oO0Oo. .oO0Oo. .oO0Oo. .oO0Oo. .oO0Oo. .oO0Oo. .oO0Oo. .oO0Oo.
        state: present


    - name: add a login banner
      cisco.ios.ios_banner:
        banner: login   # as opposed to other banners available on cisco routers
        text: |
          Hang on Chuckie!   You had better be sure that you are allowed to access
          this anonymous internet cesspool of filth.  If you know what's good for
          you, close this session now and go watch the hockey game.
          You have been warned!
           <<</>>>  <<</>>>  <<</>>>  <<</>>>  <<</>>>  <<</>>>  <<</>>>  <<</>>>
        state: present


    - name: Add a motd banner
      cisco.ios.ios_banner:
        banner: motd   # as opposed to other banners available on cisco routers
        text: |
          By the way, this banner is maintained using ansbile, specifically
          the cisco.ios.ios_banner module.
          /\/\          /\/\          /\/\          /\/\          /\/\
           /\            /\            /\            /\            /\
        state: present


    - name: Remove the slip-ppp banner
      cisco.ios.ios_banner:
        banner: slip-ppp   # as opposed to other banners available on cisco routers
        state: absent
11.2 Credentials for ios routers for ansible
You notice that there is no mention of usernames and passwords. That is because I have them defined in my inventory/hosts file. This is the first of several approaches to passing router credentials to ansible:
- host:vars
Here is the relevant section from my
inventory/hostsfile:
iosv:
  children:
    eigrp:
    ospf:
  vars:
    ansible_become: yes
    ansible_become_method: enable
    ansible_network_os: cisco.ios.ios
    ansible_connection: network_cli
    ansible_user: ansible
    ansible_password: sedemo
    ansible_python_interpreter: /Users/zintis/bin/python/venv-ansible/bin/python
- prompt for password interactively.
Obivously not good for batch processes, but convenient when you are
developing your ansible playbooks:
ansible-playbook my-cisco-playbook.yml -u ansible -k
-u specifies the user. I usually set my cisco router user to be
"ansible"-k will prompt for the ssh password - use a
credentials.ymlfile create acredentials.ymlfile and store the username and password needed for the SSH connections file: creds.ymlusername: admin password: C1sco123!
- setup an Ansible command station on VLAN 4094, with ip addr 192.168.0.0/24
- create an inventory file that contains descriptions of your devices.
This inventory file can also arbitrarily group items as you see fit. An
example could be branchrouters, corerouters, accessswitches etc…
file: inventory
[branch_routers]
172.17.18.1
172.17.20.1
172.17.22.1

[core_routers]
10.0.5.1
10.0.6.1
10.0.10.1

[access_switches}
192.168.1.1
192.168.21.1
192.168.31.1
192.168.41.1
- create a playbook, writtin in YAML format.
—
- name:
12 Installation
12.1 MacOSX
13 Shutdown interfaces that are not connected
This is taken from the stackoverflow.com link.
You should use iosfacts to retrieve a dictionary containing all the interfaces. Then you can iterate over that dictionary to shutdown the interfaces that are not connected.
If you run your playbook using the -vvv switch, you will see the all the variables collected by iosfacts.
I believe in Ansible 2.9 and later, Ansible gathers the actual network device facts if you specify "gatherfacts: yes". With Ansible 2.8 or older, you need to use the "iosfacts" module.
---
- hosts: SWITCHES
  gather_facts: no

  tasks:
  - name: gather IOS facts
    ios_facts:

  - name: Shutdown notconnect interfaces
    ios_config:
      lines: shutdown
      parents: "interface {{ item.key }}"
    with_dict: "{{ ansible_net_interfaces }}"
    when: item.value.operstatus == "down"
This requires you to have a dictionary called anisble_net_interfaces that has
all your interface defitions:
anisble_net_interfaces
{
  "ansible_net_interfaces": {
      "GigabitEthernet0/0": {
          "bandwidth": 1000000,
          "description": null,
          "duplex": "Full",
          "ipv4": [],
          "lineprotocol": "down",
          "macaddress": "10b3.d507.5880",
          "mediatype": "RJ45",
          "mtu": 1500,
          "operstatus": "administratively down",
          "type": "RP management port"
      },
      "GigabitEthernet1/0/1": {
          "bandwidth": 1000000,
          "description": null,
          "duplex": null,
          "ipv4": [],
          "lineprotocol": null,
          "macaddress": "10b3.d507.5881",
          "mediatype": "10/100/1000BaseTX",
          "mtu": 1500,
          "operstatus": "down",
          "type": "Gigabit Ethernet"
      },
      "GigabitEthernet1/0/10": {
          "bandwidth": 1000000,
          "description": "Telefon/PC",
          "duplex": null,
          "ipv4": [],
          "lineprotocol": null,
          "macaddress": "null,
          "mediatype": "10/100/1000BaseTX",
          "mtu": 1500,
          "operstatus": "down",
          "type": "Gigabit Ethernet"
      },
      "GigabitEthernet1/0/11": {
          "bandwidth": 1000000,
          "description": null,
          "duplex": null,
          "ipv4": [],
          "lineprotocol": null,
          "macaddress": "10b3.d507.588b",
          "mediatype": "10/100/1000BaseTX",
          "mtu": 1500,
          "operstatus": "down",
          "type": "Gigabit Ethernet"
      }
  }
The value of the "ansible_net_interfaces" variable is a dictionary. Each key
in that dictionary is the interface name, and the value is a new dictionary
containing new key/value pairs. The "operstatus" key will have a value "down"
when the interface is not connected.
Using "withdict" in the "iosconfig" task loops through all top-level
key/value pairs in the dictionary, and you can use the variables in each
key/value pair by referring to "{{ item.key }}" or "{{ item.value }}".
Using "when" in the "iosconfig" task, you set a condition for when the task is to be executed. In this case we only want it to run when "operstatus" has a value of "down".
The "parents" parameter in the "iosconfig" task specifies a new section where the configuration is to be entered, in this case the section is the interface configuration mode. The interface name is returned for each interface in the "ansiblenetinterfaces" using the "{{ item.key }}" variable.
Refer to Ansibles documentation for these modules to get a better understanding of them: https://docs.ansible.com/ansible/latest/collections/cisco/ios/ios_facts_module.html https://docs.ansible.com/ansible/latest/collections/cisco/ios/ios_config_module.html