Ansible Overview
1 Ansible Components
- ansible config file ansible.cfg
- Inventory file (See Inventory file section)
- ansible module (See Ansible Modules section and Ansible built-in collection of modules Network Modules vs System 4
- Modules
- Tasks
- Play
- Playbooks
- Role

2 Ansible Overview
Ansible is an excellent tool for system adimintartors looking to automate various infrastructure servers, be they web servers, database servers, network elements.
For Cisco, it is a configuration management platform. You can also use it to manage configuration of VMWare NSX infrastructure in data centers.
Using Ansible allows you to have consistent configuration across many systems.
You also get fewer fat-finger mistakes. Ansible uses code you can write
to /describe the installation and setup of servers. This makes it repeatable.
Similar to Puppet and Chef, and well as SALT
Advantages of Ansible are:
- no agent need be run on the remote node.
- Ansible is simple
- Ansible uses YAML.
- Ansible is easy to learn.
- Ansible is lightweight.
- Ansible only needs SSH access to nodes.
- Ansible can also use NETCONF, or REST API, or SNMP to access the nodes.
- Ansible can even adapt to use some other local client, X, to access a remote device that does not support ansible. Ansible will then control the local device client, X, that then controls the remote device, often IOT device.
- Ansible is free. Paid version (from RedHat, now IBM) adds support and advanced tools a realtime monitoring dashboard, multi-playbook workflows and scheduling jobs
- Ansible playbooks is really
orchestrationi.e. the process of making needed changes in the required order against a specific technology, following the parameter of that technology.
Ansible lets you do:
2.0.1 IT automation
Instructions are written to automate an IT admin's work.
2.0.2 Consistent Configuration
Consistency of all systems in the infrastructure is maintained.
2.0.3 Automate deployement
Applications are deployed automatically on a variety of environments.
2.1 Ansible is a Push configuration tool
Pushconfiguration: server pushes configuration to the nodes- The server forces (pushes) the config onto the node. (ignores what is already there. So there is no need for the node to communicate back)
- Unlike Chef and Puppet,
- No agent is needed on the node. Contrast that to
Puppet Chefthat as aslaveclienton every node, and apuppet master.
2.1.1 Pull configuration tool (not ansible)
Pull configuration:
- nodes check with the server periodically and fetch the configurations from it.
- each node needs an agent to do the periodic checking and fetching.
2.2 Efficient architecture through "modules"
Ansible works by connecting to your nodes and pushing out small programs, called "Ansible modules" to them. These programs are written to be resource models of the desired state of the system. Ansible then executes these modules (over SSH by default), and removes them when finished.
It is the actual module that is sent to the node, but then executed locally on the node, therefore the node must have a python interpreter to use to execute these modules. (remember modules are written in python). All true except in networking. See Network Modules vs System Modules section below.
Your library of modules can reside on any machine, and there are no servers, daemons, or databases required. Typically you'll work with your favorite terminal program, a text editor, and probably a version control system to keep track of changes to your content.
2.2.1 Help on an Ansible Module
When you want to learn about a module and how to use it correctly,
issue the command "ansible-doc <modulename>"
2.3 Ansible Playbook Overview
Ansible uses a concept of playbooks which are simply scripts that run against
devices in your environment. Playbooks are extensible, because they use modules
written in Python, so basic Python skills lets you write your own module for
a device, or tweak an existing module to enhance that module's functionality.
2.3.1 Playbooks w.r.t. roles
Ansible playbooks simply take the roles that you have created, and the hosts
groups that you have created, and map them together. i.e. Playbooks dictate
which role will be applied to which target node.
Playbooks group together one or more plays.
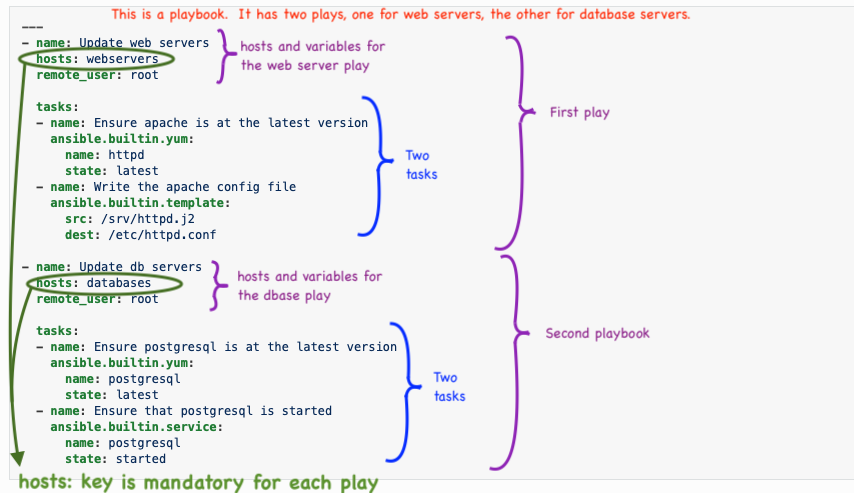
2.4 Ansible plays
Each play is a list of tasks mapped to a set of hosts which run on those
hosts to define the role that those systems will perform.
Actually a play is a list of tasks and roles that should be run. But that
is NOT the definition used by Cisco.
| Cisco description | |
|---|---|
| Module | Code, often written in Python, to perform an action |
| on a managed device. Often vendor supplied, or built-in. | |
| Task | An action referenceing a module to run together with |
| input arguments and actions | |
| Play | A set of tasks to a host or group of hosts |
| Playbook | A yaml file that includes one or more plays |
| Role | A set of playbooks, often prebuilt, used to execute a |
| standard config in a repeatable manner | |
| A single host can have multiple roles |
2.4.1 Playbooks are written in YAML… while modules are written in Python
2.5 My first ansible for linux playbook
File is "dnf.yml". This is an "all-in-1" playbook, meaning, the tasks are included in the playbook itself. See "roles" for a more scalable approach.
---
   - name: add figlet to all hosts
     hosts: *
     tasks:
       # install epel respository first
       name: epel-release
       state: latest
     tasks:
       # install figlet
       name: figlet
       state: installed   # don't really care about the latest figlet
Another example:
---
- hosts: all
  become: true

- name: Install apache httpd
  apt:
   name: apache2
   state: present
- name: Copy in new index file
  copy:
   src: index.html
   dest: /var/www/html/index.html
   mode: '0755'
You could also use roles. Here is an example of installing apache2 using roles:
---
- hosts: all
  become: true
  roles:
  - install_apache2
For the above example, there needs to be a file called "installapache2" ???
2.6 Similar Offerings: chef and puppet
From: Ansible.com
"Ansible is a radically simple IT automation engine that automates cloud provisioning, configuration management, application deployment, intra-service orchestration, and many other IT needs.
Designed for multi-tier deployments since day one, Ansible models your IT infrastructure by describing how all of your systems inter-relate, rather than just managing one system at a time.
It uses no agents and no additional custom security infrastructure, so it's easy to deploy - and most importantly, it uses a very simple language (YAML, in the form of Ansible Playbooks) that allow you to describe your automation jobs in a way that approaches plain English."
3 Roles and the Local Machine Directory Structure
3.1 Roles (a set of playbooks)
The roles are the collections of commands that can be run on hosts. Roles are NOT defined within a playbook, but are a set of playbooks. Roles are stored in specific subdirectories, each of which have specific subdirectories.
The goal of roles is to organize playbooks and increase the flexibility and reusablility of ansible playbooks.
Ansible will execute the commands stored in specific directories on a target machine. The direcotries are all stored on the controller / local machine.
Within a given role subdirectory you can define variables, templates, files, and handlers that are specific to that role. When a playbook then calls a role, all those customizations are then applied. Makes for great flexibility.
Like a play, the role defines tasks and handlers. However, roles do not define
on which hosts the role will be run. Therefore you must reference roles from
within a playbook
3.2 Roles Directory
The top level directory is the roles directory. Each role is stored in a
subdirectory of the roles directory. Each role directory must at least
contain a folder called tasks which contains a file called main.yml
3.3 Roles in a playbook
---
- name: play1
  hosts: all
  become: true
  pre_tasks:
  - name: do something before roles
    debug: msg="this is run before a role"
  roles:
  - install_role

- name: play 2
  hosts: group2
  roles:
  - config_role
Notice that it is the play that has the list of tasks and roles that should
be run.
4 Local Machine i.e. "controller"
Ansible has a controller, or master server, that controls one or many nodes. The master server is also known as the "local machine". Because you run the automation playbooks from this controller, as a user on that controller, i.e. on the "local machine".
The local machine is the master that pushes configs out to nodes. It has 3 parts: 1) Inventory file 2) the Ansible Modules writtin in python, and 3) the config file, ansible.cfg
Even though the playbooks run on local machines, i.e. the "controller" the modules typically push out a python script to the managed node, and run the script remotely on the managed node. For this to work the managed node has to have python installed on it. Also, the ansible controller has to know where this python interpreter is located on the remote/managed node. This is typically accomplished by a variable called
5 ansible.cfg file
When first installing ansible, an ansible directory won't exist. You have to create the directory manaully, along with the hosts and ansible.cfg files.
The file is USUALLY in /etc/ansible/ansible.cfg but could be elsewhere. The
first one found will be used. ansible searches the following locations
as shown in order ansible.cfg is searched
The configuration specifies only how the local machine/controller runs. There is no configuration file on the remote nodes.
5.1 order ansible.cfg is searched
ANSIBLE_CFG: environment variable./ansible.cfg(i.e. in the current directory)~/.ansible.cfg(i.e. in the user's home directory)/etc/ansible/ansible.cfg(i.e. system wide in /etc directory)
5.2 To confirm which ansible.cfg file is selected
Run ansible-config --version
ansible-config --version
ansible-config 2.9.13
  config file = /etc/ansible/ansible.cfg
  configured module search path = ['/home/ansible/.ansible/plugins/modules', '/usr/share/ansible/plugins/modules']
  ansible python module location = /home/ansible/.venv-ansible/lib/python3.8/site-packages/ansible
  executable location = /home/ansible/.venv-ansible/bin/ansible-config
  python version = 3.8.5 (default, Sep  7 2020, 12:02:06) [GCC 8.3.1 20191121 (Red Hat 8.3.1-5)]
(.venv-ansible) ansible@c8host /etc/ansible[1034] $
5.3 Best Practices ansible.cfg
Placed in the top level directory of the project:
[defaults] inventory = ./inventory retryfilesenabled = False
[sshconnection] pipelining = True
6 Inventory file
The inventory file is a listing, and grouping of all the nodes that can be
ansible managed by the controller/local machine. To see what what hosts are
defined, you can run ansible all --list hosts
- nodes are the remote hosts or routers or switches.
- groups are collections of nodes under specific labels of your choosing.
- The grouping of nodes into common classes by type is so that ansible can
operate on the whole group as one. - Optionally the hosts can have host variables (
host-vars) in the hosts file. - hostvars can also be kept separately in a directory.
The default inventory file is /etc/ansible/hosts
A better approach is to set the inventory location in ansible.cfg as:
./inventory which means a subdirectory in the top level project directory,
one for each new project. Then the hosts files are always accessible by the
relative path ./inventory/hosts for the top of the project directory.
I have gone and changed ansible.cfg to make the hosts file in ./inventory of the local ansible diretory. That way you can have different host files for each projet you run on. See section for recommended setup.
Here's what a plain text inventory file looks like, .ini format and yaml (mostly taken from the horse's mouth: docs.ansible.com )
localhost ansible_connection=local
outside.zintis.ops

[lab]
vm[1:5].zintis.ops

[dbservers]
db0.example.com
172.27.32.2
mysql
mariadb-1
mariadb-2

[labservers]
vm1  ansible_host=192.168.111.11
vm2
vm3 ansible_host=192.168.111.13
vm4
vm5

[edgeswitches]
192.168.111.1
192.168.50.1

[webservers]
web1.zintis.ops
web2.zintis.ops
web3.zintis.ops

[webservers:vars]
apache_http_port=80
apache_https_port=443
The same hosts file csn be written in yaml:
---
ungrouped:
  hosts:
    localhost:
      ansible_connection:  local
    outside.zintis.ops:

lab:
  hosts:
    vm[1:5].zintis.ops:

dbservers:
  hosts:
    db0.example.com:
    db1.example.com:
    mysql:
    mariadb-1:
    mariadb-2:
    mariadb-3:


labservers:
  hosts:
    vm1:
      ansible_host: 192.168.111.11
    vm2:
    vm3:
      ansible_host: 192.168.111.13
    vm4:
    vm5:

edgeswitches:
  192.168.111.1:
  192.168.50.1:

webservers:
  hosts:
    web1.zintis.ops:
    web2.zintis.ops:
    web3.zintis.ops:

  vars:
    apache_http_port:   80
    apache_https_port:  443
Once inventory hosts are listed, variables can be assigned to them in simple
text files (in a subdirectory called group_vars/ or host_vars/) or
directly in the inventory file. See variable section.
Or, as already mentioned, use a dynamic inventory to pull your inventory from data sources like EC2, Rackspace, or OpenStack.
6.1 inventory domain name variations.
Ansible takes the first string on a line in the hosts file as
inventory_hostname You can override that using ansible_host on each line
in your inventory, or in the [vars] section like follows:
- If you have very long domain names, and want to shorten the typing of these
in your inventory file, you can optionally use ansible_host
So rather than have:
[lab]
vm[1:5].zintis.ops

[webservers]
web1.zintis.ops
web2.zintis.ops
web3.zintis.ops

[webservers:vars]
apache_http_port=80
apache_https_port=443
You could have:
[all:vars]
host_domain=zintis.ops
ansible_host="{{inventory_hostname}}.{{host_domain}}"

[lab]
vm[1:5]

[webservers]
web1
web2
web3

[webservers:vars]
apache_http_port=80
apache_https_port=443
See intro to ansible inventory link in docs.ansible.com for more details.
6.2 To confirm hosts are configured
Run ansible all --list hosts and that should show you all your inventory
6.3 Best Practices ./inventory/hosts file
Placed in ./inventory/hosts. See section Inventory file below for details.
localhost  ansible_connection=local

[labservers]
vm1 ansible_host=192.168.111.11
vm2 ansible_host=192.168.111.12
vm3 ansible_host=192.168.111.13
vm4 ansible_host=192.168.111.14 ansible_python_interpreter: /usr/bin/python
vm5 ansible_host=192.168.111.15

[continents]
aus ansible_host=172.28.105.2
ant ansible_host=172.28.105.3
asia ansible_host=172.28.105.5
eu  ansible_host=172.28.105.6
sa  ansible_host=172.28.105.8
6.4 Same file in YAML format (your pick which you want to use)
The .ini file format for hosts is more common. Howerver, you can also use YAML format for the hosts(inventory) file. The same file is shown in YAML:
all:
  hosts:
    localhost:
      ansible_connection=local
  children:
    labservers:
      hosts:
        vm1:
          ansible_host: 192.168.111.11
        vm2:
          ansible_host: 192.168.111.12
        vm3:
          ansible_host: 192.168.111.13
        vm4:
          ansible_host: 192.168.111.14
          ansible_python_interpreter: /usr/bin/python
        vm5:
          ansible_host: 192.168.111.15

    lab:
      hosts:
        vm[1:5].zintis.ops
      vars:
        variable1:  value1

    continents:
      hosts:
        aus:
          ansible_host: 172.28.105.2
        ant:
          ansible_host: 172.28.105.3
        asia:
          ansible_host:172.28.105.5
        eu:
          ansible_host: 172.28.105.6
        sa:
          ansible_host: 172.28.105.8
For the above .yml file, everything defined after a host: is considered a host variable.
Two more examples, proved to work with sandbox. They are the same hosts, but one is in [ini] format, the other in .yml format:
# minimal hosts version (ini) confirmed to work Feb 16, 2021
# for both of these sandbox routers.
[routers]
ios-xe-mgmt-latest.cisco.com
ios-xe-mgmt.cisco.com

[routers:vars]
ansible_user=developer
ansible_password=C1sco12345
ansible_connection=network_cli
ansible_network_os=ios
ansible_port=8181
netconf_port=10000
http_port=80
https_port=443
---
routers:
  hosts:
    ios-xe1:
      ansible_host: ios-xe-mgmt-latest.cisco.com
    ios-xe2:
      ansible_host: ios-xe-mgmt.cisco.com
  vars:
    ansible_user: developer
    ansible_password: C1sco12345
    ansible_connection: network_cli
    ansible_network_os: ios
    ansible_port: 8181
    netconf_port: 10000
    http_port: 80
    https_port: 443
7 ansible variables
To quickly check if your variables are defined properly, you can run the
command $ ansible-inventory --list that will list your inventory and all the
variables associated with your inventory, combinine all the sources where
any variables are found. See the section Where to define variables: for an
inclusive list of where variables can be defined and used.
7.1 YAML gotcha:
If you start a value with {{ foo }}, you must quote the whole expression to
create valid YAML syntax, so "{{ foo }}"
Wrong:
app_path: {{ base_path }}/22
Correct:
app_path: "{{ base_path }}/22"
Automation of multiple systems, each with slight variations, would be very
difficult if not for ansible supporting variables. These variables include
lists and dictionaries, so that all these slight variations can be supported
and automated often within a single ansible command or playbook.
In a playbook you can use these variables (and lists) in the following:
as module arguments- in conditional
"when"statements - in
templates - in loops
- in hosts file (deprecated, but still supported) eg: 192.168.11.15 OS=LINUX
As the docs.ansible.com site directs, you can see many examples of variable use in the ansible-examples section.
As already seen in multiple places in this org file, ansible variables can
be set in numerous places, and then used by playbooks and in playbook loops.
Since ansible uses ssh, the ssh environment is available and active to any
ansible task (session). These would typically be environement variables set
in .bash_profile or .bashrc, or other shell specific environment tweaks.
We can use ansible to set and retrieve environment variables too. Typically
these are temporarily set, and NOT permanently saved to the ssh user on the
remote host. After the playbook closes, those environment variables are gone.
7.2 Defining Variables
Only alphanumeric characters and underscores can be used in a variable name.
Variables cannot begin with a number. No python word or command can be used
as a variable name.
- As ini format
vm1 ansibleuser=ansible remoteinstallpath=/opt/usr/local/packages vm[1:5] ansibleuser=ansible (this expands to vm1, vm2, vm3, vm4, vm4)
- As yaml format
vm1: ansibleuser: ansible remoteinstallpath: /opt/usr/local/packages # this dir is just for eg.
- list variables
A single variable name, with multiple values. They can be stored inside square brackets, as csv, OR as an itemized list.
neighbors:
  - AS656
  - AS64512
  - AS64513
neighbors=[AS656, AS64512, AS64513]
referencing:
region: "{{ region[0] }}" - dictionary variables
foo:
  field1: one
  field2: two
referencing:
- region: foo['field1'] ** preferred
- region: foo.field1 * discouraged as could collide with python attributes and methods
7.3 Referencing nested variables
Many registered variables (and facts) are nested YAML or JSON data structures. You cannot access values from these nested data structures with the simple {{ foo }} syntax. You must use either bracket notation or dot notation. For example, to reference an IP address from your facts using the bracket notation:
For example:
{{ ansible_facts["eth0"]["ipv4"]["address"] }}
To reference an IP address from your facts using the dot notation:
{{ ansible_facts.eth0.ipv4.address }}
7.3.1 What would the corresponding variable file syntax be for these examples??
7.4 Where to define variables:
From the docs.ansible.com variables docs: "You can define these variables in
your playbooks, in your inventory, in re-usable files or roles, or at the
command line. You can also create variables during a playbook run by
registering the return value or values of a task as a new variable."
7.4.1 Direct in a playbook in a vars: section
vars:
  http_proxy: http://proxy.acme.ca:8080/
  key: value

  proxy_vars:
    http_proxy: http://dev.proxy.acme.ca:8080/
    https_proxy: https://example-proxy:80/
Here you can refer to the individual variables, or you can also call up the variable using environment: proxyvars
7.4.2 Direct in a playbook with a pointer to a vars: file
The result is identical as with a vars: section. Use variables in separate files when there are many of them. Otherwise can keep it in the playbook in the vars: section.
vars_files:
  - vars/main.yml
where vars/main.yml is a file that has only:
---
key: value
key: value
...
7.4.3 Inventory File per Host: (deprecated but still supported)
mywebserver http_prot=8080, ansible_user=ansible
7.4.4 Inventory File as a Separate host:vars section
[mywebserver:vars]
http_prot=8080
ansible_user=ansible
7.4.5 Inventory File as a Separate group:vars section
[webservers:vars]
http_prot=8080
7.4.6 vars: files in ./hostvars project subdirectory
The ./hostvars subdirectory can have files named the same as their mapping
host node, i.e. vm1.yml, vm2.yml etc… for vm1, vm2, etc…
Here I am cat a vm specific file in ./host_vars subdirectory
---
# vm1 host specific variables, hostvars

ansible_user: "ansible"

# prompt colours red cyan red
c1: 31
c2: 36
c3: 31
For Cisco networking that could look like: r4.yml
---
local_loopbacks:
- name: Loopback7
  ip_address: 172.17.17.2
My CML lab setup has these router yml files:
---
interfaces:
  GigabitEthernet0/1:
    desc: "border link to r2 configured by ansible"
    ip_address: 172.31.31.10/24
  GigabitEthernet0/2:
    desc: "intra area link to r5 configured by ansible"
     ip_address: 10.5.0.10/24
7.4.7 vars should be a simple YAML dictionary
The contents of each variables file is a simple YAML dictionary. For example:
---
# in the above example, this would be vars/external_vars.yml
somevar: somevalue
password: magic
7.4.8 groupvars: files in the ./groupvars project subdirectory
The ./groupvars subdirectory can have files named the same as the name given to the hosts inventory sections. i.e. labservers.yml for a section in host that is named [labservers]
---
ansible_user: ansible
7.4.9 use the "environment:" ansible built-in module per task
I have not trie this method, but if environment: is at the playbook level, then ALL tasks can have access to those variables.
environment:
  http_proxy: http://example-proxy:80/
  https_proxy: https://example-proxy:80/
7.4.10 Add an environment variable using lineinfile
Simply add the variable into .bashprofile or .bashrc using lineinfile module. (need an example here)
7.4.11 In a playbook as result of previous task
You can also create variables during a playbook run by registering the
return value or values of a task as a new variable. See the next section
called Registering variables, but in short you use register: my_result
in a task and then you can use myresult later.
7.4.12 From "ansible facts" retrieved from the remote systems
You can use ansible to retrieve/discover a bunch of variables from the remote node you are managing. These remote system variables are called "facts". You can dump the load of them using ansible -m setup
7.4.13 From ansible magic variables
7.5 Using variables (i.e. referencing variables)
Once defined, you can use them
- as module arguments
- in conditional "when" statements
- in templates
- in loops
- use jinja2 syntax
You use jinja2 syntax, i.e. {{ variable }} to reference a variable. Example:
src=fubar.conf.j2
dest={{ remote_install_path }}/fubar.conf=
Another example, with variables:
vars:
  my_file: "fixupfile"
debug:
  msg: "My fixup file is {{ my_file }}"
- YAML GOTCHA
- yaml syntax is key:<space>value, so if try to leave the spaces as is in the jinja2 variable format, i.e. {{ variable }}, you will get an error.
- So use "" whenever referencing variables:
template:
  src: fubar.conf.j2
  dest: {{ remote_install_path }}/fubar.conf
Will get you a Syntax ERROR while loading YAML. Use this instead:
template:
  src: fubar.conf.j2
  dest: "{{ remote_install_path }}/fubar.conf"
- List variables
List variables can be referenced as a whole or as individual list fields. The first item is 0, second is 1, …
region: "{{ region[0] }}"Dictionary variables can be referenced as the dictionaryname.field1 or
dictionaryname['field1'] - nested variables
Many registered variables and facts are nested YAML or JSON data structures These may not be accessible with a simple {{ foo }}. Use bracket notation. (and occasionally dot notation).
{{ ansible_facts["eth0"]["ipv4"]["address"] }}or if you must
{{ ansible_facts.eth0.ipv4.address }} - transforming variables with jinja2 filters
see Jinja2 filters for how to do this, but for example
region: "{{ region[0] | upper }}"to change the region to all upper case.
7.6 Registering variables
Any task that you have, you can register it to a variable. Then using debug you can display the variable, and so find out everything about the task.
In a task include the line:
register: kasmanseitir
Then create another task, and call up debug: module
debug: var=kasmanseitir
Once you see all the info on the task, you can run it again, and recall
a specific field from that task, for instance
debug: var=kasmanseitir.rc
But a more robust approach (that ends up doing the same thing, just safer)
debug: var=kasmanseitir['rc']
The reason is that some returned fields might have a dash, like rc-status If so, then your playbook will fail as "dash" "-" is not a valid syntax in ansible. So, be safe and use ['field'] and not .field notation.
You can turn off gathering facts, by telling ansible gatherfacts: no You may want to turn off facts gathering on a docker container… But if you turn off facts, then none of the facts (variables) from any remote node will be unavailable to you.
8 Ansible Variable Precendence
As shown above, and NOT exhaustively, you can set variables in many places. Here is the precedence ansible will take when conflicts arise. From least to greatest. i.e. lower down in the list will override higher up in the list
- command line values (for example, -u myuser, these are not variables)
- role defaults (defined in role/defaults/main.yml) 1
- inventory file or script group vars 2
- inventory groupvars/all 3
- playbook groupvars/all 3
- inventory groupvars/* 3
- playbook groupvars/* 3
- inventory file or script host vars 2
- inventory hostvars/* 3
- playbook hostvars/* 3
- host facts / cached setfacts 4
- play vars
0
- play varsprompt
- play varsfiles
- role vars (defined in role/vars/main.yml)
- block vars (only for tasks in block)
- task vars (only for the task)
- includevars
- setfacts / registered vars
- role (and includerole) params
- include params
- extra vars (for example, -e "user=myuser")(always win precedence)
8.1 Precedence footnotes:
- 1 Tasks in each role will see their own role’s defaults. Tasks defined outside of a role will see the last role’s defaults.
- 2(1,2) Variables defined in inventory file or provided by dynamic inventory.
- 3(1,2,3,4,5,6) Includes vars added by ‘vars plugins’ as well as hostvars and groupvars which are added by the default vars plugin shipped with Ansible.
- 4 When created with setfacts’s cacheable option, variables will have the high precedence in the play, but will be the same as a host facts precedence when they come from the cache.
8.2 Scoping variables
In order:
- Global: set by config, env variables and command line
- Play: each play and contained structures, vars entries (vars; varsfiels: varsprompt), role defaults, and vars
- Host: variables direclty associated to a host, like inventory, includevars, facts, registered task outputs.
Best practice: Choose to define a variable based on the kind of control you need over the values, but here are tips:
- inventory variables when dealing with geography or behaviour
- groups often map roles to hosts, so you can set variables on the groups instead of defining them on a role
- child groups override parent groups and host vars override group vars
- set common defaults in groupvars/all, generally alongside your inventory file.
# file: /etc/ansible/group_vars/toronto
ntp_server: toronto-time.acme.org

# file /etc/ansible/host_vars/west-coast-test
ntp_server: override-west-ntp.acme.org
- set defaults in roles to avoid undefined-variable errors. Often reasonable
defaults should be set in roles/x/defaults/main.yml file. (or override
that using the inventory, or at the command line.)
# file ./roles/x/defaults/main.yml
# if no other value is supplied in inventory or as  a parameter, pick
# this value
http_port: 80
- set vars in roles ensure it is not overridden by inventory variables.
Often reasonable
defaults should be set in roles/x/defaults/main.yml file. (or override
that using the inventory, or at the command line.)
# file ./roles/x/vars/main.yml
# this, 100% will be used in this role
http_port: 80
- Pass variables as parameters when you call roles (again best practice)
It improves readability, clarity, and flexibility, adn overrides any
defaults that exist for a role
roles:
  - role: apache
    vars:
      http_port: 8080
Or same role multiple times for example:
roles:
- role: app_user
  vars:
    myname: Ian
- role: app_user
  vars:
    myname: Terry
- role: app_user
 vars:
   myname: Graham
- role: app_user
 vars:
   myname: John
8.3 Running a playbook
Once our YAML playbook is finished and saved as a .yml file, you run it using the command:
ansible-playbook <filename>.ymlansible-playbook -u root <filename>.ymlif you are overriding the user id.Cisco claims that "ansible uses the root username by default" so -u can be omitted. THIS IS INCORRECT. The default username is to use yourself. So cisco is correct
only if you are logged in as rootwhich of course is NOT recommended. For example, I use a username of ansible and all my ansible playbooks run as the user ansible.
Often you will see -K as an option when you need to be prompted for a passwd.
So, ansible-playbook -K <filename>.yml
If my is this playbook file called basics-playbook.yml:
---
- hosts: opsvms
  become: true
  roles:
  - basic-utils
If I was to run ansible-playbook basics-playbook.yml
Ansible will look in the following directories for the basic-utils role:
(notice: it was NOT looking for basics-playbook.yml file, but basic-utils
which means it found the basics-playbook.yml file but was
unable to find the role file, called 'basic)
- /home/ansible/Ansible-CentOS/playbooks/roles:
- home/ansible.ansible/roles
- /usr/share/ansible/roles
- /etc/ansible/roles
- /home/ansible/Ansible-CentOS/playbooks
That failed for me with ERROR! the role 'basic-utils' was not found in :
According to my tree, I put it in
9 handlers
9.1 handlers
Handlers are just tasks. But the handler name allows it to be "called" based
on the condition of some other tasks, or at the very end of the playbook. So
they are tasks that ONLY run when notified to run by another task.
Handlers will not be called if there was NO change in the system based on the playbook being executed. That way, if the config you want is already on the node in question, you don't have to restart apache (for example).
Other tasks tell a handler to run, using the notify: mytaskname function.
-tasks:
  - name: Write the apache config file
    ansible.builtin.template:
      src: /srv/httpd.j2
      dest: /etc/httpd.conf
    notify:
    - Restart apache
-handlers:
  - name: Restart apache
    systemctl: restart ?????/   this is wrong, find whzt is correct...
Handlers are very nice for preventing repeated restarts of a given service. Highly recommend. They can be used for other things that only need to be run once as well. This is accomplished by task running, and if successful use notify command that then is collected by the end of the playbook and only THEN run once.
9.2 Series of progressive examples showing handlers
Start with a simple playbook that installs Apache:
---
# run with "ansible-playbook -i inventory ansible-zp1.yml"
- name: Install Apache.
  hosts: centos
  become: true

  tasks:
    - name: Ensure Apache is installed.
      yum:
        name: httpd
        state: present

    - name: Ensure Apache is running and starts at boot.
      service:
        name: httpd
        state: started
        enabled: true
Then add a handler, (task), that only runs at the end of this playbook, and only if all the other tasks completed. Notice that we have not explicitly called the handler yet. We do that in the next example.
---
# run with "ansible-playbook -i inventory ansible-zp1.yml"
# adding a handler, named "restart apache"

- name: Install Apache.
  hosts: centos
  become: true

  handlers:
    - name: restart apache
      service:
        name: httpd
        state: restarted

  tasks:
    - name: Ensure Apache is installed.
      yum:
        name: httpd
        state: present

    - name: Ensure Apache is running and starts at boot.
      service:
        name: httpd
        state: started
        enabled: true
Adding a copy config task, that will then call the restart apache handler
---
# run with "ansible-playbook -i inventory ansible-zp1.yml"

- name: Install Apache.
  hosts: centos
  become: true

  handlers:
    - name: restart apache
      service:
        name: httpd
        state: restarted

  tasks:
    - name: Ensure Apache is installed.
      yum:
        name: httpd
        state: present

    - name: Copy test config file.
      copy:
        src: files/test.conf
        dest: /etc/httpd/config.d/test.conf
      notify: restart apache
      # the notify will "call" the handler "restart apache" iff a copy occurred

    - name: Ensure Apache is running and starts at boot.
      service:
        name: httpd
        state: started
        enabled: true


# this notify line will add the restart apache task to the end of the stack of
# handlers at the end of the playbook.  This stack will grow as needed for each
# run, then execute at the end of the playbook.
#
  ---
# changing handler to run immediately after copy, and not wait to the end
# of the playbook to run, using ansible flush handlers.

- name: Install Apache.
  hosts: centos
  become: true

  handlers:
    - name: restart apache
      service:
        name: httpd
        state: restarted

  tasks:
    - name: Ensure Apache is installed.
      yum:
        name: httpd
        state: present

    - name: Copy test config file.
      copy:
        src: files/test.conf
        dest: /etc/httpd/config.d/test.conf
      notify: restart apache
      # the notify will "call" the handler "restart apache" iff a copy occurred

    - name: Make sure handlers are flushed immediately.
      meta: flush_handlers

    - name: Ensure Apache is running and starts at boot.
      service:
        name: httpd
        state: started
        enabled: true


# run with "ansible-playbook -i inventory ansible-zp1.yml"
  ---
# by default ansible will only run handlers if the playbook did not run into
# errors.  But if you want to restart apache, even if other ansible tasks
# failed with errors, then add the option "--force_handlers" This will make all
# handlers at the end of the playbook run, even if other tasks had errors.
#

- name: Install Apache.
  hosts: centos
  become: true

  handlers:
    - name: restart apache
      service:
        name: httpd
        state: restarted

  tasks:
    - name: Ensure Apache is installed.
      yum:
        name: httpd
        state: present

    - name: Copy test config file.
      copy:
        src: files/test.conf
        dest: /etc/httpd/config.d/test.conf
      notify: restart apache
      # the notify will "call" the handler "restart apache" iff a copy occurred

    - name: Make sure handlers are flushed immediately.
      meta: flush_handlers

    - name: Ensure Apache is running and starts at boot.
      service:
        name: httpd
        state: started
        enabled: true

    - fail:
    # this convenient ansible module simply fails for you.  Used to test handlers

# run with "ansible-playbook -i inventory ansible-zp1.yml --force_handlers"
  ---
# I can add a second handler, that will restart memcached (flush cached
# memory on the apache server).   Now that I have two handlers, I can
# set my notify: to be a list of handlers, not just a single handler

- name: Install Apache.
  hosts: centos
  become: true

  handlers:
    - name: restart apache
      service:
        name: httpd
        state: restarted

    - name: restart memcached
      service:
        name: memcached
        state: restarted

  tasks:
    - name: Ensure Apache is installed.
      yum:
        name: httpd
        state: present

    - name: Copy test config file.
      copy:
        src: files/test.conf
        dest: /etc/httpd/config.d/test.conf
      notify:
        - restart apache
        - restart memcached
      # the notify will "call" all the handlers in the list given:


    - name: Make sure handlers are flushed immediately.
      meta: flush_handlers

    - name: Ensure Apache is running and starts at boot.
      service:
        name: httpd
        state: started
        enabled: true

# run with "ansible-playbook -i inventory ansible-zp1.yml
And more:
  ---
# Since a handler is just a task, I can have that handler itself notify another
# handler, and so daisy-chain handlers that I need in the order I need them.
#
# Summarizing: a handler is just an ansible task, and you use the "notify"
# key to "call" that handler, by default at the end, but optionally with
# "force_handlers" immediately.


- name: Install Apache.
  hosts: centos
  become: true

  handlers:
    - name: restart apache
      service:
        name: httpd
        state: restarted
      notify: restart memcached

    - name: restart memcached
      service:
        name: memcached
        state: restarted

  tasks:
    - name: Ensure Apache is installed.
      yum:
        name: httpd
        state: present

    - name: Copy test config file.
      copy:
        src: files/test.conf
        dest: /etc/httpd/config.d/test.conf
        notify: restart apache

    - name: Make sure handlers are flushed immediately.
      meta: flush_handlers

    - name: Ensure Apache is running and starts at boot.
      service:
        name: httpd
        state: started
        enabled: true

# run with "ansible-playbook -i inventory ansible-zp1.yml
10 Ansible Modules
Modules are written in python (99% of the time) and used in playbooks which are written in YAML. YAML written playbooks call python written modules.
Modules are customized for a specific type of host and for a specific type of task. Playbooks have tasks that call a module, along with the arguments needed for that module. Most of the time you write YAML playbooks, not modules.
Ansible modules can be downloaded from a provider. In fact docs.ansible.com k has lists of modules provided by various networking companies, including Cisco. Here are the Network modules user guide available.
Cisco's ansible modules are grouped under:
- aci
- AireOS
- ios
- iosxr
- meraki
- nso
- nx-os
- ucs
- ios vs iosxr ( an asside )
- ios was the original, monolithic ios.
- Then came ios-xe which was a set up; still monolithic, based on ios but also had some advanced features.
- iosxr is a complete re-write, based on QNX ( a unix flavour) Processes can be independently stopped and restarted. (no longer monolithic)
- iosxr runs on large SP routers, like ASR and CRS series of routers
- ios-xe runs on ASR1K, and newer Catalyst 9K (that are not running as SDA nodes)
- ios runs on old Cisco routers
If a module does not do exactly what you want it to do, and you can program in python, then you can edit the module to your liking, and even publish the changes to github or gitlabs, or just use it internally.
See section on specific modules
11 Ansible built-in collection of modules
- service:
- template:
- ping:
- yum
- dnf
- user
- Ansible comes with over 750 built-in modules. I suspect they are called
modules because they are in fact python modules. Most of them are but
some are now written in other languages, but the modules name stuck.
As well as running raw commands, we have access to all these modules. These modules are extremely easy to write so you can extend ansible as needed, or utilize the toolbox of built-in modules.
- modules as ad-hoc commands
Used in ad-hoc commands, they have the form:
- -m <ansible module>
- -a <arguments> # depending on the module, the arguments to the module.
- <host> # defined in the /etc/ansible/hosts file, so could be a
- -u <remote ansible user>
- –ask-pass # of the remote ansible user
- modules in playbooks
Used in a playbook they have the form: #+BEGINEXAMPLE task: modulename: list of module parameters: #+ENDSRC
For example: (this example also shows a playbook that loops through items.
- name: create a .bash_profile for each user
  template:
    src: .bash_profile.j2
    dest: "/home/{{ item.username }}/.bash_profile"
    owner: "{{ item.username }}"
    group: "{{ item.username }}"
    mode: 0640
  become: true
  loop: "{{ items }}"
Now, where do the item lists come from? i.e. what items???
11.1 ping module
For example:
- ansible all -m ping
- ansible all -m ping -u zintis
- ansible all -m ping -u zintis –ask-pass
- ansible -m ping all
11.2 yum module, deprecated. use dnf module, unless running CentOS7 or earlier.
11.3 dnf module
Here is how to use the dnf module as a ad-hoc call:
- ansible foo.example.com -m dnf -a "name=httpd state=installed"
- ansible foo.example.com -m dnf -a "pkg=httpd state=installed"
Note: 'pkg' is an alias for 'name' so use them interchangeably
Look up details of the dnf module in docs.ansible.com
- Valid dnf states:
present: will simply ensure that a desired package is installed. installed: will simply ensure that a desired package is installed. latest: will update the specified package if it's not of the latest available version. absent: will remove the specified package. removed: will remove the specified package. Default is None, however in effect the default action is present unless the autoremove option is enabled for this module, then absent is inferred.
- name="*" or name=vim,httpd,python3 etc. or in yaml, name: *
A package name or package specifier with version, like name-1.0.
- If a previous version is specified, the task also needs to turn allowdowngrade on.
- When using state=latest, this can be '*' which means
run
dnf -y update * - you can also pass a url or a local path to a rpm file (using
state=present).
- To operate on several packages this can accept a comma separated string of packages or (as of 2.0) a list of packages.
- Sample dnf task (all-in-one)
This is how an all-in-one playbook would look
 tasks:
- name: Ensure Apache is installed.
  yum:
    name: httpd
    state: present

- name: Ensure Apache is running and starts at boot.
  service:
    name: httpd
    state: started
    enabled: true
- Sample dnf task (roles playbook)
This is how a dnf roles would look:
- name: "List installed packages"
  shell: dnf list --installed
  register: installed

- debug: msg="{{ installed.stdout_lines }}"

- name: "dnf clean all"
  ansible.builtin.dnf:
    name: vim
    state: installed
As per the docs.ansible.com documentation, name: "*" can be used when state=latest, which means run a dnf -y update. name: is an alias for pkg:
11.4 command module
First as an ad-hoc command:
- ansible -m command -a "hostname" mailservers
- ansible -m command -a "uptime" opsvms
- ansible -m command -a "cat /etc/resolv.conf" opsvms
Then as a playbook: -name: Run a command to show ip routes fill this in…
11.5 shell module
- ansible -m shell -a 'hostname' all
- ansible -m shell -a 'df -h' all
- ansible -m shell -a 'whoami' all
- ansible -m shell -b -a "iptables -S" all
you had to have run a sudo command within the sudo timeout I think.
- ansible -m shell -b -K -a 'whoami' allzp
(venv-ansible) ansible@c8host ~/Ansible-CentOS[1050] $
ansible  -b -K -m shell -a 'whoami'  allzp
BECOME password:
vm1 | CHANGED | rc=0 >>
root
vm2 | CHANGED | rc=0 >>
root
vm4 | CHANGED | rc=0 >>
root
vm3 | CHANGED | rc=0 >>
root
(venv-ansible) ansible@c8host ~/Ansible-CentOS[1051] $
- ansible -m shell -a 'whoami' allzp
Compare the following output to the previous output.
(venv-ansible) ansible@c8host ~/Ansible-CentOS[1051] $
ansible -m shell -a 'whoami'  allzp
vm1 | CHANGED | rc=0 >>
ansible
vm4 | CHANGED | rc=0 >>
ansible
vm2 | CHANGED | rc=0 >>
ansible
vm3 | CHANGED | rc=0 >>
ansible
(venv-ansible) ansible@c8host ~/Ansible-CentOS[1052] $
-b is to "become" the root user, i.e. sudo. -K is the prompt for password to get to sudo, (if the node does not permit visudo with NOPASSWD option.
I set up my vms to have visudo with NOPASSWD option. The details of how I did that are as follows:
11.6 shell module examples from:
Taken from docs.ansible.com
- name: Execute the command in remote shell; stdout goes to the specified file on the remote. shell: somescript.sh >> somelog.txt
- name: Change the working directory to somedir/ before executing the command. shell: somescript.sh >> somelog.txt args: chdir: somedir/
- name: This command will change the working directory to somedir/ and will only run when somedir/somelog.txt doesn't exist.
  shell: somescript.sh >> somelog.txt
  args:
    chdir: somedir/
    creates: somelog.txt
- name: This command will change the working directory to somedir/. shell: cmd: ls -l | grep log chdir: somedir/
- name: Run a command that uses non-posix shell-isms (in this example /bin/sh doesn't handle redirection and wildcards together but bash does) shell: cat < /tmp/*txt args: executable: /bin/bash
- name: Run a command using a templated variable (always use quote filter to avoid injection) shell: cat {{ myfile|quote }}
- name: Run expect to wait for a successful PXE boot via out-of-band CIMC
shell:
set timeout 300
spawn ssh admin@{{ cimchost }}
expect "password:" send "{{ cimcpassword }}\n"
expect "\n{{ cimcname }}" send "connect host\n"
expect "pxeboot.n12" send "\n"
exit 0 args: executable: /usr/bin/expect delegateto: localhost
- name: Using curl to connect to a host via SOCKS proxy (unsupported in uri). Ordinarily this would throw a warning. shell: curl –socks5 localhost:9000 http://www.ansible.com args: warn: no
11.7 script
Runs a local script on a remote node, after transfering it
11.8 user module (ansible.builtin.user)
First, you can use this as an ad-hoc ansible command:
ansible -m user -b -K -a 'name=bob' all# -K will prompt sudo password
You should then follow up with shell module to check if user has been added like so:
ansible -m shell -a 'getent passwd | grep bob' all
Finally, if you were just testing, or need to remove a user you can:
ansible -m user -b -a 'name=bob state=absent' all
If you have more users to maintain, you can use a playbook as follows:
- name: update password for a given user3
  hosts: labservers

  tasks:
   - name: run user module to update password
     become: True
     ansible.builtin.user:
       name: zintis
       state: present
       password: $6$DUbU9uH3k3MUBSbL$MNxEvOqwc6CGZwRtrmBTb32Tjtw2gdlYsHJtHMjXpy70vY6ptP3aCZcW2MfyDtJR3DyilkOFm.MAyKdngBiHF.


# the password is a sha256 hash of the actual password.  I got that using python
# as recommended by docs.ansible.com user module documentation.
# $ python3.8 -c "from passlib.hash import sha512_crypt; import getpass; print(sha512_crypt.using(rounds=5000).hash(getpass.getpass()))"
More examples are available from docs.ansible.com
- name: Add the user 'johnd' with a specific uid and a primary group of 'admin'
  user:
    name: johnd
    comment: John Doe
    uid: 1040
    group: admin

- name: Add the user 'james' with a bash shell, appending the group 'admins' and 'developers' to the user's groups
  user:
    name: james
    shell: /bin/bash
    groups: admins,developers
    append: yes

- name: Remove the user 'johnd'
  user:
    name: johnd
    state: absent
    remove: yes

- name: Create a 2048-bit SSH key for user jsmith in ~jsmith/.ssh/id_rsa
  user:
    name: jsmith
    generate_ssh_key: yes
    ssh_key_bits: 2048
    ssh_key_file: .ssh/id_rsa

- name: Added a consultant whose account you want to expire
  user:
    name: james18
    shell: /bin/zsh
    groups: developers
    expires: 1422403387

- name: Starting at Ansible 2.6, modify user, remove expiry time
  user:
    name: james18
    expires: -1
11.9 user mod encrypted passwords
If using the password option in the user module, it is a bad idea to leave the passwords unencrypted. So, see how I generate encrypted passwords link to 1st generate an encrypted password, then copy that into the user task as needed.
I use the easiest option, and that is to use ansible itself with this ad-hoc
command:
ansible all -i localhost, -m debug -a "msg={{ 'mypassword' | passwordhash('sha512', 'mysecretsalt') }}"
ansible all -i localhost, -m debug -a "msg={{ 'mypassword' |
   password_hash('sha512', 'mysecretsalt') }}"
The mkpasswd utility that is available on most Linux systems is also a great option:
mkpasswd --method=sha-512
Yet a 3rd option is to use Python. First, ensure that the Passlib password hashing library is installed:
pip install passlib
Then, generate the SHA512 password value with:
python -c "from passlib.hash import sha512_crypt; import getpass;
   print(sha512_crypt.using(rounds=5000).hash(getpass.getpass()))"
11.10 copy module
- ansible -m copy you will need a source and desintation as a minimum. src and dest
- src is the location of the copy source relative to the main.yml file
- dest is where to put the file on the target node
- permissions is the permissions on the target node
Example of a copy module "task"
- name: "adding standardized .bashrc"
  copy: src=../files/bash.bashrc dest=/etc/bash.bashrc owner=root, group=root, mode=0640
Notice that the src is a relative reference ../files/vash.bashrc That implies that the "current" directory of this script is the 'roles' directory
Example of a copy module "full playbook"
- name: "Adding bashrc to /etc/"
  copy:
    src: bash.bashrc
    dest: $HOME/dot.bashrc
Note: this command can run for the user specified in the actual playbook.
So, if the playbook has become: true (as in the example here, then the
file copied will be in root's home directory, with root permissions.
---
- hosts: mailservers
  become: true
  roles:
  - basic-utils
If however the playbook omits become: true then the file will be in
$HOME of the user running this playbook. (in my case user is ansible)
11.11 copy module for directories.
When copying directores using the ansible copy module there is a small quirk that can trip you up. That is the destination should be a directory IN WHICH the source directory will be placed.
So this:
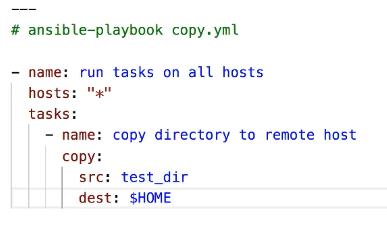
Not this:
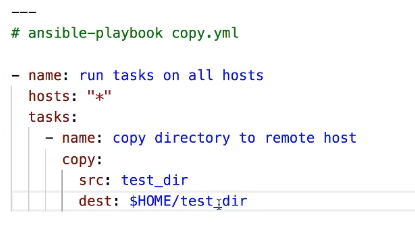
Another quirk: If you but the trailing / on the source directory, ONLY the contents of the directory will be copied, not the directory itself.
11.12 copy with permissions
- name: "Copy four files to remote host"
  copy:
    src: "{{ item }}"
    dest: $HOME/{{ item }}
    owner: root
    group: root
    mode: 0600
  # source files should reside in ../files directory
  loop:
    - init.el
    - requirements.txt
    - readme.newuser
    - readme
  become: true   # needed because owner is to be root.
11.13 copy remote to remote
- name: "copy files within remote host"
  copy:
    src: $HOME/.bashrc
    dest: $HOME/.bashrc-backup
    remote_src: true
11.14 copy to remote (replaces content)
- name: write content to a remote file
  copy:
    dest: $HOME/.basrhc
    content: "alias lst='ls -lart --color=auto'"
But this replaces the entire contents of the file with the one line. So you may need to look at another module, or use the command module:
-name: Check for line in /etc/fstab
 command: grep /dev/sdb1
 changed_when: False
 register: shell_out

-name: Append to /etc/fstab
 command: cat /home/ansible/files/fstabdata >> /etc/fstab
 when: shell_out.std_out != ''
11.15 setup
The ansible setup module is a good way to see what variables ansible has made available to you for the nodes you are asking for. These are called ansible "facts".
ansible -i inventory vm1 -m setup if inventory is giving errors run this:
ansible ops -m setup # where ops is a section in the ansible hosts file.
And you will see all the variables at your disposal for the vm1 host.
Or can say all, if you like.
Now, any variable that comes back from setup, can be used in your playbooks. almost everything… ansibledns, ansibleipv4, etc.
IF your playbook has gatherfacts: false
Then a playbook that ask for stuff like ansibleosfamily or any other of
these many facts, the playbook will fail. So set gatherfacts: true if you
want to use the ansible facts
11.16 - debug: var=ansiblefacts
Can be run this in any playbook to see all available facts. the ansible setup module gives you the "raw" information.
You can reference the ansible facts in a template or playbook as:
{{ ansible_facts['devices']['xvda']['model'] }}
To reference the node name us:
{{ ansible_facts['nodename'] }}
11.17 fetch
fetch files from remote nodes
11.18 file
manage files and file properties
handlers:
  - name: remove_bashrc file
    file:
      path: "$HOME/.bashrc"
      state: absent
11.19 find
return a list of files based on specific properties
11.20 lineinfile
manages lines in text files, works well when you only are adding/removing a single line.
Parameters I use:
- backup Creates a backup of the file before adding the line.
- create If file not present, create the file. (used with state=present)
- insertafter Default is EOF, otherwise specify a regex.
- line This is the line to add/replace/remove. It is a string. read docs.ansible.com for details on double quoted control characters
- newline unix *this is key, as the default is windows, i.e. \r\n not \n
- path is required.
- regex Is a string to look for in every line of the file
- state present (whether the line should be there or not)
Example:
- name: add groups to sudoers
  lineinfile: dest=/etc/sudoers regexp="^root(\s+)ALL=(ALL)(\s+)ALL" insertafter="^root" line='{{ item }}' state=present backup=yes backrefs=yes
  with_items:
    - '%admin\tALL=(ALL:ALL)\tALL'
    - '%users\tALL=(ALL:ALL)\tALL'
  tags: sudoers
11.21 reboot
---
- hosts: all
  become: yes

  tasks:
   - name: Check the uptime
     shell: uptime
     register: UPTIME_PRE_REBOOT

   - debug: msg={{UPTIME_PRE_REBOOT.stdout}}

   - name: Unconditionally reboot the machine with all defaults
     reboot:

   - name: Check the uptime after reboot
     shell: uptime
     register: UPTIME_POST_REBOOT

   - debug: msg={{UPTIME_POST_REBOOT.stdout}}
A better option is to use the shell module, and sleep for 5 before shutting down. That gives ansible's ssh session time to cleanly terminate.
---
- hosts: all
  become: yes

  tasks:
   - name: Check the uptime
     shell: uptime
     register: UPTIME_PRE_REBOOT

   - debug: msg={{UPTIME_PRE_REBOOT.stdout}}

   - name: sleep 5 then shutdown
     shell: "sleep 5 && shutdown -h now"
—
- hosts: all
become: yes
tasks:
- name: Check the uptime shell: uptime register: UPTIMEPREREBOOT
- debug: msg={{UPTIMEPREREBOOT.stdout}}
- name: sleep 5 then shutdown shell: "sleep 5 && shutdown -h now"
Yet another reboot example…. to be edited later (and pared down):
---
- name: Do something that requires a reboot when it results in a change.
  ...
  register: task_result

- name: Reboot immediately if there was a change.
  shell: "sleep 5 && reboot"
  async: 1
  poll: 0
  when: task_result is changed

- name: Wait for the reboot to complete if there was a change.
  wait_for_connection:
    connect_timeout: 20
    sleep: 5
    delay: 5
    timeout: 300
  when: task_result is changed
Finally, a good link to review reboot module is on docs.ansible.com
11.22 replace
replace all instances of a string in a file using a back-referenced regex.
11.23 synchoronize
wrapper around rsync. Makes common tasks in playbooks quick and easy
12 Network Modules vs System Modules
Fundamentally ansible controller uses ssh to connet to the target nodes, and then run python scripts on the target host that accomplish the tasks offered by the module being run. That implies that the target hosts need to have python interpreter available, and located in a directory that ansible will be able to find it.
12.1 Network modules do NOT typically have a python interpreter
This then is a problem if ansible will be running python commands on the network switch or router. That is why Netork Modules use a different approach.
12.2 Network modules run on the controller, not the node
So, ansible ad-hoc and ansible playbooks that call network modules, such as the iosinterface module, ( see Ansible Modules provided by Cisco: for complete list) actually run python on the local host (controller) and use a connection to the remote nodes according to the implementation specifics of the module used. For instance, the ansible module xxx actually uses Netconf to configure cisco router settings. But that is hidden in internal details in the cisco provided module.
13 Ansible Modules provided by Cisco:
Cisco's ansible modules are grouped under:
- aci
- AireOS
- ios
- iosxr
- meraki
- nso
- nx-os
- ucs
Referred to as cisco.ios, cisco.iosxr, cisco.nx-os etc..
That means anyone can automate cisco devices using ansible without learning python. That's because while the ansible modules themselves are written in python, to use ansible you don't need to modify those modules, just use them.
Before starting make this change to /etc/ansible.cfg:
Uncomment host_key_checking = False so that you do NOT need to copy ssh
keys to the cisco devices in devnet ahead of time. In fact, Cisco Devnet
won't allow it anyway, so you MUST set host_key_checking = False
13.1 Installing cisco.ios.ios
From the docs.ansible.com website re Cisco collections: So, as you can see, if you install the cisco.ios collection, you will get a whole slew of modules to use with ansible and cisco ios devices. The whole list is documented in the collections index on docs.ansible.com
I did this successfully on my Alpine Linux:
= ansible-galaxy collection install cisco.ios
13.2 The complete list of ios_… modules.
As described on docs.ansible.com, there are multiple communication protocols available to manage network node, because network modules execute on the control node instead of on the managed nodes.
Options are:
- XML over SSH
- CLI over SSH
- API over HTTPS
Depending on the vendor and model, you may forced to use one protocol, or
have a choice of protocols. The most common protocol is CLI over SSH.
You set the communication protocol with the ansible_connection variable:
- ansible.netcommon.networkcli
- ansible.netcommon.netconf
- ansible.netcommon.httpapi
- local
The ansibleconnecion is mandatory for network modules
ansible_connection |
Protocol | Requires? | Persistent |
|---|---|---|---|
| ansible.netcommon.networkcli | CLI over SSH | networkos | yes |
| setting | |||
| ansible.netcommon.netconf | XML over SSH | networkos | yes |
| setting | |||
| ansible.netcommon.httpapi | API over | networkos | yes |
| HTTP/HTTPS | setting | ||
| local | depends on | provider | no |
| (deprecated) | provider | setting |
- note:
ansible.netcommon.httpapideprecateseos_eapiandnxos_nxapi
For ansible network modules, you MUST also have the networkos set to the correct vendor.
CLI over SSH
networkos setting
yes
ansible.netcommon.netconf
XML over SSH
networkos setting
yes
ansible.netcommon.httpapi
API over HTTP/HTTPS
networkos setting
yes
local
depends on provider
provider setting
no
13.3
13.4
13.5 Cisco ioscommand module (interactive)
13.5.1 Group vars
File is group_vars/ios.yml
Contents:
ansible_connection: ansible.netcommon.network_cli
ansible_network_os: cisco.ios.ios
ansible_user: myuser
ansible_password: !vault...
ansible_become: yes
ansible_become_method: enable
ansible_become_password: !vault...
ansible_ssh_common_args: '-o ProxyCommand="ssh -W %h:%p -q bastion01"'
13.5.2 Usage (task syntax for cisco.ios.iosconfig
- name: Backup current switch config (ios)
  cisco.ios.ios_config:
    backup: yes
  register: backup_ios_location
  when: ansible_network_os == 'cisco.ios.ios'
13.6 Cisco iosbanner module:
- name: Add a banner
  ios_banner:
    banner: login   # as opposed to other banners available on cisco routers
    text:
      This router is part of DevNet.  Please play nice
    state: present
Straight out of docs.ansible.com:
- name: configure the login banner
  cisco.ios.ios_banner:
    banner: login
    text: |
      this is my login banner
      that contains a multiline
      string
    state: present

- name: remove the motd banner
  cisco.ios.ios_banner:
    banner: motd
    state: absent

- name: Configure banner from file
  cisco.ios.ios_banner:
    banner: motd
    text: "{{ lookup('file', './config_partial/raw_banner.cfg') }}"
    state: present
13.7 Cisco iosinterfaces module:
  - name: Add a loopback interface 27
    ios_interface:
      name: loopback27
      state: present

  - name: Override device configuration of all interfaces with provided configuration
    cisco.ios.ios_interfaces:
      config:
      - name: GigabitEthernet0/2
        description: Configured and Overridden by Ansible Network
        speed: 1000
      - name: GigabitEthernet0/3
        description: Configured and Overridden by Ansible Network
        enabled: false
        duplex: full
        mtu: 2000
      state: overridden

- name: Override device configuration of all interfaces with provided configuration
  cisco.ios.ios_interfaces:
    config:
    - name: GigabitEthernet0/2
      description: Configured and Overridden by Ansible Network
      speed: 1000
    - name: GigabitEthernet0/3
      description: Configured and Overridden by Ansible Network
      enabled: false
      duplex: full
      mtu: 2000
    state: overridden
13.8 Cisco config module:
- name: Merge provided configuration with device configuration
  cisco.ios.ios_interfaces:
    config:
      - name: GigabitEthernet0/2
	description: 'Configured and Merged by Ansible Network'
	enabled: True
      - name: GigabitEthernet0/3
	description: 'Configured and Merged by Ansible Network'
	mtu: 2800
	enabled: False
	speed: 100
	duplex: full
    state: merged
13.9 Cisco nxosinterface and nxosl3interfaces modules:
---
- name: Add loopbacks on all my nxos switches
  hosts: nxosswitches
  connection: local
  gather_facts: no
  tasks:
    - name: Create loopback
      with_items: "{{local_loopback}}"
      nxos_interfaces:
	interface: "{{item.name}}"
	mode: layer3
	description: "{{item.desc}}"
	admin_state: down

    - name: Configure new loopback interfaces
      with_items: "{{local_loopback}}"
      nxos_l3_interfaces:
	config:
	  - name: "{{item.name}}"
	    ipv4:
	      - address: "{{item.ip_address}}"
	state: merged
With this example, we must also have the variables to pass into items So, the vars directory has this somehow?? If I were to guess I would say the localloopback is a variable somewhere that is acually a list of items. Maybe:
local_loopback:
- name: loopback 1
- name: loopback 2
- name:
loopback 3
But that is just my guess!!! What is the actual method???
nxos_switch1.yml
---
local_loopback:
  - name: Loopback1
    desc: Ansible created loopback 1 interface
    ip_address: 192.168.1.1/24
  - name: Loopback2
    desc: Ansible created loopback 2 interface
    ip_address: 192.168.2.1/24


nxos_swtich2.yml
---
  - name: Loopback3
    desc: Ansible created loopback 3 interface
    ip_address: 192.168.3.1/24
  - name: Loopback4
    desc: Ansible created loopback 4 interface
    ip_address: 192.168.4.1/24
13.10 Cisco ospf module
From a config in the traditional sense:
ip routing
router ospf 6401
network 172.16.0.0 0.15.255.255 area 0
router-id 172.17.17.100
13.11 Vendors providing ansible modules:
- Arista: arista.eos
- Cisco: cisco.ios, cisco.iosxr, cisco.nxos,… see: Ansible Modules provided by Cisco:
- Juniper: junipernetworks.junos
- VyOS: vyos.vyos
Add this somewhere ansible iosv -m ios_command -a "commands='show ip int brief'"
14 Ansible directory structure (best practices)
Ansible looks for files in certain directories. If they are not where they should be ansible will complain. For example, I tried running ansible-playbook from an incorrect directory and got the following error, which as it happens, shows where ansible is expecting to find certain files.
ansible-playbook  playbooks-with-roles/site.yml
ERROR! the role 'whats-my-status' was not found in
- /home/ansible/Centos-ansible/playbooks-with-roles/roles:
- /home/ansible/.ansible/roles:
- /usr/share/ansible/roles:
- /etc/ansible/roles:
- /home/ansible/Centos-ansible/playbooks-with-roles

The error appears to be in '/home/ansible/Centos-ansible/playbooks-with-roles/site.yml': line 5, column 5, but may
be elsewhere in the file depending on the exact syntax problem.
So, I cannot run ansible-playbook playbooks-with-roles/site.yml but rather
have to run ansible-playbook site.yml from the directory above roles.
In other words, all roles playbooks MUST be in the directory above roles.
I think it good practice to cp the role up to the SAME file, playbook.yml
and depending on what I choose to copy will dictate what actual playbook
runs. That way I am ALWAYS running ansible-playbook playbook.yml and
it is the contens of playbook.yml that changes.
Until I get a better idea, I will stick to this. (Sept 14, 2020)
14.1 My directory structure on CentOS8
(venv-ansible) ansible@c8host ~/Ansible-CentOS[653] $
tree .
.
├── ansible.cfg
├── base-utils.yml
├── hosts
├── playbooks
│   ├── dnf-delete.yml
│   ├── dnf-install-list.yml
│   ├── dnf-install-list.yml~
│   ├── dnf-list.yml
│   ├── dnf-updateall.yml
│   ├── dnf-update-specifics.yml
│   └── dnf-update.yml
└── roles
    ├── apache-LAMP
    │   ├── defaults
    │   ├── files
    │   ├── tasks
    │   │   └── main.yml
    │   ├── tests
    │   └── vars
    ├── basic-utils
    │   ├── defaults
    │   ├── files
    │   │   └── bash.bashrc
    │   ├── tasks
    │   │   ├── install-utils.yml
    │   │   ├── main.yml
    │   │   └── zintis-note.txt
    │   ├── tests
    │   └── vars
    ├── each-dir-is-a-role.txt
    ├── install-pb.yml
    └── mailservers
	├── defaults
	├── files
	├── tasks
	│   └── main.yml
	├── tests
	└── vars

20 directories, 22 files
If I want to run a basics-playbook.yml you must be at the level above the
roles directory. Even if the basics-playbook.yml file is in playbooks
sub-directory. Best to run it as:
ansible-playbooks playbooks/basic-playbook.yml
14.2 Best Practices directory structure
In stead of having /etc/ansible.cfg as the only file, create a new directory structure for each project, and put the ansible.cfg file in the top level of that new directory. Following that, instead of using the default /etc/ansible/hosts file, you can create a hosts file in the ./inventory subdirectory as well.
Summarizing:
- a new folder per project
- ansible.cfg in the top directory
- ./inventory/hosts as hosts file
- ./groupvars
14.3 Sample directory structure:
ansible@c8host ~/Centos-ansible[717] $
tree
.
├── all-in-1-playbooks
│   ├── all-in-one-playbooks-are-listed-here
│   ├── ansible.cheat
│   ├── dnf-update.yml
│   ├── shutdown-all.yml
│   └── shutdown-ops.yml
├── basics-playbook.yml
├── filter_plugins
├── group_vars
├── hosts
├── host_vars
├── library
├── module_utils
├── playbooks-using-roles
│   └── labservers.yml
├── production
├── roles
│   ├── each-dir-is-a-role.txt
│   ├── apache-LAMP
│   │   ├── defaults
.
.
.

│   ├── lab-tier
│   │   ├── defaults
│   │   │   └── main.yml
│   │   ├── files
│   │   │   ├── bar.txt
│   │   │   └── fu.txt
│   │   ├── handlers
│   │   │   ├── main.yml
│   │   │   └── main.yml~
│   │   ├── library
│   │   ├── meta
│   │   │   └── main.yml
│   │   ├── tasks
│   │   │   └── main.yml
│   │   ├── templates
│   │   │   └── ntp.conf.j2
│   │   ├── tests
│   │   └── vars
│   │       └── main.yml
│   └── whats-my-status
│       ├── defaults
│       │   └── main.yml
│       ├── files
│       │   ├── bar.txt
│       │   └── fu.txt
│       ├── handlers
│       │   ├── main.yml
│       │   └── main.yml~
│       ├── library
│       ├── meta
│       │   └── main.yml
│       ├── tasks
│       │   ├── debug-directly.yml
│       │   ├── debug-with-msg.yml
│       │   ├── debug-with-multiline-msg.yml
│       │   └── main.yml
│       ├── templates
│       │   └── ntp.conf.j2
│       ├── tests
│       └── vars
│           └── main.yml
├── samba-playbook.yml
├── site.yml
├── staging
├── status-playbook.yml
└── web-playbook.yml

64 directories, 68 files
ansible@c8host ~/Centos-ansible[718] $
15 vault passwords
You can store passwords in a vault. Really what you are doing is encrypting variables and files. So you will need a password to encrypt and decrypt.
15.1 ansible-vault
The ansible-vault command is a command line tool to create and view encrypted
variables. You can then place encrypted content in source code management
(SCM) aka VCS, such as git.
Remember that ansible vault only protects data at rest.
You can use encrypted variables in ad-hoc commands and playbooks by supplying
the passwords. You can modify ansible.cfg to specify the location of a
password file, or to always prompt for a password.
15.2 Strategy for managing vault passwords
I will encrypt all my variables with a single password, but you could decide to use different passwords for different needs. For example you could run a playbook that includes two vars files, one for production, one for dev. and encrypt with different passwords for the two.
ansible-playbook -i hosts --ask-vault-pass --extra-vars '@cluster.data.yml' reboot.yml
See docs.ansible.com for more info on vault.
15.3 Using encrypted variables and files
When you run a task or playbook that uses encrypted variables or files, you must provide the passwords to decrypt the variables or files. You can do this at the command line or in the playbook itself.
Passing a single password
If all the encrypted variables and files your task or playbook needs use a
single password, you can use the --ask-vault-pass or --vault-password-file
cli options.
15.3.1 To prompt for the password:
ansible-playbook --ask-vault-pass site.yml
15.3.2 To retrieve the password from a file.
Say your passwords are in /path/to/my/vault-password-file file:
ansible-playbook –vault-password-file /path/to/my/vault-password-file site.yml
15.3.3 To get the password from the vault password client script
Say it is in my-vault-password-client.py:
ansible-playbook --vault-password-file my-vault-password-client.py
15.3.4 Passing vault IDs
You can also use the --vault-id option to pass a single password with its
vault label. This approach is clearer when multiple vaults are used within a
single inventory.
15.3.5 Storing and accessing vault passwords
You can memorize your vault password, or manually copy vault passwords from any source and paste them at a command-line prompt, but most users store them securely and access them as needed from within Ansible.
You have two options for storing vault passwords that work from within Ansible:
- in files, or in
- a third-party tool
3rd party tools such as such as the system keyring or a secret manager. If you store your passwords in a third-party tool, you need a vault password client script to retrieve them from within Ansible.
15.3.6 Storing passwords in files
To store a vault password in a file, enter the password as a string on a single line in the file. Make sure the permissions on the file are appropriate. Do not add password files to source control.
Storing passwords in third-party tools with vault password client scripts You can store your vault passwords on the system keyring, in a database, or in a secret manager and retrieve them from within Ansible using a vault password client script.
Enter the password as a string on a single line. If your password has a vault ID, store it in a way that works with your password storage tool.
To create a vault password client script:
- Create a file with a name ending in -client.py
- Make the file executable
- Within the script itself:
- Print the passwords to standard output
- Accept a –vault-id option
- If the script prompts for data (for example, a database password), send the prompts to standard error
When you run a playbook that uses vault passwords stored in a third-party tool, specify the script as the source within the –vault-id flag. For example:
ansible-playbook --vault-id dev@contrib/vault/vault-keyring-client.py Ansible
executes the client script with a –vault-id option so the script knows which
vault ID label you specified. For example a script loading passwords from a
secret manager can use the vault ID label to pick either the ‘dev’ or ‘prod’
password. The example command above results in the following execution of the
client script:
contrib/vault/vault-keyring-client.py –vault-id dev For an example of a client script that loads passwords from the system keyring, see contrib/vault/vault-keyring-client.py.
16 Encrypting content with Ansible Vault
Once you have a strategy for managing and storing vault passwords, you can start encrypting content. You can encrypt two types of content with Ansible Vault:
- variables and
- files.
Encrypted content always includes the !vault tag,
which tells Ansible and YAML that the content needs to be decrypted, and a |
character, which allows multi-line strings. Encrypted content created with
--vault-id also contains the vault ID label. For more details about the
encryption process and the format of content encrypted with Ansible Vault, see
Format of files encrypted with Ansible Vault. This table shows the main
differences between encrypted variables and encrypted files:
| Encrypted variables | Encrypted files | |
|---|---|---|
| How much is | Variables within a | The entire file |
| encrypted | plaintext file | |
| When is it | On demand, only | Whenever loaded |
| decrypted | when needed | or referenced |
| What can be | Only variables | Any structured |
| decrypted | data file |
16.1 ansible-vault encrypt-string
This command will encrypt single values inside a YAML file, thatn can be then included in a playbook, role, or variables file. You will need to pass three items:
- a source for the vault password (prompt, file, or script, with or without a vault ID)
- the strting to encrypt
- the string name (name of the variable)
For example:
ansible-vault encrypt_string <password_source> '<string_to_encrypt>' --name '<string_name_of_variable>'
Or a more concrete example to encrypt the string 'Cisco123!' using the only
password stored in a "a_password_file" and name the variable 'IOSv-passwd':
ansible-vault encrypt_string --vault-password-file a_password_file 'Cisco123!' --name 'IOSv-passwd'
To be prompted for a string to encrypt, encrypt it with the ‘dev’ vault
password from ‘a_password_file’ name the variable ‘new_user_password’ and
give it the vault ID label ‘dev’:
ansible-vault encrypt_string --vault-id dev@a_password_file --stdin-name 'new_user_password'
You will be prompted: "Reading plaintext input from stdin. (ctrl-d to end input)" Warning, do NOT press ENTER after supplying the string to encrypt, or \n will be added to the end of the string to encrypt.
16.2 viewing encrypted variables
Use the debug module. You will need to pass the passwd. For example, if the above was stored in a file vars.yml, you could do:
-ansible localhost -m ansible.builtin.debug -a var=new_user_password" -e "@vars.yml" --vault-id dev@a_password_file
16.3 Using vault passwords:
With a single password, you can --ask-vault-pass while in a playbook to then
get prompted for one. or
With a singel password, you can retrieve the password from the file /path/to/my/vault-password-*
file Ad Hoc Commands ( and parallel task execution ) Once you have an ansible instance available, and the nodes have python and ssh setup, you can talk to it right away, without any additional setup.
ansible lab -m ping
16.4 ansible setup module
Remember to run this from your ansible root directory or it won't work.
Running ansible all -m setup > my-ansible-host-ansible-extracted-facts is
particularly useful to see what your are dealing with. The plethora of facts
returned can help you refine your future ansible calls. For example, you
could have a task that only applies to hosts from a specific ansible os
family by adding when: ansible_os_family = 'RedHat'= to a task such as:
cat dnf-update.yml
---
  - name: update figlet, vim, iftop on all hosts
    hosts: opsvms
    tasks:
      - name: install epel repo first
	dnf:
	  name: epel-release
	  state: present
	become: true
	when: ansible_os_family == 'RedHat'

      - name: dnf update figlet vim and iftop
	dnf:
	  name:
	    - figlet
	    - vim
	    - iftop
	  state: latest
	become: true
But you would not have known that was an option had you not run the setup
module
16.5 Sample output, ansible on c8host controller:
ansible all -m shell -a 'getent passwd | grep ansi'
vm3 | CHANGED | rc=0 >>
ansible:x:1003:1003::/home/ansible:/bin/bash
vm1 | CHANGED | rc=0 >>
ansible:x:1002:1002::/home/ansible:/bin/bash
vm4 | CHANGED | rc=0 >>
ansible:x:10003:10003::/home/ansible:/bin/bash
vm5 | CHANGED | rc=0 >>
ansible:x:1002:1002::/home/ansible:/bin/bash
vm2 | CHANGED | rc=0 >>
ansible:x:1002:1002::/home/ansible:/bin/bash


ansible -m command -a "uname -a" opsvms
vm3 | CHANGED | rc=0 >>
Linux vm3 4.18.0-147.5.1.el8_1.x86_64 #1 SMP Wed Feb 5 02:00:39 UTC 2020 x86_64 x86_64 x86_64 GNU/Linux
vm2 | CHANGED | rc=0 >>
Linux vm2 4.18.0-147.5.1.el8_1.x86_64 #1 SMP Wed Feb 5 02:00:39 UTC 2020 x86_64 x86_64 x86_64 GNU/Linux
vm4 | CHANGED | rc=0 >>
Linux vm4 3.10.0-1062.18.1.el7.x86_64 #1 SMP Tue Mar 17 23:49:17 UTC 2020 x86_64 x86_64 x86_64 GNU/Linux
vm1 | CHANGED | rc=0 >>
Linux vm1 4.18.0-147.5.1.el8_1.x86_64 #1 SMP Wed Feb 5 02:00:39 UTC 2020 x86_64 x86_64 x86_64 GNU/Linux
vm5 | CHANGED | rc=0 >>
Linux vm5 4.18.0-147.8.1.el8_1.x86_64 #1 SMP Thu Apr 9 13:49:54 UTC 2020 x86_64 x86_64 x86_64 GNU/Linux
(venv-ansible) ansible@c8host ~[89] $

ansible -m command -a "host cbc.ca" opsvms
vm3 | CHANGED | rc=0 >>
cbc.ca has address 104.126.76.230
cbc.ca mail is handled by 10 alt4.aspmx.l.google.com.
cbc.ca mail is handled by 5 alt1.aspmx.l.google.com.
cbc.ca mail is handled by 10 alt3.aspmx.l.google.com.
cbc.ca mail is handled by 1 aspmx.l.google.com.
cbc.ca mail is handled by 5 alt2.aspmx.l.google.com.
vm1 | CHANGED | rc=0 >>
cbc.ca has address 104.126.76.230
cbc.ca mail is handled by 10 alt3.aspmx.l.google.com.
cbc.ca mail is handled by 5 alt2.aspmx.l.google.com.
cbc.ca mail is handled by 10 alt4.aspmx.l.google.com.
cbc.ca mail is handled by 1 aspmx.l.google.com.
cbc.ca mail is handled by 5 alt1.aspmx.l.google.com.
vm4 | CHANGED | rc=0 >>
cbc.ca has address 104.126.76.230
cbc.ca mail is handled by 5 alt1.aspmx.l.google.com.
cbc.ca mail is handled by 5 alt2.aspmx.l.google.com.
cbc.ca mail is handled by 10 alt4.aspmx.l.google.com.
cbc.ca mail is handled by 10 alt3.aspmx.l.google.com.
cbc.ca mail is handled by 1 aspmx.l.google.com.
vm5 | CHANGED | rc=0 >>
cbc.ca has address 104.126.76.230
cbc.ca mail is handled by 10 alt3.aspmx.l.google.com.
cbc.ca mail is handled by 10 alt4.aspmx.l.google.com.
cbc.ca mail is handled by 1 aspmx.l.google.com.
cbc.ca mail is handled by 5 alt1.aspmx.l.google.com.
cbc.ca mail is handled by 5 alt2.aspmx.l.google.com.
vm2 | CHANGED | rc=0 >>
cbc.ca has address 104.126.76.230
cbc.ca mail is handled by 10 alt4.aspmx.l.google.com.
cbc.ca mail is handled by 1 aspmx.l.google.com.
cbc.ca mail is handled by 5 alt1.aspmx.l.google.com.
cbc.ca mail is handled by 10 alt3.aspmx.l.google.com.
cbc.ca mail is handled by 5 alt2.aspmx.l.google.com.
(venv-ansible) ansible@c8host ~[91] $
Here is the output (with errors) of my first ansible ad-hoc command:
First attempt at an ansible hostname -m ping
(venv-pandas) zintis@c8host /etc/ansible[1025] $
ansible -i /etc/ansible/hosts mailservers -m ping
[Warning]: Unhandled error in Python interpreter discovery for host vm3: unexpected output from Python interpreter discovery
[WARNING]: sftp transfer mechanism failed on [vm3]. Use ANSIBLE_DEBUG=1 to see detailed information
[WARNING]: scp transfer mechanism failed on [vm3]. Use ANSIBLE_DEBUG=1 to see detailed information
[WARNING]: Platform unknown on host vm3 is using the discovered Python interpreter at /usr/bin/python, but future installation of another Python interpreter
could change this. See https://docs.ansible.com/ansible/2.9/reference_appendices/interpreter_discovery.html for more information.
vm3 | FAILED! => {
  "ansible_facts": {
      "discovered_interpreter_python": "/usr/bin/python"
  },
  "changed": false,
  "module_stderr": "Shared connection to vm3 closed.\r\n",
  "module_stdout": " \r\n                 _____ \r\n__   ___ __ ___ |___ / \r\n\\ \\ / /  _ ` _ \\  |_ \\\r\n \\ V /| | | | | |___) |\r\n  \\_/ |_| |_| |_|____/\r\n \r\n/bin/sh: /usr/bin/python: No such file or directory\r\n",
  "msg": "The module failed to execute correctly, you probably need to set the interpreter.\nSee stdout/stderr for the exact error",
  "rc": 127
}
vm2 | SUCCESS => {
  "ansible_facts": {
      "discovered_interpreter_python": "/usr/libexec/platform-python"
  },
  "changed": false,
  "ping": "pong"
}
vm4 | SUCCESS => {
  "ansible_facts": {
      "discovered_interpreter_python": "/usr/bin/python"
  },
  "changed": false,
  "ping": "pong"
}
(venv-pandas) zintis@c8host /etc/ansible[1025] $
The error were fixed by ensuring my ssh connection was corrected to vm3.
16.6 discovered interpreter
When you get warnings that a host is using a discovered interpreter, you can override the discovered interpreter by adding a line to the hosts file for that host, to specify exactly what the intpreter should be:
But that might not be the best long term solution. Need to investigate.
16.6.1 inventory hosts
interpreterpython=autosilent (as default. where?)
16.7 Common commands:
Ansible commands can be straight commands for the local ansible controller or modules that all you to execute ad-hoc commands on nodes, or groups of nodes.
- Native ansible commands
- ansible prod -m ping
- ansible all –list-hosts
- ansible mailservers –list-hosts
- ansible databaseservers –list-hosts
- ansible webservers –list-hosts
- ansible all -m setup | grep fqdn # grep all sorts of info you are after
- ansible all -m command -a "hostnamectl"
$ ansible iosv -m ping
r3 | SUCCESS => {
    "changed": false,
    "ping": "pong"
}
r1 | SUCCESS => {
    "changed": false,
    "ping": "pong"
}
r5 | SUCCESS => {
    "changed": false,
    "ping": "pong"
}
r0 | SUCCESS => {
    "changed": false,
    "ping": "pong"
}
r4 | SUCCESS => {
    "changed": false,
    "ping": "pong"
}
r2 | SUCCESS => {
    "changed": false,
    "ping": "pong"
}
(venv-ansible)
17 Confusion No.1 about roles vs playbooks
I seem to see playbooks that look like they include roles. Then other playbooks that refer to roles only. What is the difference? What is the preferred way?
e.g. I have successfully run the role file in roles/basic/tasks/main.yml, which on first glance is NOT a valid YAML file as it does NOT begin with the "—" line.
- name: "Installing figlet"
  dnf: pkg=figlet, state=installed

- name: "Installing git"
  dnf: pkg=git, state=installed

- name: "Installing wget"
  dnf: pkg=wget, state=installed
The above examples shows three tasks, 1) intalling figlet, 2) installing git, and
- installing wget.
Notice however that the above three "tasks" do NOT have a "tasks:" line, just the "- name:" headings.
Then below, we write a playbook that IS a YAML file called playbook.yml in the directory above roles. This playbook calls the above tasks, through the reference to "basic-utils" which is the directory name hold the tasks directory, holding main.yml file.
---
- hosts: opsvms
  become: true
  roles:
  - basic-utils
But I have also successfully run playbooks that seem in include the roles. I think of them as "all-in-one" playbooks. For example:
(venv-ansible) ansible@c8host ~/Ansible-CentOS/playbooks[359] $
cat dnf-update.yml
---
  - name: update figlet, vim, iftop on all hosts
    hosts: opsvms
    tasks:
      - name: install epel repo first
	dnf:
	  name: epel-release
	  state: present
	become: true
	when: ansible_os_family == 'RedHat'

      - name: dnf update figlet vim and iftop
	dnf:
	  name:
	    - figlet
	    - vim
	    - iftop
	  state: latest
	become: true
(venv-ansible) ansible@c8host ~/Ansible-CentOS/playbooks[360] $
£
You can see the "tasks:" section in this file and the "—" start to the YAML file.
I will hazard a guess here. The "all-in-one" playbook that includes the tasks is useful if the playbook and tasks is small. Contrast to the method where the playbook does NOT include tasks, but rather calls those via the "roles:" command, will scale better. i.e. the roles can be quite extensive, and they can be re-used on many different host groups more easily if you use method 1 above. But that, as of May 2020, is just my guess. I need to confirm that. Either way, both work.
This youtube video by Jeff Geerling confirms exactly that.
17.1 My CentOS 8 ansible directory structure
(venv-ansible) ansible@c8host ~/CentOS-vms/roles[238] $
 tree ..
 ..
 ├── ansible.cfg
 ├── hosts
 ├── playbooks
 └── roles
     ├── apache-LAMP
     │   ├── defaults
     │   ├── files
     │   ├── tasks
     │   │   └── main.yml
     │   ├── tests
     │   └── vars
     ├── basic-utils
     │   ├── defaults
     │   ├── files
     │   ├── tasks
     │   │   └── main.yml
     │   ├── tests
     │   └── vars
     ├── each-dir-is-a-role.txt
     └── mailservers
	 ├── defaults
	 ├── files
	 ├── tasks
	 │   └── main.yml
	 ├── tests
	 └── vars

 20 directories, 6 files
Here is a more extensive example I got online:
.
├── ansible.cfg
├── dbservers.yaml
├── dev
├── dev_BAK
├── filter_plugins
├── group_vars
├── host_vars
├── library
├── module_utils
├── playbooks
│   └── fridayUpdates.yaml
├── prod
├── prod_BAK
├── roles
│   ├── apache
│   │   ├── defaults
│   │   │   └── main.yml
│   │   ├── files
│   │   │   ├── cci.conf
│   │   │   ├── wildcard-plus.cci.fsu.edu.key
│   │   │   └── wildcard-plus-intermediate.cci.fsu.edu.cer
│   │   ├── handlers
│   │   │   └── main.yml
│   │   ├── meta
│   │   │   └── main.yml
│   │   ├── README.md
│   │   ├── tasks
│   │   │   ├── apache.yaml
│   │   │   └── main.yml
│   │   ├── templates
│   │   ├── tests
│   │   │   ├── inventory
│   │   │   └── test.yml
│   │   └── vars
│   │       └── main.yml
│   ├── common
│   │   ├── defaults
│   │   │   └── main.yml
│   │   ├── files
│   │   │   ├── 00-graylog.conf
│   │   │   ├── 01-graylog_apache.conf
│   │   │   ├── 01-graylog.conf
│   │   │   ├── 02-graylog_fail2ban.conf
│   │   │   ├── 03-graylog_apt.conf
│   │   │   ├── 04-graylog_mysql.conf
│   │   │   ├── apache-404.conf
│   │   │   ├── apache_jail.local
│   │   │   ├── km12n_zpreztorc
│   │   │   ├── snmpd.conf
│   │   │   └── web15c_zpreztorc
│   │   ├── handlers
│   │   │   └── main.yml
│   │   ├── meta
│   │   │   └── main.yml
│   │   ├── README.md
│   │   ├── tasks
│   │   │   ├── fail2ban.yaml
│   │   │   ├── hosts.yaml
│   │   │   ├── hyperv.yaml
│   │   │   ├── libreagent.yaml
│   │   │   ├── main.yml
│   │   │   ├── rsyslog.yaml
│   │   │   ├── snmp.yaml
│   │   │   └── zsh.yaml
│   │   ├── templates
│   │   │   └── hosts.j2
│   │   ├── tests
│   │   │   ├── inventory
│   │   │   └── test.yml
│   │   └── vars
│   │       └── main.yml
│   └── mysql
│       ├── defaults
│       │   └── main.yml
│       ├── files
│       ├── handlers
│       │   └── main.yml
│       ├── meta
│       │   └── main.yml
│       ├── README.md
│       ├── tasks
│       │   ├── main.yml
│       │   └── mysql.yaml
│       ├── templates
│       ├── tests
│       │   ├── inventory
│       │   └── test.yml
│       └── vars
│           └── main.yml
├── site.yml
├── virtualmin.yaml
The local machine also has the ansible configuration file, and the inventory file, as explained below
18 Ansible Playbook (ansible-playbook myplay.yml)
Playbooks
- is where you do all the work.
- playbooks push out configurations to nodes.
- connect to nodes via an SSH client
You run a playbook with the command: ansible-playbook mynewplaybook.yml
Ansible playbooks simply take the roles that you have created, and the hosts groups that you have created, and map them together. i.e. Playbooks dictate which role will be applied to which target node.
When you need to do more than an ad-hoc commands on a remote node, you can
write a YAML file, called a playbook, with a declarative recipe, and ansible
will try to make it happen.
And for those that are extra cautious you can run your playbooks in check mode (–check) to show what would have been done (not all modules support check but there are ways around it.)
And if you want some extra detail about what's going to be changed, many modules support a diff option (–diff) to show more granular changes (e.g., which lines in /etc/hosts are going to be added/removed, which dnf packages are going to be installed, etc).
18.1 Playbooks: a simple+powerful automation language
Playbooks can finely orchestrate multiple slices of your infrastructure topology, with very detailed control over how many machines to tackle at a time. This is where Ansible starts to get most interesting.
Ansible's approach to orchestration is one of finely-tuned simplicity, as we believe your automation code should make perfect sense to you years down the road and there should be very little to remember about special syntax or features.
Here's what a playbook looks like. As a reminder, this is only here as a teaser - hop over to docs.ansible.com for the complete documentation and all that's possible.
---
- dnf: name={{contact.item}} state=installed
  with_items:
    - app_server
    - acme_software
 - service: name=app_server state=running enabled=yes
 - template:
   src=/opt/code/templates/foo.j2
   dest=/etc/foo.conf
 notify:
 - restart app server
Another example. How is this different? :
---
- hosts: all
  tasks:
    - name: ensure ntpd is at the latest version
      dnf: pkg=ntp state=latest
      notify:
      - restart ntpd
  handlers:
    - name: restart ntpd
      service: name=ntpd state=restarted
Here is a similar YAML file for a job
---
name: play1
hosts: webserver
tasks:
  -name: install apache
    dnf:
        name: apache
	state: present
  -name: start apache
    service:
        name: apache
	state: start
name: play2
hosts: databaseserver
tasks:
  -name: MySQL
  -state: present
18.2 YAML syntax
See the "key-value-notation.org" file for more detail. I am including just an extract from that file here:
And of course, members of the list can also be maps:

---
apiVersion: v1
kind: Pod
metadata:
  name: rss-site
  labels:
  app: web
spec:
  containers:
  - name: front-end
    image: nginx
    ports:
      - containerPort: 80
      - sec_containerPort: 443
  - name: rss-reader
    image: nickchase/rss-php-nginx:v1
    ports:
      - containerPort: 88
      - sec_containerPort: 443

So as you can see here, we have a list of containers “objects”, each of
which consists of a name, an image, and a list of ports.  Each list item
under ports is itself a map that lists the containerPort and its value.
The Ansible documentation explores this in much greater depth. There’s a LOT more that you can do, including:
Take machines in and out of load balancers and monitoring windows Have one server know the IP address of all the others using facts gathered about those particular servers - and use those to dynamically build out configuration files some variables and prompt for others, and set defaults for when they are not set. Use the result of one command to decide whether to run another. There are lots of advanced possibilities but it's easy to get started.
Most importantly, the language remains readable and transparent, and you never have to do things like declare explicit ordering relationships or write code in a programming language.
extend ansible: modules, plugins and api Should you want to write your own, Ansible modules can be written in any language that can return JSON (Ruby, Python, bash, etc). Inventory can also plug in to any datasource by writing a program that speaks to that datasource and returns JSON. There's also various Python APIs for extending Ansible’s connection types (SSH is not the only transport possible), callbacks (how Ansible logs, etc), and even for adding new server side behaviors.
19 Confusion No. 2 Roles with with and without.
Below I have a successful example of installing a list of apps using a name list. BOTH WORK. Compare that to the next example:
(venv-ansible) ansible@c8host ~/Ansible-CentOS/roles/basic-utils/tasks[638] $
cat main.yml
- name: "update epel-release"
  dnf:
    name: epel-release
    state: present
    update_cache: true
  become: true
  when: ansible_os_family == 'RedHat'

- name: "install apps from a list"
  dnf:
    name:
      - figlet
      - vim
      - git
      - htop
      - bind-utils
      - nmap
      - iproute
      - tmux
      - wget
      - rsync
      - perl
    state: latest
    update_cache: true
  become: true
Compare that to the following role (i.e. tasks that are matched to host by a playbook:
- name: "update epel-release"
  dnf:
    name: epel-release
    state: present
    update_cache: true
  become: true
  when: ansible_os_family == 'RedHat'

- name: "install apps with with"
  dnf: pkg={{ item }} state=latest update_cache=true become=true
  with_items:
  - figlet
  - vim
  - git
  - htop
  - bind-utils
  - nmap
  - iproute
  - tmux
  - wget
  - rsync
  - perl
20 Nodes
Nodes are the servers, switches, routers that are mananged by the Local Machine, or controller. They need NO AGENT S/W but need ssh setup, as well as python runtime setup before ansible will be able to manage it.
Some characteristics of 'nodes':
- All the entities being managed by Ansible.
- Local machine connects to the nodes using SSH.
- Prerequisites for nodes:
- must have python runtime installed
- must have ssh server installed (for controller to connect)
- I added ansible user to sudoers for all nodes too. although I am not sure this was needed.
- The configurations of these nodes are called modules.
- 'module' are in fact YAML config files.
From a youtube video by Simplilearn:
First the Local Machine needs the correct inventory file and playbook YAML files. It then connects to each node via secure SSH.
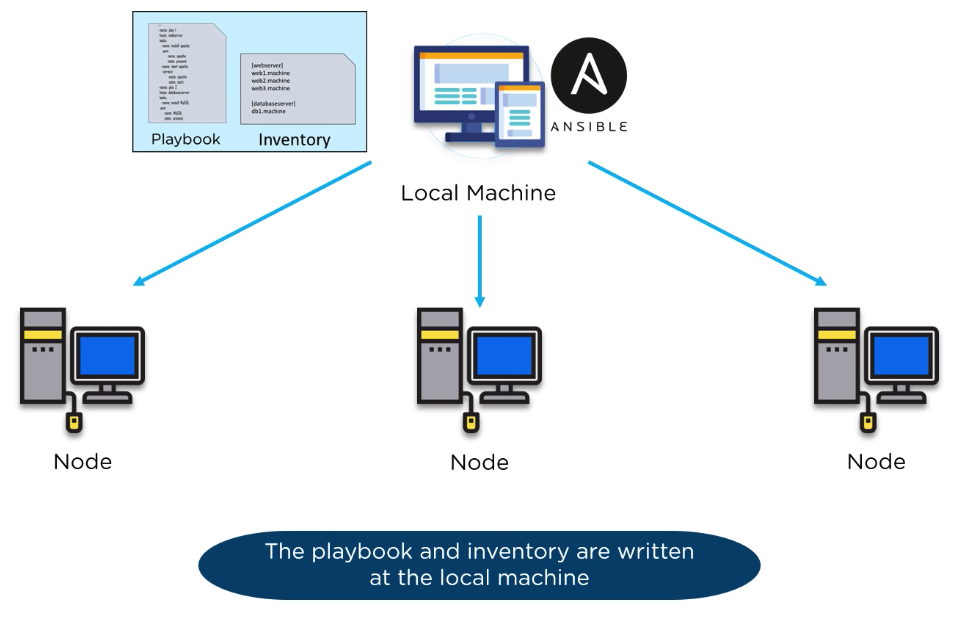
The Local Machine gathers some information about the nodes in the SSH sessions

With the gathered information, the local machine is able to push the playbook configuration appropriate for each node.
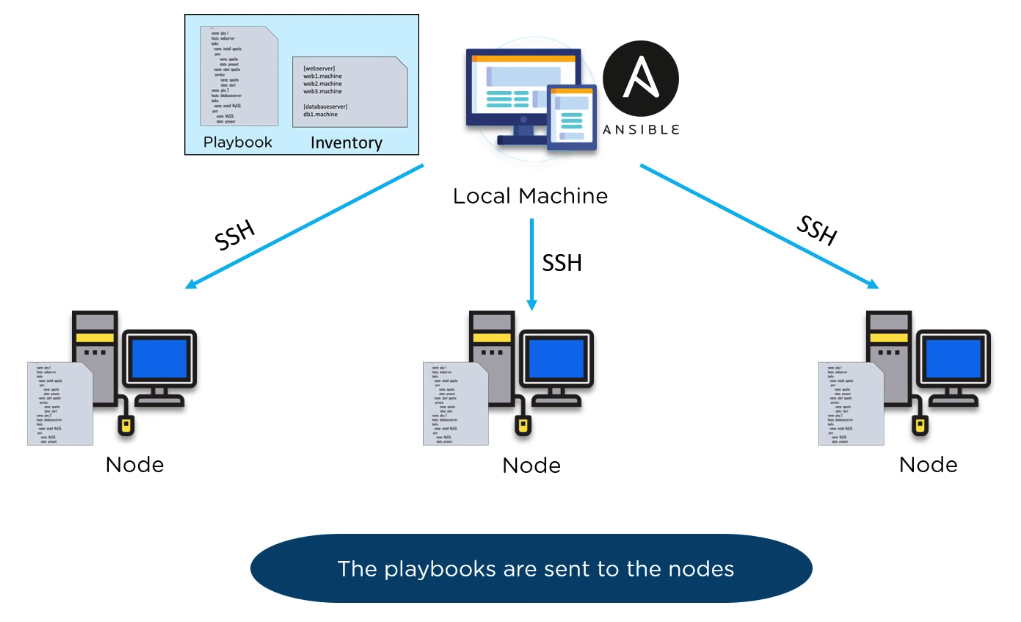
20.1 ssh keys are your friends
Passwords are supported, but SSH keys with ssh-agent are one of the best ways to use Ansible. Though if you want to use Kerberos, that's good too. Lots of options! Root logins are not required, you can login as any user, and then su or sudo to any user.
Ansible's "authorizedkey" module is a great way to use ansible to control what machines can access what hosts. Other options, like kerberos or identity management systems, can also be used.
ssh-agent bash ssh-add ~/.ssh/idrsa MANAGE YOUR INVENTORY IN SIMPLE TEXT FILES By default, Ansible represents what machines it manages using a very simple INI file that puts all of your managed machines in groups of your own choosing.
To add new machines, there is no additional SSL signing server involved, so there's never any hassle deciding why a particular machine didn’t get linked up due to obscure NTP or DNS issues.
If there's another source of truth in your infrastructure, Ansible can also plugin to that, such as drawing inventory, group, and variable information from sources like EC2, Rackspace, OpenStack, and more.
21 Loops
So much documentation is available on docs.ansible.com that I will simply defer all about loops to the user guide. Click link above.
I am just including some quick examples here:
- name: "Copy four files to remote host"
  copy:
    src: "{{ item }}"
    dest: $HOME/{{ item }}
    owner: root
    group: root
    mode: 0600
  # source files should reside in ../files directory
  loop:
    - init.el
    - requirements.txt
    - readme.newuser
    - readme
  become: true   # needed because owner is to be root.
List of hashes with a simple dictionary:
- name: Add several users
  ansible.builtin.user:
    name: "{{ item.name }}"
    state: present
    groups: "{{ item.groups }}"
  loop:
    - { name: 'testuser1', groups: 'wheel' }
    - { name: 'testuser2', groups: 'root' }
21.1 Loops over a list
---
- name: Looping over a list
  hosts: ospfrouters
  gather_facts: no
  vars:
    runtask: true
    saygoodby: false
    a: 1
    b: [2, 3, 4]
  tasks:
    - debug:
      msg: "Looping where item is now {{ item }}"
      loop: "{{ b }}"
21.2 Loops over a straight dictionary
This is the learning-loops.yml playbook.
     ---
     - name: Looping over a single dictionary
       hosts: r1 r2
       gather_facts: no

       vars:
         runtask: true
         saygoodby: false
         a: 1
         b: [2, 3, 4]
         c:
           Title: "Brave New World"
           Author: "Aldous Huxley"
           Publication_date: 1932

       tasks:
       - debug:
         msg: "Looping where item is now {{ item }}"  # option 1 and option 2
         msg: "Looping where item is now {{ item.name }}" # option 3
         loop: "{{ c  }}"   # option 1 (see below)
         loop: "{{ c|dict2items  }}"   # option 2
         loop: "{{ c  }}"   # option 3
       # option 1  Gives an error:  looping over c, while c is a dictionary
       # fails because you can only loop over a list, and c is not a list
       # it is a dictionary.   To fix this see option #2

       # option 2 Works as "dict2items" converts a dictionary to a list.
       # but it may not be what your were looking for.  You will get these
       # messages


ansible-playbook learning-loops.yml # with option 2.

TASK [debug] *******************************************************************************************************************************
ok: [r1] => (item={'key': 'Title', 'value': 'Brave New World'}) => {
    "msg": "Looping where item is now {'key': 'Title', 'value': 'Brave New World'}"
}
ok: [r2] => (item={'key': 'Title', 'value': 'Brave New World'}) => {
    "msg": "Looping where item is now {'key': 'Title', 'value': 'Brave New World'}"
}
ok: [r1] => (item={'key': 'Author', 'value': 'Aldous Huxley'}) => {
    "msg": "Looping where item is now {'key': 'Author', 'value': 'Aldous Huxley'}"
}
ok: [r1] => (item={'key': 'Publication_date', 'value': 1932}) => {
    "msg": "Looping where item is now {'key': 'Publication_date', 'value': 1932}"
}
ok: [r2] => (item={'key': 'Author', 'value': 'Aldous Huxley'}) => {
    "msg": "Looping where item is now {'key': 'Author', 'value': 'Aldous Huxley'}"
}
ok: [r2] => (item={'key': 'Publication_date', 'value': 1932}) => {
    "msg": "Looping where item is now {'key': 'Publication_date', 'value': 1932}"
}
21.3 Loops over a list of dictionaries (map)
---
- name: Looping over a list of dictionaries
  hosts: ospfrouters
  gather_facts: no
  vars:
    runtask: true
    saygoodby: false
    a: 1
    b: [2, 3, 4]
     c:
     - hello: "Hello world."
       goodbye: "Goodbye dude."
     - e: 2.7182818
       pi: 3.14159265

  tasks:
    - debug:
        msg: "Looping where item is now {{ item }}"  # option 1 (see below)
        msg: "Looping where item is now {{ item.key  }}" # option 2
        msg: "Looping where item is now {{ item['key']  }}" # option 3
      loop: "{{ c  }}"

  # option 1  prints out the whole dictionary "c" twice
  # once for the two keys "hello" and "goodbye" and the 2nd time
  # for the kyes e and pi

  # option 2 prints out "hello Hello world." ok, but then fails
  # on the 2nd go around because "hello" is not a valid key in the
  # 2nd dictionary (only "e" and "pi" are defined keys now)

  # option 3 is exactly the same as option 2
Option 2 output, where the message is item.key I get this output
TASK [debug] *****************************************************************************************************************************
ok: [r1] => (item={'key': 'Title', 'value': 'Brave New World'}) => {
    "msg": "Looping where item is now Title"
}
ok: [r2] => (item={'key': 'Title', 'value': 'Brave New World'}) => {
    "msg": "Looping where item is now Title"
}
ok: [r1] => (item={'key': 'Author', 'value': 'Aldous Huxley'}) => {
    "msg": "Looping where item is now Author"
}
ok: [r1] => (item={'key': 'Publication_date', 'value': 1932}) => {
    "msg": "Looping where item is now Publication_date"
}
ok: [r2] => (item={'key': 'Author', 'value': 'Aldous Huxley'}) => {
    "msg": "Looping where item is now Author"
}
ok: [r2] => (item={'key': 'Publication_date', 'value': 1932}) => {
    "msg": "Looping where item is now Publication_date"
}
But if I change it item.value I will get this output
TASK [debug] *****************************************************************************************************************************
ok: [r1] => (item={'key': 'Title', 'value': 'Brave New World'}) => {
    "msg": "Looping where item is now Brave New World"
}
ok: [r2] => (item={'key': 'Title', 'value': 'Brave New World'}) => {
    "msg": "Looping where item is now Brave New World"
}
ok: [r1] => (item={'key': 'Author', 'value': 'Aldous Huxley'}) => {
    "msg": "Looping where item is now Aldous Huxley"
}
ok: [r1] => (item={'key': 'Publication_date', 'value': 1932}) => {
    "msg": "Looping where item is now 1932"
}
ok: [r2] => (item={'key': 'Author', 'value': 'Aldous Huxley'}) => {
    "msg": "Looping where item is now Aldous Huxley"
}
ok: [r2] => (item={'key': 'Publication_date', 'value': 1932}) => {
    "msg": "Looping where item is now 1932"
}
So, at this point my playbook is this:
---
- name: Looping over a single dictionary
  hosts: r1, r2
  gather_facts: no

  vars:
    runtask: true
    saygoodby: false
    a: 1
    b: [2, 3, 4]
    c:
      Title: "Brave New World"
      Author: "Aldous Huxley"
      Publication_date: 1932

  tasks:
    - debug:
        msg: "Looping where item is now {{ item.value }}"
      loop: "{{ c|dict2items }}"  # option 0
21.3.1 Move the varaible "c" to a hostvars file.
The playbook should stay exactly the same, but for each host/node I run it on, i.e. r1, and r2, I should have c: defined in the file r1.yml and r2.yml in the hostvars directory.
That is exactly correct. My playbook becomes:
---
- name: Looping over a single dictionary
  hosts: r1, r2
  gather_facts: no

  tasks:
    - debug:
        msg: "Looping where item is now {{ item.value }}"
      loop: "{{ c|dict2items }}"
And under hostvars/r1.yml
c:
  Title: "Brave New World"
  Author: "Aldous Huxley"
  Publication_date: 1932
hostvars/r2.yml I had:
c:
  Title: "Nineteen Eight-Four"
  Author: "George Orwell"
  Publication_date: 1948
And here is the corresponding output:
TASK [debug] *****************************************************************************************************************************
ok: [r1] => (item={'key': 'Title', 'value': 'Brave New World'}) => {
    "msg": "Looping where key is now Title with value Brave New World"
}
ok: [r2] => (item={'key': 'Title', 'value': 'Nineteen Eight-Four'}) => {
    "msg": "Looping where key is now Title with value Nineteen Eight-Four"
}
ok: [r1] => (item={'key': 'Author', 'value': 'Aldous Huxley'}) => {
    "msg": "Looping where key is now Author with value Aldous Huxley"
}
ok: [r2] => (item={'key': 'Author', 'value': 'George Orwell'}) => {
    "msg": "Looping where key is now Author with value George Orwell"
}
ok: [r1] => (item={'key': 'Publication_date', 'value': 1932}) => {
    "msg": "Looping where key is now Publication_date with value 1932"
}
ok: [r2] => (item={'key': 'Publication_date', 'value': 1948}) => {
    "msg": "Looping where key is now Publication_date with value 1948"
}
Notice that the order is not specified, but all items get covered.
21.4 When NOT to loop
Some modules are more efficient if they handle the looping. For example, right out of docs.ansible.com
- name: Optimal yum
  ansible.builtin.yum:
    name: "{{  list_of_packages  }}"
    state: present
is better than:
- name: Non-optimal yum, slower and may cause issues with interdependencies
  ansible.builtin.yum:
    name: "{{  item  }}"
    state: present
  loop: "{{  list_of_packages  }}"
22 Ansible for Networks
Automation is about performing simple, repetitive, high-volume tasks in order to reduce errors, gain consistency, be fast (agile).
Let's say you wanted add a security setting to all your routers, or maybe add a new VLAN to all your switches.
22.1 Example
- setup an Ansible command station on VLAN 4094, with ip addr 192.168.0.0/24
- create a credentials .yml file and store the username and password needed
for the SSH connections
file: creds.yml
username: admin
password: C1sco123!
- create an inventory file that contains descriptions of your devices.
This inventory file can also arbitrarily group items as you see fit. An
example could be branchrouters, corerouters, accessswitches etc…
file: inventory
[branch_routers]
172.17.18.1
172.17.20.1
172.17.22.1

[core_routers]
10.0.5.1
10.0.6.1
10.0.10.1

[access_switches}
192.168.1.1
192.168.21.1
192.168.31.1
192.168.41.1
- create a playbook, writtin in YAML format.
—
- name:
22.2 Modules cisco.ios.iosl3interfaces vs cisco.ios.iosconfig
tasks:
- name: Set ip addresses of all interfaces defined in host_vars
  cisco.ios.ios_l3_interfaces:
    config:
    - name: "{{ item.key }}"
      ipv4:
      - address: "{{ item.value }}"
    state: merged
    loop: "{{ interfacestochange|dict2items }}"


 - name: configure ip helpers on multiple interfaces
   cisco.ios.ios_config:
     lines:
     - ip helper-address 172.26.1.10
     - ip helper-address 172.26.3.8
     parents: '{{ item }}'
   with_items:
   - interface Ethernet1
   - interface Ethernet2
   - interface GigabitEthernet1
For the first task in the above example, this was r4.yml and r5.yml:
# r4
interfacestochange:
  GigabitEthernet0/1: 10.0.0.17/28
  GigabitEthernet0/2: 10.0.0.2/28
  GigabitEthernet0/3: 172.31.30.4/24
  Loopback7: 172.17.17.4/32

# r5
interfacestochange:
  GigabitEthernet0/1: 172.16.16.34/28
  GigabitEthernet0/3: 172.16.16.49/28
  Loopback7: 172.17.17.5/32
22.3 Final example showing BOTH l3 interfaces AND interfaces modules:
Here is my r1 hostvars file:
interfacestochange:
  GigabitEthernet0/1: 172.16.16.33/28
  GigabitEthernet0/3: 172.16.16.17/28
  Loopback7: 172.17.17.1/32

describe_int:
  GigabitEthernet0/1: "Ethernet towards r5 and route to the Internet"
  GigabitEthernet0/3: "Ethernet towards r3 and border router"
With the following playbook, I can add descriptions to those two interfaces.
23 Ansible on Mac OSX (installation)
Since the nodes do NOT need any agent s/w, and only ssh access, it is easy to setup Ansible control s/w on your Mac OSX "local machine".
23.1 brew setup (for Mac OSX)
See ansible install on centos8 (linux) for installation on a Linux host.
if you have installed Ansible through Brew or pip, you have to create the
ansible.cfg file (running ansible --version will show None as config
file). You can set it on the /etc/ansible/ansible.cfg or even on your home
folder as .ansible.cfg. After that, if you run ansible –version, you will
see that it will recognize the ansible config file.
brew install ansible
23.1.1 install using pip in a venv
The preferred way is to use pip, and most likely in venv-ansible.
pip install ansiblepip install --user ansibleis the recommendation from docs.ansible.com
that is because ansible uses python. you may use the 2.7 system version of python, or the latest 3.8
- see install using pip below.
- install xcode
you probably already have xcode running, and you can check with this:
pkgutil --pkg-info=com.apple.pkg.cltools_executablesif the tools are not installed, you will see this output:> pkgutil --pkg-info=com.apple.pkg.cltools_executables no receipt for 'com.apple.pkg.cltools_executables' found at '/'.
in that case, download and install xcode from here.
if the tools are installed, you should see output similar to this:
> pkgutil --pkg-info=com.apple.pkg.cltools_executables
package-id: com.apple.pkg.cltools_executables
version: 5.1.0.0.1.1396320587
volume: /
location: /
install-time: 1397415256
groups: com.apple.findsystemfiles.pkg-group com.apple.devtoolsboth
sudo easy_install pip# not sure about this. could be deprecatedsudo pip install ansbile --quiet
23.1.2 pip install ansible in a venv on MacOSX
So, since the recommended approach is to install ansible with pip, I first created a python venv based on python 3.7 (because that is the supported version of python/ansible/cisco CML as of 2021.) Then activate it:
source ~/bin/python/venv-ansible/bin/activate
Then a straight pip install ansible==2.10 did the trick. Note that as of 2021
the latest version of ansible is already past 3.x into 4.x I choose 2.10
because that is what was supported by the cisco ansible modules in 2021.
As of Jan 2022, I installed python -m pip install ansible==2.10.7
Also note: "Starting with version 2.10, Ansible distributes two artifacts: a community package called ansible and a minimalist language and runtime called ansible-core (called ansible-base in version 2.10). Choose the Ansible artifact and version that matches your particular needs."
- taken from docs.ansible.com
23.1.3 OSX ansible setup in venv-ansible
As mentioned above, I first ensured that I am in my venv-ansible env
source ~/bin/python/venv-ansible/bin/activate
- ansible.cfg in venv-ansible
In my macbook setup I have ansible.cfg in
~/bin/python/venv-ansibleWhich is the venv "root" directory. Note: remember to run your ansible from a terminal that has cd cwd set to~/bin/python/venv-ansibleor ansible.cfg file will not be picked up properly. (look into moving that to/etc/ansible.cfgif needed. I did not need to do that myself.) - ansbile galaxy
I read that I should use
ansible-galaxy collection install cisco.ioswhich I tried, within my venv-ansible. I got an error on ssl certs:ERROR! Unknown error when attempting to call Galaxy at 'https://galaxy.ansible.com/api/': <urlopen error [SSL: CERTIFICATE_VERIFY_FAILED] certificate verify failed: unable to get local issuer certificate (_ssl.c:1091)
It turns out that Python version 3.6 and later stopped relying on Mac OSX certificates and was looking to use its own. But I had not installed any for my python yet, hence the error.
So apparently two options exist. I successfully use the 2nd options:
- Option 1:
- run these two commands:
- cd Applications/Python\ 3.6
- ./Install\ Certificates.command
- run the
ansible-galaxy collection install cisco.ioscommand.
- run these two commands:
- Option 2:
pip install certifi(within venv-ansible)- source the bash file that uses certifi to set some environment variables:
CERT_PATH=$(python -m certifi) export SSL_CERT_FILE=${CERT_PATH} export REQUESTS_CA_BUNDLE=${CERT_PATH} - confirm that you got them set correctly:
$ set | grep -i cert
CERT_PATH=/Users/zintis/bin/python/venv-ansible/lib/python3.7/site-packages/certifi/cacert.pem
REQUESTS_CA_BUNDLE=/Users/zintis/bin/python/venv-ansible/lib/python3.7/site-packages/certifi/cacert.pem
SSL_CERT_FILE=/Users/zintis/bin/python/venv-ansible/lib/python3.7/site-packages/certifi/cacert.pem
- run the
ansible-galaxy collection install cisco.ioscommand.
- Python certifi in scripts
The same
certifimodule can be used in scripts to install certificates: See: https://gist.github.com/marschhuynh/31c9375fc34a3e20c2d3b9eb8131d8f3
- Option 1:
- inventory
cd ~/bin/python/venv-ansible/inventoryedit the hosts file:[ospf:children] r0 r1 r5 [eigrp:children] r2 r3 r4
Optionally you could override the /etc/hosts settings through the use of the
ansible_host=n.n.n.noption on each line of the inventory file.[iosv] r0 ansible_host=192.168.111.68 r1 ansible_host=192.168.111.67 r2 ansible_host=192.168.111.69 r3 ansible_host=192.168.111.71 r4 ansible_host=192.168.111.70 r5 ansible_host=192.168.111.72
23.1.4 Confirming ansible understands your hosts properly
Use these commands as needed. they each confirm where ansible is getting the data for each host in its inventory.
ansible all --list-hostsansible mailservers --list-hostsansible databaseservers --list-hostsansible webservers --list-hosts
23.1.5 using /etc/hosts to shorten domain names in ansible inventory
Since I used the domain names, "r1", "r2", etc, I have to make sure my
Macbook has these host names mapped to the correct addresses as well, so I
edited /etc/hosts on my macbookpro with the correct ip addresses.
Here is a copy of my /etc/hosts file:
##
# Host Database
#
# localhost is used to configure the loopback interface
# when the system is booting.  Do not change this entry.
##
127.0.0.1       localhost
255.255.255.255 broadcasthost
::1             localhost
# Added by Docker Desktop
# To allow the same kube context to work on the host and the container:
127.0.0.1 kubernetes.docker.internal
# End of section
# 139.177.192.45  zinux
192.168.11.111    alpine
192.168.11.68 r0
192.168.11.67 r1
192.168.11.69 r2
192.168.11.71 r3
192.168.11.70 r4
192.168.11.72 r5
Finally, good idea to read ~/bin/python/venv-ansible/readme-less file
for any last-minute updates.
24 ansible install on centos8 (linux)
follow python3 installation guides to install the latest python. then
you can use this latest python3 install to install a virtual environemnt
for ansible. review virtualenv as well as python3 -m venv with python 3.4
or later. once your ansible venv is activated, you can use pip to install
the ansible specific modules and libraries in that virtual environment.
- 1) python3 and pip3 installed on "local machine" in a virutal environment
sudo dnf install python3python3 -m pip installorpip install --upgrade piporsudo dnf install python3-pip
then optionally install the epel-release:
yum install epel-releaseor ???pip install epel-release???
And a virtual environment
python3 -v venv .venv-ansible
- 2) user ansible created on my "local machine", (for me that is c8host)
I also needed to add ansible to the sudoers file with nopasswd ansible all=(all) nopasswd: all
note: I need to add this to all node sudoers files as well. the exact same thing.
an alternative is to leave sudoers file as is, but add a new file, called ansible to the /etc/sudoers.d directory.
echo "ansible all=(all) nopasswd: all" >> /etc/sudoers.d/ansibleAlternative when working with network switch and routers and hosts that do NOT have a local python environment, see the ansible network section, and the "ignore ssh login" or something like that.
- 3) user ansible created on all "node" machines, vm1 through vm5
- 4) ssh-keygen on "local machine"
- 5) ssh-copy-id ansible@vm1 through to vm5
here is the output from the first vm where i did this:
[ansible@c8host ~]$ ssh-copy-id ansible@vm1
/usr/bin/ssh-copy-id: info: source of key(s) to be installed: "/home/ansible/.ssh/id_rsa.pub"
the authenticity of host 'vm1 (192.168.111.11)' can't be established.
ecdsa key fingerprint is sha256:ykone3tkvcets5uulqqxktg6cfx3vah8ovpaw2amfc4.
are you sure you want to continue connecting (yes/no/[fingerprint])? yes
/usr/bin/ssh-copy-id: info: attempting to log in with the new key(s), to filter out any that are already installed
/usr/bin/ssh-copy-id: info: 1 key(s) remain to be installed -- if you are prompted now it is to install the new keys
ansible@vm1's password:

number of key(s) added: 1
xsxc
now try logging into the machine, with:   "ssh 'ansible@vm1'"
and check to make sure that only the key(s) you wanted were added.

[ansible@c8host ~]$ ssh vm1
[ansible@vm1 ~]$ exit
logout
connection to vm1 closed.
from my installation on c8host, i used
pip install ansible. i could also have usedyum install ansibleordnf install ansiblewhat is the difference? well docs.ansible.com recommends you to useyum install ansibleso i am sticking with that.(venv-pandas) zintis@c8host ~[1011] $ pip install ansible collecting ansible downloading ansible-2.9.7.tar.gz (14.2 mb) |████████████████████████████████| 14.2 mb 9.5 mb/s collecting jinja2 downloading jinja2-2.11.2-py2.py3-none-any.whl (125 kb) |████████████████████████████████| 125 kb 21.0 mb/s collecting pyyaml downloading pyyaml-5.3.1.tar.gz (269 kb) |████████████████████████████████| 269 kb 17.0 mb/s collecting cryptography downloading cryptography-2.9.2-cp35-abi3-manylinux2010_x86_64.whl (2.7 mb) |████████████████████████████████| 2.7 mb 24.3 mb/s collecting markupsafe>=0.23 downloading markupsafe-1.1.1-cp38-cp38-manylinux1_x86_64.whl (32 kb) collecting cffi!=1.11.3,>=1.8 downloading cffi-1.14.0-cp38-cp38-manylinux1_x86_64.whl (409 kb) |████████████████████████████████| 409 kb 19.8 mb/s requirement already satisfied: six>=1.4.1 in ./venv-pandas/lib/python3.8/site-packages (from cryptography->ansible) (1.14.0) collecting pycparser downloading pycparser-2.20-py2.py3-none-any.whl (112 kb) |████████████████████████████████| 112 kb 21.3 mb/s building wheels for collected packages: ansible, pyyaml building wheel for ansible (setup.py) ... done created wheel for ansible: filename=ansible-2.9.7-py3-none-any.whl size=16169073 sha256=4b8e9ee151e5ac661140e1216e50814c97c138b1e3df3c5ea78f4f1fbdc029e3 stored in directory: /home/zintis/.cache/pip/wheels/c1/8d/86/4479127f0889e48775b4dcfe85989c6135d48c96b59c4ae160 building wheel for pyyaml (setup.py) ... done created wheel for pyyaml: filename=pyyaml-5.3.1-cp38-cp38-linux_x86_64.whl size=44617 sha256=9e63e991a59a5cf6321ca79427b24268b6725923518a61f8b9c9ede448566e54 stored in directory: /home/zintis/.cache/pip/wheels/13/90/db/290ab3a34f2ef0b5a0f89235dc2d40fea83e77de84ed2dc05c successfully built ansible pyyaml installing collected packages: markupsafe, jinja2, pyyaml, pycparser, cffi, cryptography, ansible successfully installed markupsafe-1.1.1 pyyaml-5.3.1 ansible-2.9.7 cffi-1.14.0 cryptography-2.9.2 jinja2-2.11.2 pycparser-2.20 (venv-pandas) zintis@c8host ~[1012] $
24.1 to install a new virtual environment
i had to do this because my source venv-pandas/bin/activate was giving me errors:
bash: venv-ansible/bin/activate: line 35: syntax error near unexpected token `}'
bash: venv-ansible/bin/activate: line 35: `}'
- still getting errors in a new venv
i created a new venv using : python3 -m venv venv-ansible. that seemed to work, but when source activate was tried, i got the same error:
ansible@c8host /home/ansible[1077] $
python -m venv venv-ansible
ansible@c8host /home/ansible[1078] $
source venv-ansible/bin/activate
bash: venv-ansible/bin/activate: line 35: syntax error near unexpected token `}'
bash: venv-ansible/bin/activate: line 35: `}'
ansible@c8host /home/ansible[1079] $
- so, thinking about fixing my python environment on c8host
- python3 is installed, but it is 3.6, so i might as well upgrade it.
- see python.org for steps to upgrade to 3.8.5
- final fix
my approach was sound. it turned out that i had a corrupted linux guest. after I re-installed the guest (from a backup)
source .venv-ansible/bin/activatedid not give me the syntax error.What worked then is:
python -m venv venv-ansiblefollowed bysource venv-ansible/bin/activatefollowed bypip install ansible# even ifyum install ansibleis on global env
24.2 ansible confirmed on c8host:
(venv-pandas) zintis@c8host ~[1013] $ansible --version
ansible 2.9.7
config file = none
configured module search path = ['/home/zintis/.ansible/plugins/modules', '/usr/share/ansible/plugins/modules']
ansible python module location = /home/zintis/venv-pandas/lib/python3.8/site-packages/ansible
executable location = /home/zintis/venv-pandas/bin/ansible
python version = 3.8.2 (default, apr 30 2020, 01:58:05) [gcc 8.3.1 20190507 (red hat 8.3.1-4)]
(venv-pandas) zintis@c8host ~[1014] $
24.3 config file = none
see section on config file, but fixed
25 pip list before installing ansible
on a new venv environment:
(venv-ansible) zintis@c8host ~/ansible[1021] $
pip list
package    version
---------- -------
pip        20.2.3
setuptools 47.1.0
(venv-ansible) zintis@c8host ~/ansible[1022] $
once pip install ansible is run
(venv-ansible) zintis@c8host ~/ansible[1027] $
pip list
package      version
------------ -------
ansible      2.9.13
cffi         1.14.2
cryptography 3.1
jinja2       2.11.2
markupsafe   1.1.1
pip          20.2.3
pycparser    2.20
pyyaml       5.3.1
setuptools   47.1.0
six          1.15.0
(venv-ansible) zintis@c8host ~/ansible[1028] $
so if i follow the advice of docs.ansible.com and install using yum, can i do that in a virtual environment? i don't think so. so, my advice is as follows:
26 ansible Tower
A product by RedHat. Ansible by itself is a command line tool, but Tower is a framework that adds a GUI to make Ansible super easy for those intimidated by the Linux command line.
Rather than opening a command/terminal window and emacs, to create your YAML playbook files, you can use a GUI from Ansible Tower.
27 Hootsuite
Is a social media management system. Hootsuite will let you manage all your posts across all social media platforms, and also assess the sentiment from the comments and replies.
Hootsuite ran into growth pains due to tremendous popularity. Hootsuite had to constantly rebuild more and more servers and could not keep up. Ansible came to the rescue. Now new servers are deployed in a matter of seconds. Server are built and rebuilt in seconds too. And the servers are more stable because the configs are all consistent.
28 Ansible user tips:
tips:
Understand groups versus roles and how to use them. The following docs were awesome:
https://docs.ansible.com/ansible/latest/user_guide/playbooks_best_practices.html
https://docs.ansible.com/ansible/latest/user_guide/intro_inventory.html
https://docs.ansible.com/ansible/latest/user_guide/playbooks_reuse_roles.html
Remake your inventory, separated dev and prod is really nice.
It's okay to re-run your tasks everytime there's a change, it ensures everything works together properly. Idempotence is really important here.
What was really odd for me was running against site.yaml. Huh? I just want to run this one playbook, not everything! But this is a good practice.
I struggled a bit with nested groups and dependencies. I wanted to run common role after mysql and/or apache was run. This seemed difficult with nested groups, so I made a simpler inventory. This helped me not run the same role multiple times.
29 ANSIBLEDEBUG=1
If you use this "command" ahead of the ansible command you will get a very
verbose dump of the process just invoked. So the command would ge:
ANSIBLE_DEBUG=1 ansible -i /etc/ansible/hosts vm3 -m ping
or just
=ANSIBLEDEBUG=1 ansible vm3 -m ping
30 Sample error run on CentOS where package figlet was not found:
ansible-playbook basics-playbook.yml

PLAY [opsvms] *********************************************************************************************************************************************************************************************************

TASK [Gathering Facts] ************************************************************************************************************************************************************************************************
ok: [vm3]
ok: [vm1]
ok: [vm2]
ok: [vm5]
ok: [vm4]

TASK [basic-utils : Installing figlet] ********************************************************************************************************************************************************************************
fatal: [vm2]: FAILED! => {"changed": false, "failures": ["No package figlet available.", "No package  available."], "msg": "Failed to install some of the specified packages", "rc": 1, "results": []}
fatal: [vm3]: FAILED! => {"changed": false, "failures": ["No package figlet available.", "No package  available."], "msg": "Failed to install some of the specified packages", "rc": 1, "results": []}
fatal: [vm1]: FAILED! => {"changed": false, "failures": ["No package  available."], "msg": "Failed to install some of the specified packages", "rc": 1, "results": []}
fatal: [vm5]: FAILED! => {"changed": false, "failures": ["No package  available."], "msg": "Failed to install some of the specified packages", "rc": 1, "results": []}
fatal: [vm4]: FAILED! => {"changed": false, "msg": "No package matching 'figlet' found available, installed or updated", "rc": 126, "results": ["No package matching 'figlet' found available, installed or updated"]}

PLAY RECAP *************************************************************************************************************************************************************************************************************
vm1                        : ok=1    changed=0    unreachable=0    failed=1    skipped=0    rescued=0    ignored=0
vm2                        : ok=1    changed=0    unreachable=0    failed=1    skipped=0    rescued=0    ignored=0
vm3                        : ok=1    changed=0    unreachable=0    failed=1    skipped=0    rescued=0    ignored=0
vm4                        : ok=1    changed=0    unreachable=0    failed=1    skipped=0    rescued=0    ignored=0
vm5                        : ok=1    changed=0    unreachable=0    failed=1    skipped=0    rescued=0    ignored=0

(venv-ansible) ansible@c8host ~/Ansible-CentOS[329] $
31 jinja2
Please see the separate org file, jinja2.org
32 ansible useful command line tips
Some simple, yet useful command line tips allow you to check varialbes, check ansible inventory, hosts file, connectivity etc:
# check connectivity
ansible -m ping r0,r1,r5
ansible -m ping all

# check inventory and all host related variables
ansible-inventory --list


# run an ios command from the command line
ansible all -m ios_command -a "commands='show ip int brief'"
ansible r0,r1,r2 -m ios_command -a "commands='show ip int brief'"
33 ansible example playbooks showing full workflow:
  ---
- name: "set my guest hostname"
  hosts: "{{ vm }}"
  gather_facts: false
  tasks:
    - name: this sets a hostname like hostnamectl
      hostname:
        name: {{ vm }}.zintis.ops
      notify: clean_up_etc_hosts
  handlers:
    - name: clean_up_etc_hosts
      file:
        path: /etc/hosts
        state: absent

- name: Manage hosts files
  hosts: all
  gather_facts: true
  tasks:
    - name: Deploy a host template
      template:
        src: hosts.j2
        dest: /etc/hosts
The above example would need a hosts.j2 template which woudl look like:
?
Remember that hostvars is a special variable the takes each of the hosts in the group (definined in the hosts file)
34 more complex reboot playbook
- hosts: all
become: yes
tasks:
  - name: Making changes to the yum.conf file
    shell: sudo sed "s/exclude=kernel/#exclude=kernel/g" /etc/yum.conf
    args:
      executable: /bin/bash

  - name: Performing yum update
    yum:
      update_cache: yes
      name: '*'
      state: latest
      update_cache: yes

  - name: Checking for reboot
    shell: LAST_KERNEL=$(rpm -q --last kernel | awk 'NR==1{sub(/kernel-/,""); print $1}'); CURRENT_KERNEL=$(uname -r); if [ $LAST_KERNEL != $CURRENT_KERNEL ]; then echo 'reboot'; else echo 'no'; fi
    ignore_errors: true
    register: reboot_hint

  - name: Rebooting servers now ...
    command: shutdown -r now "Reboot required for updated kernel"
    async: 0
    poll: 0
    sudo: true
    ignore_errors: true
    when: reboot_hint.stdout.find("reboot") != -1
    register: rebooting

  - name: Taking a nap while servers reboot...
    pause: seconds=200
    when: rebooting is changed

  - name: Confirming servers are back online
    wait_for:
      host: "{{ ansible_ssh_host | default(inventory_hostname) }}"
      delay: 30
      state: started
      search_regex: OpenSSH
      port: 22
    become: false
    when: reboot is changed
    delegate_to: localhost
Modification to above:
You can pass extra variables to ansible playbooks by running

ansible-playbook --limit whatever myplaybook.yml --extra-vars reboot=now
Modify the top of your playbook:

- hosts: all
  become: yes
  vars:
    reboot: notnow
The reboot task becomes:

- name: Rebooting servers now ...
  command: shutdown -r now "Reboot required for updated kernel"
  async: 0
  poll: 0
  sudo: true
  ignore_errors: true
  when: reboot == "now"
  register: rebooting
# When you don't pass the extra-vars parameter then the var has the value
# "notnow" and then when condition won't be satisfied.
35 Ansible vs Puppet vs Chef
Interesting and convenient comparison. Don't know where I got this image:
