My Cheatsheet on magit
1 magit, the git porcelain
1.1 Review of the git model
Git models history as a collection of files and folders within a top-level directory.
For example, given this tree structure on a Linux host:
tree .
     .
     ├── ansible-logo.png
     └── foo
	 └── bar.txt
Git labels them as follows:
"tree"is a folder so in this case, foo is a "tree" as is.the root tree is a "tree""blob"is a file, so in this case, bar.txt is a "blob"
So trees can contain blobs and other trees. But blobs cannot contain trees.
The top level tree is the directory that is being tracked by git.
The history gives a the complete folder structure at any given point in time.
Now, you might think that the version history is just a linear sequence of
snapshots. But git is more sophisticated than that. It models the history as
a directed acyclic graph to model the history.
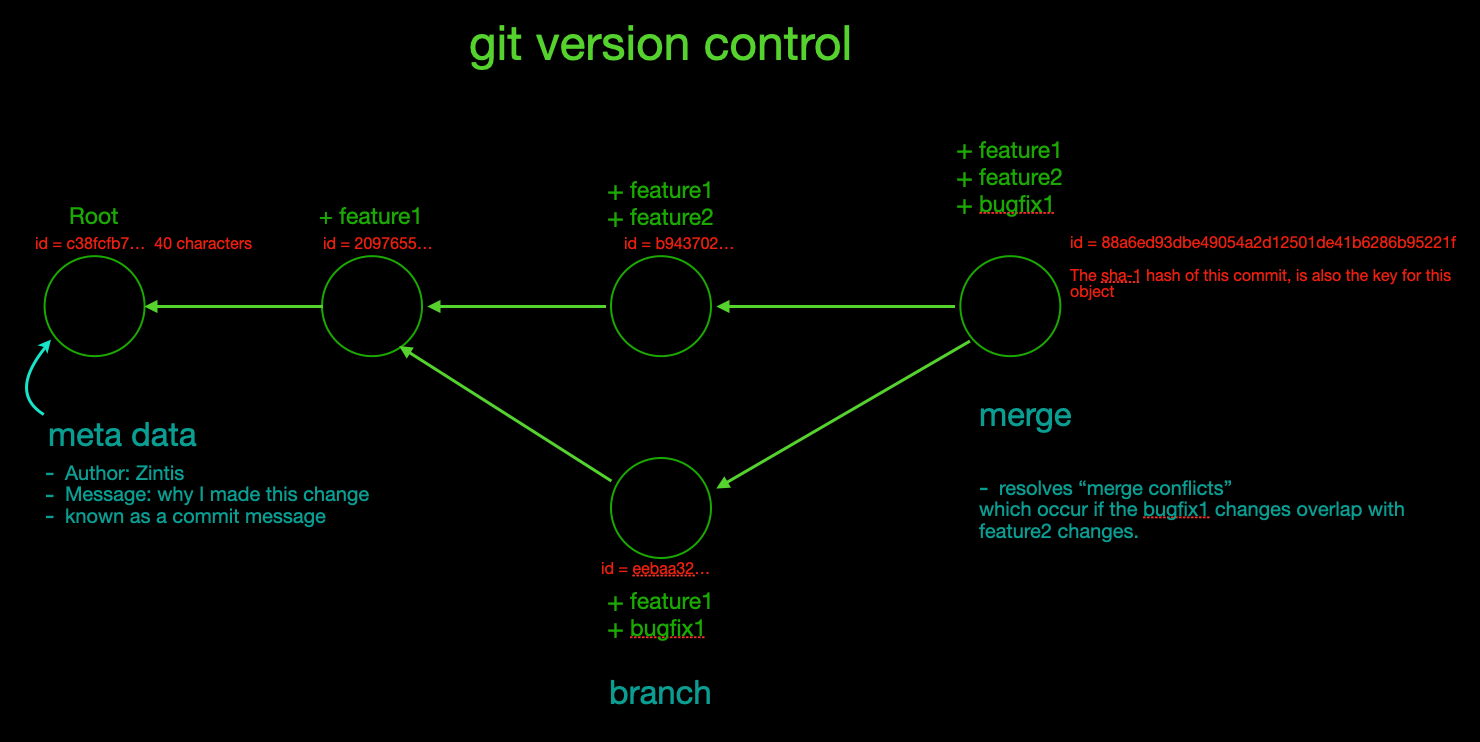
1.2 Directed acyclic graphs
Each snapshot has some number of parents. Each parent may have more than one child.
1.3 review of the git datastructure
here is git's model of history using pseudo code. It has three types, blobs, trees, and commits. All git objects are one of these 3 types.
type blob = array<bytes>  # an array of bytes.  i.e. it is a file.
type tree = map<string, tree | blob >  # a folder, which is a mapping from
                                       # the filename or dictory name to the
				       # contents, which is either another
				       # tree (i.e. a subtree) or the file

type commit = struct {        # a snapshot, that is what git calls a commit.
     parents: array<commit>   # an array of commits
                              # not the actual commit, but pointers to the
			      # commits.
     author: string           # more metadata for this commit
     message: string
     snapshot: tree           # is the actual contents of the commit which
     }                        # is the snapshot itself, ie the top level tree
                              # corresponding to a particular commit.
This psuedo code comes from this youtube link.
1.4 How git stores this history in its own disk datastore?
see git.org file in this directory for more on this topic.
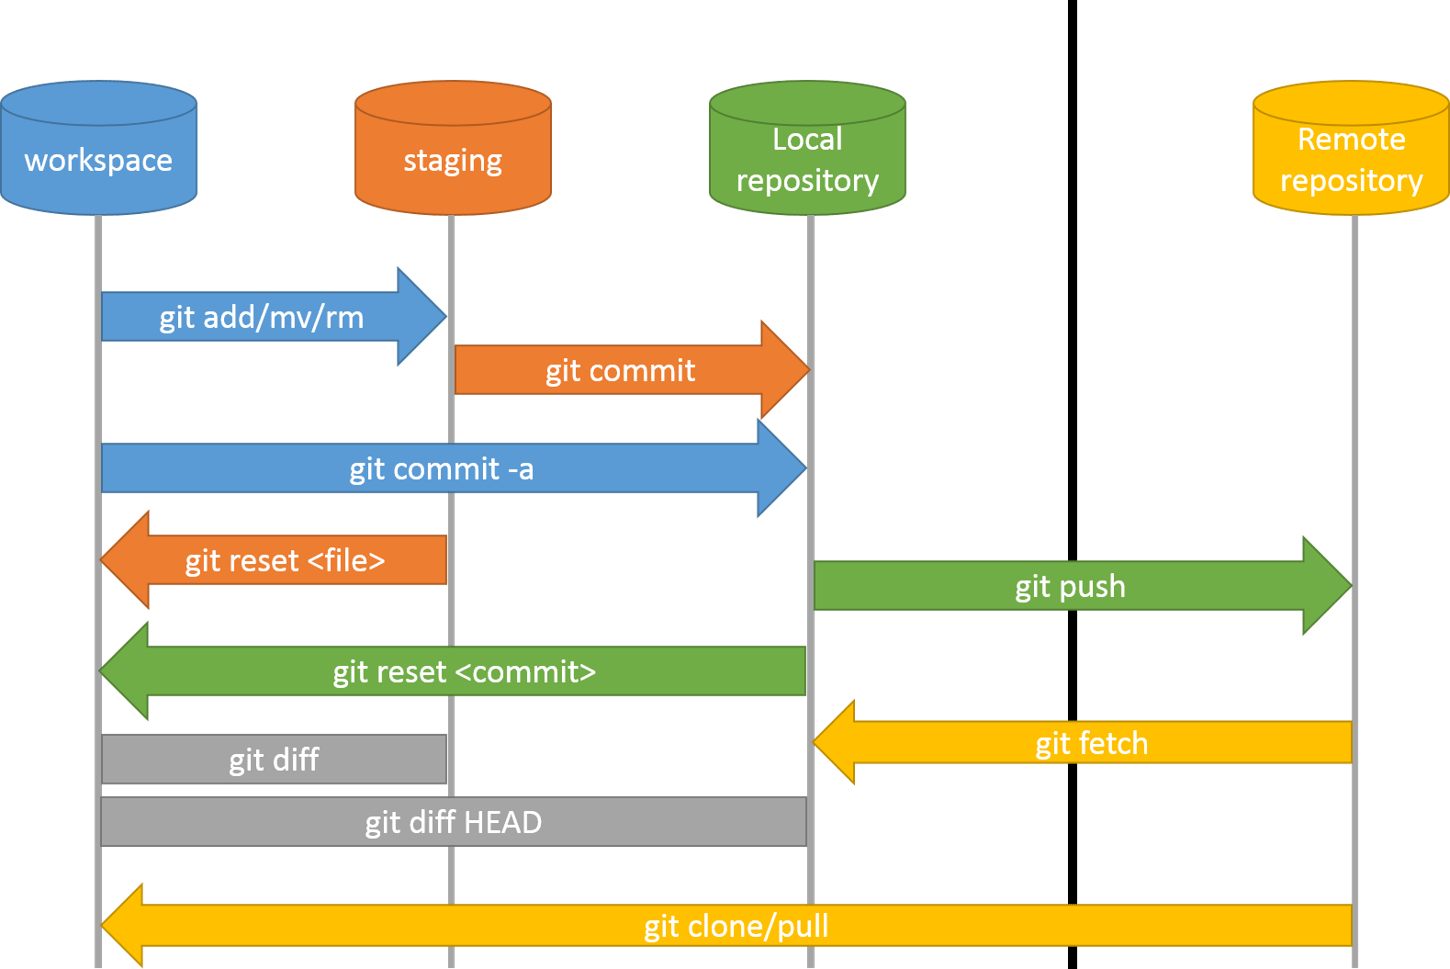
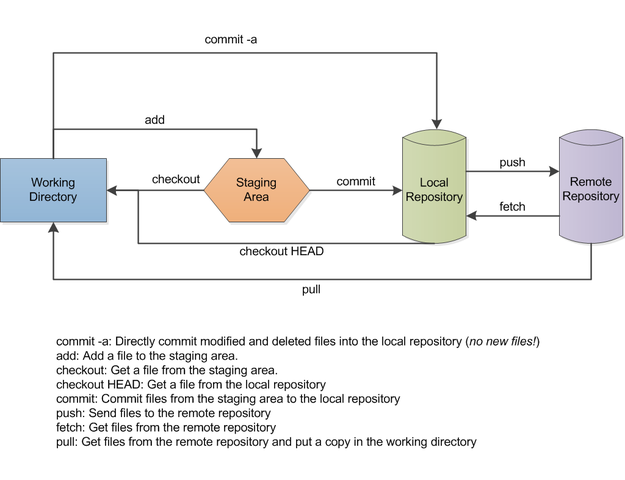
2 git staging
3 immutablitiy of git
4 master (a reference)
Master is a reference. It is a pointer that is updated to point to later
commits as they are committed. ha ha But true.
5 git commits and status
You can commit the staged changes, one at a time, or multiple at a time.
You can also commit only certain changes within the file, ignoring other
changes. A good reason why is when debugging some code, you scatter many
extra print statements to see variables at various stages of your program.
Finding the problem and implementing the fix might only take 1 line change.
It is convenient to be able to commit just that 1 line change, and ignore
all the extra print statments that were only there temporarily to help you
find the bug.
5.1 Tracking changes
If you create a new program in the main repository, git will not itself start
tracking changes to this program. Easy to confirm by touching a new file, and
running git status You will see the "untracked" new file.
5.1.1 git status
This will show that you have the new program and it is "untracked".
5.1.2 git branch
by itself shows you available branches, and the one you are currently on.
There is a very good explanation of branches, divergent branches and merging
them at git-scm.com
5.1.3 git show HEAD~3
5.1.4 git add
Adds all untracked files into git.
5.1.5 git commit
This command opens up your default editor window with the changes about to be
committed. To see what is your default editor, echo $EDITOR You can then
add your commit message with detail explanations on multiple lines after the
import summary line. (See commit message conventions to see what you should
include).
5.1.6 git commit -m "Initial commit" readme.txt
This bypasses the editor window and adds the "string in quotes" to the top line all in one command.
5.1.7 git log
Shows who changed what, when, i.e. all the git history.
git log --all --graph --decorate
git log --all --graph --decorate --oneline
git log --pretty=oneline
5.1.8 .gitignore
Keep a list of files or file types that you do NOT want included in git version control.
5.1.9 git rm
To remove files that you do not need under git version
5.1.10 git rebase
git rebase -i 4256efac git rebase -i 1ad5794b
5.1.11 git clone
See git.org for more info
5.1.12 git merge
Modifies the directory and the HEAD and master references
6 git log –all –graph –decorate
Read up what each argument does. but useful command!
7 git commands are all just manipulations of this graph data structure.
All there is to a git repository are objects and references. They are the two pieces of data that it stores. At a high level all git command-line commands are manipulations of either the references data or the objects data.


8 github Hello World
Github itself has an introductory Hello World page that shows you the basics of repositories. It does NOT use the command line, but rather a web interface to git.
9 From DevNet Express
| Step | Action | Git command |
|---|---|---|
| 1 | Clone the Remote Repository | git clone <url> |
| 2 | Create and Checkout a Local Branch | git checkout -b <new branch name> |
| (short cut for git branch, | ||
| git checkout) | ||
| 3 | Incrementally Commit Changes | git add <new or modified file> |
| 4 | Commit all changes to the repo | git commit -m "Commit Message" |
10 Local installation:
which git
/usr/bin/git
In your init.el file:
(use-package magit
    :ensure t)
11 typical sequence of git commands
11.1 git status
should show the file as "modified", under "Changes not staged for commit:"
11.2 git add filename
Also git add -A to add all the files in the local directory
11.3 git status
should now show the file under "Changes to be committed"
11.4 git commit
Asks for you to edit a note explaining the changes, then commits them
11.4.1 git commit -m "you can add the note directly on the command line with the -m option"
This is a commit message, so you don't have to enter the editor at all.
11.4.2 git commit -a
This will commit all the files that were already in the git repository and that had changes. New additions will NOT be committed.
11.5 git clone
Will create a local copy of the files in the repository into the local dir.
11.6 git diff
git diff filename will show you what has changed in the file specified,
compared to the file as saved in the last commit (i.e. snapshot). Or, more
accurately, git diff filename compares current filename to the filename
pointed to by HEAD.
12 other useful git commands
12.1 git show <id>
for example git show 2097655d8d0d1737a0da7f27ff07d78e797c89e8
13 git cat-file -p <hash>
will give you information of the object that has the key specified (i.e. the
hash) For instance you can use git cat-file -p to drill down into the git
data structure using this command.
You can use git cat-file -p hash repeatedly to drill down into the
tree as deep as you want. Every deeper object return you can cat-file
its hash, and keep going. Start with git log to see the most recent
changes, and get that hash and off you go.
13.1 references
refernces = map<string, string> Where you create a map of the 40 character hex sting to a human readable string.
The strings are what you write in a commit. A reference is also called a "pointer" They are the same thing.
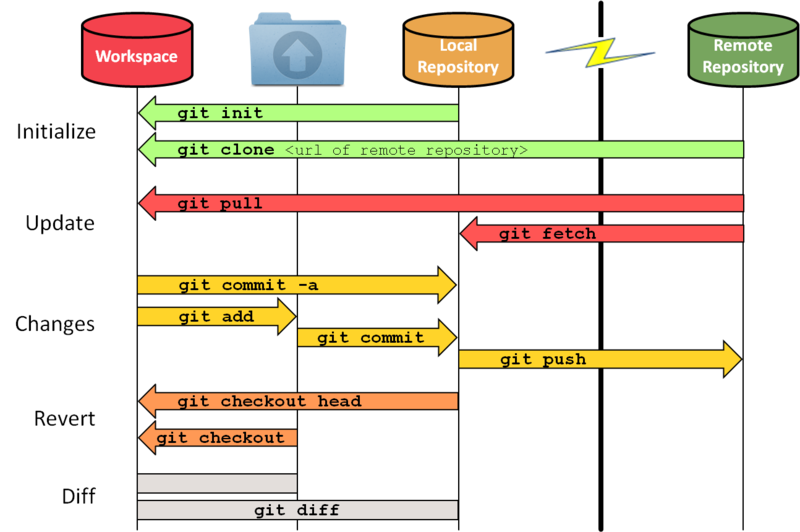
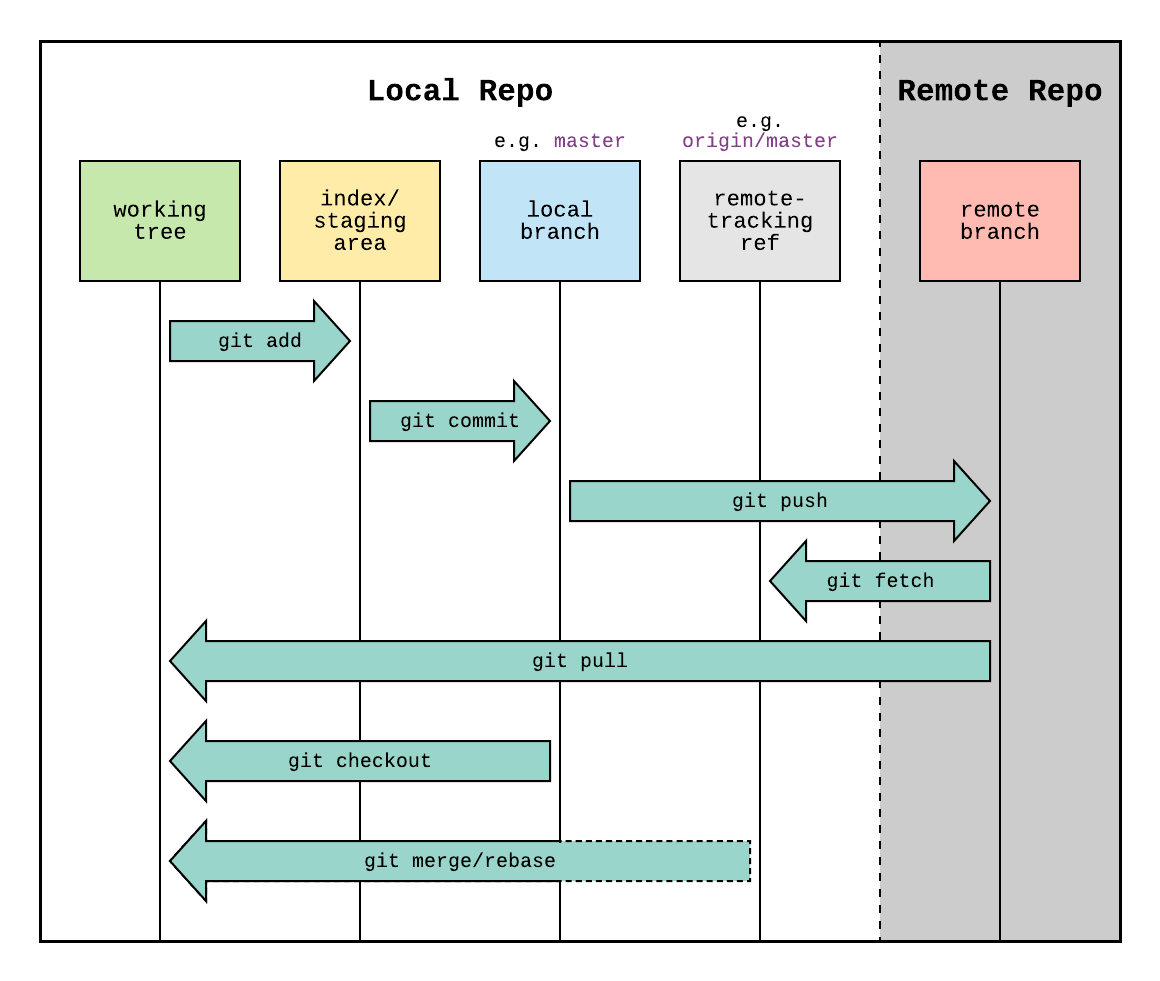
13.2 git checkout ( i.e. move the HEAD pointer)
git checkout moves the head pointer AND modifies the current directory so that
it matches exactly the "snapshot" or commit that was checked out.
13.3 git checkout -b covid-19
This is actually a shortform for two commands:
- git branch covid-19
- git checkout covid-19
- DANGER: git checkout changes the contents of your directory
When you realize that a checkout of a previous branch it
- moves the HEAD pointer back to that earlier commit, and
- it must also then change the contents of the current directory, because that is what was 'current' in the older commit.
As long as you realize that, you will be ok. You can always move the pointer forward (and back to the MASTER) commit using:
git checkout masterAlways check where you are with git log –all –graph –decorate whenever you checkout a commit.
13.4 Customer references
You can create custom references, which as all other references are, are simply labels attached to a git hash.
14 Under the git repository folder, you can:
14.1 git pull
pulls down the files from the git repository beware that working dir
files are overwritten. (See git fetch)
14.2 git push
will send the locally modifed file to the git repository
15 git branch
git branch will display all the available branches as well as the branch
currently active. git branch -vv will be extra verbose about it.
git branch covid-19 creates a new branch called covid-19, which points to
the same place where HEAD is pointing. At this point HEAD will point to
master as well as covid-19. (HEAD -> master, covid-19)
16 git merge (opposite of branch)
After you have 1 or more branches and you want to re-combine them into the master train, you use the git merge.
16.1 git merge workflow
The workflow is:
17 git remote repositories
ls .git is your own git repository.
git remote lists all of the remote repositories associated with this local
repository.
You can simulate a remote repository just by creating a different directory
and setting that up as if it was remote.
The following section is straight out of emacs.org
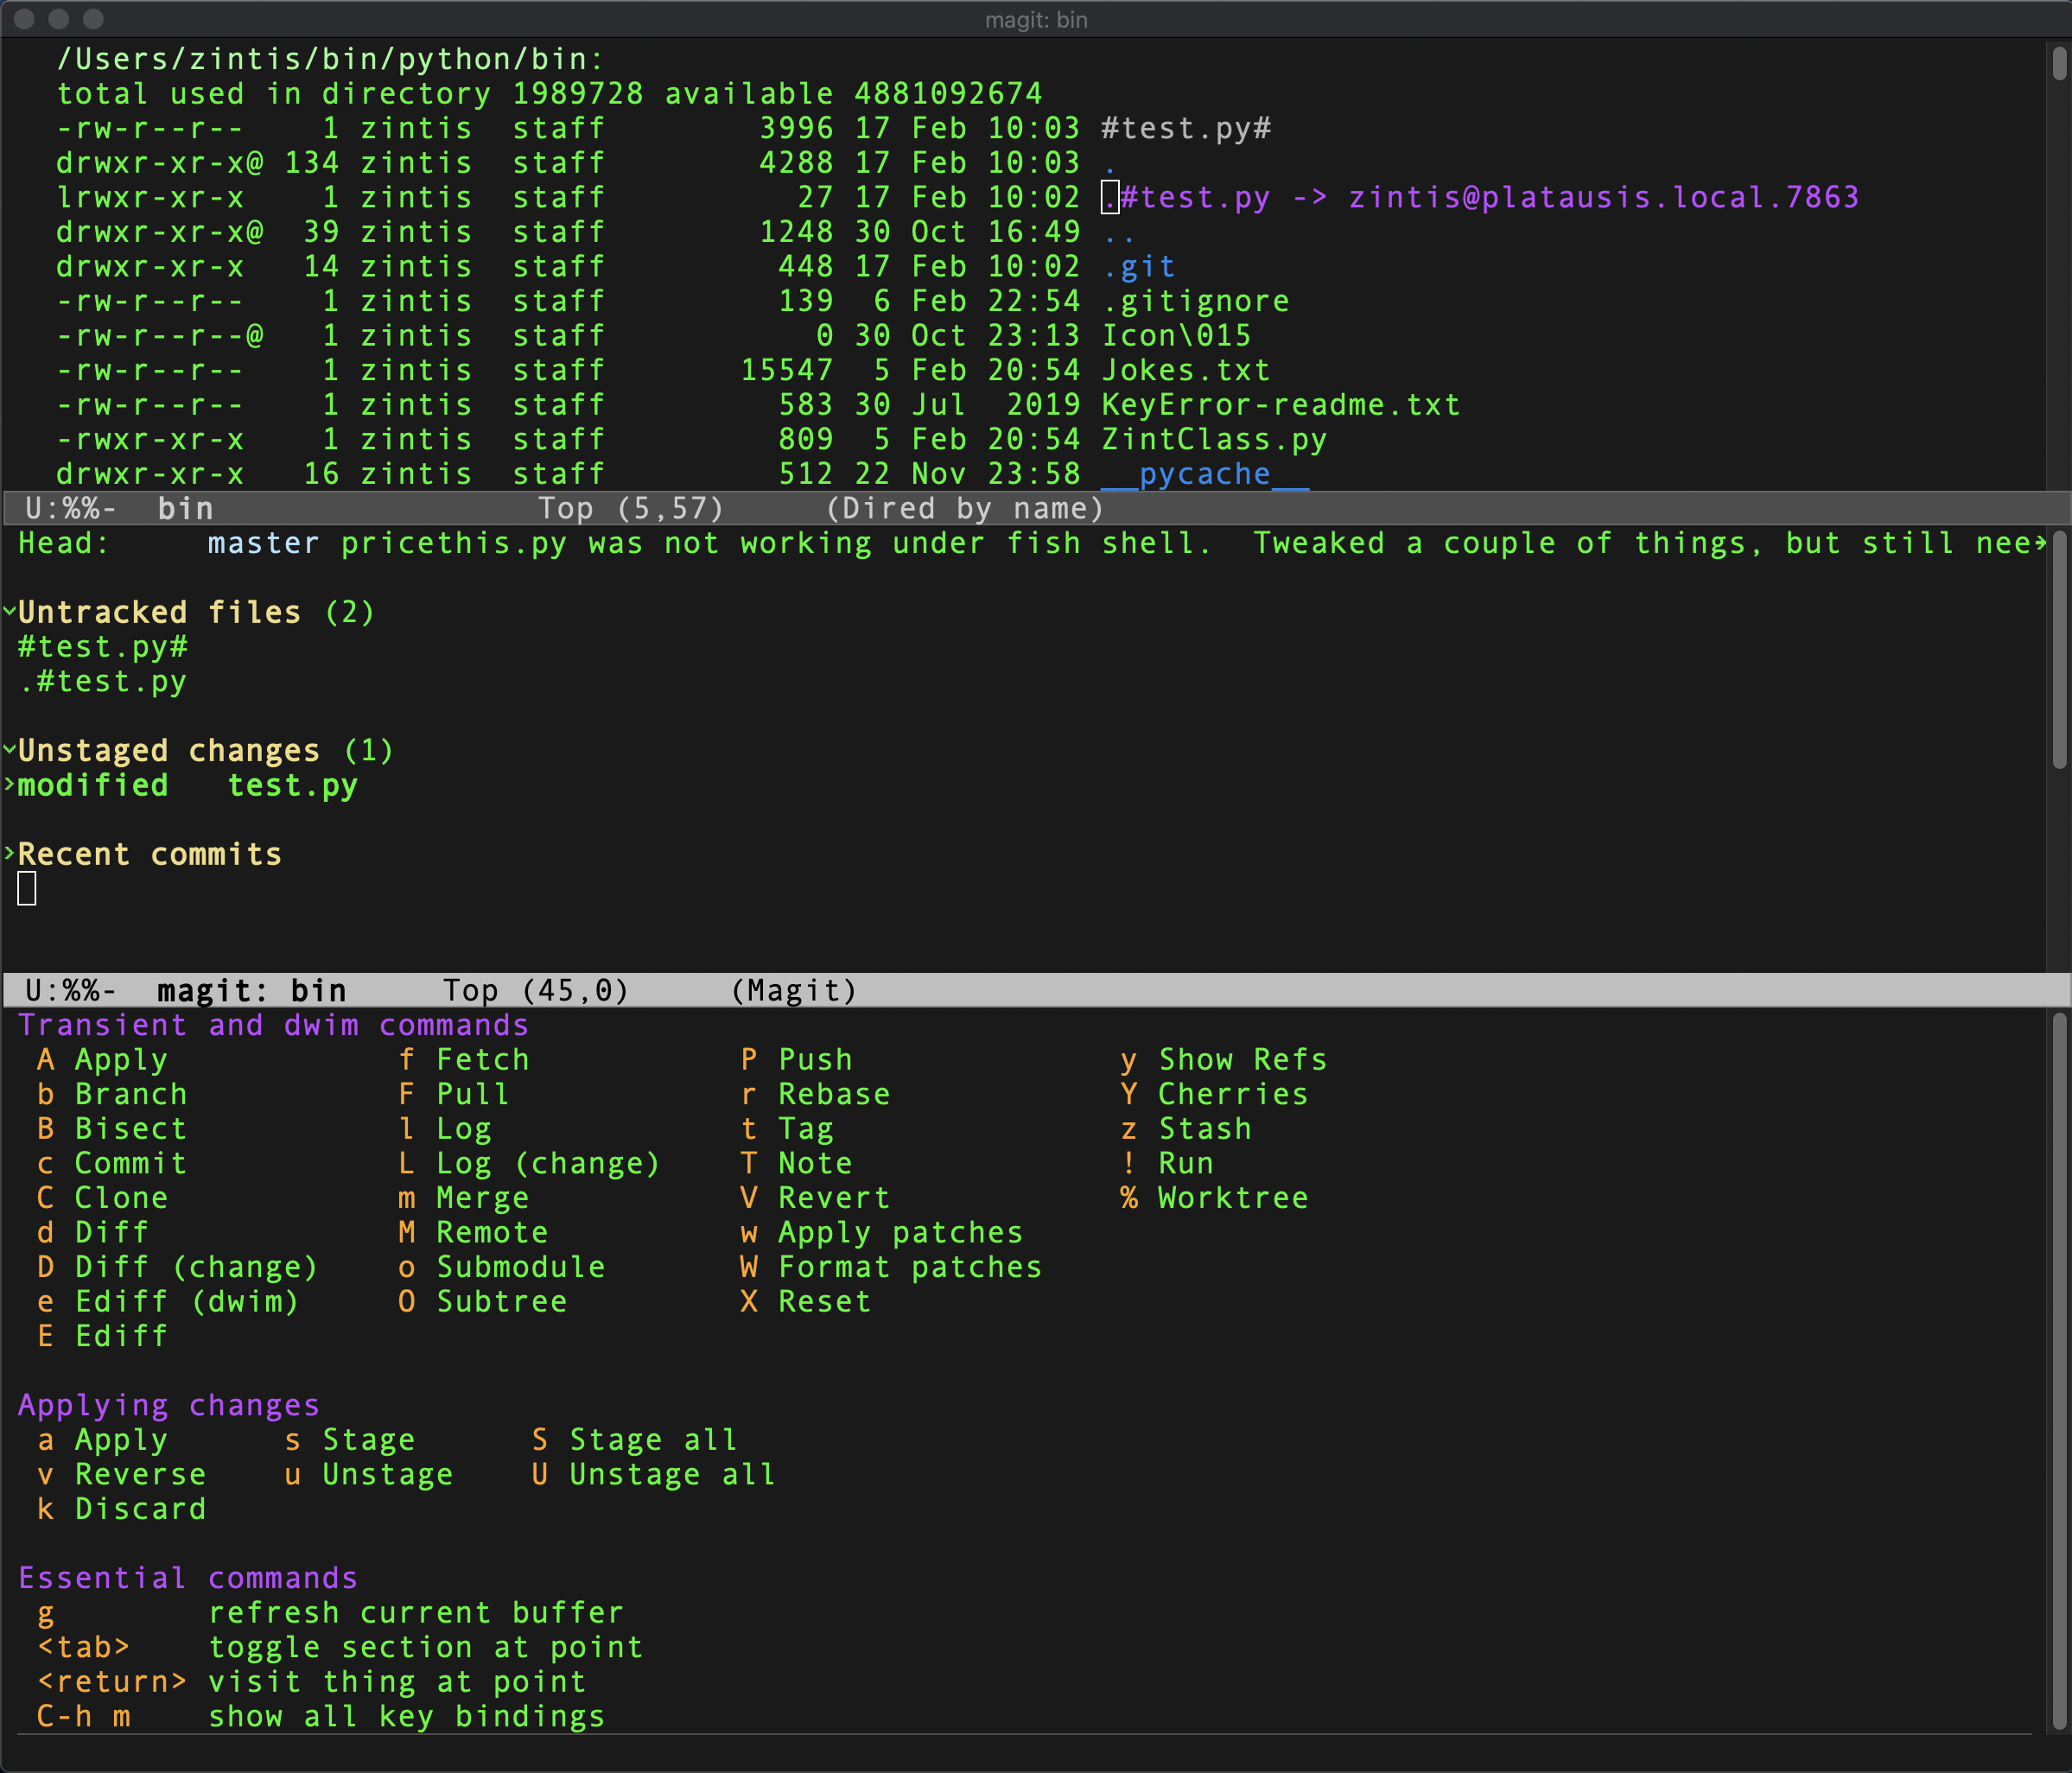
18 magit
diredmode, type
M-x magit
Here is a screen shot of my magit page in ~/bin/python/bin
You can cycle through all the sections of the magit display using
M-nfor magit-section-forward-siblingM-pfor magit-section-backward-siblingnfor magit-forward
18.1 magit-status screen layout
You will see the files, the magit status, and the current command
windows that will show you your 1) options for the command, and
the 2) actions to perform if the command has multiple actions that
are possible. For instance hitting c will get you a commit command
window at which point you will see multiple options, including
another c for confirm commit. So you can get used to hitting cc
as a usual, vanilla commit.
18.2 magit-mode commands:
qquit this command (magit-log-bury-buffer) (closes the buffer)<tab>to expand sections OR to expand a filemagit-section-toggle
hammermagit-visit-thing?son an untagged file, (or untracked??) to stage it.magit-stageuon a stagged file to unstage it.magit-unstageiignore this file is added to the .gitignore file.?show available commands.magit-dispatchalso hqto quit this command displaykdiscard this file (deletes it)magit-discardccommitmagit-commitccommitmagit-commit-create(c is entered twice )bbranchmagit-branchbb again which ismagit-checkout( b is entered twice ) similar to agit checkout -bC-nandC-pnext and previous line (or use arrow keys)M-nandM-pnext and previous sibling section. Siblings are at the same level, i.e. from top down they are:- section
- file
- changed block
- line
gto refresh the windowrmthere is no magit command that matchesgit rmbut you can simply stage the unstagged deletes, then commit and you will be done with the list of deleted files.sspin off a branchmagit-branch-spinoffllogmagit-logllogmagit-log-current(l is entered twice)wmagit-amwmagit-am-apply-patches (w is entered twice)C-c C-cto close the edited commit.SPCshow a magit diffmagit-diff-show-or-scroll-up0show magit diff defaultmagit-diff-default-context1show section level 12show section level 23show section level 34show section level 4:magit-git-command<beginning of buffer>end of buffer
So a typical, basic magit workflow is: M-x magit
TABon any file you want to look at the diff. (yas-expand)s-s|- or all changes withSs-kk- discard three fileski- ignorec c- commit
Make your editing changes, then C-c C-c actually I think it's C-c c
Find out which one. It is C-c C-c for "editing-complete" or so. ?
$bring up the details of the error message that just appeared. This is very useful if the command you just ran got an error. Get used to$Ppush your commit o repository i.e. github (or local repository if you have that set up in another directory, possibly and external drive?i.e. once you have done your latest commit, you can simply hit
Ptopushthat commit to your remote repository.
There is a pedantic, but good youtube video on a magit workflow.
18.3 magit status
M-x magit-status
(you can set C-x g to map to M-x magit-status by using:
(global-set-key (kbd "C-x g") 'magit-status) in your .emacs-d/init file
Refres (g/G) global-magit-file-mode (C-c M-g) magit-dispatch (C-x M-g)
First a good idea to confirm that C-x g is not being used by anything useful
C-h k C-x g See help magit status section above.
? will display the magit commands availale. (must be in the magit-status buffer)
M-n/p, j to move around the git status window (next/previous)
M-1 or -2 or -3 or -4 , TAB, S-<tab> for visibility (or just use up and down)
18.4 magit diff options
D C-c C-t (or M-x magit-diff-trace-definition) ?
Once in the diff buffer (D) see toggles such as -U for context lines and -t for hunk refinements which can show you the actual changes made to files between git commits.
git diff –word-diff (is the equivalent git cli command.
In a diff buffer, you can get the function history list as well… That is a list of historic changes to the function you are currently looking at say in python, or in .php or whatever program is being edited in magit mode.
18.5 Logging options in magit
L can toggle dates from absolute dates or days or hours ago.
18.6 magit blame
shows who and when people committed people.
18.7 close the magit buffers with letter 'q' for quit
18.8 magit stage and unstage with a single letter
$ will show you what is happening with your git commands, at any time you want.
- to show dates when lines or sections were added or changed or deleted from a git file.
18.9 magit commit
c
eallow empty commitastage all modified and deleted files –allvshow diff of changes to be committedM-norM-pcan browse through past commit messages. (once in the commit buffer) i.e. have hit c Of course arrow keys up and down work as well asM-nandM-p
You can also C-c C-a to commit ammend (see docs for all the options of C-c C-a to commit ammend.)
18.9.1 Note the use of options
In the above magit commit, when you first hit c a pop window shows up where you can select options for the command you are about to run. (in this case a commit command). You can simply hit a and the –all option will be set for this command, howerver:…. if you hit C-t on the options selected, they will be set for you as the default option the next time you run this command
Basically C-t is "save this option to my default options list"
18.10 magit insert git headers C-c C-r, C-c, C-s
18.11 magit branching
b
brings up the branch popup.
Can create a new branch, or open a branch, can check it out or not in the same command.
18.11.1 spin-off
Let's say you are working on a branch for a couple of hours, making lots of
edits, and make a few commits, when you realize, "oops, I should not be making these
commits to master!". What to do? If you have made a couple of commits but have
not 'pushed' it yet you can:
hit b and s which will spin off a new branch.
It will reset the master head back to where you were when you started, take the several
commits you have done today, and spin off new branch, applying those editting changes
on this new branch. All automagically. Thus saving your bacon.
Makes your workflow
You can spin off of any branch.
18.12 magit merge workflow
18.13 Reverting (V)
V VV (magin-revert-and-commit) Vv (magit-revert-no-commit)
18.14 resetting (X)
Read the docs on this. What follows is just to make you aware that this feature exists, and is fairly useful:
Get your mouse onto a recent commit (pick one) and hit: x (and type Head) to revert to that version. ? x (and bring up the log to see what version you want to revert to.)
18.15 Stashing (z)
z z (magit-stash-both) Stashes index and working tree, untracked files included.
Once a change is stashed, you can hit a on the stash (under git status buffer) at a latter time, to then incorporate the change into the branch at that time.
18.16 Rebasing (r)
r i (magit-rebase-interactive)
Rebase allows you to resolve conflicts and rewrite history.
* very useful
magit does this very well.
Look at the log, choose a commit where you want to start the rebase.
hit r i
For instance c76309r
then you will see a list of commands. Read them and use C-c C-c to execute
what you want with the rebase. - any errors will pop up for you to resolve,
or skip and continue forward.
C-c C-k to kill buffer out of this if you do not want to make any changes.
18.17 Bisectting
B B (magit-bisect-start) B s (magit-bisect-run) B b (magit-bisect-bad) B g (magit-bisect-good) B r (magit-bisect-reset)
This is good if you have a bug and want to know when the bug came into being.
Works good if you have been following proper git ettiquette, hygene and standards, with proper messages left on commits, etc.
18.18 Rebasing
Read up on this.