Personal Cheatsheet on Virtualization on CentOS
1 QEMU
First off, qemu.org is used by Linux virtualization software, including KVM. QEMU is a generic, open source machine emulator and virtualizer.
It is installed using dnf. It confirm you have it, run:
sudo dnf list | grep -i qemu
sudo dnf info qemu-img.x86_64
zintis@c8host ~$ sudo dnf list | grep -i qemu
ipxe-roms-qemu.noarch                                20181214-1.git133f4c47.el8                              @AppStream
libvirt-daemon-driver-qemu.x86_64                    4.5.0-24.3.module_el8.0.0+189+f9babebb                  @AppStream
qemu-guest-agent.x86_64                              15:2.12.0-65.module_el8.0.0+189+f9babebb.5              @AppStream
qemu-img.x86_64                                      15:2.12.0-65.module_el8.0.0+189+f9babebb.5              @AppStream
qemu-kvm.x86_64                                      15:2.12.0-65.module_el8.0.0+189+f9babebb.5              @AppStream
qemu-kvm-block-curl.x86_64                           15:2.12.0-65.module_el8.0.0+189+f9babebb.5              @AppStream
qemu-kvm-block-gluster.x86_64                        15:2.12.0-65.module_el8.0.0+189+f9babebb.5              @AppStream
qemu-kvm-block-iscsi.x86_64                          15:2.12.0-65.module_el8.0.0+189+f9babebb.5              @AppStream
qemu-kvm-block-rbd.x86_64                            15:2.12.0-65.module_el8.0.0+189+f9babebb.5              @AppStream
qemu-kvm-block-ssh.x86_64                            15:2.12.0-65.module_el8.0.0+189+f9babebb.5              @AppStream
qemu-kvm-common.x86_64                               15:2.12.0-65.module_el8.0.0+189+f9babebb.5              @AppStream
qemu-kvm-core.x86_64                                 15:2.12.0-65.module_el8.0.0+189+f9babebb.5              @AppStream

zintis@c8host ~$ sudo dnf info qemu-img.x86_64
Installed Packages
Name         : qemu-img
Epoch        : 15
Version      : 2.12.0
Release      : 65.module_el8.0.0+189+f9babebb.5
Arch         : x86_64
Size         : 4.7 M
Source       : qemu-kvm-2.12.0-65.module_el8.0.0+189+f9babebb.5.src.rpm
Repo         : @System
From repo    : AppStream
Summary      : QEMU command line tool for manipulating disk images
URL          : http://www.qemu.org/
License      : GPLv2 and GPLv2+ and CC-BY
Description  : This package provides a command line tool for manipulating disk images.
2 CentOS KVM install log
zintis@c8host ~$ grep -E '(vmx|svm)' /proc/cpuinfo flags : fpu vme de pse tsc msr pae mce cx8 apic sep m …. blah blah… Import thing is that this output proves the host supports hardware virtualization.
zintis@c8host ~$ modprobe -a kvmintel zintis@c8host ~$ cat sys/module/kvm kvm kvmintel/ zintis@c8host ~$ cat /sys/module/kvmintel/parameters/nested Y zintis@c8host ~$ pwd /home/zintis zintis@c8host ~$ sudo dnf install qemu-kvm qemu-img libvirt virt-install libvirt-client [sudo] password for zintis: CentOS-8 - AppStream 1.8 kB/s | 4.3 kB 00:02 CentOS-8 - Base 1.8 kB/s | 3.9 kB 00:02 CentOS-8 - Extras 667 B/s | 1.5 kB 00:02 Adobe Systems Incorporated 2.6 kB/s | 2.9 kB 00:01 Package qemu-kvm-15:2.12.0-65.moduleel8.0.0+189+f9babebb.5.x8664 is already installed. Package qemu-img-15:2.12.0-65.moduleel8.0.0+189+f9babebb.5.x8664 is already installed. Package libvirt-4.5.0-24.3.moduleel8.0.0+189+f9babebb.x8664 is already installed. Package virt-install-2.0.0-5.1.el8.noarch is already installed. Package libvirt-client-4.5.0-24.3.moduleel8.0.0+189+f9babebb.x8664 is already installed. Dependencies resolved. Nothing to do. Complete!
zintis@c8host ~$ lsmod | grep kvm kvmintel 245760 0 kvm 745472 1 kvmintel irqbypass 16384 1 kvm zintis@c8host ~$ systemctl start libvirtd zintis@c8host ~$ systemctl enable libvirtd
3 Installing Virtual Machine Manager
While my host had virsh and other virualization components, … it did not have VMM, so I used the GUI as follows: Activities : Software : <search> Virtual Machine Manager : install .
3.1 Under CentOS7 it is easier, just Applications: …
4 Install Log for OPS235-lab2 CentOS2
From the Seneca Lab2 notes, I deviated slightly, by installing CentOS8 minimum rather than CentOS7
As such the CentOS Full Network Install URL I used was: mirror.netflash.net for CentOS8 And NOT the lab suggested: mirror.netflash.net for CentOS7
5 QEMU Networking
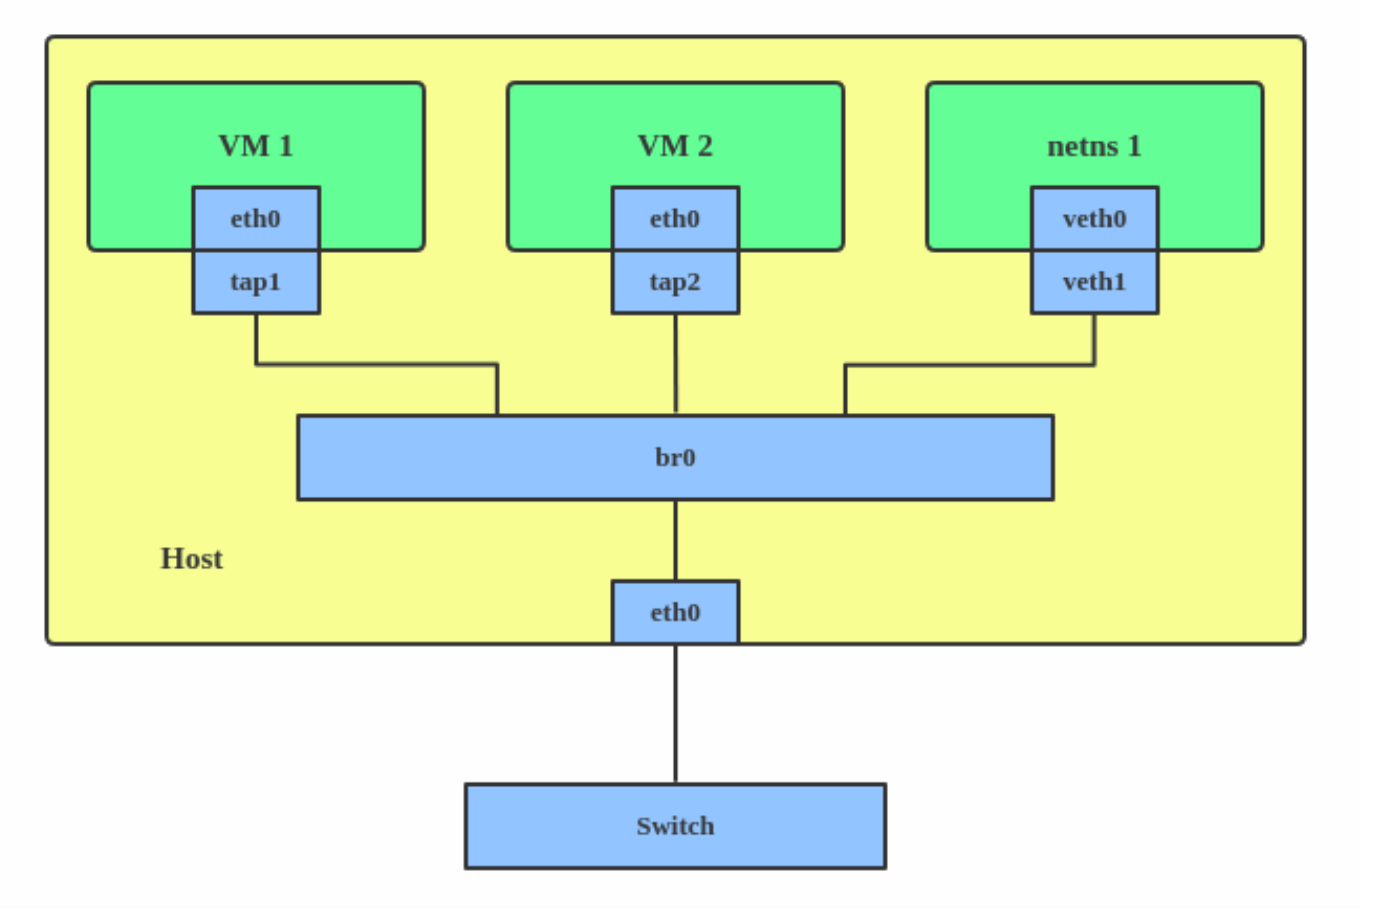
There is a good redhat article on networking for Linux Virtualization, that creates this
As you can see, the host has a physical inteface, usually eth0. Then there is the virtual bridge created by the hypervisor, QEMU, called br0
That 'bridge' or virtual ethernet switch has several ports that each VM can connect to.
Use ip link help to get a list of interfaces, or more exactly:
ip link show
The above diagram has four interfaces connecting into the bridge 0. All of these interfaces can be created using just these commands:
#BEGINEXAMPLE
ip link add br0 typ bridge ip link set eth0 master br0 ip link set tap1 master br0 ip link set tap2 master br0 ip link set veth1 master br0
From archlinux.org description on Nework bridge, you can see that any real interface, e.g. eth0 and anuy virtual devices e.g. tap0 can be connected to it.
6 Creating a QEMU bridge
6.1 iproute2 (using the ip tool)
Use the ip tool from the iproute2 package on a VMM host. This package is required by the base meta package, so you will almost always have it.
ip link add name bridgename type bridge ip link set bridgename up
6.1.1 adding int to bridge
Now, to add an interfacd to the bridge, first make sure the interface is up. ip link set eth0 up
Then add eth0 into the bridge by setting its master to bridgename
ip link set eth0 master bridgename
6.2 show existing bridges and associated interfaces with the bridge utitily
man 8 bridge # will show you details, but in essence:
bridge link
6.2.1 removing int from bridge
ip line set eth0 nomaster
Then shutdown with ip link set eth0 down
6.3 Remove a bridge altogether
ip link delete bridgename type bridge
This will also automatically remmove all interfaces from the bridge. The slave interfaces will still be up, so good practice to shutdown those as well, (either before or after).
6.4 show arp table
either arp -a (on CentOS host) that has net-tools installed or ip neigh
7 Keep /etc/network/interfaces file open
This is read by the boot system. But, keep the devices that you are bridging OUT OF THIS CONFIG, as a boot will mess up your bridging. All sorts of crazy can happen to your bridge configurations in QEMU.
So, create your briges do it manually, and NOT in the /etc/network/interfaces file.
8 Legacy "bridge-utils" tool or 'brctl.
See man 8 brctl (i.e. brctl(8))
brctl addbr bridgename brctl addif bridgename eth0
8.0.1 caution:
addding an interface to a bridge will cause the int to loose its existing ip addr, so script it at system startup. you have been warned…
9 QEMU bridge type: bonded, teamed, vlan, vxlan, and others
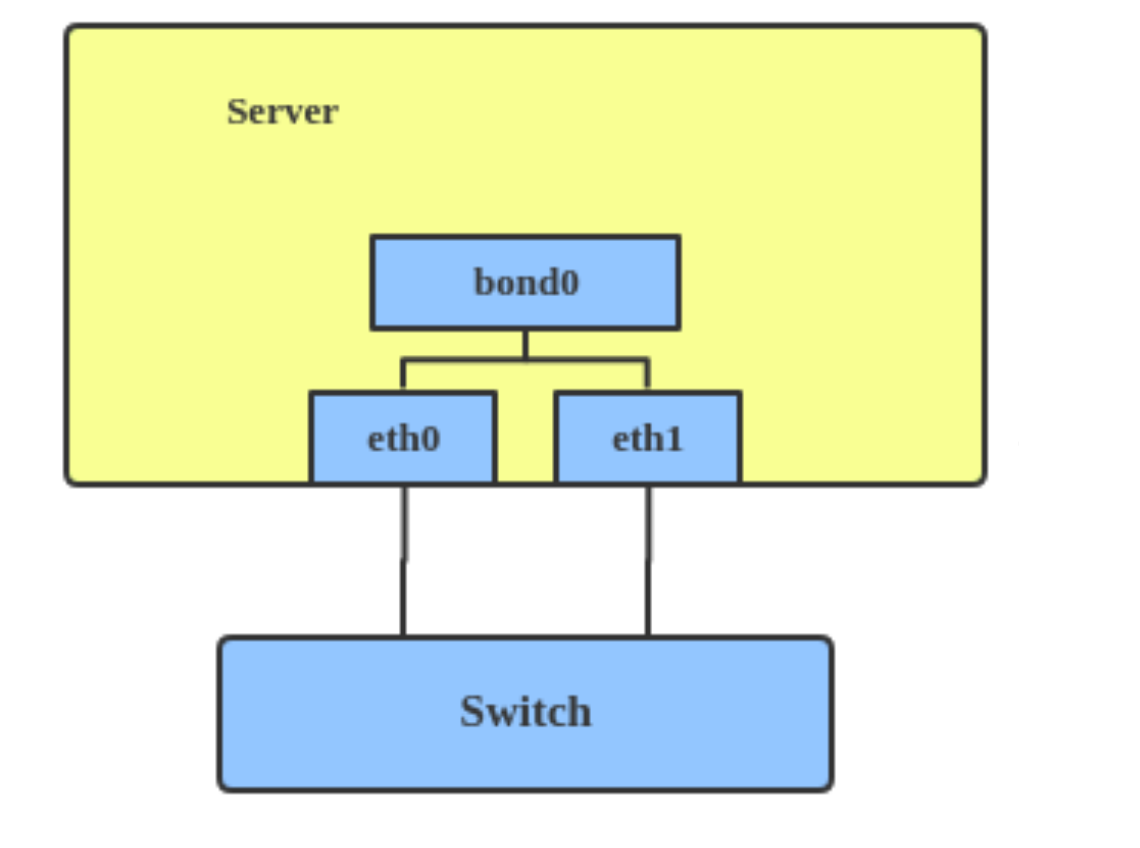
9.1 Bonded intefaces
On the linux VM host, you could also create a bonded interface
These three interfaces (and the bond0) virtual 'bridge'? can be created with
ip link add bond0 type bond miimon 100 mode active-backup ip link set eth0 master bond0 ip link set eth1 master bond0
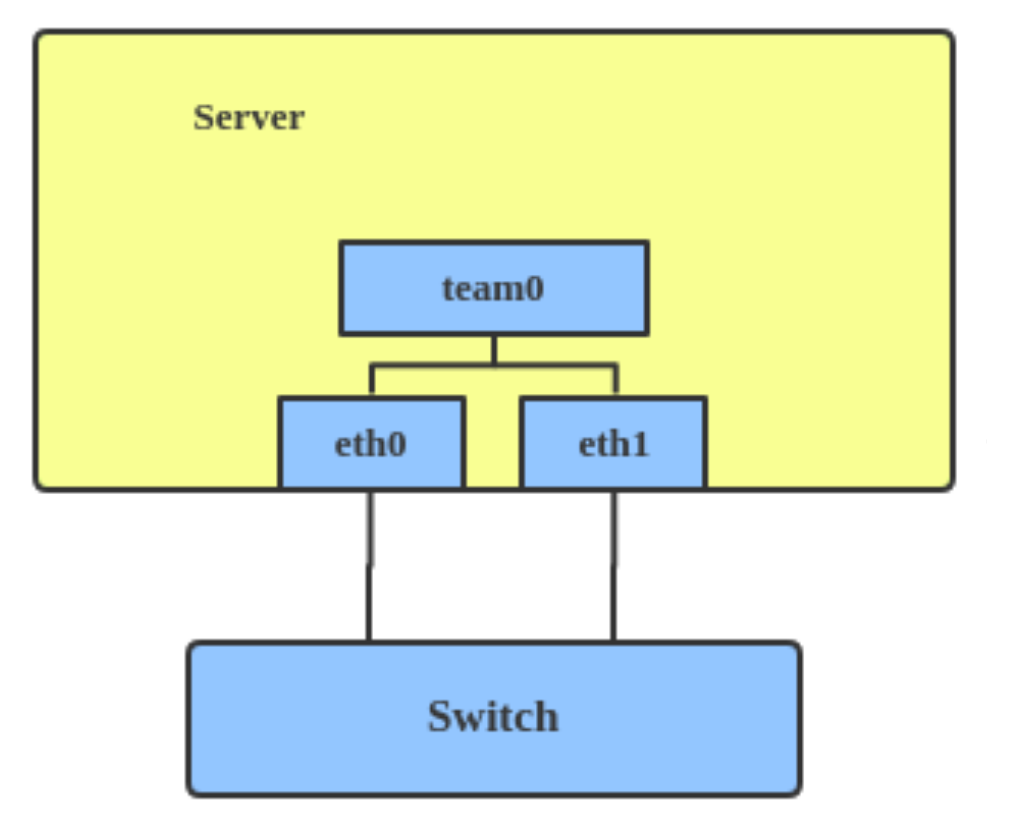
9.2 Team device
On the linux VM host, you could also create a teamed interface, that in essence does the same thing, but gives you slightly different features:
Team supports LACP load balancing (that is the big one)
These two interfaces (and the team0) virtual 'bridge'? can be created with
teamd -o -n -U -d -t team0 -c '{"runner": {"name ": "activebackup "},"linkwatch": {"name": "ethtool"}}' ip link set eth0 down ip link set eth1 down teamdctl team0 port add eth0 teamdctl team0 port add eth1
eth0 and eth1 become team0's 'sub-interfaces'.
9.3 Other Linux drivers not discussed here:
- netfailover
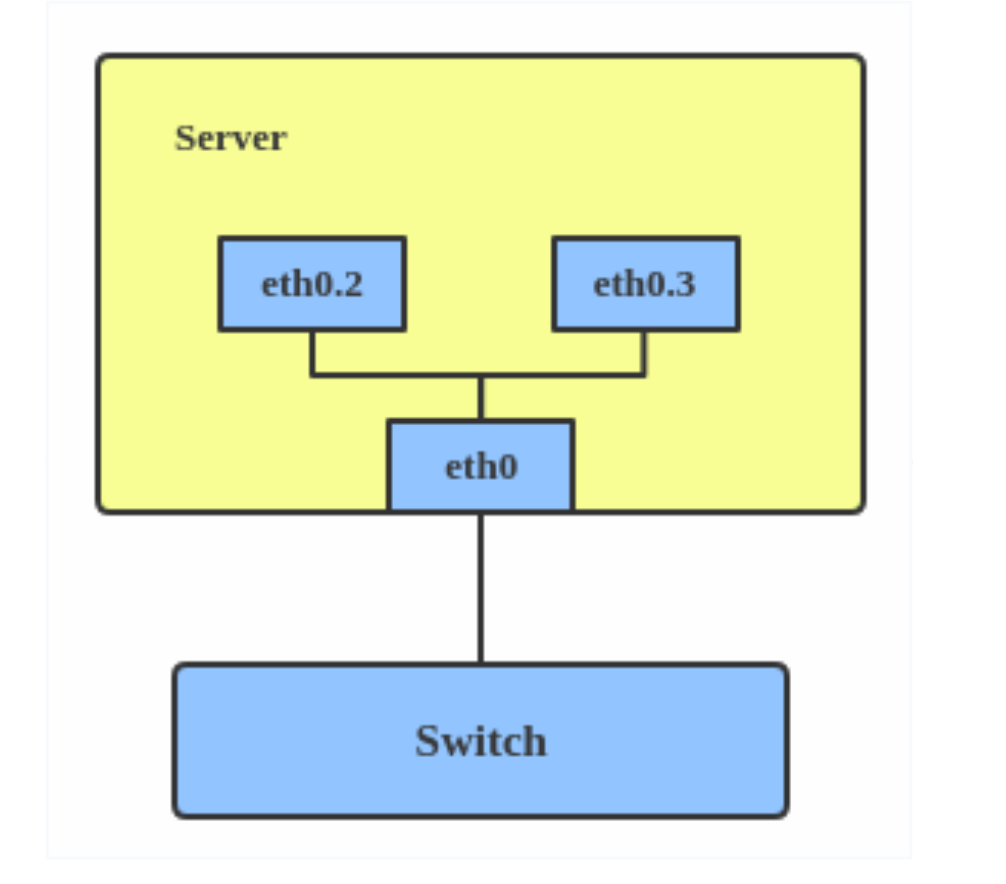
9.4 VLAN
To create a VLAN to create a separate subnet for VMs, namespaces and/or hosts.
ip link add link eth0 name eth0.2 tuype vlan id 2 ip link add link eth0 name eth0.3 tuype vlan id 3
Whether this is 802.1x "dot1.q trunk" and vlan ALLOW x, y, z etc and whether this supports VTP is up to the upstream switch.
9.5 VXLAN
Linux also supports VXLAN, that has 24 bit segment IDS giving you way more than the 4096 dot1.q vlans. 224 gives you 16 million unique VXLAN IDs a.k.a. VNIDs.
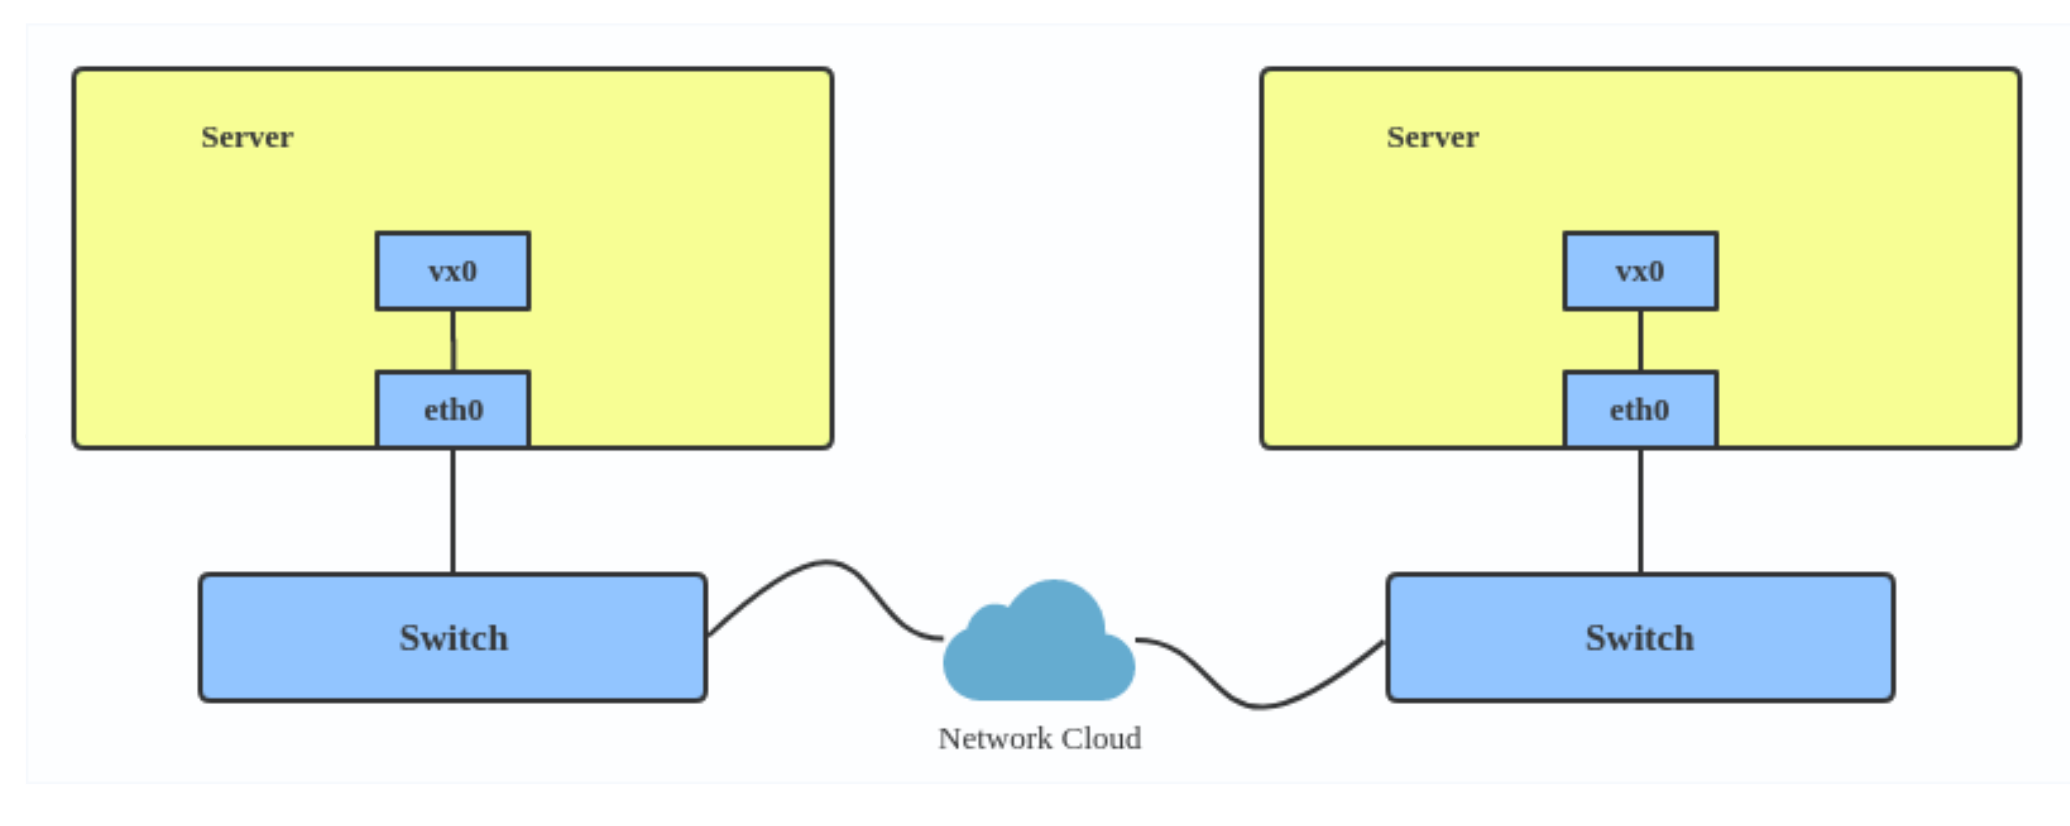
These are created with : ip link add vx0 type vxlan id 100 local 1.1.1.1 remote 2.2.2.2 dev eth0 dstport 4789