iptables cheatsheet
1 iptables quick cheat
iptables-save > /etc/sysconfig/iptables.newconfirm, thenmv iptables iptables.oldandmv iptables.new iptablesiptables-apply/sbin/iptables-restore < /root/iptables-works-2018-09-11You may want to flush it first with iptables -F [chain]iptables-save -f _filename_, -t _tablename_sudo systemctl status iptablessudo systemctl restart iptablessudo systemctl start iptablessudo systemctl stop iptablessudo systemctl enable iptables=iptables -L INPUT#liststhe rules in the INPUT chainiptables -L INPUT -v -niptables -L INPUT --line-numbersiptables -I INPUT 2 new_rule#insertsin position 2.iptables -D INPUT 3 old-rule#deletesrule in position 3.watch --interval 2 'iptables -L INPUT -v -n'iptables -F# flush *(clear all rules) but leaves default policyiptables -S INPUT# show thesyntaxform of the existing iptables INPUT chain
Same info in a different format:
iptables-save > /etc/sysconfig/iptables.new
confirm, then =mv iptables iptables.old= and =mv iptables.new iptables
iptables-apply
/sbin/iptables-restore < /root/iptables-works-2018-09-11
# You may want to flush it first with iptables -F [chain]
iptables-save -f _filename_, -t _tablename_
sudo systemctl status iptables
sudo systemctl restart iptables
sudo systemctl start iptables
sudo systemctl stop iptables
sudo systemctl enable iptables

iptables -L INPUT  # lists the rules in the INPUT chain
iptables -L INPUT -v -n
iptables -L INPUT --line-numbers
iptables -I INPUT 2  new_rule  # inserts in position 2.
iptables -D INPUT 3  old-rule  # deletes rule in position 3.

watch --interval 2 'iptables -L INPUT -v -n'
iptables -F        # flush *(clear all rules) but leaves default policy
iptables -S INPUT  # show the syntax form of the existing iptables INPUT chain
2 iptables background
A user-space utility program to configure tables provided by Linux kernel firewall, implemented as different Netfilter modules, and the chains and rules it stores.
iptables superseded ipchains nftables supersedes iptables (released Jan 2014)
Different kernel modules are used for different protocols:
- iptables for ipv4
- ip6tables for ipv6
- arptables for arp
- ebtables for ethernet bridge (i.e. L2 frames)
The user space module is iptables, the kernel module is netfilter. iptables allows you to interact with netfilter.
3 iptables Architecture.
A very good explanation and tutorial is in the wiki.centos.org Howto guide
Have to understand, ip addresses, ip protocols, and ports
3.1 chains (INPUT, OUTPUT, FORWARD)
A chain is a list of rules. These rules are all placed into predefined
chains:
(INPUT, OUTPUT, and FORWARD).
These are checked against any network traffic relevant to those chains and a decision is made based on the outcome of those rules.
3.1.1 INPUT - all packets destined for the host computer
3.1.2 OUTPUT - all packets originating from the host computer
3.1.3 FORWARD - all packets passing through
(in cases where the Linux hosts acts as a router.)
Note: the FORWARD tables will come into play when the host is setup to pass traffic (say web trafic) from the outside, through a NAT rule on this host, to a web server guest VM on the inside. In this case, the web traffic needs these two rules in this order:
- on the
nat table, a rule that NAT'sincoming web traffic on port 80to the inside web server's ip address. So, you need PREROUTING as in:iptables -t nat -A PREROUTING -i ens33 -p tcp -m tcp --dport 80 -j LOG --log-prefix "<<< PREROUTING pkt >>>" --log-level 6 iptables -t nat -A PREROUTING -i ens33 -p tcp -m tcp --dport 80 -j DNAT --to-destination 192.168.111.11
- on the
filter table, a rule thatallows forwarding of those webpacketson to the destination guest web server:iptables -A FORWARD -j LOG --log-prefix ">>> FORWARD rule <<<" --log-level 6 iptables -A FORWARD -d 192.168.111.11 -p tcp --dport 80 -j ACCEPT
This is an example from the PREROUTING chain in the nat table (-t nat)
Mar 11 16:56:36 c8host kernel: <<< PREROUTING pkt >>>IN=ens33
SRC=192.168.128.78
DST=192.168.128.76
PROTO=TCP
SPT=60380 DPT=80
And this is a log output from the FORWARD chain in the filter table:
Mar 11 16:56:36 c8host kernel: >>> FORWARD rule <<<IN=ens33 OUT=virbr0
SRC=192.168.128.78
DST=192.168.111.11
PROTO=TCP
SPT=60380 DPT=80
Order is important, as the rules are added into a chain in a list. Packets are checked against this list of rules, one at a time, starting at the top
If a rule matches, then that rules ACTION (target) is immediately taken.
Some ACTIONS cause the chain processing to STOP. i.e. no further rules
in the chain are processed. These are called terminating actions
ACTIONS that are non-terminating, continue to the next rule in the chain.
Typically you would NOT terminate a LOG action, because presumably you
would want to DROP a packet, but before that, LOG that the packet was, or
will be dropped. The LOG goes into the /var/log/messages file or in
a /var/log/iptables/log file? ????? check this……..
If the bottom is reached without being matched then the default action is taken. This is defined in the DEFAULT POLICY which can be set to either ACCEPT or DROP.
3.2 Tables (we will cover PRE AND POSTREROUTING tables later in the course)
Underneath the covers, Linux offers actually 5 tables, that the above 3 chains can use:
- Filter table ** most common one used for IPTABLES
- NAT table
- Mangle table (rewritting ip headers, such as TTL, or QOS )
- RAW (used for connection monitoring only)
- Security table (used by SELinux and internal security)
Refer to this table on order that tables and chains are processed
(Tables top to bottom, Chains left to right)
Table PREROUTING INPUT FORWARD OUTPUT POSTROUTING (routing decision) x raw x x (connection tracking enabled x x mangle x x x x x nat (DNAT) x X (routing decision) X X filter x x x security x x x nat (SNAT) x x
For packet filtering only, this table becomes easier:
3.3 Filter tables (Usually synonymous with IPTABLES
| Table | INPUT | FORWARD | OUTPUT |
|---|---|---|---|
| filter | x | x | x |
3.4 Rules (Filter rules specifically)
A rule is part of a list of rules in a single chain.
Rules are processed in order.
The whole list of rules defines a complete chain.
The type of chain defines where/when these list of rules is applied.
3.4.1 matching part & action part
Each rule has a matching part and an action part, a.k.a. target.
- if a
rule matches an incoming packetthat ruledecisionis executed~ - if a
rule does *NOT* match an incoming packetthe next rule in the chain is examined.** in order ** - once a rule is
matchedthe chain is exited. i.e. No further rules are examined.
3.4.2 Matching part
packets are examined and compared to matching rules based on ip packet headers. The matching part can be combined to create very specific matching criteria.
Most common matching criteria are:
- s source ip address ip address in standard netmask, or prefix format 192.168.0.0/255.255.0.0 or 192.168.0.0/16 172.16.29.131 (netmask defaults to all 1's so host specific) 172.16.29.131
- d destination ip address # used on OUTPUT or FORWARD chain same as above
- p <protocol> –dport <port> protocol = tcp, udp, icmp, –dport -p tcp –dport 21 ftp -p tcp –dport 22 ssh -p tcp –dport 23 telnet -p tcp –dport 53 dns -p tcp –dport 6881:6890 for an inclusive range of ports. –sport -p tcp –sport 21 ftp
You can get the port numbers from IANA.org
- i <interface> lo loopback eth0 ethernet 0
- h headers
- h headers
- m module (several modules are availalbe) mac –mac-source 00:00:be:ef:fe:ed state –state=ESTABLISHED,RELATED
3.4.3 Targets (actions) ACCEPT, REJECT, DROP and LOG
The decissions result in actions, called targets. targets (actions) can be DROP or ACCEPT or REJECT
-j the "j" comes from "jump" as in jump to this action.
3.5 NAT tables (-t nat)
| Table | PREROUTING | INPUT | FORWARD | OUTPUT | POSTROUTING |
|---|---|---|---|---|---|
| mangle | X | X | X | X | X |
| nat (DNAT) | Y | Y | |||
| filter | X | X | X | ||
| nat (SNAT) | x | Y |
3.6 Whitelist approach
Default policy DROP, then chain is set to define what packets are allowed. The list is a whitelist. Cisco ACI, and SD Access uses whitelist model.
3.7 Blacklist approach
Default policy ACCEPT, then chain is set to define all the packets to drop. For many years all switches and routers were and are still to this day following the blacklist model. A switch out of the box will happily pass all traffic entering it.
3.8 CentOS uses Whitelist on INPUT chain and Blacklist on OUTPUT chain.
4 iptables files (called FILTER tables) (hold all the rules)
/etc/sysconfig/iptables
/usr/sbin/iptables
in CentOS 7&8, /usr/sbin/iptables is in fact a symlink to tables-nft-multi
CentOS 8 adds a bash scripts: /usr/sbin/iptables-apply /usr/sbin/iptables-translate /usr/sbin/iptables-restore-translate /usr/sbin/iptables-save
/etc/sysconfig/iptables
4.1 Safely over-writting /etc/sysconfig/iptables
iptables-save > /etc/sysconfig/iptables.new
confirm, then mv iptables iptables.old and mv iptables.new iptables
4.2 Backup and Restore tables (with a date timestamp)
/sbin/iptables-save > /root/iptables-works-`date +%F`
You get a file with a name like:
/root/iptables-works-2018-09-11
If you do something that prevents your system from working, you can quickly restore it:
/sbin/iptables-restore < /root/iptables-works-2018-09-11
You may want to flush it first with iptables -F [chain]
5 iptables starting, stopping, managing
Must be root.
- check that iptables is installed sudo yum list –checkduplicates iptables
- lsmod | grep iptables
$ lsmod | grep iptables
- if iptables are not running, you can enable them by: sudo systemctl status iptables sudo systemctl restart iptables sudo systemctl start iptables sudo systemctl stop iptables sudo systemctl enable iptables
- You could also (according to wiki.centos.org ) start iptables if they are
not running by using
system-config-securitylevel
5.1 netstat -plant to check open ports
netsstat has a nice set of options that lets you see the open ports on your system. That is netstat -plant. Best to do it as sudo.
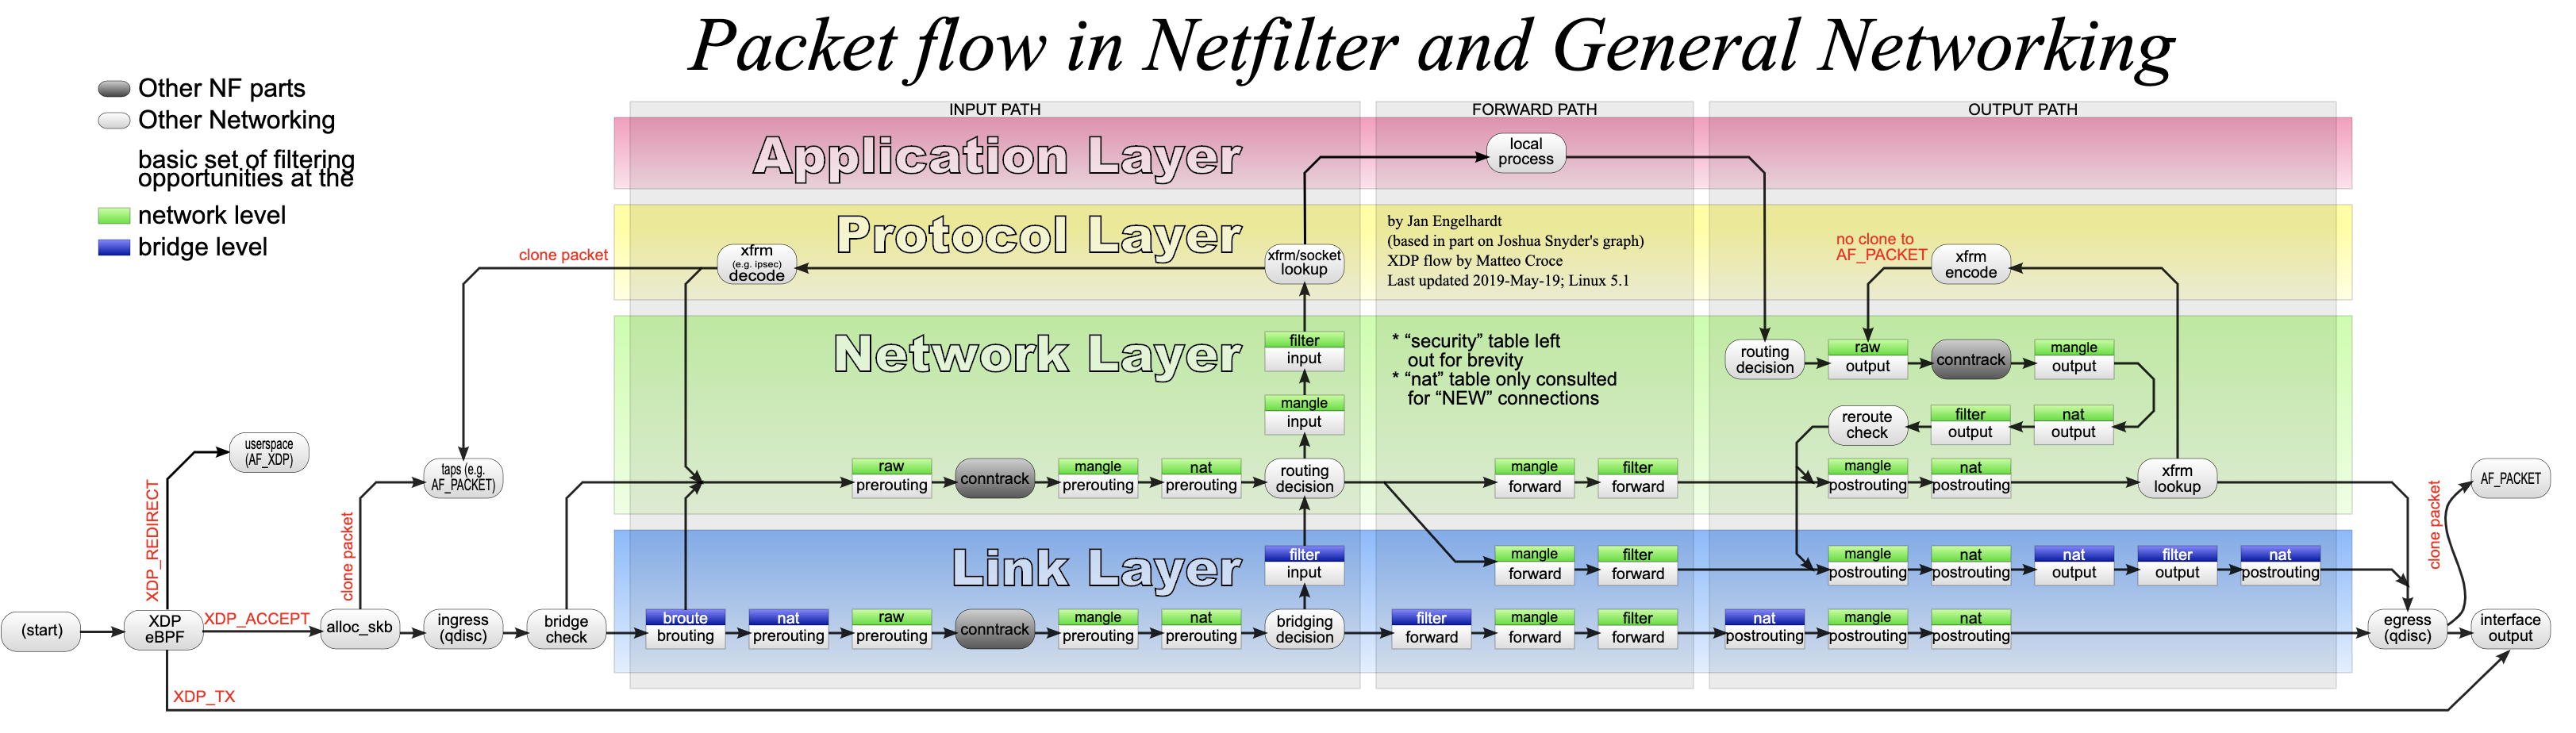
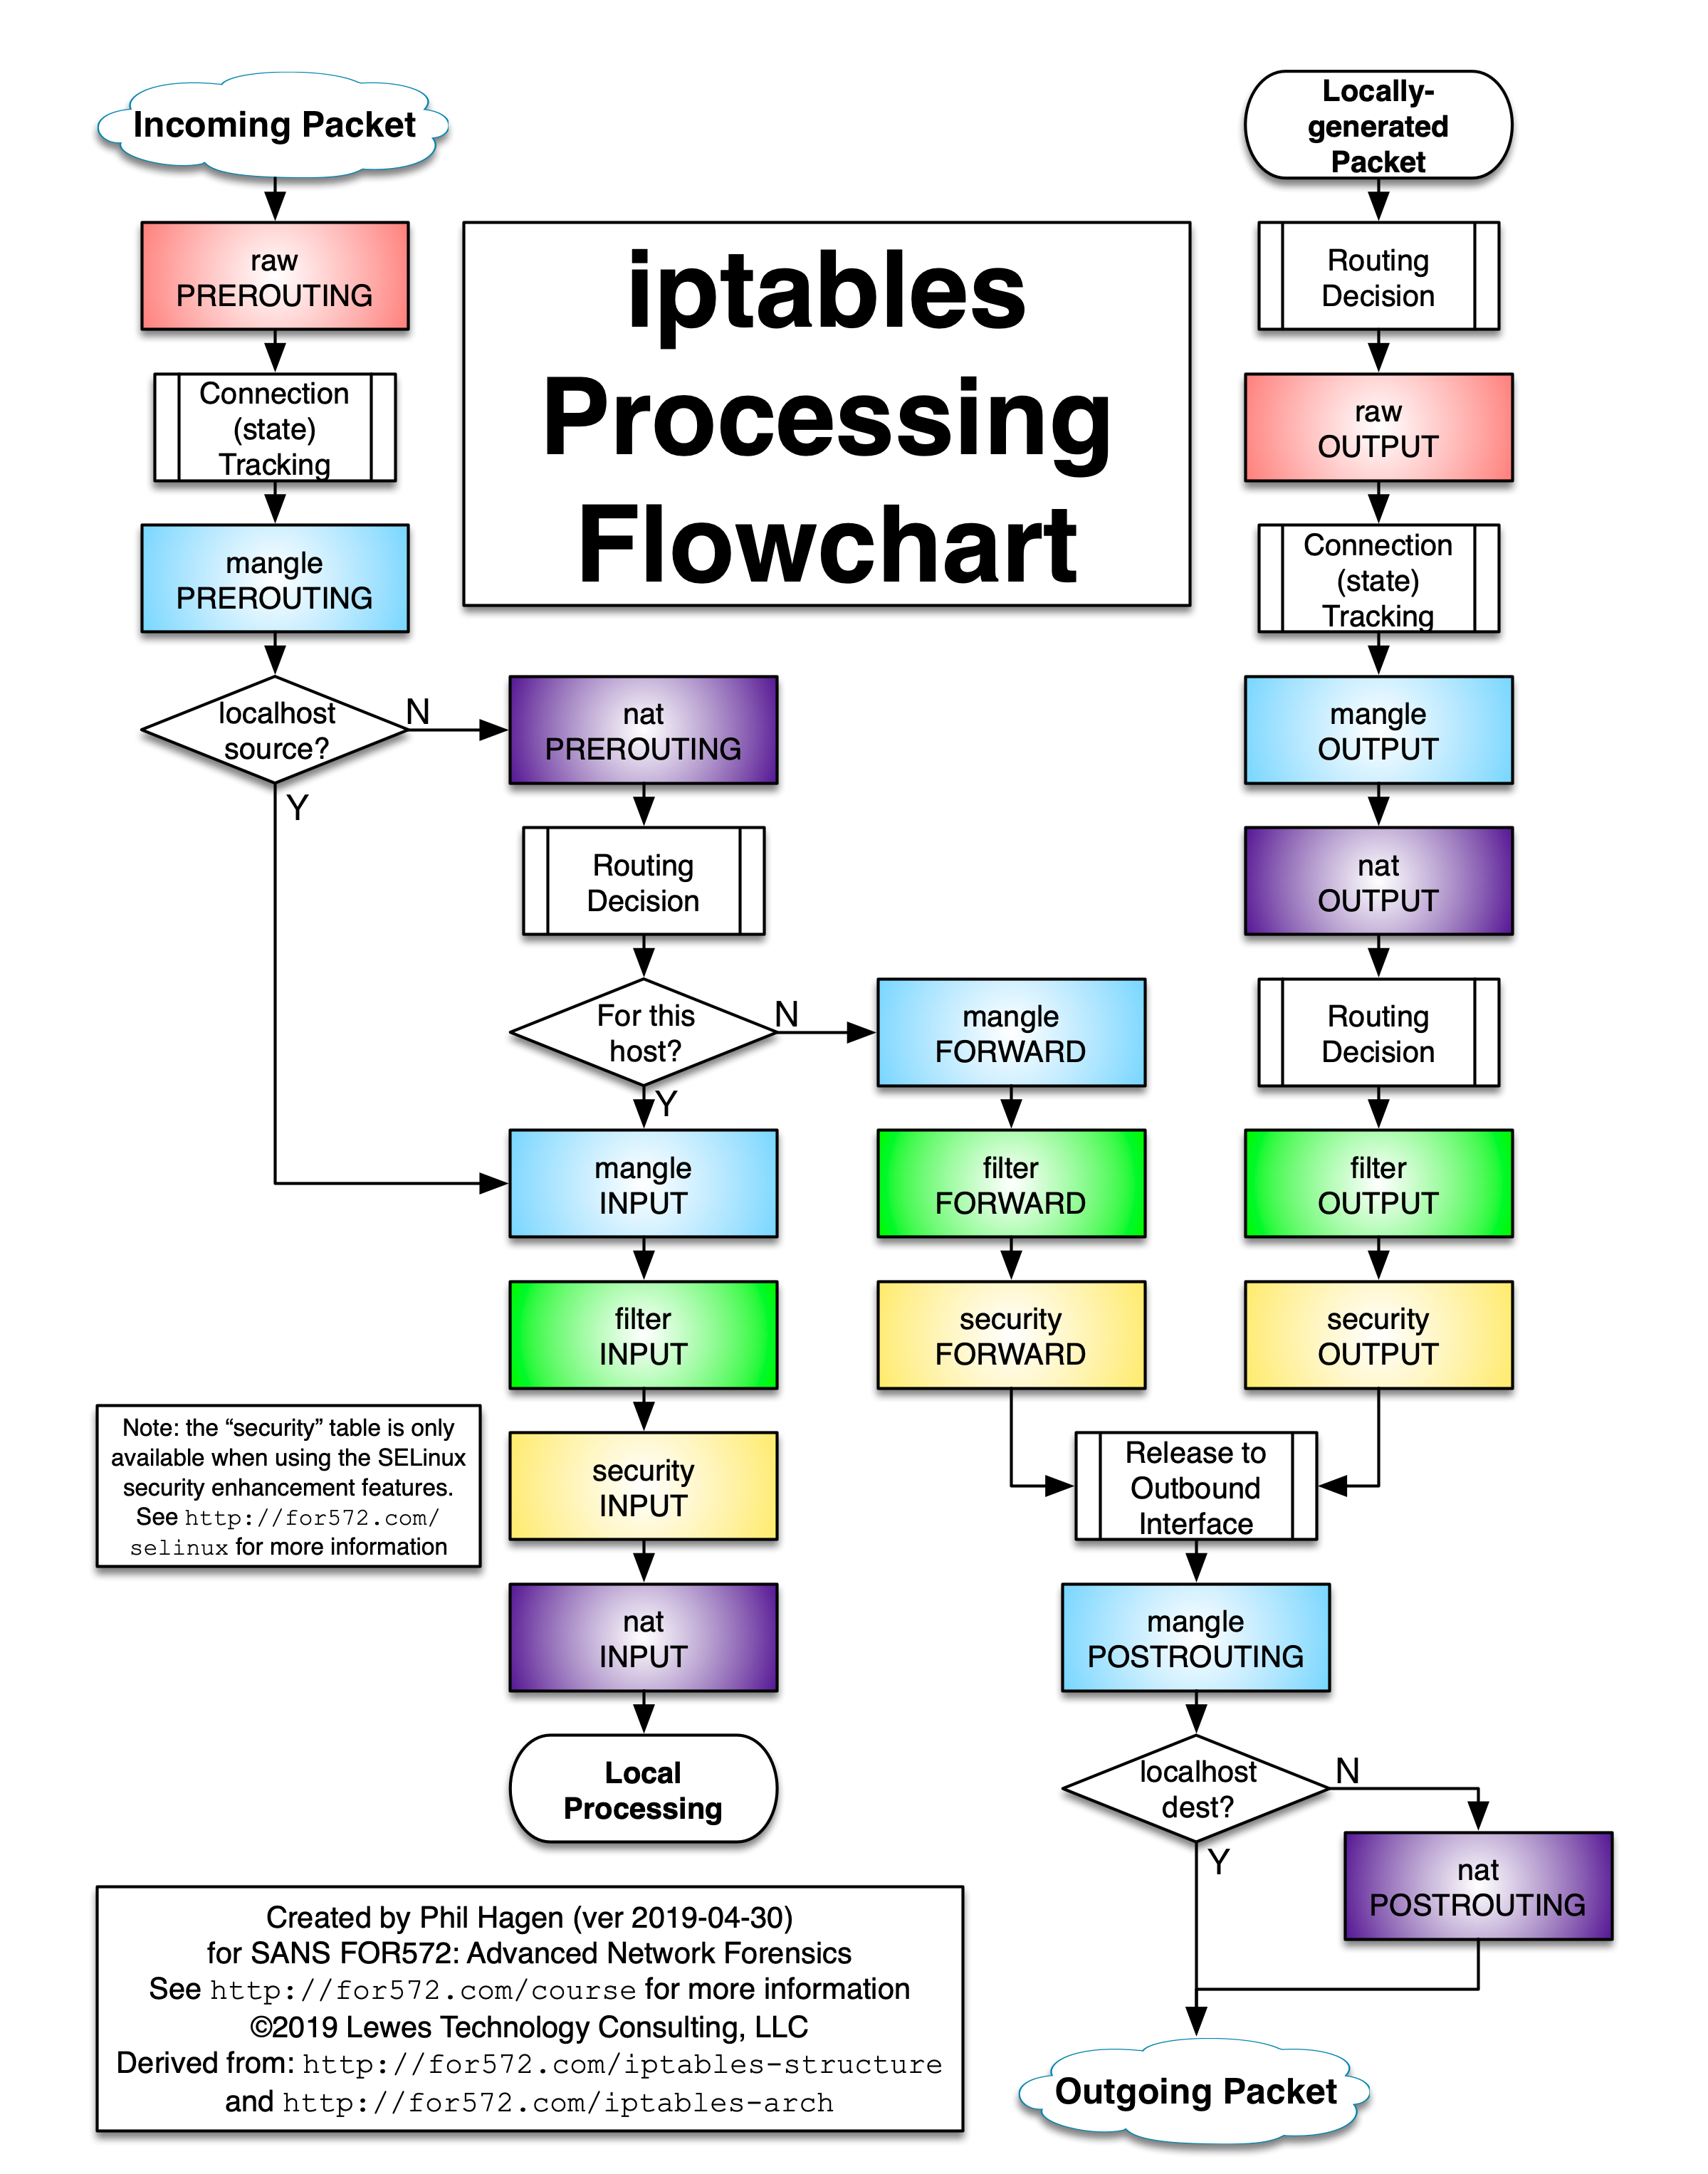
6 Iptables processing flowchart
There is a good article in stuffphilwrites.com that shows this table:
7 iptables configutation
7.1 Careful if you are doing this remotely. You could cut your own lifeline.
Best to set a default policy to accept before flushing current rules, then add a rule at the start to explicitly allow yourself access (as specific as you can).
7.2 iptables -OPTIONS [chain] [matching component] [target component, a.k.a. action]
7.3 iptables commands (first argument)]
Below rule really means a rule specification, like match this and action that.
-A --appendchain rule-D --deletechain rule-I --insertchain [rulenum] rule-R --replacechain rulenum rule-Z --zero[chain [rulenum]]-L --list[chain]-S --list-rules[chain] but use the syntax of the iptables-save output -S is same as –list-rules [chain]-P --policychain target-E --rename-chain old-chain new-chain-F --flush[chain]-N --new-chain chain# iptables -N MYSSHRULES-X --delete chain[chain] # not just delete a rule, delete the whole chain.- =-h help
-D MYICMP 5# just deletes rule # 5
= -X MYICMP # deletes the entire MYICMP chain.
7.4 iptables matching rules (2nd argument) a.k.a. "parameters"
-p, --protocolThe protocol, such as TCP, UDP, etc.-s, --sourceCan be an address, network name, hostname, etc.-d, --destinationAn address, hostname, network name, etc.-j, --jumpSpecifies the target of the rule; i.e. what to do if the packet matches.-g, --goto chainSpecifies that the processing will continue in a user-specified chain.-i, --in-interfaceNames the interface from where packets are received.-o, --out-interfaceName of the interface by which a packet is being sent.-f, --fragmentThe rule will only be applied to the second and subsequent fragments of fragmented packets.-c, --set-countersEnables the admin to initialize the packet and byte counters of a rule.-m, --matchan extension module that tests for a specific property
Here ares some examples of matching syntax
-i lo
-i ens33

-m state --state ESTABLISHED,RELATED
-m mac   --mac-source 00:0c:be:ef:fe:ed
See man7.org for a description of -m mac --mac-source
-m multiport
See man7.org for a description of -m multiport –sports 22,53,1024:65535
multiport This module matches a set of source or destination ports. Up to 15 ports can be specified. A port range (port:port) counts as two ports. It can only be used in conjunction with one of the following protocols: tcp, udp, udplite, dccp and sctp.
[!] –source-ports,–sports port[,port|,port:port]… Match if the source port is one of the given ports. The flag –sports is a convenient alias for this option. Multiple ports or port ranges are separated using a comma, and a port range is specified using a colon. 53,1024:65535 would therefore match ports 53 and all from 1024 through 65535.
[!] –destination-ports,–dports port[,port|,port:port]… Match if the destination port is one of the given ports. The flag –dports is a convenient alias for this option.
[!] –ports port[,port|,port:port]… Match if either the source or destination ports are equal to one of the given ports.
-m comment --comment "what this rule does in -> out"-m comment --comment "limit ssh access"-p tcp --dport 22-p tcp --dport 22 -m state --state NEW-p tcp --dport 22-p tcp --dport 20:21-p tcp --dport 53-p tcp --sport 21 ?-p tcp-p udp-p icmp-p all-s 192.168.128.0/255.255.255.0-s 192.168.128.20-d 192.168.111.0/255.255.255.0-p icmp -s 192.168.0.0/255.255.0.0 -d 192.168.0.0/255.255.0.0-p tcp --dport 22 -s 192.168.128.0/255.255.255.0
7.5 iptables target (actions) (3rd argument)
-j ACCEPT-j DROP-j LOG-j LOG --log-prefix "rule description"-j LOG --log-prefix "RULE4:" --log-level 6-j LOG --log-prefix " .oO8Oo. .oO8Oo. " --log-level 6-j MYSSHRULES
Typical logging rule would be:
iptables -A INPUT -j LOG --log-prefix " .oO8Oo. .oO8Oo. " --log-level 6
iptables -A INPUT -s 192.168.111.0/24 -j LOG --log-prefix " .oO8Oo. 111 .oO8Oo. " --log-level 6
iptables -A INPUT -s 172.28.0.0/16 -j LOG --log-prefix " .oO8Oo. 172 .oO8Oo. " --log-level 6
The last was an example to insert a rule at position #4 in the FORWARD chain that logs packets information:
sudo iptables -I FORWARD 4 -j LOG --log-prefix "RULE4:" --log-level 7
7.6 Configuration sample starting point
iptables -P INPUT ACCEPTiptables -Fiptables -A INPUT -i lo -j ACCEPTiptables -A OUTPUT -o lo -j ACCEPTiptables -A INPUT -m state --state ESTABLISHED,RELATED -j ACCEPTiptables -A INPUT -p tcp --dport 22 -j ACCEPTiptables -P INPUT DROPiptables -P FORWARD DROPiptables -A INPUT -p icmp -s <source ip / mask> -d <destination ip / mask>iptables -A INPUT -p icmp -s 192.168.0.0/255.255.0.0 -d 192.168.0.0/255.255.0.0 -j ACCEPTiptables -P OUTPUT ACCEPTiptables -L -v -nwatch --interval 2 'iptables -L INPUT -v -n'
This should give you the following output:
sudo iptables -L -v
Chain INPUT (policy DROP 0 packets, 0 bytes)
pkts bytes target     prot opt in     out     source               destination
   0     0 ACCEPT     all  --  lo     any     anywhere             anywhere
   0     0 ACCEPT     all  --  any    any     anywhere             anywhere            state RELATED,ESTABLISHED
   0     0 ACCEPT     tcp  --  any    any     anywhere             anywhere            tcp dpt:ssh
Chain FORWARD (policy DROP 0 packets, 0 bytes)
 pkts bytes target     prot opt in     out     source               destination
Chain OUTPUT (policy ACCEPT 0 packets, 0 bytes)
 pkts bytes target     prot opt in     out     source               destination
Explations follow:
7.6.1 iptables -P INPUT ACCEPT
This is your lifeline… i.e. if you are connecting remotely, first
temporarily set the default policy on the INPUT change to ACCEPT
so that we don't cut our own lifeline when we flush the rules.
7.6.2 iptables -F
flush all rules
7.6.3 iptables -A INPUT -i lo -j ACCEPT
-Aappend a rule to the INPUT chain-iapplied to an interface, matching (or destined to) 'lo' (localhost, 127.0.0.1)-jjump to the action "ACCEPT"
This rule allows all incoming packets destined for the localhost interface to be accepted. This is generally required as many s/w applications expect to be able to communicate with the localhost adaptor.
7.6.4 iptables -A INPUT -m conntrack –ctstate ESTABLISHED,RELATED -j ACCEPT ????
7.6.5 iptables -A INPUT -m state –state ESTABLISHED,RELATED -j ACCEPT
-Aappend a rule to the INPUT chain-mload a module, called 'state'--statethe state module expects this command, and looks at theTCP state. It could beNEW, ESTABLISHED,orRELATED. in this case we are looking for ESTABLISHED OR RELATED.-jjump to the action "ACCEPT"
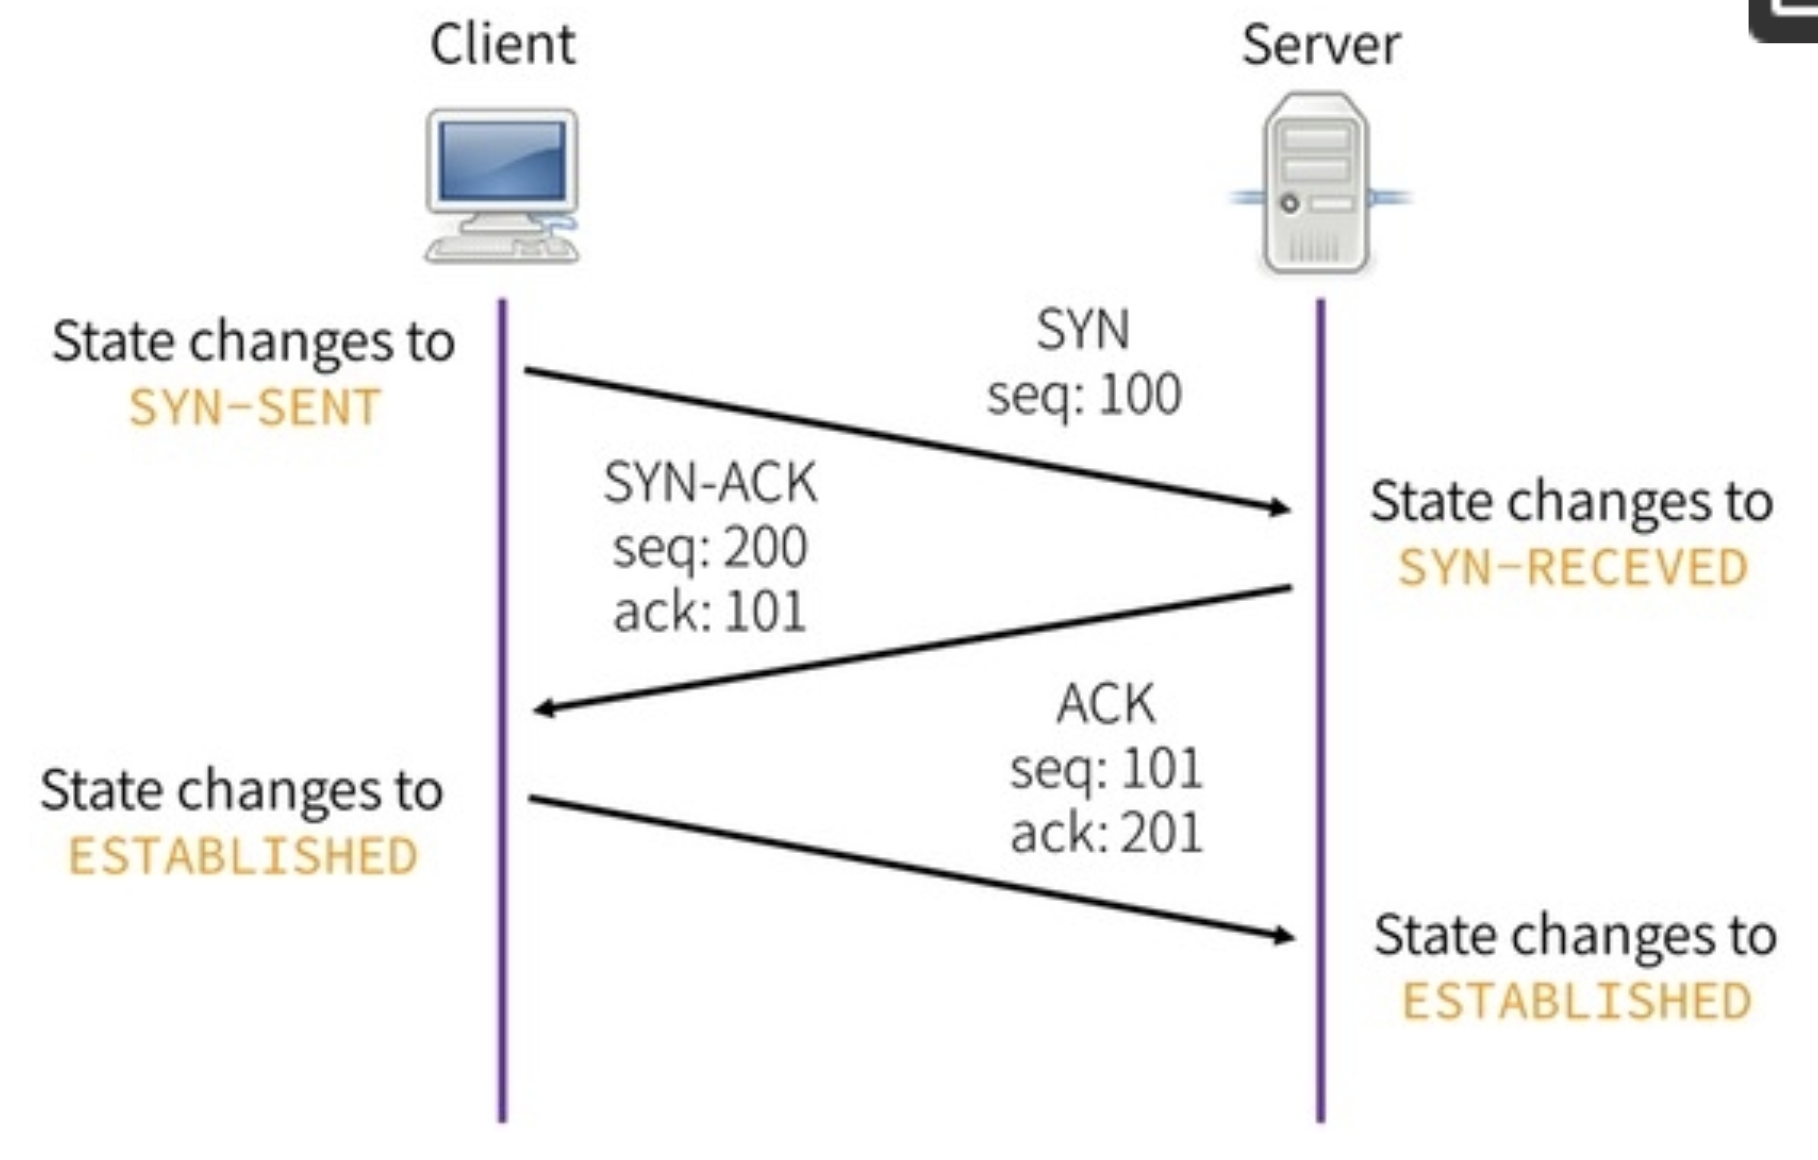
This line is the bulk of the work. See TCP 3-way handshake
7.6.6 iptables -A INPUT -p tcp –dport 22 -j ACCEPT
-Aappend a rule to the INPUT chain-pexamine a TCP port--dportspecifically a destination TCP port equal to 22 (ssh)-jjump to the action ACCEPT
Prevents accidental lockout when working on remotes systems over ssh
-pport could be [tcp | udp | icmp | all]
7.6.7 iptables -P INPUT DROP
-Psets thedefault policyfor this chain, so specifically
= -P INPUT DROP sets the default policy of the INPUT chain to DROP packets
Make sure you won't cut your lifeline with this command.
7.6.8 iptables -P FORWARD DROP
-P FORWARD DROPsets the default policy on the FORWARD chain to drop
(not applicable unless you Linux server is acting as a router with multiple interfaces, but good insurance policy if someone adds an interface later.)
7.6.9 iptables -P OUTPUT ACCEPT
-P OUTPUT ACCEPTsets the default policy on the OUTPUT chain to ACCEPT i.e. allow all outbound traffic.
7.6.10 iptables -L -v
-Llist the table entries (rules)-vverbose output (more info)-nnumeric (so as not to waste time waiting for DNS to answer private addr
7.6.11 iptables -S INPUT
7.6.12 iptables -t nat -S PREROUTING
7.7 More iptable options
iptables -Iwill insert the rule at the beginning of the chainiptables -I3 will insert the rule at the 3rd line of the chainiptables -Awill append the rule at the end fo the chain
7.8 Make our changes persistent across reboots
While the above commands take effet immediately, unless we save our ruleset a reboot will come back with the old ruleset. Therefore, we save it using:
iptables-save > /etc/sysconfig/iptables# first backup the current iptablesiptables-apply
7.8.1 Restart RHEL/CentOS
the iptables service must be enabled. chkconfig –list | grep iptables OR….
sudo systemctl | grep iptables
sudo systemctl status iptables
sudo systemctl restart iptables
sudo systemctl start iptables
sudo systemctl stop iptables
sudo systemctl enable iptables  # for persistence across boots
sudo systemctl
7.8.2 RHEL and CentOS
iptables-save > /etc/sysconfig/iptables.new
confirm, then mv iptables iptables.old and mv iptables.new iptables
7.8.3 ubuntu & debeian
iptables-save > /etc/iptables/rules.v4.new
inspect, then mv rules.v4 rules.v4.old and mv rules.v4.new rules.v4
7.8.4 old-school (deprecated) commands: /sbin/service iptables save
If none of these are working, you may be running firewalld.service instead
systemctl status firewalld.serviceto checksystemctl status iptables.service
Example session, NOT on CentOS:
cp /etc/sysconfig/iptables /etc/sysconfig/iptables.bak  // to make a backup of old configuration
iptables-save > iptables.conf			   //save running conf in iptables.conf
iptables-save > ~/my-iptables-backup			   //save running conf in an extra location
mv iptables.conf /etc/sysconfig/iptables		   //override the old conf
iptables-save > iptables.conf			   //make another copy of running conf just for safety
systemctl stop firewalld				   //stop firewall d
systemctl disable firewalld 				   //disable firewall d
systemctl enable iptables				   // to enable iptables
Fix for above. It appears that simply copying the saved file onto /etc/sysconfig/iptables is not enough. You have to iptables-apply it too.
iptables-save > /etc/sysconfig/iptables# first backup the current iptablesiptables-apply- This worked for me, but I should investigate to confirm this for CentOS8
7.8.5 ubuntu persistent iptables
/etc/iptables/rules.v4 /etc/iptables/rules.v6
8 Inserting rules in a CHAIN
The first obvious advanced technique is to give the rules numbers, so that
you can insert rules in a certain order, and not have to rewrite them all.
These numbers are called indices.
By default, the rules are read in the order they are listed on each chain.
You can list the rules with indices using the command:
sudo iptables -L --line-numbers
To insert a rule ABOVE a given indexed rule, simply insert using that rule's
index.
For example
sudo iptables -L OUTPUT --line-numbers# if looking at OUTPUT chain only.sudo iptables -L --line-numbers1 2 2nd rule 3 3rd rule 4
sudo iptables -I INPUT 2 new_rule1 2 new_rule 3 2nd rule 4 3rd rule 5
To remove a specific rule, based on an index, use:
- sudo iptables -D INPUT 3
results in:
1
2 new_rule
3 3rd rule
4
9 Debugging iptables rules & Monitoring same
You must be root for all these commands:
9.1 iptables -L # to list the tables/chains in use
- iptables -L –linenumbers # to make it easier to manipulate the chains .
- iptables -I INPUT 2 newrule # inserts in position 2. (see above)
- iptables -D INPUT 3 old-rule # deletes rule in position 3. (see above)
9.2 iptable -S # to examine the ruleset.
sudo iptables -S
[sudo] password for zintis:
-P INPUT ACCEPT     # default policy to accept (we may want to change that to DROP)
-P FORWARD ACCEPT
-P OUTPUT ACCEPT    # usually trust yourself to go out (unless you want to block facebook etc.)
-A INPUT -i virbr0 -p udp -m udp --dport 53 -j ACCEPT
-A INPUT -i virbr0 -p tcp -m tcp --dport 53 -j ACCEPT
-A INPUT -i virbr0 -p udp -m udp --dport 67 -j ACCEPT
-A INPUT -i virbr0 -p tcp -m tcp --dport 67 -j ACCEPT
-A INPUT -i virbr0 -p udp -m udp --dport 53 -j ACCEPT
-A INPUT -i virbr0 -p tcp -m tcp --dport 53 -j ACCEPT
-A INPUT -i virbr0 -p udp -m udp --dport 67 -j ACCEPT
-A INPUT -i virbr0 -p tcp -m tcp --dport 67 -j ACCEPT
-A INPUT -m state --state RELATED,ESTABLISHED -j ACCEPT
-A INPUT -p icmp -j ACCEPT
-A INPUT -i lo -j ACCEPT
-A INPUT -p tcp -m state --state NEW -m tcp --dport 22 -j ACCEPT
-A INPUT -j REJECT --reject-with icmp-host-prohibited
-A FORWARD -d 192.168.111.0/24 -i ens33 -o virbr0 -m conntrack --ctstate RELATED,ESTABLISHED -j ACCEPT
-A FORWARD -s 192.168.111.0/24 -i virbr0 -o ens33 -j ACCEPT
-A FORWARD -i virbr0 -o virbr0 -j ACCEPT
-A FORWARD -o virbr0 -j REJECT --reject-with icmp-port-unreachable
-A FORWARD -i virbr0 -j REJECT --reject-with icmp-port-unreachable
-A FORWARD -d 192.168.112.0/24 -i ens33 -o virbr1 -m conntrack --ctstate RELATED,ESTABLISHED -j ACCEPT
-A FORWARD -s 192.168.112.0/24 -i virbr1 -o ens33 -j ACCEPT
-A FORWARD -i virbr1 -o virbr1 -j ACCEPT
-A FORWARD -o virbr1 -j REJECT --reject-with icmp-port-unreachable
-A FORWARD -i virbr1 -j REJECT --reject-with icmp-port-unreachable
-A FORWARD -d 192.168.111.0/24 -i ens33 -o virbr0 -m conntrack --ctstate RELATED,ESTABLISHED -j ACCEPT
-A FORWARD -s 192.168.111.0/24 -i virbr0 -o ens33 -j ACCEPT
-A FORWARD -i virbr0 -o virbr0 -j ACCEPT
-A FORWARD -o virbr0 -j REJECT --reject-with icmp-port-unreachable
-A FORWARD -i virbr0 -j REJECT --reject-with icmp-port-unreachable
-A FORWARD -j REJECT --reject-with icmp-host-prohibited
-A OUTPUT -o virbr0 -p udp -m udp --dport 68 -j ACCEPT
-A OUTPUT -o virbr1 -p udp -m udp --dport 68 -j ACCEPT
-A OUTPUT -o virbr0 -p udp -m udp --dport 68 -j ACCEPT
-A OUTPUT -s 10.10.10.0/24 -j DROP
9.3 adding -j LOG
-j LOG --log-prefix "rule description" --log-level 6
You should add an identical rule to the one you are interested in debugging
but with the action as shown above.
Everytime this rule matches, you will get a line in syslog with lots of
useful information about the packet.
Put this rule just BEFORE the rule you are interested in.
E.g. to insert a rule at position #4 in the FORWARD chain that logs packets information:
sudo iptables -I FORWARD 4 -j LOG –log-prefix "RULE4:" –log-level 7
9.4 check rule counters
The command: iptables -L -v Will show you counters. Take those before and after your blocked behaviour and see what is happening.
9.5 resetting rule counters to zero (clearing counters) -Z
Often it is easier to see what is happening now, by resetting your rule counters. From iptables(8): -Z, –zero [chain] Zero the packet and byte counters in all chains. -Z –zero [chain [rulenum]]
sudo iptables -Z FORWARD 6 sudo iptables -Z INPUT 3 sudo iptables -Z OUTPUT 2 sudo iptables -Z # all chains at once (but this gave me an error)
9.6 resetting policy counters to zero
This will involve restoring the iptables from a saved backup. Should do this in a batch script as you could cut your own lifeline unless you are on the console:
iptables-save > saved-iptables-file
# flush all chains
iptables -F
iptables -t nat -F
iptables -t mangle -F
# delete all chains
iptables -X

# set policy of all chains to ACCEPT
iptables -P INPUT ACCEPT
iptables -P FORWARD ACCEPT
iptables -P OUTPUT ACCEPT
iptables -t nat -
iptables
iptables-restore < saved-iptables-file
9.7 use ss to investigate system sockets (related to systemctl and netstat)
ss -h : help ss -n : numeric ss -a : all (display both listening and non-listening sockets) for TCP, non-listening will show established connections ss -l : listening sockets (default) ss -o : options - see man pages, but includes timers and other counters ss -e : extended info on the sockets ss -m : memory ss -i : info - lots of TCP info ss -s : summary ss -E : Events, to continually show sockets as they are destroyed ss -u : udp sockets ss -t : tcp sockets ss -p : processes # show the proccess that is using the socket ss -n : numeric display (not DNS equivalents) ss -4
ss -aunp ss -atnp ss -at ss -atn to display all TCP sockets (no DNS lookup) ss -t - a -Z to display all TCP sockets with process SELinux security contexts ss -tulpn
9.8 Add a final rule to log all packets
A good tip to see if your firewall rules (iptables rules) are missing some packets that they should be blocking, is to add a last rule that logs all packets. Since this rule would only be reached after all other match rules have been examined and found not matching, you can see anything you missed.
9.9 Reset iptables (temporarily)
iptables -F will flush (clear) all rules, but will leave the DEFAULT policy intact. systemctl stop iptables will clear all rules, INCLUDING the default policies.
9.10 Create a shell script (or use iptables-restore) from a previously saved
known good state.
9.11 Possibly investigate graphic visualization tools for iptables:
stackexchange.com has some suggestions…
9.12 Tips from opensource.com
10 Controlling (start/stop/reload/restore)
- sudo iptables-persistent ??? Centos 8 does not have this script.
- sudo iptables-save -f filename, -t tablename
- I actually had better success with
- sudo iptables-save > /etc/sysconfig/iptables
- iptables-apply
- I actually had better success with
- sudo iptables -F [chain] to flush the current/live table chain.
- sudo iptables-restore -t -v (test before actually restoring, using verbose)
- sudo iptables-apply -t 300 # controlled way of applying rulesets (chains).
- First backup the current /etc/sysconfig/iptables to a dated backup
- Second login as root, as sudo still does not have access to /etc/sysconfig/iptables
- as root: iptables-save > /etc/sysconfig/iptables
- then you can reboot and the saved iptables will be read in and active. (This worked for me too, so I am not sure if I need iptables-apply or not…)
10.1 from linode.com
CentOS / FedoraPermalink CentOS 7 or Fedora 20 and above. (published late 2019)
In these distros, FirewallD is used to implement firewall rules instead of using the iptables command. If you prefer to use it over iptables, see our guide: Introduction to FirewallD on CentOS.
If you prefer to use iptables, FirewallD must first be stopped and disabled.
sudo systemctl stop firewalld.service && sudo systemctl disable firewalld.service Install iptables-services and enable iptables and ip6tables:
10.1.1 Steps to get iptables to a known state (from saved clean iptables file)
sudo yum install iptables-services
sudo systemctl enable iptables && sudo systemctl enable ip6tables sudo systemctl start iptables && sudo systemctl start ip6tables
Create the files /tmp/v4 and /tmp/v6. Paste the following rulesets above into their respective files.
Assume that this example below is your saved, clean, iptables file. ** note: I got this by editing the file I got from iptables-save > edit-this-file
*filter

# Allow all loopback (lo0) traffic and reject traffic
# to localhost that does not originate from lo0.
-A INPUT -i lo -j ACCEPT
-A INPUT ! -i lo -s 127.0.0.0/8 -j REJECT

# Allow ping.
-A INPUT -p icmp -m state --state NEW --icmp-type 8 -j ACCEPT

# Allow SSH connections from your local 192.169 networks.
-A INPUT -p tcp -s 192.168.111.0/24  --dport 22 -m state --state NEW -j ACCEPT

# Allow HTTP and HTTPS connections from anywhere
# (the normal ports for web servers).
-A INPUT -p tcp --dport 80 -m state --state NEW -j ACCEPT
-A INPUT -p tcp --dport 443 -m state --state NEW -j ACCEPT

# Allow inbound traffic from established connections.
# This includes ICMP error returns.
-A INPUT -m state --state ESTABLISHED,RELATED -j ACCEPT

# Log what was incoming but denied (optional but useful).
-A INPUT -m limit --limit 5/min -j LOG --log-prefix "iptables_INPUT_denied: " --log-level 7

# Reject all other inbound.
-A INPUT -j REJECT

# Log any traffic that was sent to you
# for forwarding (optional but useful).
-A FORWARD -m limit --limit 5/min -j LOG --log-prefix "iptables_FORWARD_denied: " --log-level 7

# Reject all traffic forwarding.
-A FORWARD -j REJECT

COMMIT
This is my actual clean iptables file on my c8host (running CentOS 8)
# Generated by xtables-save v1.8.2 on Thu Jan 30 16:38:50 2020
*filter
:INPUT ACCEPT [0:0]
:FORWARD ACCEPT [0:0]
:OUTPUT ACCEPT [1364:142896]

# Allow DNS and boot from the virtual bridge virbr0
-A INPUT -i virbr0 -p udp -m udp --dport 53 -j ACCEPT
-A INPUT -i virbr0 -p tcp -m tcp --dport 53 -j ACCEPT
-A INPUT -i virbr0 -p udp -m udp --dport 67 -j ACCEPT
-A INPUT -i virbr0 -p tcp -m tcp --dport 67 -j ACCEPT

# allow established connections back in
-A INPUT -m state --state RELATED,ESTABLISHED -j ACCEPT

# allow ssh from two trusted networks and reject all others
-A INPUT -s 192.168.128.0/24 -p tcp -m tcp --dport 22 -j ACCEPT
-A INPUT -s 192.168.111.0/24 -p tcp -m tcp --dport 22 -j ACCEPT
-A INPUT -p tcp -m tcp --dport 22 -j REJECT --reject-with icmp-port-unreachable

# allow ping (and other icmp packets, like icmp redirects
-A INPUT -p icmp -j ACCEPT

# allow loopbacks  in and out
-A INPUT -i lo -j ACCEPT
-A OUTPUT -o lo -j ACCEPT

# reject all other INPUT
-A INPUT -j REJECT --reject-with icmp-host-prohibited

# we are passing traffic for the VMs below us
# first, established packets coming back in to the virtual bridge
-A FORWARD -d 192.168.111.0/24 -i ens33 -o virbr0 -m conntrack --ctstate RELATED,ESTABLISHED -j ACCEPT

# second, all outbound traffic from the virtual bridge out the ethernet
-A FORWARD -s 192.168.111.0/24 -i virbr0 -o ens33 -j ACCEPT

# allow all in and out traffic on the virtual bridge
-A FORWARD -i virbr0 -o virbr0 -j ACCEPT

# all other traffic to virtual bridge is rejected (most has been allowed above here)
# this would block any inter-virtual bridge traffic for example, from virbr1, or virbr2
-A FORWARD -o virbr0 -j REJECT --reject-with icmp-port-unreachable
-A FORWARD -i virbr0 -j REJECT --reject-with icmp-port-unreachable

# allow established packets back in to my trusted subnet on virtual bridge 0
-A FORWARD -d 192.168.111.0/24 -i ens33 -o virbr0 -m conntrack --ctstate RELATED,ESTABLISHED -j ACCEPT
# allow packets only from recognized ip subnets from my virtual bridge, out my ethernet
-A FORWARD -s 192.168.111.0/24 -i virbr0 -o ens33 -j ACCEPT

# final command to make this a whitelist policy, i.e. reject all else.
-A FORWARD -j REJECT --reject-with icmp-host-prohibited


# Allow bootp packets to virtual bridge 0
# kvm automagically added the lines related to virbr0
-A OUTPUT -o virbr0 -p udp -m udp --dport 68 -j ACCEPT

# User added example of appending all packets form 10.10.10.10
-A OUTPUT -s 10.10.10.0/24 -j DROP

COMMIT
# Completed on Thu Jan 30 16:38:50 2020
# Generated by xtables-save v1.8.2 on Thu Jan 30 16:38:50 2020
*nat
:PREROUTING ACCEPT [125:14253]
:INPUT ACCEPT [23:1568]
:POSTROUTING ACCEPT [323:22938]
:OUTPUT ACCEPT [323:22938]
-A POSTROUTING -s 192.168.111.0/24 -d 224.0.0.0/24 -o ens33 -j RETURN
-A POSTROUTING -s 192.168.111.0/24 -d 255.255.255.255/32 -o ens33 -j RETURN
-A POSTROUTING -s 192.168.111.0/24 ! -d 192.168.111.0/24 -o ens33 -p tcp -j MASQUERADE --to-ports 1024-65535
-A POSTROUTING -s 192.168.111.0/24 ! -d 192.168.111.0/24 -o ens33 -p udp -j MASQUERADE --to-ports 1024-65535
-A POSTROUTING -s 192.168.111.0/24 ! -d 192.168.111.0/24 -o ens33 -j MASQUERADE

COMMIT
# Completed on Thu Jan 30 16:38:50 2020
# Generated by xtables-save v1.8.2 on Thu Jan 30 16:38:50 2020
*mangle
:PREROUTING ACCEPT [1590:1120165]
:INPUT ACCEPT [1371:1064197]
:FORWARD ACCEPT [214:55480]
:OUTPUT ACCEPT [1364:142896]
:POSTROUTING ACCEPT [1610:201690]
-A POSTROUTING -o virbr0 -p udp -m udp --dport 68 -j CHECKSUM --checksum-fill
-A POSTROUTING -o virbr0 -p udp -m udp --dport 68 -j CHECKSUM --checksum-fill
COMMIT
# Completed on Thu Jan 30 16:38:50 2020
To restore this known clean state into the active iptables use iptables-restore:
sudo iptables-restore < /home/zintis/iptables-zintis-edited-Jan30 sudo ip6tables-restore < /tmp/v6 # if you had saved the ip6tables in /tmp/v6
Save each ruleset: sudo service iptables save # need this to make it persistent. sudo service ip6tables save
Remove the temporary rule files: sudo rm /tmp/{v4,v6}
11 Netfilter hooks: (nftables)
			         	     Local
				 	    process
			                     ^  |      .-----------.
		   .----------.             |  |      |  Routing  |
		   |          |----> input /    \---> |  Decision |---> output--\
--> prerouting --->| Routing  |                        .-----------.             \
		   | Decision |                                                   --> postrouting
		   |          |                                                  /
		   |          |---------------> forward ------------------------/
		   .----------.
Basically, traffic flowing to the local machine in the input path see the prerouting and input hooks. Then, the traffic that is generated by local processes follows the output and postrouting path.
If you configure your Linux box to behave as router, do not forget to enable forwarding via:
 echo 1 > /proc/sys/net/ipv4/ip_forward sudo sh -c "echo 1 >
/proc/sys/net/ipv4/ip_forward"
And then, the packets that are not addressed to your local system will be seen from the forward hook. In summary, packets that are not addressed to local processes follow this path: prerouting, forward and postrouting.
Ingress hook Since Linux kernel 4.2, Netfilter also comes with an ingress hook that you can use from nftables. So the big picture now look like this:
				 .-----------.
				 |           |-----> input ...
---> ingress ---> prerouting --->|  Routing  |
				 | Decision  |
				 |           |
				 |           |-----> forward ...
				 .-----------.
You can use this new ingress hook to filter traffic from Layer 2. This new hook comes before prerouting, so this allows you to enforce very early filtering policies. This new hook basically provides an alternative to tc ingress filtering. You still need tc for traffic shaping/queue management.
12 Some sample iptables commands:
12.1 watch -n 2 iptables -vnL
To see packet counts increasing while you are troubleshooting, watch works
well, as shown in this example.
sudo watch --interval=2 'iptables -nvL'
sudo watch -n s iptables -nvL INPUT
sudo watch -n 2 iptables -L INPUT -v -n
You can run this in a split tmux window, to monitor changes to your iptables rules.
Then in another tmux window run the example above and try to ssh.
An alias in .bashrc for root is also useful while troubleshooting iptables:
alias wi='sudo watch -n 2 iptables -L INPUT -v -n'
12.2 iptables -I INPUT -p tcp –dport 22 -m state –state NEW
12.3 iptables -D INPUT -p tcp –dport 22 -m state –state NEW
12.4 iptables -P INPUT DROP
default policy on INPUT set to DROP
12.5 iptables -D INPUT 5
delete the fifth rule in the INPUT chain
12.6 iptables -I INPUT -p icmp -j ACCEPT
insert at the top of the INPUT chain, allowing all icmp packets
Allow Outgoing SSH
If your firewall OUTPUT policy is not set to ACCEPT, and you want to allow
outgoing SSH connections—your server initiating an SSH connection to another
server—you can run these commands:
sudo iptables -A OUTPUT -p tcp –dport 22 -m conntrack –ctstate NEW,ESTABLISHED -j ACCEPT sudo iptables -A INPUT -p tcp –sport 22 -m conntrack –ctstate ESTABLISHED -j ACCEPT
12.7 allowing rsync
rsync, which runs on port 873, can be used to transfer files from one
computer to another.
To allow incoming rsync connections from a specific IP address or subnet, specify the source IP address and the destination port. For example, if you want to allow the entire 15.15.15.0/24 subnet to be able to rsync to your server, run these commands:
sudo iptables -A INPUT -p tcp -s 15.15.15.0/24 --dport 873
              -m conntrack --ctstate NEW,ESTABLISHED -j ACCEPT

sudo iptables -A OUTPUT -p tcp --sport 873
              -m conntrack --ctstate ESTABLISHED -j ACCEPT
The second command, which allows the outgoing traffic of established rsync
connections, is only necessary if the OUTPUT policy is not set to ACCEPT.
12.7.1 conntrack vs state modules (modules are a.k.a. 'extensions')
Conntrack supersedes state, but in modern kernels there is now no difference between the two. State is currently aliased and translated to conntrack in iptables if the kernel has it, so the syntax -m state –state is actually translated into -m conntrack –ctstate and handled by the same module. `
12.8 Example of FORWARD chain on my c8host (Centos 8) running KVM
zintis@c8host ~ [1012]$
sudo iptables -S FORWARD
-P FORWARD ACCEPT

# Allow established TCP connectios back in to private virtual network:
-A FORWARD -d 192.168.111.0/24 -i ens33 -o virbr0 -m conntrack --ctstate RELATED,ESTABLISHED -j ACCEPT

# Allow output packets from virtual bridge out the host's ethernet interface
-A FORWARD -s 192.168.111.0/24 -i virbr0 -o ens33 -j ACCEPT

# allow VMs to talk on the virtual bridge
-A FORWARD -i virbr0 -o virbr0 -j ACCEPT

# Reject all other packets that are going out to the private virtual network
-A FORWARD -o virbr0 -j REJECT --reject-with icmp-port-unreachable

# For good measure reject all other packets coming from the private virtual network
-A FORWARD -i virbr0 -j REJECT --reject-with icmp-port-unreachable

# finally reject all others.
-A FORWARD -j REJECT --reject-with icmp-host-prohibited
zintis@c8host ~ [1013]$
13 Example statistics on C8host, after a guest VM did a dnf update
In particular vm1 did a 270M yum update. vm1 is off of virbr0
     zintis@c8host ~ [1033]$
sudo iptables -L -v
[sudo] password for zintis:
Chain INPUT (policy ACCEPT 0 packets, 0 bytes)
 pkts bytes target     prot opt in     out     source               destination
   58  4022 ACCEPT     udp  --  virbr0 any     anywhere             anywhere             udp dpt:domain
    0     0 ACCEPT     tcp  --  virbr0 any     anywhere             anywhere             tcp dpt:domain
    0     0 ACCEPT     udp  --  virbr0 any     anywhere             anywhere             udp dpt:bootps
    0     0 ACCEPT     tcp  --  virbr0 any     anywhere             anywhere             tcp dpt:bootps
    0     0 ACCEPT     udp  --  virbr1 any     anywhere             anywhere             udp dpt:domain
    0     0 ACCEPT     tcp  --  virbr1 any     anywhere             anywhere             tcp dpt:domain
    0     0 ACCEPT     udp  --  virbr1 any     anywhere             anywhere             udp dpt:bootps
    0     0 ACCEPT     tcp  --  virbr1 any     anywhere             anywhere             tcp dpt:bootps
    0     0 ACCEPT     udp  --  virbr0 any     anywhere             anywhere             udp dpt:domain
    0     0 ACCEPT     tcp  --  virbr0 any     anywhere             anywhere             tcp dpt:domain
    0     0 ACCEPT     udp  --  virbr0 any     anywhere             anywhere             udp dpt:bootps
    0     0 ACCEPT     tcp  --  virbr0 any     anywhere             anywhere             tcp dpt:bootps
# 8641  17M ACCEPT     all  --  any    any     anywhere             anywhere             state RELATED,ESTABLISHED
    0     0 ACCEPT     icmp --  any    any     anywhere             anywhere
    0     0 ACCEPT     all  --  lo     any     anywhere             anywhere
    0     0 ACCEPT     tcp  --  any    any     anywhere             anywhere             state NEW tcp dpt:ssh
  296 33521 REJECT     all  --  any    any     anywhere             anywhere             reject-with icmp-host-prohibited

Chain FORWARD (policy ACCEPT 0 packets, 0 bytes)
 pkts bytes target     prot opt in     out     source               destination
# 35469 270M ACCEPT    all  --  ens33  virbr0  anywhere             192.168.111.0/24     ctstate RELATED,ESTABLISHED
# 11698 671K ACCEP     all  --  virbr0 ens33   192.168.111.0/24     anywhere
    0     0 ACCEPT     all  --  virbr0 virbr0  anywhere             anywhere
    0     0 REJECT     all  --  any    virbr0  anywhere             anywhere             reject-with icmp-port-unreachable
    0     0 REJECT     all  --  virbr0 any     anywhere             anywhere             reject-with icmp-port-unreachable
#   0     0 ACCEPT     all  --  ens33  virbr1  anywhere             192.168.112.0/24     ctstate RELATED,ESTABLISHED
#   0     0 ACCEPT     all  --  virbr1 ens33   192.168.112.0/24     anywhere
    0     0 ACCEPT     all  --  virbr1 virbr1  anywhere             anywhere
    0     0 REJECT     all  --  any    virbr1  anywhere             anywhere             reject-with icmp-port-unreachable
    0     0 REJECT     all  --  virbr1 any     anywhere             anywhere             reject-with icmp-port-unreachable
    0     0 ACCEPT     all  --  ens33  virbr1  anywhere             192.168.112.0/24     ctstate RELATED,ESTABLISHED
    0     0 ACCEPT     all  --  virbr1 ens33   192.168.112.0/24     anywhere
    0     0 ACCEPT     all  --  virbr1 virbr1  anywhere             anywhere
    0     0 REJECT     all  --  any    virbr1  anywhere             anywhere             reject-with icmp-port-unreachable
    0     0 REJECT     all  --  virbr1 any     anywhere             anywhere             reject-with icmp-port-unreachable
    0     0 ACCEPT     all  --  ens33  virbr0  anywhere             192.168.111.0/24     ctstate RELATED,ESTABLISHED
    0     0 ACCEPT     all  --  virbr0 ens33   192.168.111.0/24     anywhere
    0     0 ACCEPT     all  --  virbr0 virbr0  anywhere             anywhere
    0     0 REJECT     all  --  any    virbr0  anywhere             anywhere             reject-with icmp-port-unreachable
    0     0 REJECT     all  --  virbr0 any     anywhere             anywhere             reject-with icmp-port-unreachable
    0     0 REJECT     all  --  any    any     anywhere             anywhere             reject-with icmp-host-prohibited

Chain OUTPUT (policy ACCEPT 8249 packets, 725K bytes)
 pkts bytes target     prot opt in     out     source               destination
    0     0 ACCEPT     udp  --  any    virbr0  anywhere             anywhere             udp dpt:bootpc
    0     0 ACCEPT     udp  --  any    virbr1  anywhere             anywhere             udp dpt:bootpc
    0     0 ACCEPT     udp  --  any    virbr1  anywhere             anywhere             udp dpt:bootpc
    0     0 ACCEPT     udp  --  any    virbr0  anywhere             anywhere             udp dpt:bootpc
14 Troubleshooting iptables before and after
zintis@c8host /etc [1199]$
  sudo iptables -L
Chain INPUT (policy DROP)
num  target     prot opt source               destination
1    ACCEPT     tcp  --  192.168.0.0/16       0.0.0.0/0            tcp dpt:22
2    REJECT     tcp  --  0.0.0.0/0            0.0.0.0/0            tcp dpt:22 reject-with icmp-port-unreachable
3    ACCEPT     tcp  --  0.0.0.0/0            0.0.0./0/0            state RELATED,ESTABLISHED
4    ACCEPT     tcp  --  0.0.0.0/0            0.0.0.0/0            tcp dpt:53
5    ACCEPT     all  --  0.0.0.0/0            0.0.0.0/0            state RELATED,ESTABLISHED
zintis@c8host /etc [1200]$
fwo
Chain OUTPUT (policy ACCEPT)
num  target     prot opt source               destination
1    ACCEPT     all  --  0.0.0.0/0            0.0.0.0/0
2    ACCEPT     all  --  0.0.0.0/0            0.0.0.0/0            state RELATED,ESTABLISHED
zintis@c8host /etc [1201]$

sudo iptables -D INPUT 5
zintis@c8host /etc [1203]$


Chain INPUT (policy DROP)
num  target     prot opt source               destination
1    ACCEPT     tcp  --  192.168.0.0/16       0.0.0.0/0            tcp dpt:22
2    REJECT     tcp  --  0.0.0.0/0            0.0.0.0/0            tcp dpt:22 reject-with icmp-port-unreachable
3    ACCEPT     tcp  --  0.0.0.0/0            0.0.0.0/0            state RELATED,ESTABLISHED
4    ACCEPT     tcp  --  0.0.0.0/0            0.0.0.0/0            tcp dpt:53
zintis@c8host /etc [1204]$
14.1 use watch to see differences in iptables:
   sudo watch --interval=5 'iptables -nvL'
watch --interval=5 'iptables -nvL | grep -v "0     0"'
14.2 Verify that the service was set to start on boot :
Proper way is to use systemctl list-unit-files checkconfig only shows SysV services and does not include native systemd services. SysV service may be overwritten by native systemd services;.
But here's the SysV command anyway:
chkconfig iptables --list
iptables 0:off 1:off 2:off 3:on 4:on 5:on 6:off
If iptables is off, then enable the service for runlevels 3-5
chkconfig iptables on
15 Examles online from 2018
From www.linode.com
iptables -A INPUT -m state --state ESTABLISHED,RELATED -j ACCEPT
iptables -A INPUT -i lo -m comment --comment "Allow loopback connections" -j ACCEPT
iptables -A INPUT -p icmp -m comment --comment "Allow Ping to work as expected" -j ACCEPT
iptables -A INPUT -p tcp -m multiport --destination-ports 22,25,53,80,443,465,5222,5269,5280,8999:9003 -j ACCEPT
iptables -A INPUT -p udp -m multiport --destination-ports 53 -j ACCEPT
iptables -P INPUT DROP
iptables -P FORWARD DROP
From a forums posting:
What do you mean with add modules?
To use them the syntax is
Code:
iptables -A INPUT -m statistic --mode random --probability 1 -j ACCEPT
If that doesn't work maybe they are not compiled your kernel, see the output of
Code:
ls /lib/modules/`uname -r`/kernel/net/netfilter/xt_statis*
grep CONFIG_NETFILTER_XT_MATCH_STATISTIC /boot/config-`uname -r`


 |   |
 |   |
 |   |
 V   V

Code:
iptables -t nat -A PREROUTING -p tcp --dport 443 -m state --state NEW -m statistic --mode nth --every 4 --packet 0 -j DNAT --to-destination 192.168.0.5:443
the module name is statistic, nth is a mode for that module
-j DNAT make sense only in the nat table
--counter does not exist

RTFM ?
16 /var/log/messages on incoming natted web traffic to vm1 (192.168.111.11)
   Mar 11 19:01:28 c8host kernel: ><><><><>web traffic<><><><>
IN=ens33
OUT= MAC=00:0c:29:81:40:98:60:6d:3c:43:76:8d:08:00
SRC=192.168.128.78
DST=192.168.128.76 LEN=64 TOS=0x00 PREC=0x00 TTL=64 ID=0 DF
PROTO=TCP SPT=61945
DPT=80


Mar 11 19:01:28 c8host kernel: >>> FORWARD rule <<<
IN=ens33
OUT=virbr0
MAC=00:0c:29:81:40:98:60:6d:3c:43:76:8d:08:00
SRC=192.168.128.78
DST=192.168.111.11 LEN=64 TOS=0x00 PREC=0x00 TTL=63 ID=0 DF PROTO=TCP SPT=61945 DPT=80 WINDOW=65535 RES=0x00 SYN URGP=0
17 iptables from finished ops335 course
These are my iptables commands (-S) setup for accessing the assignment network which is continents.earth.ops on 172.28.105.0/24
Filter tables:
sudo  iptables -P INPUT DROP
sudo  iptables -P FORWARD DROP
sudo  iptables -P OUTPUT ACCEPT
sudo  iptables -N MYSSH
sudo  iptables -N MYICMP
sudo  iptables -A INPUT -i virbr0 -p udp -m udp --dport 53 -j ACCEPT
sudo  iptables -A INPUT -i virbr0 -p tcp -m tcp --dport 53 -j ACCEPT
sudo  iptables -A INPUT -i virbr0 -p udp -m udp --dport 67 -j ACCEPT
sudo  iptables -A INPUT -i virbr0 -p tcp -m tcp --dport 67 -j ACCEPT
sudo  iptables -A INPUT -i virbr1 -p udp -m udp --dport 53 -j ACCEPT
sudo  iptables -A INPUT -i virbr1 -p tcp -m tcp --dport 53 -j ACCEPT
sudo  iptables -A INPUT -i virbr1 -p udp -m udp --dport 67 -j ACCEPT
sudo  iptables -A INPUT -i virbr1 -p tcp -m tcp --dport 67 -j ACCEPT
sudo  iptables -A INPUT -m state --state RELATED,ESTABLISHED -j ACCEPT
sudo  iptables -A INPUT -p icmp -m comment --comment "direct icmp rules to the MYICMP chain" -j MYICMP
sudo  iptables -A INPUT -p tcp -m tcp --dport 22 -m comment --comment "direct ssh rules to the MYSSH chain" -j MYSSH
sudo  iptables -A INPUT -i lo -j ACCEPT
sudo  iptables -A INPUT -d 192.168.128.255/32 -j LOG --log-prefix ">>> I N P U T  Dropped " --log-level 6
sudo  iptables -A FORWARD -d 192.168.111.0/24 -i ens33 -o virbr0 -m conntrack --ctstate RELATED,ESTABLISHED -j ACCEPT
sudo  iptables -A FORWARD -s 192.168.111.0/24 -i virbr0 -o ens33 -j ACCEPT
sudo  iptables -A FORWARD -i virbr0 -o virbr0 -j ACCEPT
sudo  iptables -A FORWARD -d 172.28.105.0/24 -o virbr1 -m conntrack --ctstate RELATED,ESTABLISHED -j ACCEPT
sudo  iptables -A FORWARD -s 172.28.105.0/24 -i virbr1 -j ACCEPT
sudo  iptables -A FORWARD -i virbr1 -o virbr1 -j ACCEPT
sudo  iptables -A FORWARD -d 192.168.111.0/24 -i ens33 -o virbr0 -m conntrack --ctstate RELATED,ESTABLISHED -j ACCEPT
sudo  iptables -A FORWARD -s 192.168.111.0/24 -i virbr0 -m comment --comment "Allow only 192.168.111.x packets from virbr0" -j ACCEPT
sudo  iptables -A FORWARD -d 192.168.111.11/32 -p tcp -m tcp --dport 80 -j LOG --log-prefix " F O R W A R D http --> vm1" --log-level 6
sudo  iptables -A FORWARD -d 192.168.111.11/32 -p tcp -m tcp --dport 80 -m comment --comment "Forward web to VM1" -j ACCEPT
sudo  iptables -A FORWARD -i virbr0 -o virbr0 -m comment --comment "allow inter-bridge vm traffic" -j ACCEPT
sudo  iptables -A FORWARD -i virbr1 -o virbr1 -j ACCEPT
sudo  iptables -A FORWARD -i virbr1 -o virbr0 -m comment --comment "Forward virbr1 to virbr0" -j ACCEPT
sudo  iptables -A FORWARD -i virbr0 -o virbr1 -m comment --comment "Forward virbr0 to virbr1" -j ACCEPT
sudo  iptables -A FORWARD -d 172.28.105.0/24 -i ens33 -o virbr1 -m conntrack --ctstate RELATED,ESTABLISHED -j ACCEPT
sudo  iptables -A FORWARD -s 172.28.105.0/24 -i virbr1 -m comment --comment "Allow only 172.28.105.x packets from virbr1" -j ACCEPT
sudo  iptables -A FORWARD -d 172.28.105.8/32 -p tcp -m tcp --dport 139 -j LOG --log-prefix " F O R W A R D smb 139 to S.A" --log-level 6
sudo  iptables -A FORWARD -d 172.28.105.8/32 -p tcp -m tcp --dport 139 -m comment --comment "Forward SMB to southamer" -j ACCEPT
sudo  iptables -A FORWARD -d 172.28.105.8/32 -p tcp -m tcp --dport 445 -m comment --comment "Forward SMBs to southamer" -j ACCEPT
sudo  iptables -A FORWARD -j LOG --log-prefix " F O R W A R D pkt rejected " --log-level 6
sudo  iptables -A OUTPUT -o virbr0 -p udp -m udp --dport 68 -j ACCEPT
sudo  iptables -A OUTPUT -o virbr1 -p udp -m udp --dport 68 -j ACCEPT
sudo  iptables -A OUTPUT -o lo -j ACCEPT
sudo  iptables -A MYSSH -s 192.168.111.0/24 -i virbr0 -m comment --comment "SSH allowed from 192.168.111.0" -j ACCEPT
sudo  iptables -A MYSSH -p tcp -m tcp --dport 22 -j LOG --log-prefix "Denied by MYSSH " --log-level 6
sudo  iptables -A MYSSH -p tcp -m tcp --dport 22 -m comment --comment "DROP all other SSH" -j DROP
sudo  iptables -A MYICMP -p icmp -m mac --mac-source A4:83:E7:74:CC:CC -j REJECT --reject-with icmp-port-unreachable
sudo  iptables -A MYICMP -s 172.28.105.0/24 -p icmp -m comment --comment "Allow pings from continents.earth.ops" -j ACCEPT
sudo  iptables -A MYICMP -s 192.168.0.0/16 -p icmp -m comment --comment "Allow pings from 192.168.0.0" -j ACCEPT
And nat tables:
sudo  iptables -t nat -P PREROUTING ACCEPT
sudo  iptables -t nat -P INPUT ACCEPT
sudo  iptables -t nat -P POSTROUTING ACCEPT
sudo  iptables -t nat -P OUTPUT ACCEPT
sudo  iptables -t nat -A PREROUTING -i ens33 -p tcp -m tcp --dport 80 -j LOG --log-prefix " . . D N A T  web pkt to vm1 " --log-level 6
sudo  iptables -t nat -A PREROUTING -i ens33 -p tcp -m tcp --dport 80 -m comment --comment "translate web destination to VM1" -j DNAT --to-destination 192.168.111.11
sudo  iptables -t nat -A PREROUTING -i ens33 -p tcp -m tcp --dport 139 -j LOG --log-prefix " . . D N A T smb to southamer" --log-level 6
sudo  iptables -t nat -A PREROUTING -i ens33 -p tcp -m tcp --dport 139 -m comment --comment "translate SMB destination to southamer" -j DNAT --to-destination 172.28.105.8
sudo  iptables -t nat -A PREROUTING -i ens33 -p tcp -m tcp --dport 445 -m comment --comment "translate SMB destination to southamer" -j DNAT --to-destination 172.28.105.8
sudo  iptables -t nat -A POSTROUTING -s 192.168.111.0/24 -d 224.0.0.0/24 -o ens33 -j RETURN
sudo  iptables -t nat -A POSTROUTING -s 192.168.111.0/24 -d 255.255.255.255/32 -o ens33 -j RETURN
sudo  iptables -t nat -A POSTROUTING -s 192.168.111.0/24 ! -d 192.168.111.0/24 -o ens33 -p tcp -j MASQUERADE --to-ports 1024-65535
sudo  iptables -t nat -A POSTROUTING -s 192.168.111.0/24 ! -d 192.168.111.0/24 -o ens33 -p udp -j MASQUERADE --to-ports 1024-65535
sudo  iptables -t nat -A POSTROUTING -s 192.168.111.0/24 ! -d 192.168.111.0/24 -o ens33 -j MASQUERADE
sudo  iptables -t nat -A POSTROUTING -s 172.28.105.0/24 -d 224.0.0.0/24 -j RETURN
sudo  iptables -t nat -A POSTROUTING -s 172.28.105.0/24 -d 255.255.255.255/32 -j RETURN
sudo  iptables -t nat -A POSTROUTING -s 172.28.105.0/24 ! -d 172.28.105.0/24 -p tcp -j MASQUERADE --to-ports 1024-65535
sudo  iptables -t nat -A POSTROUTING -s 172.28.105.0/24 ! -d 172.28.105.0/24 -p udp -j MASQUERADE --to-ports 1024-65535
sudo  iptables -t nat -A POSTROUTING -s 172.28.105.0/24 ! -d 172.28.105.0/24 -j MASQUERADE
NOTE: the POSTROUTING rules were added automatically by VMM when creating a new virtual network. I did NOT have to add those myself. I only added the PREROUTING rules. (which address the incoming packets, and only DNAT.)