My Personal Cheat-sheet on emacs
1 emacs
"Emacs is a fantastic operating system with a mediocre editor"
This is my emacs cheat. It is longer than it needs to be, but I am only in my
seventh year of the book "Learning emacs in 10 short years".


2 Generic key modifiers to get going
C-is "control-" e.g.C-sreally means Ctrl-sM-is "escape key-" e.g.M-xreally means ESC-xM-depending on your keyboard mapping, could be ALT- or OPTION-
tip: if C-s acts as XOFF, use C-q to activate XON again to get your input back
Just getting in, saving, reading, inserting, and leaving
tip2: On my mac I have remapped CAPS LOCK to be the Control key and fn to be
the CAPS LOCK key.
3 Basics on entering and exiting emacs
C-x C-ffind file (i.e. open file)C-x C-vfind alternate fileC-x iinsert fileC-x C-ssave fileC-x ssave multiple buffersC-x C-wwrite fileC-x C-csave-buffers-kill-emacsC-x C-kkill current buffer (i.e. close file)C-x C-qtoggle read-only modeC-x nwhere n is a letter are the most common commandsC-c nwhere n is a letter are specialized commandsM-xlong-command name these are specific and speciallized commands - uses tab completion if you want.examples are:
M-xoverwrite-mode # is a toggleM-xreg
4 Advanced entering and exiting emacs
There are other options available depending on your situation. Remote or local? Access to gui or just terminal. etc. Read on:
4.1 emacs Frames
One can open emacs in gui mode or natively in terminal emacs in gui mode, is called an "emacs frame" Obviously you can open emacs on a macbook pro the usual way of opening a gui app:
- through spotlit
- through launcher
- through gui
4.2 emacs -nw no window
But how to control opening emacs from a terminal command line:
- to open emacs while staying in the command line, use
no window, -nwoption
emacs -nw
If you have minimized your emacs window, recover it using
mouse-click on appropriate app in apple's native doc (or C-z toggle)
you can also open -a emacs or just plain emacs from the terminal command line but will open emacs either in a separate GUI window, or in the command line, depending on these (as yet unknonw) settings in .emacs.d/init.el
4.2.1 .emacs.d/init.el for opening in a gui vs native command line
open -a emacs is worth a try too.
4.3 Open emacsformacosx.com emacs
If you placed the Emacs.app inside the root /Applications folder, then your path to the Emacs executable: /Applications/Emacs.app/Contents/MacOS/Emacs
If you placed the Emacs.app inside the root /Applications folder, then your path to the emacsclient executable is: /Applications/Emacs.app/Contents/MacOS/bin/emacsclient
4.4 emacs –daemon
You can run emacs --daemon so that emacs is running in the background when
you boot up. AFter that run emacsclient filename & ??
test this
You could also add this to your .bash_profile file. i.e. emacs –daemon &
4.5 set an alias?
alias emacs='open -a /Applications/Emacs.app $1'
This may be inefficient.
4.6 emacs start script
#!/bin/bash
EMACSPATH=/Applications/Emacs.app/Contents/MacOS

# Check if an emacs server is available
# (by checking to see if it will evaluate a lisp statement)

if ! (${EMACSPATH}/bin/emacsclient --eval "t"  2> /dev/null > /dev/null )
then
   # There is no server available so,
   # Start Emacs.app detached from the terminal
   # and change Emac's directory to PWD

   nohup ${EMACSPATH}/Emacs --chdir "${PWD}" "${@}" 2>&1 > /dev/null &
else
    # The emacs server is available so use emacsclient

    if [ -z "${@}" ]
  then
     # There are no arguments, so
     # tell emacs to open a new window

     ${EMACSPATH}/bin/emacsclient --eval "(list-directory \"${PWD}\")"
  else
     # There are arguments, so
     # tell emacs to open them

     ${EMACSPATH}/bin/emacsclient --no-wait "${@}"
  fi

  # Bring emacs to the foreground

  ${EMACSPATH}/bin/emacsclient --eval "(x-focus-frame nil)"
fi
4.7 A simpler way of opening emacs?
A lot of very complex solutions to this problem are posted here. That's fair
because it seems non-trivial.

However, this solution works really well for me.

ec() {
   emacsclient -n $@ 2> /dev/null
   if [[ $? == 1 ]]; then
   open -a Emacs.app  -- $@
   fi
}
Usage
ec file [...]
Let's unpack what's happening:
pass all the ec arguments to emacsclient and don't (-n) wait for emacs before continuing.
If Emacs is already running, we're all done and you're editing.
swallow up the error message posted by emacsclient when there's no emacs running. (2> /dev/null)
Manually handle the exit code 1 ([[ $? == 1 ]])
open Emacs.app and pass file arguments to it (paths will be correctly opened.)
You're all done, and Emacs has opened your files.
4.7.1 One last example:
open -a /Applications/Emacs.app <file-name> combining this with David Jame's response I've created the following emax bash script and placed it in my path at ~/bin
#!/bin/bash (open -a /Applications/Emacs.app "$@") &
4.8 From emacswiki.org
4.8.1 Start the Emacs Server
Starting Interactively To enable the Emacs server, add the command
(server-start) to your init.el. This is a requirement for using the Emacs
client! When the server is running, closing the last Emacs frame will leave
the server running. To shut Emacs down completely, call the command
`(kill-emacs)’.
4.8.2 Emacs Daemon The command
emacs –daemon will launch an emacs in daemon mode, starting the server, running the init files and then detaching into the background. This is handy for automatically running at launch. This can save you a few seconds since Emacs will already be running by the time you open your first file! This was not supported on Windows before version 25.
EmacsAsDaemon details various ways to run this command in different distributions, init scripts vs systemd and so on.
Using EmacsClient Terminal environment Simply replace every place you’d run emacs with this command instead.
emacsclient -create-frame --alternate-editor""= The emacsclient program will
connect to a running instance of Emacs if it exists. -c tells Emacs to open
the file in a new frame, which is optional. Specifying -a=”” tells
emacsclient to start an an instance of emacs if it cannot find one already
running.
To use emacsclient as your editor, add the following to your .bashrc:
export ALTERNATEEDITOR="" export EDITOR="emacsclient -t"
export VISUAL="emacsclient -c -a emacs"
If you prefer to launch GUI Emacs from your terminal when editing files, replace the -t in the second line with -c
Desktop Environment You can install a desktop entry for Emacsclient. This will make it available in context menus in Gnome, KDE, XFCE, and other Freedesktop environments. Create a file named emacsclient.desktop in ~/.local/share/applications containing the following:
[Desktop Entry] Name=Emacs (Client) GenericName=Text Editor Comment=Edit text MimeType=text/english;text/plain;text/x-makefile;text/x-c++hdr;text/x-c++src;text/x-chdr;text/x-csrc;text/x-java;text/x-moc;text/x-pascal;text/x-tcl;text/x-tex;application/x-shellscript;text/x-c;text/x-c++; Exec=emacsclient -с -a "emacs" %F Icon=emacs Type=Application Terminal=false Categories=Development;TextEditor;Utility; StartupWMClass=Emacs
5 Cursor movement:
5.1 Character at a time
           |
C-b <--------------> C-f
           |
(Or use left and right errors)
5.2 Word at a time
               |
back  M-b <---------> M-f  forward word
               |
5.3 Sentence at a time (or paragraph)
          M-[
           ^
           |
M-a <--------------> M-e
           |
           V
          M-]
5.4 Line at a time
          C-p
           ^
           |
C-a <--------------> C-e
           |
           V
          C-n
I typically use arrow keys for next and previous lines
5.5 Page at a time
For page at a time remember that others use C-v to paste contents of your
clipboard, but emacs uses C-y to paste the contents of your clipboard.
That leaves C-v for page down, and M-v for page up.
 page up
   M-v
    ^
    |
    |
    V
   C-v
page down
5.6 Whole document
  top of file
     M-<
      ^
      |
      |
      V
     M->
bottom of file
5.7 Summarizing Cursor Movements:
C-bback a characterC-fforward a characterC-amove cursor to beginning of line (a)C-emove cursor to end of line (e)M-bback a wordM-fforward a wordM-abeginning of sentenceM-eend of sentenceC-pprevious lineC-nnext lineM-[start of paragraphM-]end of paragraphM-}end of paragraphM-{start of paragraphM-vpage up (^)C-vpage down (v)M-<top of file (<)M->bottom of file (>)M-xgoto-line451(moves cursor to line451)M-g M-g233goto line233M-g ggoto line #M-x goto-line451works too, but most likely it is set in init.el ; set a global key for goto-line(global-set-key (kbd "C-c j") 'goto-line)You can check if
C-c jwas already assigned to a command, and pick something else if you wish, - but check that one too.
5.8 listing all key mappings C-h b
This could be overwhelming, but still useful. C-h b does exactly that.
6 Editing movement:
Deleting forwards and backwards
M-backspace,   backspace    <------->   C-d,          M-d
delete word    delete char  <-------> del char    delete word
7 Editing
Quick note on keyboards. On apple keyboards the top right key is "delete".
That is what I am using in in my cheat sheets. Just FYI, PC keyboards call it
"backspace". When looking at emacs documentation, "backspace" and "delete" are
both used. They both delete characters to the left of the cursor. PC keyboards
have a DEL key, which is implemented with C-d on Mac and Linux keyboards.
7.1 deleting
delete keydelete to the leftC-ddelete to rightC-kdelete to end of lineC-udelete to start of lineM-ddelete word to right remember, my mac Option key is M-M-kdelete sentence from cursor onwardsC-S-backspacedelete current line (can alsoC-a C-kto delete current line)C-S-backspace C-y C-yduplicates current line (see copying)
7.2 Deleting Character at a time
		  	    |
(char to left) delete <--------------> C-d (character to right)
			    |
7.3 Deleting to end of line, to start of line
                           |
(start of line)  C-u <------------> C-k (end of line)
                           |
7.4 Deleting by words
                           |
(start of line)  C-u <------------> M-d (word to right)
                           |
7.5 Deleting by sentences
                           |
(start of line)  C-u <------------> M-k (sentence to right)
                           |
7.6 wiping to a mark
You set a mark with C-space then can move your cursor up or down to wherever
you want to "mark". Then:
C-wdelete (wipe) from mark to where the cursor is presently.M-wcopy (wipe) from mark to where the cursor is presently.
7.7 delete up to a specific character
M-z"deleteeverthing to the next occurance of ~"that could be any character) ] } '… this is very similar to thevim "change inside" or ci" or ci) orci] ci}… also "delete inside" di" di) di) di] di} Note thatemacs is always in insert modeso the concept ofcivsdimakes no sense to emacs. emacs is like ci…ALWAYS.M-SPCjust-one-space will delete all whitespaces around cursor, leaving just one space. M-x just-one-spaceM-\delete-horizontal-space # same as above, but does not leave 1 space.M-^delete-indentation (joins current line with line above itand removes indents)M-x delete-whitespace-rectangleif you mark a region first, then this will delete all the excess whitespace in that region.C-M-smaps to Regexpl I-search: and interactive regex search and replace
7.8 more on the kill ring
M-kdelete sentence from cursor onwardsM-wdelete (wipe) the word? *this was different: C-h k M-w says it is "kill-ring-save"C-yto yank back (ie: paste a previously deleted word, sentence, line, mark) really what emacs does is "paste" back what was in the "kill ring" if you deleted three lines in a roll, emacs will keep all three in the kill ring.C-h v kill-ringto view your kill ring. yanking actually yanks it off the kill ring.
7.8.1 please note that if you change preferences in the MacOSX terminal,
under Profiles, Keyboard
7.9 repeating
M-7do this next thing 7 times, so combiningM-7-M-ddelete 7 words to the rightM-7-M-kdelete 7 sentencesM-7-C-ddelete 7 characters to the right
Repeating a character or string of characters:
C-u77-repeats whatever you type next, 77 times.
C-u77.repeats whatever you type next, 77 times. ……………… …………………………………………………..
7.10 copying
M-wcopies a selection into the buffer "kill-ring-save"C-yto yank back (ie: paste a previously deleted word, sentence, line, mark) really what emacs does is"paste" back what was in the "kill ring"if you deleted three lines in a roll, emacs will keep all three in the kill ring.C-S-backspace C-y C-yduplicates current line.C-S-backspacekills the current line, andC-yyanks it back. So secondC-yyanks it back again hence duplicating the current lineC-tto transpose the character to the one preceedin it See transpose
Remember that when in doubt: C-h k M-w tells you that M-w is "kill-ring-save"
7.11 moving
C-wto "wipe" the selection, and put it into the bufferC-yto yank back (ie: paste a previously deleted word, sentence, line, mark)
really what emacs does is "paste" back what was in the "kill ring" if you deleted three lines in a roll, emacs will keep all three in the kill ring.
7.12 example moving 3 lines
M-3 C-k which will "cut" three lines,
then move your cursor to where you want those three lines, and type C-y.
This will "move" those three lines to the new location. Alternatively you
could have done C-k C-k C-k instead of M-3 C-k
7.13 duplicate a line
You can do the typical sequence of moving to the beginning of line, deleteing it
then also deleting the newline, and yanking it back twice, i.e.
C-a C-k C-k C-y C-y
But you can shorten that with the kill-whole-line command which is C-S-BACKSPACE
and remember; on a macbook keyboard the BACKSPACE key is actually the DELETE key
So a shorter version is:
C-S-DELETE C-y C-y
C-S-DELETE C-y C-y
C-S-DELETE C-y C-y
7.14 moving by defun
In Emacs, a major definition at the top level in the buffer, such as a function,
is called a defun. The name comes from Lisp, define function, but in Emacs we
use it for all languages.
Although defun is Lisp-speak, most modes support all the defun-like commands
such as mark-defun or narrow-to-defun.
From the emacs manual: 26.2.2 Moving by Defuns These commands move point or set
up the region based on top-level major definitions, also called defuns.
C-M-a Move to beginning of current or preceding defun (beginning-of-defun).
C-M-e Move to end of current or following defun (end-of-defun).
C-M-h Put region around whole current or following defun (mark-defun).
The commands to move to the beginning and end of the current defun are C-M-a (beginning-of-defun) and C-M-e (end-of-defun). If you repeat one of these commands, or use a positive numeric argument, each repetition moves to the next defun in the direction of motion.
C-M-a with a negative argument -n moves forward n times to the next beginning of
a defun. This is not exactly the same place that C-M-e with argument n would
move to; the end of this defun is not usually exactly the same place as the
beginning of the following defun. (Whitespace, comments, and perhaps
declarations can separate them.) Likewise, C-M-e with a negative argument moves
back to an end of a defun, which is not quite the same as C-M-a with a positive
argument.
To operate on the current defun, use C-M-h (mark-defun), which sets the mark at
the end of the current defun and puts point at its beginning. See Commands to
Mark Textual Objects. This is the easiest way to get ready to kill the defun in
order to move it to a different place in the file. If the defun is directly
preceded by comments (with no intervening blank lines), they are marked, too. If
you use the command while point is between defuns, it uses the following
defun. If you use the command while the mark is already active, it extends the
end of the region to include one more defun. With a prefix argument, it marks
that many defuns or extends the region by the appropriate number of defuns. With
negative prefix argument it marks defuns in the opposite direction and also
changes the direction of selecting for subsequent uses of mark-defun.
In C mode, C-M-h runs the function c-mark-function, which is almost the same as
mark-defun; the difference is that it backs up over the argument declarations,
function name and returned data type so that the entire C function is inside the
region. This is an example of how major modes adjust the standard key bindings
so that they do their standard jobs in a way better fitting a particular
language. Other major modes may replace any or all of these key bindings for
that purpose.
7.15 transpose
C-ttranspose 2 characters (transpose-chars)M-ttranspose words (transpose-words)C-x C-ttranspose lines (transpose-lines)M-x transpose-sentencesM-x transpose-paragraphsM-x transpose-regionsC-M-ttranspose two balanced expressions (transpose-sexps)
For lines:
- if your cursor is in the
middleof a line, thatline is moved up - if your cursor is at the
endof a line, thatline is moved up
7.16 read-only mode
C-x C-qtoggles buffer read-only mode in the current bufferM-x read-only-modeis an alternative if C-x C-q isn't working out.
7.17 overwrite mode
M-x overwrite-mode(is a toggle)C-lredraw the screen (in case it gets mucked up)- tip: repeating the next command 55 times, uses
M-55 command, e.g.
7.18 Case conversion (upper, lower)
M-lconvert to lower case (downcase-word)M-uconvert to upper case (upcase-word)M-ccapitalize the following word (capitalize-word)C-cC-x C-lconvert region to lower case (downcase-region)C-x C-uconvert region to upper case (upcase-region)
M-l (downcase-word) converts the word after point to lower case, moving
past it. Thus, repeating M-l converts successive words. M-u (upcase-word)
converts to all capitals instead, while M-c (capitalize-word) puts the first
letter of the word into upper case and the rest into lower case. All these
commands convert several words at once if given an argument. They are
especially convenient for converting a large amount of text from all upper
case to mixed case, because you can move through the text using M-l, M-u or
M-c on each word as appropriate, occasionally using M-f instead to skip a
word.
7.19 iedit-mode
A very useful technique is to use the iedit package, from Iedit on emacswiki.org Also available on github
C-; is a toggle for iedit for all the occurances of a string in the
buffer. Typically a good way to change a variable name and have it change
through-out the buffer. First select a string, then C-; (which is the
default key-binding) And all matching strings will be highlighted. Make any
editing changes, then finish with C-; again, or C-g while within an
occurance.
7.19.1 iedit-mode to temporarily show buffer lines that match current text
being edited WHile in iedit-mode, hit C-' as a toggle to show and hide all
lines with the matching.
Notice that C-; is right beside C-' on a mac keyboard.
7.19.2 C-; toggle was undefined until I first used "M-x iedit"
After a reboot, I found that M-; gave me an error message, that M-; was
undefined. I simply ran iedit manually, M-x iedit-mode, and after that
the next time I ran M-x iedit-mode I say that the key mapping to M-; was
back on. Not sure what triggered the change, but I will try to recreate
this issue later.
This was confirmed days later. i.e. it appears that on first using iedit
mode, the keymap is not in place. After that, C-; was back on.
7.19.3 iedit vs lsp-rename
I tried using M-x lsp-rename but the back-end lsp did NOT accept renaming.
Not sure why, or how to fix this, so I stuck with iedit mode.
7.19.4 lsp-iedit-highlights
I have not tried this yet, but check out: https://emacs-lsp.github.io/
7.19.5 keep-lines C-'
You can also use iedit mode as a quick way to temporarily show only the
buffer lines that match the current text being edited. This gives you the
effect of a temporary ‘keep-lines’ or ‘occur’. To get this effect, hit C-’
when in Iedit mode - it toggles hiding non-matching lines.
7.19.6 iedit limited to region
Usually activating iedit M-x iedit-mode, will highlight and change ALL
instances in the file. You can limit that to a region in one of two ways as
described in this
Stackexchange link
There are a couple ways to do this.
You can narrow the buffer to the region you are interested in and then use
iedit to highlight / change all the visible matches. With this approach you
want to mark the relevant region first and call narrow-to-region or C-x n
n. Use iedit to make the changes you want and then call widen C-x n w to
see the whole buffer again. Using narrow/widen this way is handy as it can
be used in lots of other cases. Any command that operates on the buffer can be
restricted to a smaller region this way.
You can also do it the other way around and start with iedit. Use iedit-mode
to highlight all instances of some bit of text you want to change. Then mark
a region to restrict the changes and call =iedit-mode= again. This will
un-select all matches outside the region so that you can safely change just
the matches you want.
There are some options for restricting the selection once you've called
iedit-mode. Use M-H to narrow to the current function or M-I to narrow to
the current line. Your key bindings may not be setup that way so figure that
out first.
M-x iedit-toggle-selection can be used to unselect the occurence at point.
8 Multiple Cursors
8.1 Multiple cursosr and mult-line editing "Rectangular Text"
There are three approaches to editing multiple lines at once, that I have tried.
- rectangle editing
- iedit mode
- multiple cursor, mc mode
8.1.1 rectangle editing
It is called "string rectangle" Try this. Select a block and C-x r <letter> See
also "rectangle editing".
The choices I seem to like are the following
- clear rectangle
C-x r c
- delete-rectangle
C-x r d
- insert-register
C-x r i
- kill-rectaangle
C-x r k
- copy-rectangle-to-register
C-x r r
- copy-to-register
C-x r s
- string-rectangle
This one is what I use the most. It lets you add a string to every line that in the selected block. Just start typing.
C-x r t
- copy-to-register
C-x r x
- yank-rectangle
C-x r y
See also
iedit-modeand multi-cursor,mc/modes.
8.1.2 Other C-x r (rectangle) editing:
From my emacs setup using ivy, you can see that there are many different options available to you when you select rectangles:
8.2 multiple-cursors as alternative to iedit
https://emacsrocks.com/e13.html The author has a youtube video showing how powerful this is. Worth watching it. Magnars multiple cursors git hub page is: https://github.com/magnars/multiple-cursors.el
8.2.1 M-x mc/edit-lines
Activate multiple cursors with M-x mc/edit-lines which stands for "multiple
cursor/edit-lines".
C-S-c C-S-c
The default key mapping is C-S-c C-S-c C-æ =mc/mark-next-like-this Find and
mark the next part of the buffer matching the currently active region, while
also keeping the current region. Get it here. The keystrokes are C-S->
Currently C-h k C-<right> showed that this key is globally mapped to
right-word that moves the point N words to the right. but I will remap this
to be mc/mark-next-like-this
See init.el
From the page https://github.com/magnars/multiple-cursors.el:
When you have an active region that spans multiple lines, the following will add a cursor to each line:
(global-set-key (kbd "C-S-c C-S-c") 'mc/edit-lines)
When you want to add multiple cursors not based on continuous lines, but based on keywords in the buffer, use:
(global-set-key (kbd "C->") 'mc/mark-next-like-this) (global-set-key (kbd "C-<")
'mc/mark-previous-like-this) (global-set-key (kbd "C-c C-<")
'mc/mark-all-like-this)
First mark the word, then add more cursors.
To exit multiple-cursors-mode, press <return> or C-g. The latter will
first disable multiple regions before disabling multiple cursors. If you want to
insert a newline in multiple-cursors-mode, use C-j.
Example use case: I have a list of fields that I want to mark up.
- source — the file system source
- size — total number of blocks
- used — spaced used on a drive
- avail — space available on a drive
- pcent — percent of used space, divided by total size
- target — mount point of a drive
And I want it to look like this:
- =source= — the file system source.
- =size= — total number of blocks.
- =used= — spaced used on a drive.
- =avail= — space available on a drive.
- =pcent= — percent of used space, divided by total size.
- =target= — mount point of a drive.
- Select a region with my cursor on the 's' in source down to the 't' in target.
C-S-c C-S-cNow add the first'='=M-fto move to the end of the word.- Add the second
'='= C-eto move to the end of the line.- "." to add the period.
C-gto finish up with the multiple cursors
C-x r y yank-rectangle Yank the last killed rectangle with upper left corner
at point.
H-SPC set-rectangular-region-anchor Think of this one as `set-mark` except
you're marking a rectangular region. It is an exceedingly quick way of adding
multiple cursors to multiple lines. Get it here.
C-x C-q dired-toggle-read-only Edit dired buffer with Wdired, or set it
read-only.
mc/mark-all-like-this Find and mark all parts of the buffer matching the
currently active region, while also keeping the current region. i.e. a
variable.
mc/mark-next-like-this Find and mark next parts of the buffer matching the
currently active region, Keymap: C-> ( activate mc with C-S-c C-S-c first)
C-x C-e eval-and-replace Evaluate the last sexp and replace it with the
result. This is particularly useful with programming languages where you want
to replace everything within a set of brackets or braces or quotation marks I
have not tested this yet.
M-x kmacro-name-last-macro Assign a name to the last keyboard macro defined.
M-x insert-kbd-macro Insert in buffer the definition of kbd macro NAME, as
Lisp code.
8.3 Macbook keyboard keys (options and apple) keys
8.3.1 set "Use Option as Meta Key" only in Terminal Option key
will be Meta M- key For mac-emacs, the Meta key is NOT the alt key but
rather the Options key. That is because the variable
mac-command-key-is-meta is non-nil. If you make it nil then you are back
to using the escape key as the meta key. Another option to explore is
setting some varialble like mac-option-key-is-meta if that exists. ???
Apparently, it is an either-or situation. If mac-command-key-is-meta is
0, then automagically the option key becomes meta.
8.4 other mac keyboard options:
If your problem is that the modifier keys are not mapped as you expected, you
can directly set the variables mac-option-modifier, mac-command-modifier
and mac-control-modifier (and their right- counterparts) to either 'meta or
'control in your ~/.emacs.d/init.el file.
E.g. (setq mac-command-modifier 'meta) will make the Command key act as a
Meta key.
I personally like this setup:
(setq mac-control-modifier 'control) (setq mac-command-modifier 'meta) (setq
mac-right-option-modifier 'control)
Finally, you can set your CAPS lock key to be control key instead, and the
fn key to be CAPS lock key if you wish. (I have done that to make emacs key
bindings easier to use.) Go to sys-preferences, keyboard, modifier
keys, CAPS-lock changed to Control and Function key changed to CAPS
lock key. i.e. this change is done from the Mac OSX settings.
To get around not having CAPS LOCK, you can simply use M-u to uppercase all
remaining characters from cursor, to the end of the word. — or next word
if you cursor is on a space. M-u is mapped to M-x upcase-word while
M-l is mapped to M-x downcase-word (think M-l for lower vs M-u for
upper
8.5 rectangular deleting
You can remove the first n characters of a block of lines by running;
Move to one corner of the rectangle you want to delete, press C-SPC to set
the mark. Move to the other corner of the rectangle and press
C-x r d (delete-rectangle). # I found that C-x r t did the same except
that it left you still in the rectangular text mode that let you
replace the deleted block with something if so desired.
Very similar to Rectangular editing
9 Compiling / running programs within emacs
But, a better way is to display a line in your source file for which a
compiler printed an error message. Compiling from within Emacs using the M-x
compile and M-x recompile commands is a much more effective way of doing
that. Emacs automatically intercepts the compile error messages, inserts them
into a special buffer called compilation, and lets you visit the locus of
each message in the source. Type C-x ` to step through the offending lines
one by one (starting with Emacs 22, you can also use M-g M-p and M-g M-n
to go to the previous and next matches directly). Click mouse-2 or press
hammer on a message text in the compilation buffer to go to the line whose
number is mentioned in that message.
A very common work flow is to compile a program, get errors along with line # where the errors occured and then edit the program, jumping from line to line.
10 Adjusting what you see
10.1 Displaying Line # and Column (Position)
M-xline-number-modeM-xcolumn-number-mode«M-xDisplay-Fill-Column-Indicator mode
All three are toggles.
Now jump or goto a specific line with M-g g 366 to move to line 366 (you
don't have to be in line-number or linum-mode mode.)
10.2 Scaling text
M-x text-scale-adjustthen + or -M-x t-s-ad+-C-x C-+And you might not need to use the shift key for +, but just hit =C-x C--(I find it easier toC-x C-+ +++----as needed but start with+
Note, that after the first + or - is hit, you do NOT need to enter subsequent
C-x C - - commands. Just continue with C - + or C– i.e. keep holding down
the control key and hit ---++==---====)
In fact, you don't even have to hold the control key. just ----==–0==
until you like the size, then any other key will fix that font size. Voila!
C-x C-0To restore the default (global) font text face height=
10.3 Change Font Size
To increase font size: M-x text-scale-adjust then press + repeatedly To
decrease font size: M-x text-scale-adjust then press - repeatedly
Alternatively M-x t-s-ad +++- or also C-x C-+
;; turn on highlighting current line (global-hl-line-mode 1) ===> alternatively you can just use M-x hi-line-mode. It is a toggle. This did not work for me actually. Neither did M-x global-hi-line-mode nor M-x hi-line-mode
Some notes from yang-mode give a good example of init.el configurations:
11 Major and minor modes
Throughout this org file, modes are mentioned all the time. They are key to
understanding how to use and customize emacs. For starters, emacs is always in
a major mode at all times. Which major mode depends on what type of file you
are editing, and what you want to accomplish.
Within that major mode there may be multiple minor modes that can be toggled on
and off, typically by M-x minormodeofchoice So just be entering that twice, you
can turn it off.
Major modes on the other hand, cannot be turned off, as emacs has to be in a
some major mode at all times. So, to turn off a major mode, you need to enter
another mode. M-x fundamental is as good as any, which is the best way to
simulate "turning off a mode".
There are many,(~300) and most are listed in https://www.emacswiki.org/emacs/List_Of_Major_And_Minor_Modes
See also the variable: auto-mode-alist
12 Help
12.1 General Help
Version you are running by either running emacs –version or by running =M-x emacs-version from within emacs
C-hfor helpC-h tfor tutorialC-h mdescribe mode this one is key!! Learn to learn about every mode you are in. A lifetime of learning and expanding.C-h ianother key feature that is useful to finding help. It shows all the help for all the packages your have installed
12.2 Keystroke Manual (help)
C-h k for documentation on the keystroke I am about to type for example C-h
k C-x i gives me info on the "insert" command in a split mode And… to get
back to one screen, use C-x 1 (see below on modes)
C-h k C-x 1will tell me about the keyC-x 1-> " get back to 1 window "C-h k C-swill tell me about the keyC-s–> " search "C-h k M-%will tell me about the keyM-%–> interactive queary-replaceC-h f eval-last-sexpf is for function, –> eval-last-sexp which is
If you want to confirm a key binding, try checking keystroke help on the key
sequence, so C-h k keysquence-I-want-checked
12.3 Keystroke List (like C-h k C-x) but in reverse
If you type C-x C-h which is in reverse, then emacs will display all the
available key stroke combinations that start with C-x I assume that this
also works for M-x C-h ? Well it id not work for me, but that is because I
have an emacs package active that describes keys for me all the time,
interactively. That package is a emacs LISP extension called "which-key".
Install that by listing the packages with M-x package-list-packages and
pressing I beside which-key.
Another favourite of mine is C-h b to see what key bindings I have active
now
12.4 Keystroke Manual (reverse direction)
What if you want to find if there is a key binding for M-x fill-region ?
Or M-x set-fill-column ?
12.4.1 List the key-bindings in the current buffer with:
C-h b You can also get a list of keybindings via C-h m, which is help
for the major and minor mode
12.4.2 HELM-descbinds
helm-descbinds, which is available via melpa. is a nicer version of C-h b
But HELM is an alternative to ivy, and I use ivy as it seems more clean,
and minimalistic. Basically ivy (and helm) show you more information about
anything in a list in emacs, (rather than just show the list).
12.5 What key did I just press?
When some key sequence triggers an unexpected command, use view-lossage (bound to C-h l by default) to see what keystrokes Emacs has recently received.
12.6 Keyboard reset
Getting messed up in the commands?
C-gkeyboard quit * as in gong this keyboard mess *C-x uundo past editing chages. can do this repeatedly till all editing changes since last save are "undone"
Alternatively you can revert back to the last saved version with the command:
C-x /is the same asC-x uboth are undo.C-/id undoC-g C-/is redo
M-x revert-buffer RETURNYou might get: Buffer has been auto-saved recently. Revert from auto-save file (y or n)if you choose y, emacs will restore from the #filename# that it last saved (about up to 100 keystrokes ago) lf you choose n, emacs will restore from the file on the disk. (I think)
if you had even more disasters, you can mv program.py~ program.py because when you edited program.py, emacs created a backup file called program.py~ Or If an Emacs session crashed recently, type
M-xrecover-session RET to recover the files you were editing.
12.7 Customize Key Bindings
This is useful in many situations, including mapping to Keyboard macros To change key bindings interactively, use the
command define-key. Otherwise, you can use the init.el command
~(global-set-key /key/ /binding/ )
By the way, that is equivalent to: - (define-key (current-global-map) /key/
/binding/ )
When trying to set org-mode kbd macros set properly as per above link, I
tried these following additons in init.el file. Only the _last_ one
worked.
12.7.1 This was an example from online, that I did not try:
- (define-key outline-minor-mode-map [(control tab)] 'org-cycle) -
(define-key outline-minor-mode-map [(shift tab)] 'org-global-cycle)
12.7.2 org-mode-active-map did not work
- (define-key (org-mode-active-map) /key/ /binding/ ) # this is still a
guess org-mode-active-map was in error somehow.
12.7.3 org-mode-map did not work
- (define-key org-mode-map "\C-a" 'move-beginning-of-line) - (define-key
org-mode-map "\C-e" 'move-end-of-line) - (define-key org-mode-map "\C-a"
'move-beginning-of-line)
12.7.4 global-set-key worked for me.
The following worked for me, after which C-c showed all four of these options
- (global-set-key (kbd "\C-c b") 'make-bold)
- (global-set-key (kbd "\C-c h") 'make-hlight)
- (global-set-key (kbd "\C-c u") 'make-underline)
- (global-set-key (kbd "\C-c v") 'make-verbatim)
But why won't this work?
- (define-key org-mode-map "\C-c b") 'make-bold)
- (define-key org-mode-map "\C-c h") 'make-hlight)
- (define-key org-mode-map "\C-c u") 'make-underline)
- (define-key org-mode-map "\C-c v") 'make-verbatim)
It turns out that (global-set-key key command) boils down to
- (define-key (current-global-map) key command))
In fact looking up global-set-key's source code with C-h f global-set-key
you will see that it only wraps define-key
Other commnds:
(global-unset-key /key/)which is equivalent to(define-key (current-global-map) /key/ nil)(local-set-key /key/ /binding/)to set the binding of key in the current local keymap
12.8 Interactive key bindings
Keys can be bound to commands either interactively or in your .emacs
file. To interactively bind keys for all modes, type
M-x global-set-key RET key cmd RETM-x global-set-key RET key cmd RET
To bind a key just in the current major mode, type
M-x local-set-key RET key cmd RET
Use the key C-h b to see key bindings, but also I like xxx and then cycle
through all the bindings I have currently active. That is done through ivy,
simply by hitting ??? I just did it not 5 min ago, and now can't remember.
12.9 Other tips on key mapping
From emacs.stackexchange.com : Modifier key s- is called "Super". (event-modifiers 's-Y) returns (super), which says that s-Y uses (only) the super modifier.
See the Emacs manual, node Modifier Keys. What physical keyboard key, if any, might correspond to this logical modifier key depends on your system and hardware. (event-convert-list '(super ?y)) returns 8388729, which is the internal representation of the event produced by key s-Y. (kbd "s-Y") returns [8388729], which is the internal representation of the key s-Y.
In my setup, and (describe-key [8388729]) returns the key-description string "s-Y is undefined". But presumably if you use org-roam that sexp will tell you what command s-Y is bound to in Org mode using org-roam.
12.10 Setting up my working init.el file
I used keyboard macros to define the action, then keyboard mappings to set key strokes to call those actions in my init.el file. Here are the two sections:
#+BEGINEXAMPLE ;; setting Zintis org-mode keyboard macros (fset 'make-bold (kmacro-lambda-form [?\C-w ?* ?\C-y ?*] 0 "%d")) (fset 'make-hlight (kmacro-lambda-form [?\C-w ?~ ?\C-y ?~] 0 "%d")) (fset 'make-underline (kmacro-lambda-form [?\C-w ?_ ?\C-y ?_] 0 "%d")) (fset 'make-verbatim (kmacro-lambda-form [?\C-w ?= ?\C-y ?=] 0 "%d")) (fset 'make-italic (kmacro-lambda-form [?\C-w ?/ ?\C-y ?/] 0 "%d"))
;; This works (global-set-key (kbd "\C-c b") 'make-bold) (global-set-key (kbd "\C-c h") 'make-hlight) (global-set-key (kbd "\C-c u") 'make-underline) (global-set-key (kbd "\C-c v") 'make-verbatim) (global-set-key (kbd "\C-c i") 'make-italic) #+ENDEXAMPLE
13 Help with a Package
If init.el gives you: error: package.el is not yet initialized It is
because in the init file you need to have a line: (package initialize)
before you try any use-package or package related cmds
14 GNU Emacs startup help
- Get help
C-h(Hold down CTRL and press h) - Emacs manual
C-h rBrowse manualsC-h i - Emacs tutorial
C-h tUndo changesC-x u - Buy manuals
C-h RETExit EmacsC-x C-c - Activate menubar
M-`
15 Menubar and Toolbar
M-xmenu-bar-modeM-xshowhideM-xtool-bar-mode # or (setq tool-bar-mode 0) in .emacs.d/init.el
16 Setting Marks (on Apple Macs)
On a macbook pro C-<SPC> is reserved for changing language input, so you need to find something else. This is done by typing:
M-x global-set-key RETURN M-. set-mark
Now the way to set a mark is by typing M-. or rather, M-. And, if you want
to do this for every session, you can edit your .emacs file and add the line:
- (define-key global-map "\M-." 'set-mark-command)
set key by typing M-x global-set-key RETURN M-. set-mark That's because
C-<SPC> is simply a keyboard language toggle on macbooks
However, I have set C-<SPC> to work in emacs a different way. - can't
remember. But all I have to do is when I am in emacs or terminal, I need to
click the flag using my mouse to change languages. Because I change languages
much less often than I use C-space to mark blocks in emacs, I am using
C-space for emacs marking.
C-wto wipe from mark to where the cursor is presently.M-wto copy from mark to where the cursor is presently. (works in a read-only buffer)
Can also just mouse click and drag to mark a block. drag-mouse-1
Or, click-mouse-3 at one point, and click-mouse-1 at other point to mark
On my mac, mouse-3 is just two-finger click. so… click, two finger click
does it.
17 Setting Marks is working with Regions.
First you set a region, then you can take action on that region.
17.1 set a region
Setting regions is exactly the same as setting marks. See Setting Marks
- 1) Manually setting a mark
C-wto wipe from mark to where the cursor is presently.M-wto copy from mark to where the cursor is presently. (works in a read-only buffer)
- 2) Using mouse dragging
Can also just mouse click and drag to mark a block.
drag-mouse-1 - 3) Using mouse clicking
click-mouse-3at one point, andclick-mouse-1at other point to mark. On my mac, mouse-3 is justtwo-finger click. The workflow is- click
- move mouse cursor
- two finger click
- 4) Select whole paragraph
M-hmarks the "hole" paragraph as a region - 5) Select the whole buffer
Also
C-x hmarks the "hole" buffer for deletting, copying etc… - 6) My favourite way is to use
C-=By far my favourite way to select regions is with the expand-region package
If you have two or three windows, and they are open to different buffers, you can copy text
M-korM-. markandM-worM-.andC-x w
17.2 Region editing
Once region has been highlighed, you can do cool stuff with it, such as: Use
"region editing" which all starts with C-x r
17.3 Region M-x replace-regexp
This works as you would expect, only when a region is active, the replacement is limited to regexp matches within in region only.
17.3.1 M-x replace-regexp $ to add a character at the end of each line.
M-x replace-regexp $M-x replace-regexp $M-x replace-regexp $
This will allow you to add any characters to the end of each line within a
region if a region is active, or the whole document. Simply repace the $
with say ; to add a ; to the end of each line in the region.
17.4 expand-region package
Part of gnu and melpa packages. I have mapped C-= to expand-region and
C-- to contract-region
expand-region lets you type the following anywhere within the region and
emacs will "select" the whole region. i.e. it will 'expand the region'.
M-x er or M-x expand-region
Best way to see how this works is using a larger .xml file. Put your cursor
somewhere deep in a nested xml doc and repeatedly hit C-= followed by
repeatedly hitting C-- You will see emacs repeatedly expand a selection out
to eventually the whole file and C– reverses that back to the single
character you were on. At any time you can C-w to wipe out the entire
selection.
Usually C-= is smart enough to know that you can just repeatedly hit = and
the region will continue to expand. Then too hitting - and = until you got
just what you need will do the trick. i.e. no need to hold down the C key.
17.5 Indent blocks of lines
Well, you already have highlighted a block of lines so: C-x TAB arrows to
indent interactively. M-M-M which is <esc> three times when done with
indentation.
17.6 Comment blocks of commands
You can select a block of commands and uncomment or comment them like this:
Mark a bunch of lines, then
make them all coments, or if they are all comments, uncomment them. This is a toggle:
M-; with the active region (marked).
M-x comment-region also does the same thing.
17.7 Rectangular editing
You can comment out blocks using the M-; command, but to an arbitrary
string to the front of every line, you need something more versatile.
That's where block editing, a.k.a. region editing, rectangle editing comes in:
C-x r tReplace rectangle contents with string on each line
This is very similar to: M-x string-insert-rectangle hammer string hammer
See also rectangle editing.
17.8 Moving rectangles
C-x r M-w
Makes sense: C-x r to operate on the rectangular region, and M-w to copy
it.
17.9 Entering new comments
After the first comment line is entered, using M-j or C-M-j will add the
next line of comments.
In auto-fill mode, you can just keep typing and emacs will auto-fill the comment lines. * nice *
17.10 auto-fill-mode (aka wrapping) M-q
M-x auto-fill-modejust toggles it for this session.(add-hook 'text-mode-hook 'turn-on-auto-fill)turns it on for all text mode(setq-default auto-fill-function 'do-auto-fill)on all major
You can also auto-wrap text at 80 columns with with the command M-x
(set-default fill-column 80) or in your .emacs.d/init.el file If you want to
to make sure that lines don't split on your screen as you're typing things,
you can set up visual line mode. C-c f also sets your fill column #. or
M-x set-fill-column 80 at prompt
emacs.d/init.el
- (add-hook 'text-mode-hook 'turn-on-auto-fill)
- (add-hook 'text-mode-hook '(lambda() (set-fill-column 80)))
I would like it to happen in all modes, e.g. org-mode. I added the line
(global-visual-line-mode t) to my .emacs file, in order for the word wrapping
also to work in org-mode.
17.11 refill-mode vs auto-fill-mode
If you are continuously typing text without making mistakes or editing, then the end result would be the same in both cases.
auto-fill-mode isn't so helpful when editing existing text, though
(especially so when editing text which has already been filled). It is just
inserting line breaks when the current column exceeds the fill column, but if
you are editing before the fill column, it does nothing; and it doesn't
care about the preceding lines at all. You would probably need to invoke
fill-paragraph manually from time to time.
refill-mode OTOH will automatically refill the current paragraph as you
edit, and will still trigger when you are before the fill-column. This can
be very useful, yet also be totally useless when you want to create lists
with items on each new line. refill mode will keep putting them back as part
of a paragraph. So good to know that you can toggle it on and off.
To set C-c q to the refill-mode toggle (it was unset before) use:
(global-set-key (kbd "C-c q") 'refill-mode)
17.12 Hard wrap lines
These three commands together will set up hard-wrapping lines
- set how wide to set your lines
M-x set-fill-column - Align lines to give a l\f based on what your set-fill-columns is set with:
M-x fill-paragraph( orM-q)M-x fill-regionselect region first then align highlighted blockM-x set-fill-column(useC-x f))
- If
C-x fdoes not work check your keybinding ofC-x f
18 recentf-mode
Open recently opened files using the M-x recentf-mode to turn it on, then
M-x recentf-open-files to list and open recently opened file
To actually open the file, just enter the digit, or move the mouse
cursor on it and hammer it.
To make this persistent, (requre 'recentf') and (recentf-mode 1) in your
emacs init file.
19 magit
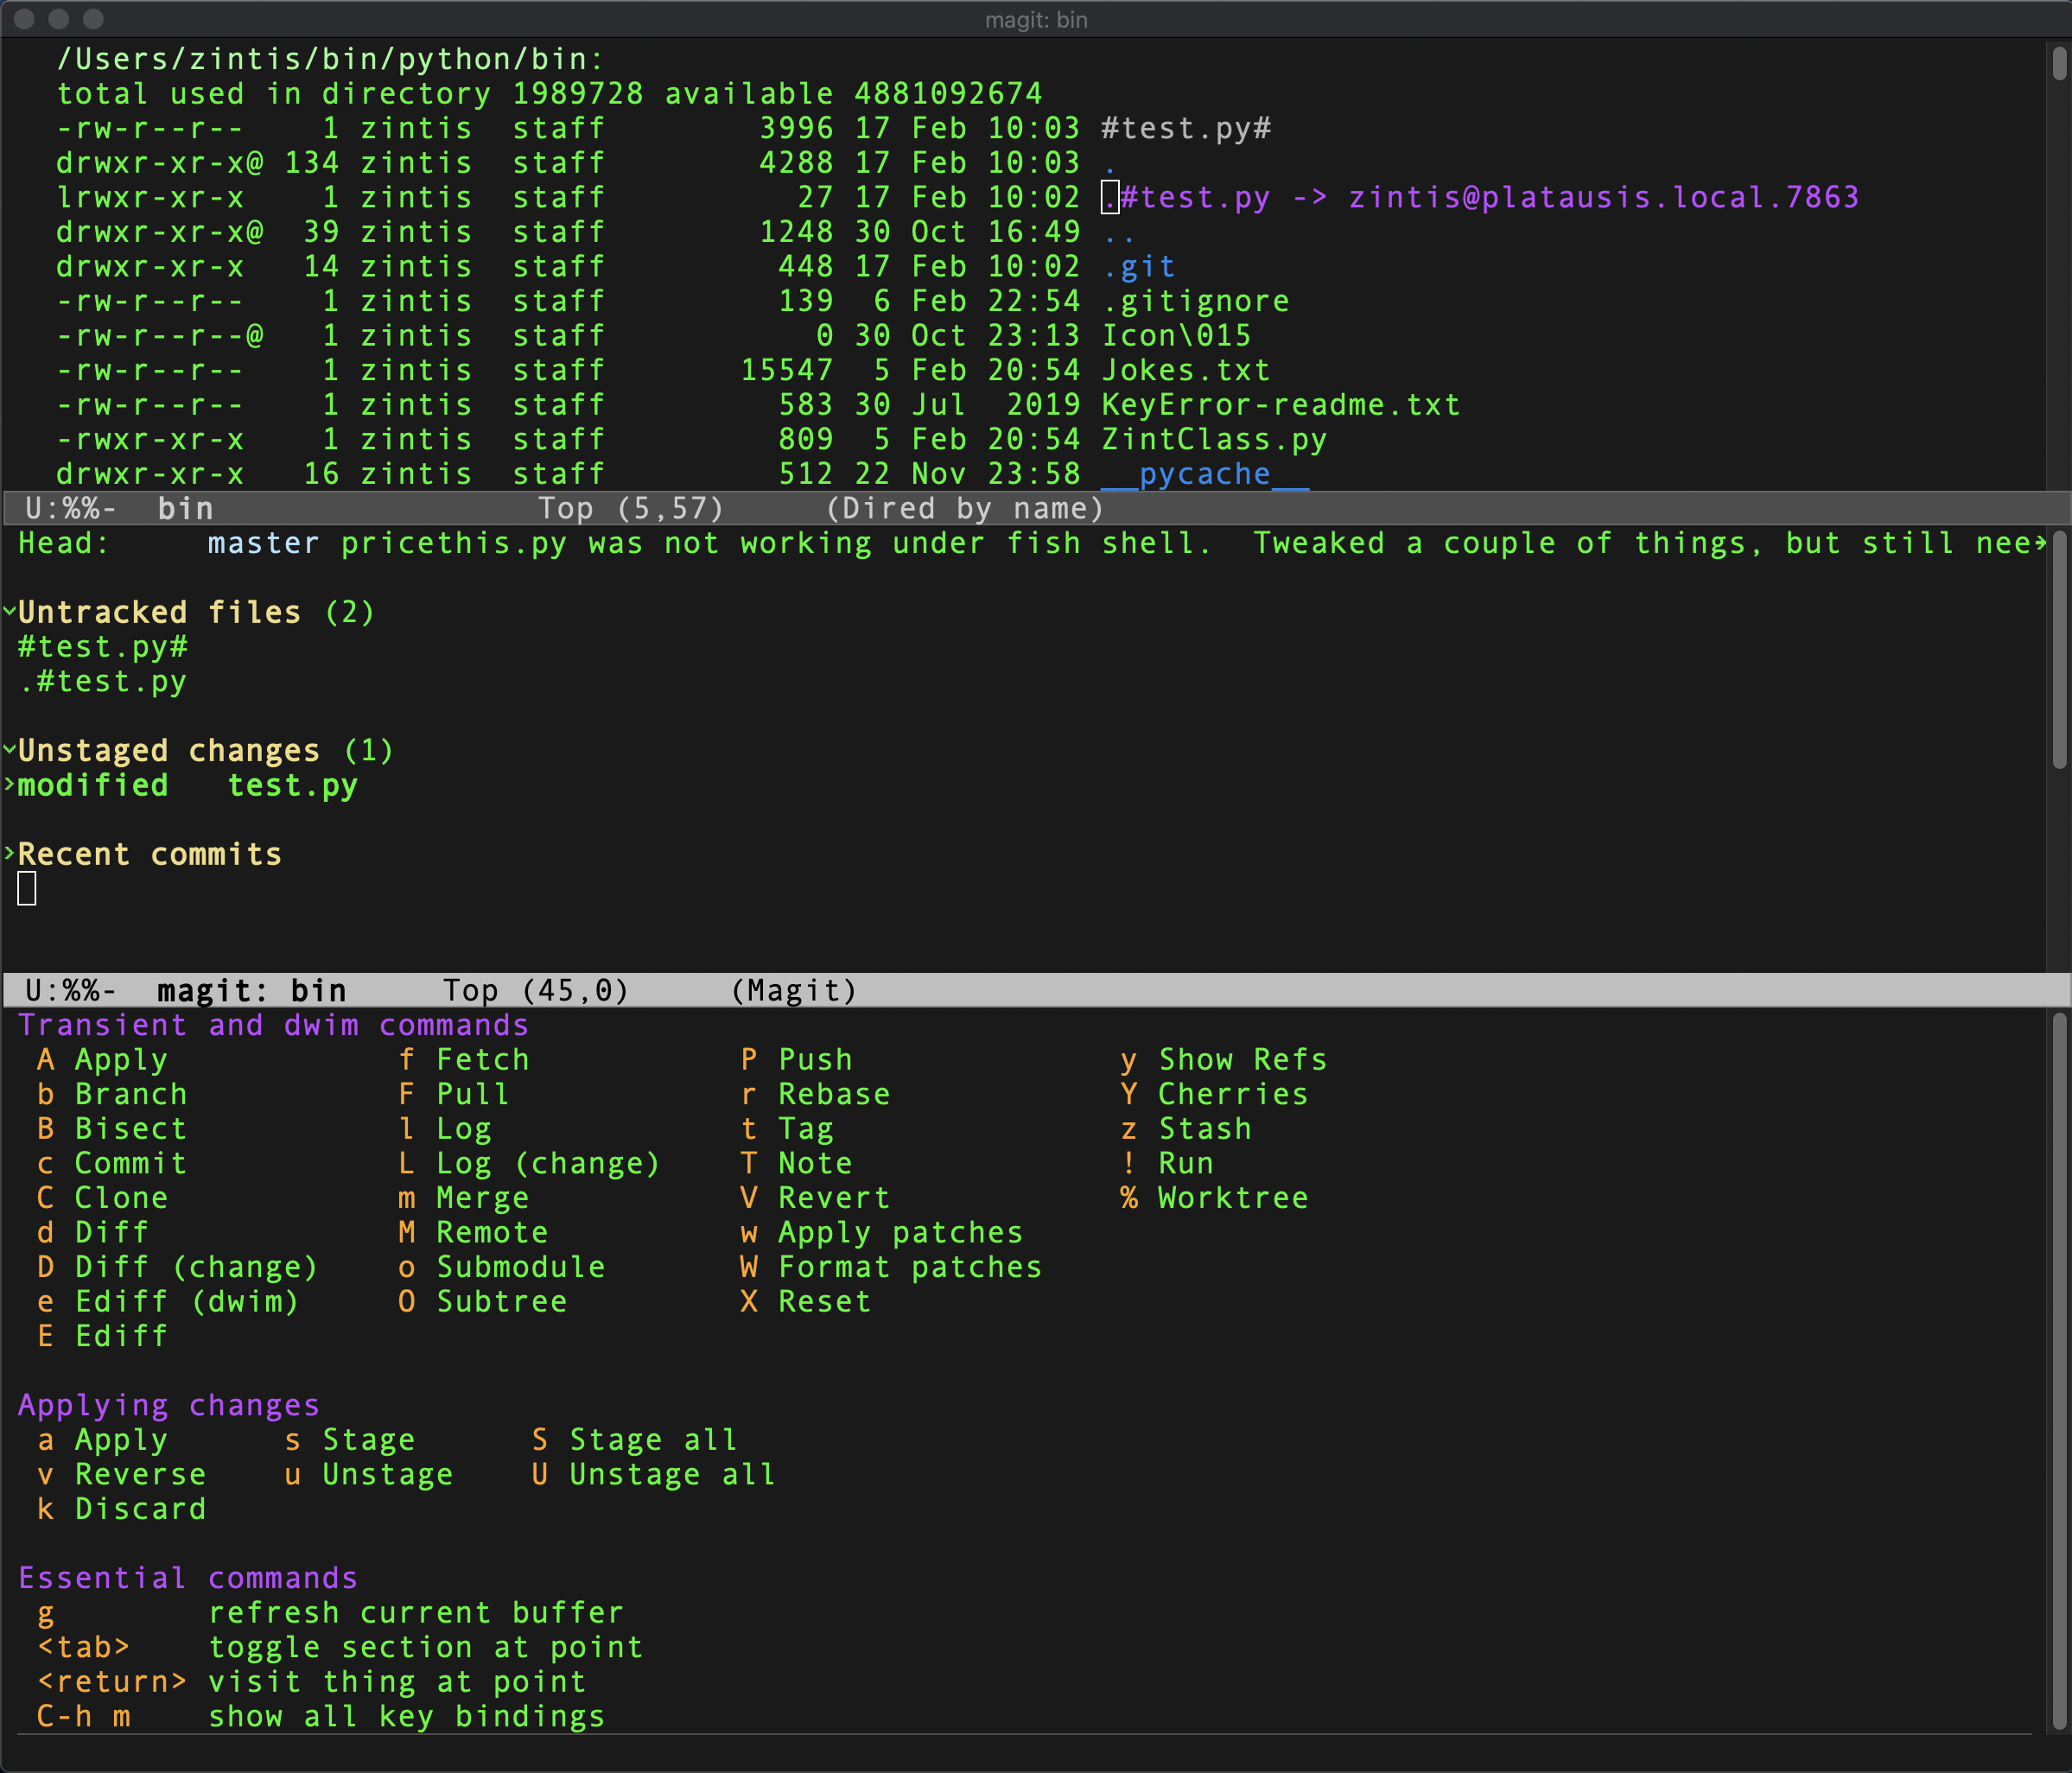
Had to first install it using melpa (see Packages section of this document) Once installed, and in dired
mode, type M-x magit
Here is a screen shot of my magit page in ~/bin/python/bin
19.1 magit-mode commands:
?show available commands.magit-dispatchthis is always available and opens a transient buffer that will automatically close once you hit the next command you want<tab>to expand sections OR to expand a filemagit-section-toggleson an untagged file, to stage it.magit-stageuon a stagge4d file to unstage it.magit-unstageqto quit this command displayccommitmagit-commitc ccommitmagit-commit-create(c is entered twice )d ddiff (d is entered twice)bbranchmagit-branchbb again which ismagit-checkout( b is entered twice )sspin off a branchmagit-branch-spinoffllogmagit-logllogmagit-log-current(l is entered twice)qquit this command (magit-log-bury-buffer)wmagit-amwmagit-am-apply-patches (w is entered twice)C-c C-cto confirm the edited commit.C-c C-kto cancel this commit.
So a typical, basic magit workflow is: M-x magit or C-x g
?remind yourself what commands are available- move to any untracked or unstaged files and hit
s sssSto stage all remaining unstaged or untracked filesTABon any file you want to examine (diff)c ccommit commit- Add your commit message, then:
C-c C-c( or is
C-c C-cfollowed byc c??? No, it isc cthenC-c C-c)$bring up the details of the error message that just appeared.Ppush your commit o repository i.e. github
19.2 magit status
M-x magit-status (you can set C-x g to map to M-x magit-status by using:
(global-set-key (kbd "C-x g") 'magit-status) in your .emacs-d/init.el file
- Refresh (
g/G) - global-magit-file-mode (
C-c M-g) - magit-dispatch (
C-x M-g)
First a good idea to confirm that C-x g is not being used by anything
useful C-h k C-x g See help magit status section above.
? will display the magit commands available. (must be in the magit-status
buffer)
M-n/p, jto move around the git status window (next/previous)M-1or-2or-3or-4,TAB,S-<tab>for visibility
19.3 magit diff options
D
C-c C-t (or M-x magit-diff-trace-definition) ?
Once in the diff buffer (D) see toggles such as -U for context lines and
-t for hunk refinements which can show you the actual changes made to
files between git commits.
git diff --word-diff (is the equivalent git cli command. ~ In a diff
buffer, you can get the function history list as well… That is a list of
historic changes to the function you are currently looking at say in python, or
in .php or whatever program is being edited in magit mode.
19.4 Logging options in magit
L can toggle dates from absolute dates or days or hours ago.
19.5 magit blame
shows who and when people committed people.
19.6 close the magit buffers with letter 'q' for quit
19.7 magit stage and unstage with a single letter
$ will show you what is happening with your git commands, at any given time
- to show dates when lines or sections were added or changed or deleted from a git file.
19.8 magit commit
c c then edit the commit message with the following (emacs enforced) best
practices
19.8.1 commit message best practises
summary less than 50 chars, 2nd line must be a blank line, more text on next lines.
eallow empty commitastage all modified and deleted files –allvshow diff of changes to be committedM-norM-pcan browse through past commit messages. (once in the commit buffer) i.e. have hit c afterwards (i.e. a third time) to finally commit
You can also C-c C-a to commit ammend (see docs for all the options of C-c
C-a to commit ammend.)
19.9 magit insert git headers C-c C-r, C-c, C-s
19.10 magit branching
b brings up the branch popup. Can create a new branch, or open a branch,
can check it out or not in the same command.
19.10.1 spin-off
Let's say you are working on a branch for a couple of hours, making lots of edits, and make a few commits, when you realize, "oops, I should not be making these commits to master!". What to do? If you have made a couple of commits but have not 'pushed' it yet you can:
hit b and s which will spin off a new branch.
It will reset the master head back to where you were when you started, take the several commits you have done today, and spin off new branch, applying those editting changes on this new branch. All automagically. Thus saving your bacon.
You can spin off of any branch.
19.11 Reverting (V)
V
VV(magin-revert-and-commit)Vv(magit-revert-no-commit)
19.12 resetting (X)
Read the docs on this. What follows is just to make you aware that this feature exists, and is fairly useful:
Get your mouse onto a recent commit (pick one) and hit:
- x (and type
Head) to revert to that version. ? - x (and bring up the log to see what version you want to revert to.)
19.13 Stashing (z)
z z (magit-stash-both) Stashes index and working tree, untracked files included.
Once a change is stashed, you can hit on the stash (under git status buffer) at a latter time, to then incorporate the change into the branch at that time.
19.14 Rebasing (r)
r i (magit-rebase-interactive)
Rebase allows you to resolve conflicts and rewrite history. ** very useful
magit does this very well.
Look at the log, choose a commit where you want to start the rebase. hit r
i For instance c76309r, then you will see a list of commands.
Read them and use C-c C-c to execute what you want with the rebase. - any
errors will pop up for you to resolve, or skip and continue forward.
C-c C-k to kill buffer out of this if you do not want to make any changes.
19.15 Bisectting
B B (magit-bisect-start) B s (magit-bisect-run) B b (magit-bisect-bad)
B g (magit-bisect-good) B r (magit-bisect-reset)
This is good if you have a bug and want to know when the bug came into being.
Works good if you have been following proper git etiquette, hygene and standards, with proper messages left on commits, etc.
19.16 Rebasing
Read up on this.
19.17 others: magit-tag, magit-notes, submodules, worktree
20 Search and Replace
C-s search-string- search and re-search next hit- can hit
C-gto stop this thing - can repeatedly hit
C-sto cycle through all, and wrap to start again - UPDATE:
C-snow set to runswipperfor more elaborate service. The key strokes remain the same though.
- can hit
C-r search-string- search and re-search previous hit- can hit C-g to stop this thing
M-x replace-regexp- is self explanatory (but different from regexp I-searchC-M-sorM-C-sregexp I-search one of the rare times it is control-meta something.., s this time for regexp search.M-C-sregexp I-search same asC-M-sabove.M-%- query replace hammer 'y' to make the change interactively til done, or quitC-g- ! to change ALL remaining instances (like a global "yes")
M-x spell-stringM-s ooccurances window opens, showing all occurances of the searched string.M-x grepgreps a pattern in the files you specify, and shows results in a grep buffer, similar to occurances You will seegrep -nH -eto which you add"zintis" ~/bin/*.pyThis is huge! It lets you just hammer on the listed file (and line) to take you right there in that file on that line.
M-x rgrep"recursive grep" same as above, butrecursively searches all files in allsub-directories as well. Mind blown!!!To find all lines in all files that contain zintis use:
M-x regrepthenzintisthen*thenhammer(for this directory) but you can override any of these prompts.Or to limit only python files,
M-x regrep "zintis" *.pyOr to limit onlyI set a keybinding for this:
M-c Rfor"Recursive"
20.0.1 Search and Replace over multiple files
You can use the following work-flow to edit text across multiple files.
M-x find-name-dired: you will be prompted for a root directory and a filename pattern.- Press
tto "toggle mark" for all files found. - Press
Qfor "Query-Replace in Files...": you will be prompted for query/substitution regexps. - Proceed as with
query-replace-regexp:SPACEto replace and move to next match,nto skip a match, etc. - Press
C-x sto save buffers. (You can then pressy,nor!to save all at once)
20.0.2 Try dired search and replace
I think this should query through what should be replaced or not, in each of the files that are "marked":
- in dired, or find-dired: (see dired.org for details)
Markthe files you want. You can mark by regex by typing【% m】.- Type
Qto calldiredk-do-query-replace-regexp. - Type your find
regexand replacestring. 〔☛ common elisp regex pattern〕 - For each occurrence, type
yto replace,nto skip. Type 【Ctrl+g】 to abort the whole operation. - Type
!to replacealloccurrences in current file without asking,Nto skip all possible replacement for rest of the current file. (N is emacs 23 only)
20.1 Limiting search and replace to a marked block
If you have marked a region of your file then M-r should do a regexp in that marked region.
21 grep
see Search and Replace section above.
22 Dired:
M-x dired Or, simple C-x C-f not on a file, but open a directory, to
automatically be put in dired mode. See full description in
Dired Basics in file
dired.org
23 Keyboard macros
Keyboard macros are your friend. For example if I want to add the letters
"end-of-line_" at the end of each line, I can do:
C-x(C-e_end-of-line_C-nC-x) C - x ( C - e _end-of-line_ C - n C - x )
(extra spaces for clarity) C - x ( to start C - x ) to finish End of line
C-e, then end-of-line, then next-line, C-n
Will get "Defining kbd macro" C-x ) to finish C-x e to execute this kbd
macro.
Another useful keyboard macro is to add highlighting. For instance: highlight
a word or sentence, then: C-x(C-w~C-y~C-x)
That breaks down to this workflow:
C-x(to start the macroC-wto wipe the word~to add the first tildeC-yto paste back the word~to add the second (trailing) tildeC-x)
Then C-x e to execute that macro. If you wanted to run a macro 500 times,
you could run <ESC> 500 C-x e (remember typing this is really
<ESC>500C-xe)
23.1 Another good use of keyboard macros for wrapping python code in org files
As per the same workflow above, if you select the block of python code then:
That breaks down to this workflow:
C-x(to start the macroC-wto wipe the selected python code.#+BEGIN_SRC pythonto mark start of the python codeC-yto paste back the wipped block of python code#+END_SRCto add the trailing mark at the end of the python codeC-x)to end recording the macro
23.2 Saving keyboard macros.
You can save it permanently by editing your init.el file, and while
there
M-x name-last-kbd-macroand give it a name. (C-x C-k nis mapping for this)M-x insert-kbd-macroThis will insert the lisp code for the named macro at the current cursor position- Copy and paste that code in your init.el file (if not already there)
M-x nameCall the macro by name. Or, create a key mapping forM-x name- See Customize Key Bindings section.
- (global-set-key (kbd "\C-c b") 'make-bold) in your init.el as well.
#+BEGINSRC python import json for i in paragraph: x = i.strings.json.load() #+ENDSRC
23.3 edit you home-grown macro
The above notes show how you create macros, but to edit them permanently
simply edit init.el and search for kmacro-lamba-form.
23.4 kbd macros vs abbreviations
Keyboard macros are good when you want to assign a key mapping, e.g. C-C s
to a macro called "wrap python" while in org mode. But when you want
to have emacs automatically fill out typed words into a block of larger code,
you use abbreviations. So, in that way I can type "s b l k " (without the
extra spaces) in org mode and have that automagically fill out to
the #+BEGINSRC block for python source code, while still in org mode.
I set up these abbreviations in org-mode: e b l k , s b l k , and now
also
24 Working with Emacs Windows
24.1 Windows within Emacs
- scratch window, what is it?
- closing the open window
- closing the other window
- listing the windows
If you have two or three windows, and they are open to different buffers, you
can copy text M-k or M-. mark and M-w or M-. and C-x w
And then yank it back in the other buffer:
C-x oto move to the other window,- then
C-yto paste.
But you can also do that now with the window version of emacs, i.e. copy/cut
in one window and C-y yank it back in another window. Cool…
OR C-x C-o to move the editing from one buffer to another…..
Deleting a windows means it isn't displayed anymore. It does nothing to the buffer(s)
C-x 0To delete the current window:C-x 1To delete the other window, i.e. make the current window maximized (think "make this the one and only window" )C-x 2Split window below ( horizontally )C-x 3Split windows right ( vertically )C-x 3 C-x 1 C-x 2example which split verticalyl, closed it, & split horizontallyC-x ^Makes the current window taller (increase window size)C-x }Make the current window wider (increase window size)- =
C-x 4 cis "clone-indirect-buffer-other-window" let's you have vertically split windows where each window is independent of the other. Good if you want to have an outline of a file in one split, and detailed view of the SAME file in the other window.
C-x C-shift+Making text font size biggerC-x C--Making text font size smaller (control-minuskey)M-x text-scale-adjustalso changes text font sizeC-x ^Growing a window use:M-5 C-x ^Growing a window 5 lines:
25 Working with Emacs Buffers
When you open another file with say C-x C-f, emacs will open that file in a
new buffer and display the window on that buffer. The other buffers you had
open are still open. Think of buffers as a stack of pages. Emacs only
shows you the TOP page.
Buffers are working copies of files, Windows are well,… windows.
The windows could be of different buffers, or of different spots in the SAME buffer. i.e. you may want to see the top of a file, while looking at the bottom of a file to copy something from there to the top.
C-x b <buffer-name>is how you move that buffer to the top of the stack of pages
(i.e. display that buffer in the top window)
C-x bwill show you in mini-buffer, where you want to swap to.
If no other buffer is there will show:"Switch to buffer: (default scratch)"
- If you are in that scratch buffer
C-x bdefault will become the "other" buffer.
So you can swap easily. Technically called "switch-to-buffer"
C-x bto swap bufferC-x oTo swap to "other" window(s):
= C-x 0 to close the current window.
C-x 1to make that window the "1" and only window shownC-x 3to split this window vertically
Or leave it as a split windows and jump between them with
C-x oi.e. toggle back and forth to "other" window Can cycle through multiple windows.
Or, if you have more than two buffers open, you can jump to a buffer by going to the buffer list window, then jumping to that window through
C-x oand then selecting which buffer to jump to
just by moving the cursor there and hitting RETURN
C-x bswitch to bufferC-x C-blist buffers (hammer on one of these buffers to switch to it)C-M-jcounsel-switch-buffer is a short-cut forC-x C-bif you are using counsel.dmarks buffer for deletionkmarks buffer for deletionssaves bufferuunmarks bufferxexecutes the one-letter commands on all marked buffers1displays buffer in a full screen2displays this buffer and the next one in horizontal windowsfreplaces buffer list (this window) with this buffer (also RETURN)oreplaces other window with this buffermmarks buffers to be displayed in windowsqdisplays the marked buffers in as many windows as it takes.
C-x k kill buffer C-x s save buffer
25.1 Shortcuts in Buffer "minibuffer"
When in buffer list buffer, you can "kill" buffers with k That will mark
buffers to be deleted with "D". Then once all buffers to be killed are so
marked, you "execute" with x This behaviour mirrors dired mode with
marking, then executing a command on the marked files.
26 Links
- adding a link with
C-l
Good youtube where I first learning of LISP extensions, and init.el
- to open the link try
C-c o'o' for open.
27 Emacs browser eww
M-x ewwopens a web page in a buffer.
28 Emacs describe
Emacs has built-in help as well as various describe functionality.
28.1 C-h k Describe key
M-x describe-key will let you enter any key combination, and if that key is
bound to a command, will tell you the details. Use it in conjunction with M-x
describe-key which will tell you what key binding you have (if any) for the
subsequent key combination you press.
For example, you could type C-h k C-h v that will then tell you that the key
C-h v is bound to counsel-describe-variable and will describe what that
variable does.
28.2 C-h b Describe Bindings
M-x describe-bindings Is very useful to learn a new mode, or to refresh your
memory on what bindings are active in the current mode.
28.3 C-h v Describe Variable
M-x describe-variable shows you what the current variable is set to, and gives
you some help text around that variable. For example: C-h v org-agenda-files
See also LISP variables
28.4 C-h m Describer Mode
M-x describe-mode Whatever mode you are in, you might have different key
bindings, and other useful information. All that information is at your
finger tips by using: C-h m. But you have to scroll down to see the key
bindings. Elsewhere I have seen C-h ? as the "describe mode" To resolve
this, try to run the "describe-key-binding" command or C-h k then press the
key. Of course my loaded ?program? "which-key" shows you these every time,
interactively. i.e. when you run a command with M-x fill-region for
example, if there is a key mapped to this command it will show up right in
the window. Conversely if You start typing C-x then all the options
following C-x will be displayed. So you can continually be learning new
functions and new key mappings.
For example in dired mode, you can see that Q is
"dired-do-find-regexp-and-replace".
To actually search multiple files and replace strings across all of them M-x
find-name-dired then enter root directory and regexp for files to select t
to toggle mark for all files Q for Query-Replace in Files.. then enter
query/substitution regexps press SPACE to replace, n to skip this
occurance (same as in query-replace-regexp C-x s to save buffers. Then
y, n, or ! to save all at once.
28.5 Describe Face
M-x describe-face displays the properties of <face> for the current frame.
Not needed very often. Hardly at all, once your favourite fonts have been
chosed, but occassionaly useful when you see something odd, or new.
28.6 Installing Packages
To install an emacs package follow these steps: (for example elpy)
- use pip to install "elpy", "jedi" and "rope" to install these 3 python modules into your library. Note, that this line is for python packages and NOT emacs packages. So ignore this for emacs.
- Go to package mode of emacs
M-x package-list-mode(I am guessing?) - Install elpy on emacs
- Edit ~/.emacs file so that "elpy" starts with emacs
- Edit ~/.emacs file to fix two bugs with "elpy"
M-x package-list-package# see more about specialized commands in the specialized commands section.
from the package list can install directly as follows:
Or can install manually by M-x package-install [RET] ox-twbs [RET] if the
package does not work, try refreshing the package list M-x
package-refresh-contents [RET]
Or, edit your init.el file and add (without the ~ ) (use-package ox-twbs
:ensure t)
the package list will likely be using Emacs key mappings. Here are some tips for getting around:
C-vscrolls down one screen.M-vscrolls up one screen.C-sstarts the incremental search function.C-spressed repeatedly to move to the next match,RETto complete the search and stay where you are,imarks a package for installation.dmarks a package for deletion.uun-marks a package.xexecutes the operations as marked (so mark things you want with i and then press x)qquits the package interface.
You can see a full list of available key mappings by asking Emacs for help
with the current mode (“Package Menu Mode”). Press C-h followed by m, C-h m
You can get help on a lot of things in Emacs by pressing C-h followed by
some key. In fact, C-h m should have its own section.
For example C-h C-x g
28.7 package-config
Maybe only elpy has M-x elpy-config but worth looking for it as M-x
elpy-config is really quite useful.
28.8 packages in virtualenv.
M-x pyvenv-activate could be useful if you are emacs-ing on a virtualenv
framework. Try it…
28.9 Upgrading Packages
Once in M-x package-list mode, you can mark files, m, i, etc, then: Type
U to mark upgradable packages Type x to execute upgrade commands.
One can check the messages buffer for packages that need
28.10 Melpa.org
Additional emacs packages are published online at
melpa.org By default if you set up the following in
your .emacs.d/init.el file, then package list will automatically list all
4,700 plus packages available on melpa.org
(require 'package) (add-to-list 'package-archives '(" smelpa"
. "https://melpa.org/packages/"))
Best practice is use your browser to browse and search for packages in
melpa.org, and then read the package notes for instructions to download and
install, then back in emacs package mode you can install the packages. check
proper directory where the requirements.txt file is, if it exists.
28.11 Using newly installed emacs packages
typically the package will have documentation on melpa.org, and that
typically points to a homepage that is typically on gitlab.com or
github.com That will have instructions on how to change your
.emacs.d/Init.el file or how to run the package manually.
28.12 .emacs.d/elpa
This directory is where the standard emacs packages get stored. I believe other repo packages still get stored in this directory, but have not confirmed that conjecture. See emacs packages file for more details on packages.
29 Packages (a.k.a. LISP extensions)
30 auto-complete mode
On very common and useful mode is auto-complete mode. It too is a toggle, so:
M-x auto-complete-mode turns in off and on. It is most likely set in your
init.el file. First to load it use: (require 'auto-complete) Then to turn
it on, either: (auto-complete-mode t) or (global-auto-complete-mode t)
31 web-mode
First stop should be web-mode.org Everything I have here I got from the web-mode.org website.
31.1 Tips on installing packages (using web-mode package as an example)
Install First drop the file web-mode.el in a directory defined in your load-path. Then, add in your .emacs #+BEGINSRC emacs-lisp (require 'web-mode) (add-to-list 'auto-mode-alist '("\\.phtml\\'" . web-mode)) (add-to-list 'auto-mode-alist '("\\.tpl\\.php\\'" . web-mode)) (add-to-list 'auto-mode-alist '("\\.[agj]sp\\'" . web-mode)) (add-to-list 'auto-mode-alist '("\\.as[cp]x\\'" . web-mode)) (add-to-list 'auto-mode-alist '("\\.erb\\'" . web-mode)) (add-to-list 'auto-mode-alist '("\\.mustache\\'" . web-mode)) (add-to-list 'auto-mode-alist '("\\.djhtml\\'" . web-mode)) Using web-mode for editing plain HTML files can be done this way (add-to-list 'auto-mode-alist '("\\.html?\\'" . web-mode)) #+ENDSRC
31.2 Associate an engine
A specific engine can be forced with web-mode-engines-alist. #+BEGINSRC emacs-lisp (setq web-mode-engines-alist '(("php" . "\\.phtml\\'") ("blade" . "\\.blade\\.")) ) #+ENDSRC
Using this association list is required as soon as the file extension is unknown (by web-mode) or is too general (e.g. *.html). In summary, you may have to set both auto-mode-alist and web-mode-engines-alist.
Since the version v10, you can also put a fragment like #+BEGINEXAMPLE -- engine:ENGINENAME -- in a comment at the beginning of your template (web-mode-enable-engine-detection must be set to t in your .emacs)
<?php * -- engine:php -- * ?> <span><?=$x?></span> #+ENDEXAMPLE The recognized file extensions are listed in the Engine families paragraph.
31.3 Associate a content type
web-mode.el can deal with many content types: html, xml, javascript, jsx,
json, css. This was needed to edit *.js.erb files for example: js files that
embed ruby blocks.
Sometimes, web-mode.el can not guess the content type with the file
extension. e.g. you want to associate *.api files with web-mode.
The var web-mode-content-types-alist can be used to associate a file path
with a content type
(add-to-list 'auto-mode-alist '("\\.api\\'" . web-mode)) (add-to-list
'auto-mode-alist '("/some/react/path/.*\\.js[x]?\\'" . web-mode))

(setq web-mode-content-types-alist '(("json" . "/some/path/.*\\.api\\'")
  ("xml" . "/other/path/.*\\.api\\'") ("jsx"
  . "/some/react/path/.*\\.js[x]?\\'")))
web-mode is a good way to enter html. Others are: emmet-mode (also
available from MELPA) and js2-mode works well for javascript.
31.4 Using web-mode
You have many template engines to work with, Look them up.
- jumping
C-c C-njump between opening & closing tags, or between control blocks such a<?php if (): ?> … <?php endif; ?>, <c:if> … </c:if>,or{% for %} … {% endfor %}, {{#SECTION}} … {{/SECTION}}, - dom navigation (parent, child, traversal, beginning/end
- code folding
C-c C-f - HTML tag auto closing
<div></–><div>|</div> - auto opening
<div>hammer</div>–><div>\n..|\n</div> - auto expanding
d/s/–><div><span>|</span></div> - attribute auto quoting style= –> style="|"
- syntax highlighting
- snippet insertion
C-c C-s(auto indented, aware of text selection) - auto pairing (e.g. <?p … hp ?>, {% … %})
- comment / uncomment M-; according to type of block
- clever selection and expansion
C-c C-m - css colour fontification
- suspicious white-spaces detection
C-c C-w - understanding of comments and strings
- current HTML highlighting
- content and tag customized fontification
- current indentation column highlighting
- filling M-q compatibility
In an HTML document, a part is interpreted by the navigator e.g. a
Javascript part of a CSS part) a block is processed (client-side or
server-side) before being rendered by the navigator (eg. a PHP block, an Erb
block a dustjs block etc)
32 abbrev-mode
32.1 M-x abbrev-mode
It is a toggle. eblk
32.2 Defining a new abbreviation
M-x add-global-abbrev
To create a abbreviation for "iptables" put your curson on the word, then
M-x add-global-abbrevand type tab when prompted.
32.2.1 .abbrevdefs file
Adding an entry adds it into the abbreviations file, .abbrevdefs.
To use it type tab followed by any whitespace, and iptables will appear instead of tab.
M-x add-global-abbrevis typically short-cutted toC-x a g
Try it: iptables iptables iptables .. Ha it works. I was typing "t a b"
By default the saved abbreviations are in ~/.emacs.d/abbrev_defs But you
can override that with abbrev-file-name variable.
To auto save abbreviations when quiting emacs, (setq save-abbrevs
'silently)
To list abbreviations: M-x list-abbrevs To edit abbreviations: M-x
edit-abbrevs
This works with capitalization as well, for example g o v becomes government G o v becomes Government
more:
- To temporarily stop an abbreviation from expanding,
M-'?? - To undo previous expansion
M-x unexpand-abbrev - To expand all abbreviations after the fact, in a region:
M-x expand-region-abbrevs
32.3 add an abbreviation for block example:
eblk should expand to: #+BEGIN _ EXAMPLE #+END _ EXAMPLE.
#+BEGIN _ EXAMPLE without the extra spaces surrounding the underscore #+END _ EXAMPLE
without the extra spaces surrounding the underscore
1
sblk should expand to: #+BEGIN _ SRC #+END _ SRC
"sblk" 1
1
(org-mode-abbrev-table) "eblk" 1 "
32.4 abbrev-mode with emojis
You can have the expansion also expand to emojis, or math symbols. Check out
some I added to my~ /emacs.d/abbrev_devs file.
read-abbrev-file → Read abbrev definitions from file written with
`write-abbrev-file'.
write-abbrev-file → Write all user-level abbrev definitions to a file of
Lisp code.
33 Builtin-in modes of interest:
33.1 M-x shell-script-mode
M-x shell-script-mode when editing bash shell scripts But I found that turns
on automagically when you are editing a .sh file. Probably a hook. Check
your init.el file.
33.2 M-x shell
Opens up a bash shell in a buffer
Actually it opens up the shell that is specified by one of :
explicit-shell-file-nameemacs variableESHELLenvironment variableshell-file-nameemacs variable
If you change the default shell, you MUST create a new variable called
explicit-<filenameofshell>-args where
(setq explicit-shell-file-name "/bin/tcsh") (setq shell-file-name "tcsh")
(setenv "SHELL" tcsh) (add-hook 'comint-output-filter-functions
'comint-strip-ctrl-m)
33.2.1 cycle through interactive Shell commands
whin in a interactive shell buffer, the command C-p (previous buffer) and C-n
(next buffer) allows you to cycle through past outputs from past shell commands.
33.3 M-x shell-command
Rather than opening up a shell, you can simple run a single command and then
capture the output in an emacs buffer. This is quite useful. M-x shell-command
is usually keymapped to M-! The emacs buffer is named *Shell Command Output*
and gets overwritten every time a new command is run.
stdout and stderror both get sent to the same *Shell Command Output* buffer.
You can alter this to send stderror to a different buffer with a name of your
choosing, by setting shell-command-default-error-buffer to some buffer name.
you can run the command in the background, just as you would using a shell, by
appending & to the command, thus putting it to the background.
33.4 shell commands on a region
You can send a region of text to the shell command as stdin. The command is
M-x shell-command-on-region which is typically mapped to the key M-| As usual
the output (stdout) is overwrites the buffer *Shell Command Output* You can
change this to replace the region with C-u . So for example C-u M-! ls -l
puts a listing in the current buffer
C-u M-! ls -lC-u M-! dateC-u M-! curl ifconfig.me; echo " "
You might think sort would be a common use case, but emacs has its own sort
command, so use that. UTF-8 encoding works nicely, but if you get garbled
output read up on unicode and other coding systems in emacs.
33.5 hard-wrap vs soft-wrap
in hard wrap, text is not split up in words as the line wraps. the wrap occurs on what ever character in the word got you to the end of the line.
in soft-wrap, words are preserved and carried over to the new line.
m-x visual-line-modeturns on soft-wrapm-x auto-file-modeturns on hard-wrap
33.6 m-x menu-set-font (text)
to change the font. i have liked andale mono 18 personally. (text)
33.7 m-x customize-themes
You can see what themes you have available with M-x load-theme Then, if you
want to create a new one, OR, edit an existing one, follow the
instructions from
gnu.org
It worked for me.
The workflow is as follows, M-x customize-create-theme then pick the theme
you want to customize, then pick the individual text type that you want to
change, pick a colour, or bold, or other characteristic, to change. Once
happy, save it to the same name you opened (if editing) or save to a new name
(if creating a new theme). Then close C-x k this buffer, and load the new
theme with M-x load-theme or M-x counsel-load-theme
33.8 m-x tetris
34 misc notes on upgrading, and some links:
brew unlink emacsbrew uninstall emacsbrew install emacs --devel --with-modules --with-cocoa --with-gnutls \--with-librsvg --with-mailutils --with-imagemagick@6this is deprecated… see Update- brew linkapps
The imagemagick@6 library and emacs devel change frequently so exclude them from automatic updates and do updates manually at convenient times:
34.1 Update
After installing, emacs did NOT open in a new window, but in the terminal.
To change this do the following:
Do NOT install the regular, plain Jane emacs using brew install emacs
Because what you will get is emacs built without GUI support.
So, I then did:
brew uninstall emacsbrew install --cask emacs(brew cask install emacshas been deprecated)
So, as of I have emacs version 27.1 running on my mac.
====== brew pin imagemagick@6 emacs
35 Init.el file (in .emacs.d directory)
Before we get going on init.el, I want to remind you that emacs will look in the following places for instructions on how to initialize:
~/.emacs~/.emacs.el~/.emacs.d/init.el
I have chosen to use the -~ /.emacs.d/init.el location. Don't get confused
with - ~/.emacs.d/settings/ directory that has settings and configurations
for individual modes, such as Python-mode.el I will be setting up a
section in .emacs.d/init.el as well as creating python.el and or
Python-mode.el
You can use the command line switch ‘-q’ to prevent loading your init file,
and ‘-u’ (or ‘–user’) to specify a different user's init file.
35.1 Init File Syntax
The init file contains one or more Lisp expressions. Each of these consists
of a function name followed by arguments, all surrounded by parentheses. For
example, (setq fill-column 80) calls the function setq to set the
variable fill-column (see Filling) to 80.
www.gnu.org has documentation on init.el syntax. Read it.
The init file contains one or more Lisp expressions. Each of these consists
of a function name followed by arguments, all surrounded by parentheses. For
example, (setq fill-column 60) calls the function setq to set the
variable fill-column (see Filling) to 60.
You may have to use setq-default and not just setq in the init.el file
Confirm this please.
36 LISP variables
Emacs will often use LISP variables, to direct the behaviour of commands.
Those variables can be set interactively in the current buffer, as well as
read from the init.el file when emacs starts.
36.1 setting variables
In init.el, if you want to set the variable x to 100, it would be (setq x
100) Or in an interactive emacs buffer, M-x set-variable v value That seems
to contradict anther way which is M-: (setq v "value") remembering that M-: is
bound to the commnd M-x eval-expression
Yet another way I have seen is: (set (make-local-variable 'foo) "value") But
again, it was NOT documented if that should be M-: first or not. I assume yes.
I like to set the alt key as the emacs meta key, so I would use: (setq
mac-command-key-is-meta yes)
I think you can do this in an init.el file, or in any buffer with the command:
(setq-default fill-column 80) but you would use M-x eval-expression followed
by (setq-default fill-column 80) followed by hammer. eval-expression has a
default key-binding of M-: so it must be used quite often.
36.1.1 setting variables using scratch buffer
Alternatively you can go to the scratch buffer, type in the expression,
and then type C-j (see Lisp Interaction Buffers).
36.1.2 Setting default values
Lisp variables are set using setq However, some variables become buffer
local when set with setq. So to get around that you can set the default
value for that variable using setq-default
A good example of things to put in your init.el is available from github, at this link: github.com
setq can be used to set multiple variables at once.
Since emacs 29.1 there is documentation at emacsdocs.org that uses another
command: M-x make-local-variable RET var RET compare that to
M-x set-variable var value. Which one should I use? There is a difference.
- make-local-variable
M-x make-local-variablereads the name of a variable and makes it local to the current buffer. Changing its value subsequently in this buffer will not affect others, and changes in its global value will not affect this buffer - kill-local-variable
M-x kill-local-variablemakes a specified variable cease to be local to the current buffer. The global value of the variable henceforth is in effect in this buffer.Methods so far:
Method Local approach (setq foo "value") M-x eval-expression M-: local buffer only or use in init.el (setq-default foo "value") same as above M-x set-variable v value M-x set-variable M-x make-local-variable RET var RET
36.2 LISP variables in current buffer
36.2.1 Listing current variables (not their values)
You can list variables if you have autocomplete package activated. Then
simply M-x set-variable hammer and start scrolling. You will see very
many variables. To find a specific one, start entering part of the
variable name, and your autocomplete package should filter on those
characters you enter..
Another way is to use M-x apropos-variable for some regexp of variable names
that you are looking for. Or, similarily: M-x apropos-values though not as
useful. * useful technique worth repeating:
M-x apropos-variable <return> regexp <return>M-x apropos-variable <return> regexp <return>M-x apropos-variable <return> doom-modeline <return>
Then use describe-variable i.e. M-h v <variablename>
Another useful technique is to evaluate the buffer-local-variables variable:
M-x pp-eval-expression RET alist RETorM-x pp-eval-expression RET mode RETor
(apropos-value PATTERN &optional DO-ALL)
Show all symbols whose value’s printed representation matches PATTERN. PATTERN can be a word, a list of words (separated by spaces), or a regexp (using some regexp special characters). If it is a word, search for matches for that word as a substring. If it is a list of words, search for matches for any two (or more) of those words.
36.2.2 List of general variables
Easiest is to look at: www.gnu.org for a list of general emacs variables.
36.2.3 check if variable defined
C-x C-e
36.2.4 Describe variable C-h v
C-h v org-agenda-files This shows you what the current variable is set to,
and gives you some help text around that variable.
36.2.5 Describe key C-h k
Use it in conjunction with M-x describe-key which will tell you what key
binding you have (if any) for the subsequent key combination you press.
For example, you could type C-h k C-h v that will then tell you that the
key C-h v is bound to counsel-describe-variable and will describe what
that variable does.
36.2.6 Setting variables in current buffer
M-x set-variable is an interactive command. You will be prompted for a
name and a value. This takes effect immediately on the buffer you
are in. So:
M-x set-variablehammervarhammervaluehammerM-x set-variableRETvarRETvalueRET
For example, to change text editing indents you could type: M-: which runs
the command eval-expression then you can type set-variable the name and
the value
36.3 some useful variables:
36.3.1 auto-mode-alist
an array of file types and related emacs modes that tells emacs what mode to default to when opening a file of that type. Easy to list is using:
C-h v auto-mode-alist
Easy to add to this array using:
M-x add-to-list auto-mode-alist
Related to that is a list of available emacs modes. See: Major and minor modes
36.4 Init file behaviour
This is not exhaustive, just an introduction. It is ok to delete the Init.el file and start over. (maybe copy it to a safe place, and selective add back compoenents you want.)
If you are having errors with the init file, you can start emacs without any
init file by using -Q
emacs -Q
To debug init.el, run emacs like this: emacs --debug-init
To reload an init file after already in emacs : M-x load-file or
M-x eval-buffer # reads .emacs.d/init.el again. or M-x load-file If
you have problems (some packages don't like being loaded twice) simply
restart emacs. Also, it is not a good idea to evaluate your init file more
than once, as you can have hooks set multiple times which messes you up.
So, a better approach is to C-x C-e which executes code, but specifically
executes the code for the section immediately before your cursor. As long as
your cursor is on the last closed ) then it will execute just that section.
M-x eval-region Also works if you have highlighted a region and want just
those lines evaluated. Nice when tweaking your init.el file
36.5 ~/.emacs.d/init.el
=M-x set-background-color gray10 =M-x set-foreground-color green

(if (display-graphic-p) (setq initial-frame-alist '( (tool-bar-lines . 0)
(width . 106) (height . 60) (background-color . "gray10") (foreground-color
. "green") (left . 50) (top . 50)))
should have (ivy-mode 1) in the :config section of (use-package ivy)
36.5.1 Some zintis' preferences
- set-fill-column 80
- set-fill-mode
- M-x fill-region
- Hide the toolbar (tool-bar-mode -1)
If you're using use-package, put this in your .emacs:
(use-package yang-mode :ensure t)

Otherwise, put this in your .emacs: (require 'yang-mode)

For use with Emacs 23, put this in your .emacs: (autoload 'yang-mode
  "yang-mode" "Major mode for editing YANG modules."  t) (add-to-list
  'auto-mode-alist '("\\.yang$" . yang-mode))

Some users have reported other errors with Emacs 23, and have found that
removing the byte-compiled cc-mode.elc file fixes these problems.
(e.g. /usr/share/emacs/23.1/lisp/progmodes/cc-mode.elc)


For editing somewhat larger YANG modules, add this to your .emacs (setq
  blink-matching-paren-distance nil)
36.6 Save customized variables to init.el file (or custom-vars.el)
When you make a change to a variable, it will only be for that session. If
you want to have that variable made the default, use: M-x
customize-save-variable command.
37 Packages I use and how to customize them
These were collected over some time, but many of the latest changes/additions came from this youtube link.
37.0.1 command-log-mode
To open a command log, you need to have this installed, and then use: M-x
clm/toggle-command-log-buffer or using C-c o That opens the command log
window for me, but it does nothing. I have to issue the command M-x
global-command-log-mode then my commands were logged as expected.
The key sequence C-h l for help log? works for me as of
This opened up a buffer showing the last keystrokes I made. Ivy showed this
as view-lossage.
37.0.2 ivy-mode
In ivy mode, whenever you have a list, hitting M-o will show you extra
actions that can be done an any item within a a list that have to be defined
for a particular function. For example often d can be hit to see the
definition for that function. h will show you the help of that
function.
So, workflow would be M-x then move to a function you are about to enter,
but hit M-o then d to see the definition of that function.
- hammer on current ivy selection
Normally a simple hammer will execute the function currently highlighted in the ivy minibuffer, and close the minibuffer window. However, if you want to run the command but keep the minibuffer window open you can hit
C-M-norC-M-pforrunthe command andmovetonextorpreviousivy selection.
37.0.3 copy to kill-ring
While in the ivy minibuffer M-o w will copy the current string under the
cursor to the kill ring (buffer) Remember M-w copy any highligt to the kill
ring. So M-o w does the similar thing, but from the ivy minibuffer and not
the main buffer. Once in the kill-ring you can paste it "yank it" back with
C-y
You can even skip a step and run M-o i to copy from the minibuffer and
immediately paste in the main buffer in one step.
37.0.4 ivy-rich-mode
toggle with M-x ivy-rich-mode Makes any ivy list show more helpful information
37.0.5 ivy jump/insert
when the ivy window is open, hitting M-j will take the word that is currently
under the cursor in the main window, and insert it into the ivy minibuffer.
quite useful.
- lock in current selection as filter
When in ivy and you have narrowed ivy selections, hitting
S-spacewill lock that selection in as a filter for follow-on searches/selections. Just keep entering additional characters and the locked in filters will remain in effect. Good for quickly narrowing down to a specific command that you were looking for.
37.0.6 ivy occur
While in an ivy minibuffer showing a list of options, C-c C-o will produce a
buffer from the items in the list. This buffer will be in the major mode,
"ivy-occur".
Good for taking notes for yourself on what commands are you favourites, or read the docuementation on each of the modes.
37.0.7 counsel-M-x
Counsel in general counsels you on what commands are at your finger-tips.
M-x counsel-M-x counsels you on what M-x modes are availalbe? Especially
works will with ivy-rich mode.
This is known as the "Ivy version of 'execute-extended-command'.
37.0.8 switching buffers
With ivy installed, C-x C-b will list open buffers, but if you rather us
M-x counsel-switch-buffer you can see each of the buffers as you arrow up
and down (C-n and C-p) which is nicer. You may even want to remap your
key binding for C-x C-b i.e. ("C-M-j" 'counsel-switch-buffer) Notice the
single ' which is LISPs way of saying this isn't a string, but an object
named counsel-switch-buffer
37.0.9 mode line and diminish:
The bottom information line gives you details on what you have active at the current moment.
37.0.10 lsp mode
this really deservers a whole section by itself. Hence this section.
38 Python
38.1 settings/python.el
In directory ~/.emacs.d/settings
Not sure which takes precendence: See the section
38.1.1 Emacs settings files:
~/.emacs.d/settings- or
~/.emacs.d/Init.el
38.1.2 themes
I seem to like the wombat theme when running M-x counsel-load-theme but I
would like to customize this theme…. and fix up this file and consolidate
where I talk about themes.
38.1.3 header bread crumb…
38.1.4 Keeping the menu bar off
(menu-bar-mode 0)(tool-bar-mode 0)
You can always toggle it from any buffer with M-x menu-bar-mode
38.2 Running python in a buffer
Can be accomplished in several ways:
M-xrun-pythonC-c C-pwhich isM-x update this as currently is is M-x py-backward-statementsC-c |executes the region markedC-c C-cexecutes the entire buffer (M-x py-execute-buffer)- Don;t forget "describe mode" or
C-c ?to see more python options orC-h m
38.3 Python version when running C-c | (run region in python)
By default it seems that my version selected is 2.7. To change this to version 3, do the following:
- edit
python.elin the directory:
38.4 Set pyvenv in a python buffer
I often get the default, python2.7, version when I run C-c C-c because I
forget to set the python virtual environment. Remember this workflow!!!:
M-x pyvenv-activate# NOTvenv-activateSuch a thing does not existM-x pyvenv-activateM-x pyvenv-activateC-c C-cC-c C-cC-c C-c
39 Python and emacs
Check out: https://www.emacswiki.org/emacs/EmacsForMacOS https://realpython.com/emacs-the-best-python-editor/ https://wikemacs.org/wiki/Python https://www.emacswiki.org/emacs/PythonProgrammingInEmacs
Add the following configurations to your configuration file:
#+BEGINSRC elisp (setq python-shell-interpreter "ipython" python-shell-interpreter-args "-i") # There are several other good options here too. #+ENDSRC Then when opening a Python file and hit C-c C-p, another window will be created which runs an IPython interpreter. Some commonly used key bindings are shown here:
Before you do this: first see what C-c C-p is currently mapping to. For
me it is often NOT py-execute, but py-backward-statement Bottom line you
want to run py-execute so in a pinch just M-x py-execute. Gotta love
emacs! I also find that I can just C-c C-c which is mapped to
py-execute-buffer
| Key Bindings | Command | |
|---|---|---|
| C-c RET | py-execute-import-or-reload | |
| C-c TAB | py-ident-region |
* |
C-c # |
py-comment-region |
* |
| C-c - | py-up-exception | |
| C-c . | py-expression | |
| C-c : | py-guess-indent-offset | |
| C-c < | py-shift-left | |
| C-c = | py-down-exception | |
| C-c > | py-shift-right | |
| C-c ? | py-describe-mode | |
C-c vertbar |
py-execute-region |
|
| C-c C-b | py-submit-bug-report | |
C-c C-c |
py-execute-buffer |
* |
| C-c C-d | py-pdbtrack-toggle-stack-tr.. | |
| C-c C-e | py-help-at-point |
|
| C-c C-f | py-sort-imports | |
| C-c C-k | py-mark-block-or-clause | |
| C-c C-l | py-shift-left | |
| C-c C-n | py-forward-statement | |
| C-c C-p | py-backward-statement | ? where is py-execute ? |
| C-c C-q | py-forward-block | |
| C-c C-r | py-shift-right | ? where is py-execute-region? |
C-c pipe |
py-execute-region |
may want to change this… |
| C-c C-s | Py-execute-string | |
| C-c C-t | py-toggle-shell | |
| C-c C-u | py-backward-block | |
| C-c C-v | py-version |
* |
| C-c C-w | py-pychecker-run | |
| C-c C-z | py-open-python-shell |
|
| C-c C-c | python-shell-send-buffer | |
| C-c C-l | python-shell-send-file | |
| C-c C-r | python-shell-send-region | |
| C-c C-s | python-shell-send-string | |
| C-c C-z | python-shell-switch-to-shell |
Really cool use of .org files, on Mike Zamansky's youtube video.
M-x python-shell-send-region will send the region to the python interpreter.
M-x python-shell-send-buffer will send the whole buffer to python interpreter.
M-x python-shell-send-file really good if you have utils mods to load M-x
python-shell-send-defun picks the whole function wherever you cursor is at and
executes that in the python interpreter.
#+BEGINSRC python
def dude(mystring) print("Yoo dude, where you at ?", mystring) #+ENDSRC
Then M-x python-shell-send-defun will let you switch to the python
interprtr buffer and type dude("Frank") and get back: "Yoo dude, where
you at? Frank"
40 lsp mode (part of emacs IDE )
Great link is on github.io: lsp-pyls
40.1
I like that have this displayed in a buffer on the left when scripting in
python: M-x lsp-treemacs-symbols
M-x lsp-treemacs-symbolsM-x lsp-treemacs-symbolsM-x lsp-treemacs-symbolsM-x lsp-treemacs-symbols
40.2 Overview
lsp is "Language Servet Protocol". The language server protocol was proposed by
Microsoft as a way for different editors and development environments to share
language analysis backends. These backends are called language servers Several
options exist, including:
- palantir
- python-language-server
Either way, pip installs them as pyls, so a pip freeze | grep pyls will tell you what you have installed
Running emacs lsp-mode requires that you have a language server running. The
most common language server to run is installed with pip install
python-language-server, but a faster, more consise language server is palantir,
but this section describes python-language-server
After installing it, if you run pyls and your terminal just sits on a new line then it appears that you have it installed properly. (just C-c to kill it)
The emacs lsp-mode and the palantir python-language-server works well to give
you improved code intelligence when working on Python projects.
Activated for me with the sequence C-M l Brings advanced code editing features
into emacs. Similar to Visual Studio or other IDEs. Available from
https://emacs-lsp.github.io/lsp-mode/
It brings to life the idea of a separate language processing server to analyze
and run AI for your coding. This language server protocol, or lsp is what lsp
mode brings. Check out https://langserver.org/ for details on lsp itself.
From the lsp-mode link above, "Client for Language Server Protocol (v3.14). lsp-mode aims to provide IDE-like experience by providing optional integration with the most popular Emacs packages like company, flycheck and projectile."

For more info on what LSP is, check this blog, from which the above picture came: eclipe-foundation
Check out your lisp-mode.el file.
40.2.1 Language Server Protocol
A standard for an editor to communicate with an external processor that knows the syntax and modules available in some language. It actually uses JSON-RPC protocol.
40.2.2 lsp-mode vs elpy
Usually it is either/or between the two. They both work with jedi, but lsp-mode seems to work better with jedi.
You have to manually enable a virtualenv, then start lsp. I expect that if you open a python file, then start lsp, then activate your venv, you'll have to call lsp-workspace-restart to pick up the new settings.
So:
- enable virtualenv with:
M-x pyvenv-activate - start lsp with:
M-x lsp-mode?? - open python file to edit. Usually
C-c C-pfirst time, thenC-c C-c, but my key mapping may be off??
The upshot is, if you're installing pyls in your venv and not globally, you shouldn't be able to start lsp at all before the venv is on. There are alternatives. I used to have a whole setup for auto-enabling virtualenvs that I did through .dir-locals.el, which can auto-activate a venv when you visit a file in a project. pipenv is the "new thing", and does have some facilities around auto-activation. I've hit enough rough edges with its usability that I personally avoid it, but it is an option.
40.2.3 Breakthrough…. my init.el was not working with python C-c C-c errors:
The errors indicated that I was still running python 2.7.7. So, after I ran
M-x pyvenv-activate, emacs was nice enough to ask me which python venv I
wanted to activate by prompting me to enter the directory of choice, based
on the current directory. I was able to navigate to my venv for python3.9
and activate it. After that C-c C-c worked, using python3.9
Another workflow I should investigate is this one:
On a Python venv, do pip install python-language-server[all].
Use M-x pyvenv-activate to activate the venv. Use M-x pyvenv-activate
to activate the venv. Use M-x pyvenv-activate to activate the venv.
C-x C-f a Python file, and then M-x lsp.
ZP: also, C-c C-p to run python processor (1 time only per session)
followed by C-c C-c to execute the buffer. You could also run:
py-execute-region==> C-c |py-execute-filepy-execute-blockpy-execute-defpy-execute-classpy-execute-indentpy-execute-bufferpy-execute-sectionpy-execute-stringpy-execute-try-blockpy-execute-if-blockpy-execute-for-blockpy-execute-top-levelpy-execute-… a whole bunch more
If you find you are using a few of these frequently, you can assign a key mapping to it.
40.2.4 Setback
Well, now my mappings have changed, and C-c C-r is py-exec-region. What is
going on here????? I am also getting errors about jedi
#+BEGINEXAMPLE
============================== Failed to start Jedi EPC server.
============================== #+ENDEXAMPLE
40.2.5 Fix1
removed company-jedi from the "new" init.el. That helped, but I was now
getting an error that LSP :: The following servers support current file but
do not have automatic installation configuration: pyls I realized that my
pyvenv was not setup, so I ran M-x pyvenv-activate and choose my
venv-3.9/bin/activate environment. Then I re-opend the .py program and saw
that :
LSP :: Connected to [pyls:3537/starting]. [2 times] LSP :: pyls:3537
initialized successfully in folders: (/Users/zintis/bin/python/bin)
So, I am now successfully seeing code completion in a .py file, and when I
ran C-c C-c it successfully ran the buffer in a python interpretter in the
correct [venv-3.9] window. (note that I had to have the cursor active in
the python interpreter windows for that [venv-3.9] prompt to show.
40.2.6 pyls (python language server)
The default language server of python is pyls. Typically stored in
/usr/local/bin/pyls but could be elsewhere. You install it using pip:
python3 -m pip install python-language-server Possibly in a venv. I
installed in on my main python3 (3.9.1) python, as well as my venv-3.9 I
suppose I should install it in all of my venv environments, but have not
done so yet.
After that, which pyls showed me that it was in /usr/local/bin/pyls
A good walk-through for installing this is mortens.dev
Note: as of April 2020, python-language-server needs jedi greater than version 0.14.1 but less than 0.16. as jedi 0.16 does not yet work with pyls.
Additional installation notes from github.com/palantir/python-language-server: palantir and from the official lsp-pyls github
The base language server requires Jedi to provide Completions, Definitions,
Hover, References, Signature Help, and Symbols:

pip install python-language-server

If the respective dependencies are found, the following optional providers
will be enabled:

Rope for Completions and renaming Pyflakes linter to detect various errors
McCabe linter for complexity checking pycodestyle linter for style checking
pydocstyle linter for docstring style checking (disabled by default)
autopep8 for code formatting YAPF for code formatting (preferred over
autopep8) Optional providers can be installed using the extras syntax. To
install YAPF formatting for example:

pip install 'python-language-server[yapf]'

All optional providers can be installed using:

pip install 'python-language-server[all]'
40.3 python-mode.el vs python.el
Apparently python-mode.el is depracated with emacs 24.1 and later Now
emacs has a built-in python.el, so nothing to install here. But, you
stillcall the mode python_mode within emacs, but you don't have to
install python-mode from ELPY
40.3.1 Alterate lsp-mode ? or the same one??
40.3.2 flake8 compatability
Flake8 is NOT recommended , but it will work. If you do use flake8 then
flake8 is not mentioned in the pyls README, but it is supported. There are two options to enable it:
You can use (lsp-register-custom-settings) as before:
(lsp-register-custom-settings '(("pyls.plugins.flake8.enabled" t t)))
Alternatively, lsp-mode automatically turns some configuration parameters into custom variables, including the flake8 parameters. So:
(setq lsp-pyls-plugins-flake8-enabled t)
Read his blog here: mattduck.com
40.3.3 Microsoft Python Language Server
pyls along with the Microsoft pls are the two most common language servers. I use pyls.
40.3.4 4 pyls plugins: mypy, isort and black
Some integrations are not available by default in pyls, but are supported by plugins. You can install these with pip install pyls-black pyls-isort pyls-mypy.
To then enable them in lsp-mode, you can use (lsp-register-custom-settings):
(use-package lsp-mode :config (lsp-register-custom-settings '(("pyls.plugins.pylsmypy.enabled" t t) ("pyls.plugins.pylsmypy.livemode" nil t) ("pyls.plugins.pylsblack.enabled" t t) ("pyls.plugins.pylsisort.enabled" t t))) :hook ((python-mode . lsp)))
40.3.5 flycheck
flycheck is recommended over flymake. You can run M-x flycheck-errors to
go through each of the linting (syntax) erros in your buffer (that are
highlighted) You click on each line in the minibuffer to immediately go to
the corresponding line in the .py program.
40.3.6 lsp-ui
supports hovers which is what?, but either way the recommended
integration with lsp-execute-code-action is modeline~and not lsp-ui
40.3.7 company hooked into lsp
Someone uses company as their capf provider and they hook company into lsp
What does that even mean? Read and find out…. 4.3. company-lsp For completions at cursor, I use company-mode with company-lsp for the purposes of LSP:
(use-package company :config (setq company-idle-delay 0.3)

  (global-company-mode 1)

  (global-set-key (kbd "C-<tab>") 'company-complete))

(use-package company-lsp :requires company :config (push 'company-lsp
  company-backends)

   ;; Disable client-side cache because the LSP server does a better job.
  (setq company-transformers nil company-lsp-async t
  company-lsp-cache-candidates nil))
40.3.8 Typical package grouping:
- lsp-mode
- compan (company integration for lsp-mode)
- pyvenv (activate virual environments within emacs)
- highlight-indentation
40.3.9 Will also need (in order of simplest to advanced):
Some kind of auto completion mode active, so that lsp can trigger its thing
This could be 1) Mx completion-at-point (will need a back-end for this)
and this is then completing stuff that contains the string
40.3.10 pip install python-language-server
Is that needed in addition to lsp ?? Then C-x C-f a .py file and then
M-x lsp
That will give you autocompletion, code linting, xref-find-definitions and more.
40.3.11 See also:
See also
- lsp-docker - provide docker image with preconfigured language servers with corresponding emacs configuration.
- company-box - company frontend with icons.
- dap-mode - Debugger integration for lsp-mode.
- eglot - An alternative minimal LSP implementation.
- which-key - Emacs package that displays available keybindings in popup
- projectile - Project Interaction Library for Emacs
- emacs-tree-sitter - Faster, fine-grained code highlighting via tree-sitter.
- gccemacs - modified Emacs capable of compiling and running Emacs Lisp as native code.
40.3.12 Using lsp mode (I have mapped S-l and not C-c l for lsp-mode)
First of all, you must set the key binding to start
(setq lsp-keymap-prefix "C-M l") (setq lsp-keymap-prefix "C-M l") (setq
lsp-keymap-prefix "C-M l")
check with C-h k to check a key bindings or C-h b to check all bindings
some common commands:
M-x lsp-find-referenceswill give you all places in your
directory that uses this command, or variable, or definition etc… mapped
to C-c l g r
M-x lsp-find-definitionsor just jump to the next spot ??? see 23:50 of the youtube video youtube … mapped toC-M l g gM-x lsp-renamecan rename a symbol … mapped toC-M l r rwhich can run through all your programs, and calling definitions, understand what variable is being changed, andchange it in ALL locations and files!!This is NOT just a global regexp search and replace, but rather a logical review of your code and calling funcitons etc, and changing only the places where this makes sense logically!! VERY COOL!
40.3.13 Diagnostics:
flymake-show-diagnostics-buffer will work with lsp-mode too. and it will
analyze your code and make suggestions for you. both errors, and warnings.
Like an expert at your back..
If there is an action that can be done for your, C-M l a a for lsp-mode /
actions / actions
40.3.14 lsp-mode with python as and IDE
See the link: daviwil on github for emacs from scratch. It has all the files you need to use a examples to set your own init.el etc.
lsp: click the lightbulb…. on the mode line…. see 28:00 of the #8 video
C-M l = = will take the whole file and ask the language server to format
it and send it back to the editor (emacs)
- Other things that work as an IDE:
- Mode line will show parameters available for a given funciton
- hovering with documentation (lsp-mode) for built-in functions, or variables or anything that has a doc string (like methods)
- code navigation: put cursor on a class,
C-M-l g gwill look at definition of that class. Remember thatC-M-lis the key binding forlsp-keymap-prefixSo it isC-M-lfollowed byg gfor XXXXXXXXX andr rfor YYYYYYYY
- Running in a python buffer
While in python mode, I can
M-x run-pythonin a buffer. Convenient. But when editing a python file, I can select a subset of the code and send that to the interactive python buffer with the command:M-x python-shell-send-regionM-x python-shell-send-bufferM-x python-shell-send-file# good to run a setup module, or test a functionM-x python shell-send-defun# will figure out the whole
- See also the next section on working workflow as of May 2021
40.3.15 Summary of lsp-keymap-prefix commands.
C-M l g gfor go : to go to the definition of the code, or class or function where cursor is on.C-M l g gbinds tolsp-find-definitionC-M l a afor action : when looking at diagnostics, you may take some actionC-M l = =for format : takes an entire buffer and asks the language processor to check it.C-M l r rforlsp-renamea variable and change it in ALL locations and files!!C-M l g rforlsp-find-referenceson all occurances of a particular variable or function etc. across your code, not just in your current file. * this one is good *This here lets you change ALL occurances of myfile to ourfile for example. You would do that by marking the word myfile somewhere in your code, then
C-M l g rfinds ALL occurances (references) of myfile thenM-x lsp-renamewill ask you what the new name is, and you enter ourfile This works across multiple files, not just the current file you are on. It does this symantically, not just a dumb regexp replace.M-x lsp-renamecan rename a symbol … mapped toC-M l r rwhich can run through all your programs, and calling definitions, understand what variable is being changed, andchange it in ALL locations and files!!This is NOT just a global regexp search and replace, but rather a logical review of your code and calling funcitons etc, and changing only the places where this makes sense logically!! VERY COOL!- To find out, try:
M-x lsp-and see what you get (in the ivy buffer)
40.3.16 which language server to use with Python?
- Microsoft has one
- palantir is the one I use, "pip install pythonlanguage_
- yet another one..
40.4 Letting lsp reformat your entire buffer(file)
You can let the language server rules automatically apply to a whole file at once.
M-x lsp-format-buffer and voila! according to the flycheck linter rules.
So it immediately fixes all the complaints that the linter will have.
40.4.1 language services
You can also run treemacs symbols. M-x lsp-treemacs-symbols will pop up a
column on the left with symbols for variables or dictionary items related to
the code your cursor is on.
Do this in a prog buffer and you will see each variable used in your code in the left column. Clicking on those brings you to each of the occurances while highlighting all of them at once.
40.5 Running pytests inside emacs (part of emacs IDE)
First you have to install it python3 -m pip --user install --user pytest (
You might need to install the dependencies that may be listed in a
requirements.txt. If so, run ~python3 -m pip install --user -r
requirements.txt Then you can from the command line, run pytest.
Within emacs, you can use projectile called M-x projectile-test-project
It will be asking your for what tests you want to run, at the bottom with the
prompt Test command: By default it will be pre-populated with the string:
python -m unittest discover This needed some settings done as shown below.
Or, you can be more simple change the Test command to pytest and run
that, which is a more modern and flexible option to the usual unittest.
But you will need to set these:
- set a directory-local variable for
projectile-project-test-cmdwithadd-dir-local-variable - set
compilation-read-commandto nil to skip asking every time you want to run the test (might be unsafe) g rinside the unit test buffer to rerun the tests or callrecompileinteractively.
41 doom modeline
I prefer using native emacs, and not evil mode or doom themes. However, the doom modeline can be used without using doom mode. I am using that as follows:
- install the package
doom-modeline(and doom-themes even though you don't need to use the actual doom themes.) - install the nerd fonts (needed to display the correct emacs icons on
the modeline.
M-x nerd-icons-install-font - edit init.el to add the following
(use-package doom-themes
   :ensure t)


(use-package doom-modeline
  :ensure t
  :init (doom-modeline-mode 1)
  :custom ((doom-modeline-height 35)
           (doom-modeline-icon t)
           (doom-modeline-major-mode-icon t)
           (doom-modeline-major-mode-color-icon t)
           (doom-modeline-buffer-state-icon t)
           (doom-modeline-time t)
           (doom-modeline-time-icon t)
           ))
42 homegrown modeline
You can leave doom modeline uninstalled, and make your own customization. You will work with:
- variable
setq mode-line-format nilin init.el UseM-x describe variable mode-line-formatto read what is possible
43 Working Workflow May 2021 for python
This is a working workflow for me as of May 2021:
- Open a
.pyfile which triggerspython-mode. (Doommodelineshows Python) - enable virtualenv with:
M-x pyvenv-activate(Doommodelineshows [venv-3.9]) - start lsp with:
M-x lsp-mode - open python file to edit. Usually
C-c C-pfirst time, thenC-c C-c, but my key mapping may be off??
44 Python debugging in emacs
Install python3 -m pip install --user debugpy then see the video at 40:00
min called "Emacs IDE - Python Development Configuration" and continue this
tomorrow. Jan 2, 2020.
Really you need to implement dap, which is the companion to lsp dap is d ebug a ny p ython, lsp is l anguage s erver p rotocol.
45 dap (part of emacs IDE)
The companion to lsp-mode! See emacs-lsp.github.io for details.
Debug Access Protocol:
This is not easy to set up, but can be done. The big part is in the .emacs.d/init.el file of course:
45.1 dap installation
The same link above is good for installation, for each language of interest.
For python, you will need to install latest version of ptvsd:
python3 -m pip install ptvsd~# makes sure version >= 4.2- (require 'dap-python) in init.el, which adds the python specific config
to
dap-debug
45.1.1 dap customization
From emacs-lisp.github.io: You can leave dap to NOT open any dap windows, in which case you can open them up individually as follows:
- M-x dap-xxxxx
- M-x dap-xxxxx
- M-x dap-xxxxx
Or, you can enable dap-auto-configure-mode. By default auto config mode
can open many windows, which can clutter up the emacs workspace. So, you can
override that by specifiying exactly which dap windows you want opened when
dap is called (via M-x dap-mode ) Save these in init.el like this:
;; Enabling only some features (setq dap-auto-configure-features '(sessions
locals controls tooltip))
Or you can specify specific modes instead:
(dap-mode 1) ;; The modes below are optional

(dap-ui-mode 1) ;; enables mouse hover support (dap-tooltip-mode 1) ;; use
tooltips for mouse hover ;; if it is not enabled `dap-mode' will use the
minibuffer.  (tooltip-mode 1) ;; displays floating panel with debug buttons
;; requies emacs 26+ (dap-ui-controls-mode 1)
Then, you would add the language specific settings for dap:
45.1.2 python specific dap settings
45.2 dap usage
After installing ptvsd, a template named "Python :: Run Configuration" will appear, which will execute the currently visited module. This will fall short whenever you need to specify arguments, environment variables or execute a setuptools based script.
In such case, define a template:
(dap-register-debug-template "My App" (list :type "python" :args "-i"5 :cwd
  nil :env '(("DEBUG" . "1")) :target-module (expand-file-name
  "~/src/myapp/.env/bin/myapp") :request "launch" :name "My App"))
45.2.1 Make sure you lsp-mode is up and running before runnig dap debug
lsp will have several variables set, that dap-debugger needs.
The templates need to have the break-points in place. Set the cursor on the
line in your program where you want to add the break-point, then press M-x
dap-breakpoint-toggle this will add a little dot on the left of this line
in the emacs buffer (that has the program active).
This opens a bunch of panels; break-points set, variables visible at this point, active sessions
M-x dap-stack-frame
45.2.2 Stop debugging
With the M-x dap-disconnect which disconnect the dubugger from the
application and in essence, kills the applicaiton.
45.2.3 M-x dap-debug-recent
Usually you run debugs over and over, so this command makes sense.
M-x dap-debug-edit-template Gives you the code you need to run to create a
template, in a new buffer.
You then save this template, and then …
M-x dap-register-debug-template on one of those registered templates.
This emacs project template sould be in the same directory as your project root.
45.2.4 M-x dap-hydra
When debugging in dap, you do NOT have to manually enter each command, like dap-next, dap-next. etc… Instead M-x dap-hydra will leave a series of single letter dcommands open that you can use.
45.3 dap commands
After launching the dap debugger, try:
- dap-debug Select a template to execute
- dap-debug-list Run the most recent template
- dap-debug-recent Select a recent template to run
- dap-disconnect Disconnect from the debugging session (output buffer retained)
- ap-delete-session Delete current session (output buffer is deleted)
- dap-delete-all-sessions Clean up all debugging sessions.
45.4 dap debug templates
46 elpy with python 3 (and not python2.7)
Note: I have temporarily disabled Elpy in place of lsp mode (part of emacs IDE )
If I run M-x elpy-config I can see that I am defaulting to python 2.7.13 To
change that do the following:
46.0.1 Set some variables:
(set elply-rpc-python-command "python3") or create a python3 virtual wrapper
from terminal: mkvirtualenv test -p /user/bin/python3 # note: I use a
different virtual environment: see the .org file on virtual env that I have b
een maintaining (personal)
Then in emacs, activate the virtual environment using M-x pyenv-workon blah
followed by M-x elpy-config
46.0.2 Set some other variables:
M-: (run-python "python3") or
C-c C-pto run pyhon.
46.1 Running python in a buffer
Can be accomplished in several ways:
M-xrun-pythonC-c C-pwhich isM-x update thisC-c |executes the region markedC-c C-cexecutes the entire buffer- Don;t forget "describe mode" or
C-c ?to see more python options
47 Elpy
Converting emacs into a python IDE.
Note: I have temporarily disabled Elpy in place of lsp mode (part of emacs IDE )
47.1 Python elpy tips
M-x highlight-indentation-modeis a toggle.C-c C-cevaluates the current python script (or region if something is selected) in an interactive python shellC-hammerevalutes the current statement (current line plus the following nested lines)C-c C-ztoggle between script and interactive shellC-c C-ddiplays document for the item under the cursor. Documentation will pop up in a separate windwo.s - pressqto close
47.2 From the video https://youtu.be/49kBWM3RQQ8 key bindings
;; Fixing a key binding bug in elpy (define-key yas-minor-mode-map (kbd "C-c
k") 'yas-expand) ;; Fixing another key binding bug in iedit mode (define-key
global-map (kbd "C-c o" 'iedit-mode) ;; the k and o options can be changed to
somehthing else if wanted. personal ;; preference. I actually found that my
iedit-mode key was set as C-; with ;; the hide lines toggle C-' I checked
before trying and they were as yet ;; undefined, so might as well use them -
zp April2019
48 iedit mode is so cool (multiline/multi-cursor)
If you describe mode, C-c ? or describe key mapping, C-c k or simply
type M-x iedit-mode, you can see what your key mapping is for iedit mode
toggle. Mine was set to C-; This is how it works:
- Put your cursor on a variable name somewhere in your code.
- Toggle C-;
allinstances of that variable will be highlighted
- Make editing changes to that one variable and see that
allinstances of that variable are being changedat the same time
48.1 iedit-mode is soooo coool!!!!!
but how do I exit iedit-mode when I am done? Pay attention to the minibuffer
and you will be told that it is C-; or M-x iedit-mode again. i.e. a
toggle.
Note: there seems to be minor modes that, when active, re-map C-; to be
comment text . When that happens, I have found that I must first activate
iedit mode manually, using M-x iedit-mode after which the mapping is back
to C-;.
See also how to restrict iedit to a region iedit limited to region basically by narrowing your buffer or by running iedit twice.
49 Changing colours in font-lock.el.gz
MY font-lock.el.gz file has this:
;; Note that `defface' will not overwrite any faces declared above via
;; `custom-declare-face'.  (defface font-lock-comment-face '((((class grayscale)
;; (background light)) :foreground "DimGray" :weight bold :slant italic)
;; (((class grayscale) (background dark)) :foreground "LightGray" :weight bold
;; :slant italic) (((class color) (min-colors 88) (background light))
;; :foreground "Firebrick") (((class color) (min-colors 88) (background dark))
;; :foreground "chocolate1") (((class color) (min-colors 16) (background light))
;; :foreground "red") (((class color) (min-colors 16) (background dark))
;; :foreground "red1") (((class color) (min-colors 8) (background light))
;; :foreground "red") (((class color) (min-colors 8) (background dark))
;; :foreground "yellow") (t :weight bold :slant italic)) "Font Lock mode face
;; used to highlight comments."  :group 'font-lock-faces)
M-x list-faces-display to see what all the faces look like. Then click one
of the faces, such as font-lock-comment-face and you can change it, and save it
etc.
To know which face to change, you can put your cursor on a face then C-u C-x
=
the font-lock list of faces are the default syntax highlighting method the font-lock list of faces are the default syntax highlighting method the font-lock list of faces are the default syntax highlighting method so look for font-lock- faces.
49.1 Default faces I have changed to better match the IDLE3 colours:
| face name | emacs original | matching IDLE3 |
|---|---|---|
| font-lock-comment-face | chocolate | OrangeRed2 |
| font-lock-keyword-face | cyan1 | DarkOrchid1 |
| font-lock-function-name | LightSkyBlue | RoyalBlue3 |
| font-lock-builtin-face | LightSteelBlue | orange1 |
| font-lock-constant-face | Aquamarine | aquamarine1 |
49.2 Summarizing how to change colours
In a python program, but your cursor on a character and pres
C-u C-x
  =
That will tell you what the face under the cursor is.
In another emacs window,
M-x list-faces-display
Click on the face you want to change then:
- Select it
- Apply (or Apply and Save) if you know you will like the colour
C-x kto kill this buffer (i.e. close it)C-x 1to revert back to one windowC-x b(to switch to the other buffer)C-x C-bto list buffers if you have more of them open
50 Possible uses of the touchbar
These are untested but come from an online link.
(define-key mac-apple-event-map [action foobar] 'mac-handle-foobar~)
(define-key mac-apple-event-map [action version] 'mac-handle-version)


(defun mac-handle-foobar () (interactive) (print "foobar" ))

(defun mac-handle-version () (interactive) (call-interactively
  'emacs-version))

  mac-handle-foobar mac-handle-version

  mac-handle-foobar mac-handle-version
51 FocusFollows Mouse shell setting
Within Terminal.app apple normally forces you to "click" the window where you want the focus (i.e. active terminal) to be. That also raises that window to the top
If you would rather have the focus follow just where the mouse point is, without a click, and WITHOUT raising that window, enter this shell setting. (Should be good for entire laptop, all future terminal windows.
default write com.apple.Terminal FocusFollowsMouse -string YES
To reset it back to generic apple use:
default write com.apple.Terminal FocusFollowsMouse -string NO
To check it ,use:
default read com.apple.Terminal | grep -i focus
51.1 Older version (2012)
In the past it has been set as a boolean variable and not with YES/NO
defaults write com.apple.terminal FocusFollowsMouse -bool true defaults write
com.apple.terminal FocusFollowsMouse -bool false
To match a special character in Unix, use C-x 8 i.e. type Ctrl+X 8 Enter and
then the number, followed by Enter. (Ctrl+X 8 Enter can be followed by
Unicode name as well).
52 Disable trackpad while editing in Emacs
52.1 Some options using command line
The following commands have the same effect as checking the "Ignore built-in trackpad when mouse or wireless trackpad is present" option in the Accessibility panel of System Preferences:
$ defaults write com.apple.AppleMultitouchTrackpad USBMouseStopsTrackpad 1 $ defaults write com.apple.driver.AppleBluetoothMultitouch.trackpad USBMouseStopsTrackpad 1 To re-enable the trackpad:
$ defaults write com.apple.AppleMultitouchTrackpad USBMouseStopsTrackpad 0 $ defaults write com.apple.driver.AppleBluetoothMultitouch.trackpad USBMouseStopsTrackpad 0 shareimprove this answer
http://kitchingroup.cheme.cmu.edu/blog/2014/08/31/Using-Mac-gestures-in-Emacs/ (defvar my-previous-buffer t "can we switch?")
(defun my-previous-buffer () (interactive) (message "custom prev: my-previous-buffer*=%s" *my-previous-buffer) (when my-previous-buffer (previous-buffer) (setq my-previous-buffer nil) (run-at-time "1 sec" nil (lambda () (setq my-previous-buffer t)))))
(defvar my-next-buffer t "can we switch?")
(defun my-next-buffer () (interactive) (message "custom prev: my-next-buffer*=%s" *my-next-buffer) (when my-next-buffer (next-buffer) (setq my-next-buffer nil) (run-at-time "1 sec" nil (lambda () (setq my-next-buffer t)))))
(global-set-key [triple-wheel-right] 'my-previous-buffer) (global-set-key [triple-wheel-left] 'my-next-buffer)
53 emacs impatient mode (or something else??) fix this.
M-x package-list
53.1 .emacs.d/init.el
(require 'package) (add-to-list 'package-archives ')"melpa ….
54 emacs windows with a shell ( an IDE maybe?)
All external interactive shells in emacs are derived from comint-mode But that
happens under the scenes. You would actaully M-x shell or M-x python-shell
Investigate that apparently I can do many things in eshell:
- can transparently operate on /ssh: and /sudo: paths in the shell.
- I can transparently run M-x commands like find-file and magit from the shell.
- I also like that Emacs transparently intercepts commands like man from the shell.
- I can pipe to emacs buffers for further postprocessing with the syntax > #<tmp>.
- I can pipe to the system clipboard using a pseudodevice like > /dev/clip.
- I can use zsh-style fancy globbing such as etc/**/*(). instead of find'ing things.
- After getting a bit used to it, I'm starting to prefer the visual-commands approach of eshell to actually running visual commands "in my shell". When visual commands spawn in separate buffers instead of "stealing" the shell buffer, it's easy to jump back to the shell without having to either kill (C-c) or temporarily suspend (C-z) the visual command.
- I also like that I can evaluate both elisp $(···) and shell ${···} stuff inline.
- but really, your main approach to emacs as an IDE is to read the section above on lsp, Language Server Protocol.
55 emacs commands
Emacs understands elisp. So M-x command will execute that command, as is
very familiar to emacs users. i.e. M-x fill-region or M-x
replace-regexp
But you can also run other commands, such as pwd with:
M-x pwdM-x <tab>
56 GUD Grand Unified Debugger
GUD is emacs' debugger that can See: www.gnu.org for details.
Also from realpython.com:
"Here’s how to use pdb in Emacs:
- Open the debug-example.py file in the PyEval project.
- Type
M-X pdbto start the Python debugger. - Type
debug-example.py hammerto run the file under the debugger. - Once it’s running, pdb will split the frame horizontally and open itself in a window above the file you’re debugging:"
57 Other fun stuff:
57.1 Footnotes;
My favourite book 1
57.2 games
Tetris: M-x tetris
Pong M-x pong
Psychotherapist: M-x doctor
Snake M-x snake
solitaire (not what you think) M-x solitair
M-x gomoku M-x 5x5 M-x dunnet (text based adventure game) M-x
landmark
M-x bubbles (remove as many bubbles using least amount of moves)
M-x hanoi (towers of hanoi)
M-x life (runs Cponway's Game of Life cellular automation)
M-x morse-region (convert text in region to morse and back) M-x
unmorse-region
M-x nato-region and M-x denato-region Mike-Dash-Xray
Delta-Echo-November-Alfa-Tango-Oscar-Dash-Romeo-Echo-Golf-India-Oscar-November
M-x zone plays games with the display when emacs is idle
57.3 Mx list-colors-display
Useful to see to what to set your init.el default colours. You can use this to pick the colour you want to change, and then change it too.
57.4 End of line tips
Converting CRLF to just LF, and back, i.e. Windows to Unix and back:
58 starting emacs services at bootup
I did this after upgrading (uninstalling emacs and re-installing it using brew)
59 Misc notes on upgrading, and some link
As of July 2023, I upgraded with the command:
brew reinstall --cask emacs
In the past I have done these steps, but my reinstall seemed to do everything for me automagically, so these tips are for when things don't go smoothly. They worked for me in the past:
brew unlink emacs
brew uninstall emacs
brew install emacs --devel --with-modules --with-cocoa --with-gnutls \
                     --with-librsvg --with-mailutils --with-imagemagick@6
brew linkapps
The imagemagick@6 library and emacs devel change frequently so exclude them from automatic updates and do updates manually at convenient times:
====== brew pin imagemagick@6 emacs
Check out: https://www.emacswiki.org/emacs/EmacsForMacOS https://realpython.com/emacs-the-best-python-editor/ https://wikemacs.org/wiki/Python https://www.emacswiki.org/emacs/PythonProgrammingInEmacs
Really cool use of .org files, on Mike Zamansky's youtube video.
60 Customizing with ~/.emacs.d/init.el
Lots of info here. I will add as I change my init.el. Here is something you could do in your init.el file, (as an example)
To have clojure commands all run at startup in clojure-mode only, add the following to your ~/.emacs.d/init.el file:
#+BEGINEXAMPLE (defun my-clojure-startup () "Startup sequence for clojure-mode" (interactive) (split-window-horizontally) (cider-jack-in) (other-window) (find-file "/your/full/filepath.ext")) ;; To bind this to a key, for example C-c a :
(global-set-key (kbd "C-c a") 'my-clojure-startup) #+ENDEXAMPLE
60.1 Setting up prettify symbols
A built-in package to emacs is prettify that lets you define symbols to be
displayed in an emacs buffer in place of a specific string. For example, you
can have emacs display a down arrow whenever it encounters the string
#+BEGIN_EXAMPLE
While setq-default could be used to set a default value, what you should do is
use the appropriate major mode hooks to setq the value to a sensible value for
each of the modes you are interested in.
60.1.1 Activate
Activate with M-x prettify-symbols-mode in any buffer, however it is
buffer-local which means only applies to that local buffer. You can set it
globally with global-prettify-symbols-mode
From docs:
When prettify-symbols-mode and font-locking are enabled, symbols are prettified
(displayed as composed characters) according to the rules in
`prettify-symbols-alist' (which see), which are locally defined by major modes
supporting prettifying. To add further customizations for a given major mode,
you can modify `prettify-symbols-alist' thus:
(add-hook 'emacs-lisp-mode-hook (lambda () (push '("<=" . ?≤)
prettify-symbols-alist)))
You can enable this mode locally in desired buffers, or use
`global-prettify-symbols-mode to enable it for all modes that support it.
You can check the current value of prettify-symbols-alist with the describe-key
command. C-h v prettyify-symbols-alist
Likewise you can read up on the mode with C-h f prettify-symbols-mode
60.1.2 deactivate
You can turn it off with (prettify-symbols-mode -1) and query again with C-h f
prettify-symbols-mode. i.e. M-x eval-expression and (prettify-symbols-mode -1)
or just M-: (prettify-symbols-mode -1)
(set-face-attribute 'default nil :family "JetBrainsMono Nerd Font Mono" :height 300) (defun org-icons () "Beautify org mode keywords." (setq prettify-symbols-alist '(("TODO" . "") ("WAIT" . "") ("NOPE" . "") ("DONE" . "") ("[#A]" . "") ("[#B]" . "") ("[#C]" . "") ("[ ]" . "") ("[X]" . "") ("[-]" . "") ("#+BEGIN_SRC" . "") ("#+END_SRC" . "―") (":PROPERTIES:" . "")(":END:" . "―") ("#+STARTUP:" . "") ("#+TITLE: " . "") ("#+RESULTS:" . "") ("#+NAME:" . "") ("#+ROAM_TAGS:" . "") ("#+FILETAGS:" . "") ("#+HTML_HEAD:" . "") ("#+SUBTITLE:" . "") ("#+AUTHOR:" . "") (":Effort:" . "") ("SCHEDULED:" . "") ("DEADLINE:" . ""))) (prettify-symbols-mode)) # to activate it call org-icons with a hook in org-mode etc. # for example
(defun my/org-mode/load-prettify-symbols () (interactive) (setq prettify-symbols-alist '(("#+begin_src" . ?) ("#+BEGIN_SRC" . ?) ("#+end_src" . ?) ("#+END_SRC" . ?) ("#+begin_example" . ?) ("#+BEGIN_EXAMPLE" . ?) ("#+end_example" . ?) ("#+END_EXAMPLE" . ?) ("#+header:" . ?) ("#+HEADER:" . ?) ("#+name:" . ?﮸) ("#+NAME:" . ?﮸) ("#+results:" . ?) ("#+RESULTS:" . ?) ("#+call:" . ?) ("#+CALL:" . ?) (":PROPERTIES:" . ?) (":properties:" . ?) (":LOGBOOK:" . ?) (":logbook:" . ?))) (prettify-symbols-mode 1))
(add-hook 'org-mode-hook 'my/org-mode/load-prettify-symbols)
(setq org-ellipsis " ")
;; same thing but ignoring case so #+BEGIN_SRC and #+begin_src both work (setq prettify-symbols-alist (mapcan (lambda (x) (list x (cons (upcase (car x)) (cdr x)))) '(("#+begin_src" . ?) ("#+end_src" . ?) ("#+begin_example" . ?) ("#+end_example" . ?) ("#+header:" . ?) ("#+name:" . ?﮸) ("#+results:" . ?) ("#+call:" . ?) (":properties:" . ?) (":logbook:" . ?))))
(prettify-utils-add-hook org-mode
                  ("[ ]" "☐")
                  ("[X]" "☑")
                  ("[-]" "❍"))
(setq-default prettify-symbols-alist '(
  ("#+BEGIN_SRC" . "ϰ")
  ("#+END_SRC" . "ϰ")
  ("#+begin_src" . "ϰ")
  ("#+end_src" . "ϰ")
  (">=" . "≥")
  ("=>" . "⇨")))
  (setq prettify-symbols-unprettify-at-point 'right-edge)
  (add-hook 'org-mode-hook 'prettify-symbols-mode)
60.1.3 Two more examples and how to use them
(defun prettify-set ()
   (setq prettify-symbols-alist
   (prettify-utils-generate
            ("lambda"   "λ")
            ("|>"               "▷")
            ("<|"               "◁")
            ("->>"              "↠")
            ("->"               "→")
            ("<-"               "←")
            ("=>"               "⇒")
            ("<="               "≤")
            (">="               "≥")
            )))
(add-hook 'prog-mode-hook 'prettify-set)

(prettify-utils-add-hook org-mode
            ("[ ]" "☐")
            ("[X]" "☑")
            ("[-]" "❍"))
61 Issues with auto loading init.el
I seem to have issues with hooks not loading prettify-symbol-mode in both dot.org files and dot.py files.
I have to manually do these two steps:
- toggle
M-x prettify-symbols-mode - run my homemade functions
M-x org-iconsorM-x python-icons
And even then, it only takes effect in the current buffer.
My org-mode-hook commands in init.el are:
;; Disable line numbers for some modes
(dolist (mode '(org-mode-hook
                term-mode-hook
                shell-mode-hook
                treemacs-mode-hook
                eshell-mode-hook))
  (add-hook mode (lambda () (display-line-numbers-mode 0))))


;; for org-mode-hook, run defun org-icons and org-indent-mode
(add-hook 'org-mode-hook  'org-icons
            'org-indent-mode )

;; pretty bullets for org-mode-hook
(use-package org-bullets
      :ensure t
      :config
      (add-hook 'org-mode-hook (lambda () (org-bullets-mode 1))))

;;;;;;;;;;;;;;;;;;;;;;;;;;;;;;;;;;;;;;;;;;;;;;;;;;;;;;;;;;;;;;;;;;

;; for python-mode-hook, run defun python-icons
(add-hook 'python-mode-hook 'lsp 'python-icons)


;; for python-mode-hook, run defun pytyon-icons
(add-hook 'python-mode-hook  'python-icons)


;; not sure what this does
(add-hook 'python-mode-hook
          (lambda ()
            (kill-local-variable 'eldoc-documentation-function)))
And sometimes even when I have done that, #+BEGINEXAMPLE does not transform
unless I add a starting double quoatation mark, ", before the hash mark
What is going on there?????!!
62 to add:
Update: First off, reading my init.el again, I feel dumb for trying to do (package-initialize) before even doing (require 'package) first. Definitely need to get more used to Emacs Lisp.
It seems like it works the second time you boot up Emacs, very likely my fault there for not initializing stuff properly. That's much better than "never", so I'll just try to further find out what's going on. Thanks a lot!
Yes, you'd absolutely have to modify package-archives before calling package-initialize.
@xdavidliu I just moved package-initialize below iirc
M-: (string-match-p "GNUTLS" system-configuration-features) ?? this did not work for me….
62.1 manually activating python-icons by running the function
This applies to any function defined in init.el i.e. you can run any function
by evaluating the list expression: M-x eval-expression (M-:) followed by (python-icons)
To set a variable defined with defcustom you can also use M-x set-variable. You
will not have to type the parentheses and you will have name completion.
63 python indent guessing
When you open a python file, emacs guesses the indentation offset (number of
spaces to indent) based on that file style. When you create a file (the case you
describe), emacs cannot guess (file is empty) so it uses your default (4) and
notifies the user.
In other words: it is a harmless warning; if you find this is a bug please report it as such.
If you don't like emacs guessing the offset, customize the variable
python-indent-guess-indent-offset to nil, and then emacs will use always your
default (very unsafe in python, where indentation has meaning and you could be
editing a file created by somebody else with other defaults).
To discover a problem with my python indent try this:
- View the Messages buffer (can use
C-h e) and copy the error message text C-h f python-mode- Clicked the link for
python.el - Searched for the error message in
python.elusingC-susing defaults - Found that the message was called in the following block:
(when python-indent-guess-indent-offset-verbose
(message "Can't guess python-indent-offset, using defaults: %s"
python-indent-offset))))))))
- From there, I looked at the documentation for
python-indent-guess-indent-offset-verboseusingC-h v.