my cheat sheet on …
1 DNACenter, dnac API
https://{{dnac}}:{{}}/dna/system/api/v1/api Default port is 443

2 DNA Center Overview
Software delivered approach to automating and assuring services across WAN & Campus & Branch networking.
2.1 DNA Center uses 5 design principles:
Virtualize everyting:to give organizations freedom of choice to run any service anywhere, independent of the underlying platform—physical or virtual, on premises, or in the cloud.Designed for automation: to make networks and services on those networks easy to deploy, manage, and maintain—fundamentally changing the approach to network management.Pervasive analytics: to provide insights on the operation of the network, IT infrastructure, and the business—information that only the network can provide.Service management: delivered from the cloud to unify policy and orchestration across the network—enabling the agility of cloud with the security and control of on-premises solutions.Open, extensible and programmable at every layer: integrating Cisco and third-party technology, open APIs, and a developer platform, to support a rich ecosystem of network-enabled applications.

2.2 DNA Center has the objectives of providing:
- Insights and actions to drive faster business innovation
- Automation and assurance to lower costs and complexity while meeting business and user expectations
- Security and compliance to reduce risk as an organization continues to expand and grow.
2.3 DNA is delivered across three layers
Layer 1: The network element layer: Here, you havephysicalandvirtualdevicesthat bring together the network. A core principle at the network layer is virtualization. You can use Cisco Enterprise Network Functions Virtualization (E-NFV), whichbuilds the full software stackfrom the infrastructure software that can reside on servers,to virtualizednetwork functionslike routing, firewalls, and the orchestration tools to supportE-NFVon physical and virtual devices. The evolved Cisco IOS XE Software is much moreopen and programmablewithmodel-drivenAPIs. In addition, you can more easily tap into the intelligence provided by the operating system and ASIC to supportcustomized applications.Layer 2 is the platform layer: Here, use controllers to fully abstract the network andautomate all-day0, 1, and 2 functions. Throughcentralizedpolicy control, you can allow IT to provide the business intent and have the controller drive enforcement dynamically through the network. Also at this level is where you cangather rich data analytics. A single analytics platform is used to providestructured data and open APIsthat both Cisco and third parties can use to contextualize insights—relevant for businesses to betterunderstand user behavioror Internet of Things (IoT) data, as well as IT totroubleshootissues or identify threats faster.Layer 3 is the network-enabled applications layer: Layer 3 supports importantbusiness serviceslike collaboration, mobility, and IoT. Both Cisco and third parties can write once and gain the intelligence of the network tobetter understand patterns(by correlating user, app, device data) for use cases that range from capacity planning to testing customer promotions.
2.4 Cloud in DNA-C
Cloud managed-securely manage all elements through a single pane viewCloud edgeproviding critical network functions at the edge to support businesses moving their operations to the cloudCloud deliveredenabling flexible subscription models where possible, minimizing infrastructure burden.
Delivering policy based orchestration.

3 DNA Center REST APIs:
- Intent API
- SWIM API (s/w image mgt)
- PnP API
- Operational Tools
- Authentication API
- Integration API
3.0.1 Intent API
Northbound REST API provides consistently structured was to access
DNA Center platform. It provides policy-based abstraction of business
intent, allowing you to focus on an outcome to achieve
The Intent API is hierarchically structured into functional domains and
subdomains.
For example, the Devices Subdomain lets you do CRUD operations on the
devices in the network. You can filter on many criteria to find the
device you need.
The RESTful Cisco DNA Center Intent API lets you use HTTPS verbs:
- GET
- POST
- PUT
- DELETE
and JSON syntax to discover and control your network. Intent API
can be divided into multiple groups:
See Intent API docs
Here are three examples of the intent API
GET https://dnacenter-ip/dna/intent/api/v1/interface/countto get device interface countPOST https://dnacenter-ip/dna/intent/api/v1/network-deviceto add a deviceGET https://dnacenter-ip/dna/intent/api/vi/network-deviceto get device list
Responses will be in JSON format. Always.
- Site Hierarchy Intent API:
Retrieves site hierarchy with network health information.
- Network Health Intent API:
Retrieves network devices by category, with health information on each of the devices returned. Additional request paths retrieve physical and virtual topologies.
- Network Device Detail Intent API:
Retrieves detailed informationaboutdevicesretrieved by time stamp, MAC address, universally unique identifier (UUID), name, or nwDeviceName. Additional REST request paths allow you to retrieve additional information, such asfunctional capabilities, interfaces, device configuration,certificate validation status, valuesofspecified fields,modules, andVLAN dataassociated with specified interfaces.You can also
add, delete, update, orsynchronize specified devices. - Client Health Intent API:
Returnsoverallclient healtorganized aswiredandwirelesscategories. It returns detailed information about a single client.
3.0.2 SWIM API
Enables you to:
- retrieve information about
available software images, - import images into Cisco DNA Center,
- distribute images to network devices, and
- activate images that have been installed on devices.
3.0.3 PnP API
Enables you to manage PnP projects, settings, workflows, virtual accounts, and PnP-managed devices.
3.0.4 Operation Tools
- Command Runne API
Command runner is the feature in Cisco DNA Center that allows you to execute read-only commands on the devices managed by Cisco DNA Center. The
APIenables you to retriee thekeywordsof all the CLIs that command runner accepts.Then it lets you run read-only commands to retrieve real-time configuration.

Figure 4: DNA Center Command Runner API - Network Discover API
Provides programmatic access to the Discovery functionality of Cisco DNA Center. You can use this API to
create, update, delete,andmanagediscoveriesand their associated credentials.You can also use this API to retrieve the network devices that a particular discovery job acquired.
- Template Programmer API
Enables
(CRUD) operationson templates and projects that the template programmer uses to facilitate design and provisioning workflows in Cisco DNA Center.You can use this API to create, view, edit, delete, and version templates. You can also add interactive commands to templates, check the contents of templates for syntactical errors or blocked commands, deploy templates, and check the status of template deployments.
- Path Trace APIs
Simplifies resolution of network performance issues by tracing application paths through the network and providing statistics for each hop along the path. You can use this
APItoanalyze the flowbetweentwo endpointson the network,retrievethe results of a previous flow analysis,summarizeall stored flow analyses, ordeletea savedflow analysis - Task APIs
Queries Cisco DNA Center for more information about a specific task that your RESTful request initiated. Often, a network action may take several seconds or minutes to complete, so Cisco DNA Center completes most ta~sks asynchronously. You can
use the Task API to determine whether a taskcompleted successfully; if so, you can then retrieve more information from the task itself, such as a list of devices provisioned. - File API
Enables you to retrieve files from Cisco DNA Center; for example, you might use this API to get a software image or a digital certificate from Cisco DNA Center.
3.0.5 Authentication API
Generates a security token that encapsulates the privileges of an
authenticated REST caller. Cisco DNA Center authorizes each requested
operation according to the access privileges associated with the security
token that accompanies the request.
3.0.6 Integration API
Allows Cisco DNA Center to connect to other systems. These are the
westbound interfaces, typically ITSMs. (IT Service Management s/w)
4 DNA Center API Catalog
All the API documentation is available under the API Catalog, accessible by
logging intoDNA Center Controller web GUI,- selecting
Platform - selecting
Developer Toolkit
5 DNA Center Postman variables
5.1 Before token retrieved
- {{dnac}} sandboxdnac2.cisco.com
- {{port}} 443
- {{username}} devnetuser
- {{password}} Cisco123!
5.2 After token available
- {{dnac}} sandboxdnac2.cisco.com
- {{port}} 443
- {{username}} devnetuser
- {{password}} Cisco123!
- {{token}} VGhpcyBpcyB0aGUgdG9rZW4gcmV0cmlldmVkIGZyb20gRE5BQyBlYXJsaWVyCg==
Python code had the x-auth-token as a header:
url = "https://" + dnac + ":" + port + "/dna/intent/api/v1/network-device"
headers = {
  'Content-Type': 'application/json',
  'Accept': 'application/json',
  'x-auth-token': env_user_zp.DNAC_TOKEN
}
response = requests.request("GET", url, headers=headers, data=payload, timeout=400)
# this env_user_zp.DNAC_TOKEN is the long version, not the base64 encoded user/pass
6 DNA Center authentication
DNA Center uses Custom Token Authentication that starts with HTTPS Basic Auth
That will give you a response that contains the token. For subequent requests
you use that token in the X-Auth-Token HTTP header to the DNA Center server.
See Custom Token authentication org file for more general info.
6.1 Basic authentication:
url = "https://sandboxdnac.cisco.com"
username = "devnetuser"
password = "Cisco123!"
First, use HTTPS Basic Authentication to generate an authentication cookie and security token to then use for subsequent requests. HTTPS Basic uses TLS to encrypt the connection and data in a HTTP Basic Authentication transaction.
import base64
def to_base64(s):
    return base64.b64encode(s.encode('utf8')).decode('utf8')

url = "https://sandboxdnac.cisco.com/"
username = "devnetuser"
password = "Cisco123!"
api_endpoint = url + "/dna/system/api/v1/auth/token"
method = "POST"
creds = to_base64(f'{username}:{password}')
header = {"Authorization": f"Basic {creds}"}
# header = {"Authorization": 'Basic ZGV2bmV0dXNlcjpDaXNjbzEyMyE='} # manually
| Name (header) | Description | Default value |
|---|---|---|
| Content-Type | Request body content type | application/json |
| (string) | ||
| Authorization | Basic Auth Base64 | n/a |
| (string) | ||
| Response Codes | ||
| 200 | Successfull Token Generation | |
| 401 | Invalid credentials |
See authentication-API docs for up-to-date info .https://developer.cisco.com/docs/dna-center/#!authentication-api
Sent a POST to /dna/system/api/v1/auth/token with these headers: or……
Sent a POST to /dna/system/api/v1/auth/token with these headers:
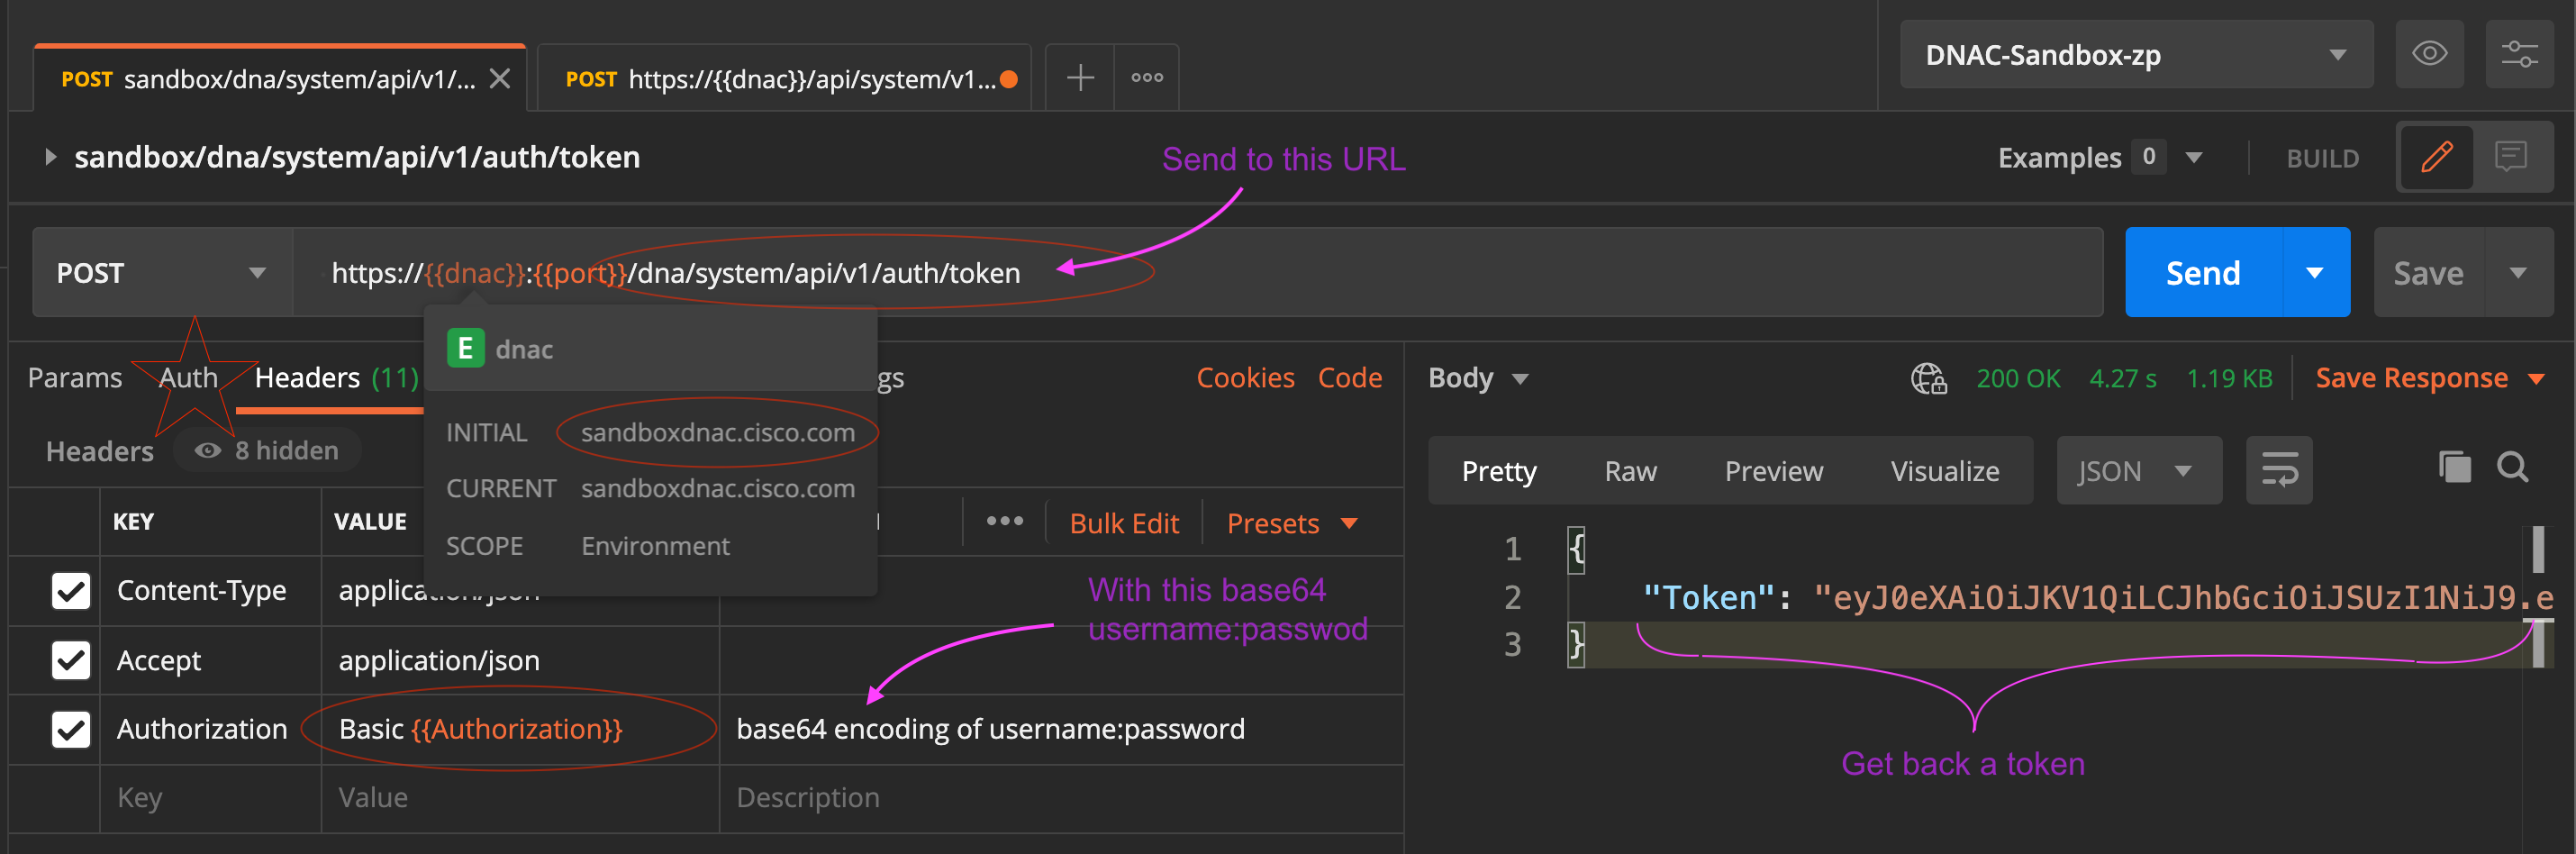
If you use /api/system/v1/auth/token : that works too but you must set the
Authorization header as shown in this postman screen capture. This worked
as of Feb 1, 2021.

And this approach needs the Auth approach:

As you can see from the 200 OK, all these methods worked.
- Content-Type application/json
- Authorization string # ** base64 encoding must be done right
- Accept application/json
Response is a token, that becomes X-Auth-Token header. i.e. all remaining
requests should include X-Auth-Token: "eyJ0egZG51Jg.agLhgwKBacAqppadgaRe"
6.2 curl
curl -L –request POST \
–url https:///dna/system/api/v1/auth/token?hostname=Switch1 \
–header 'Content-Type: application/json' \
–header 'Authorization: string' \
–header 'Accept: application/json'
Where string could be ZGV2bmV0OkNpc2NvMTIzXCE= or other base64 encoded
credentials.
6.3 python-request
import requests

url = "https:///dna/system/api/v1/auth/token?hostname=Switch1"

payload = None

headers = {
    "Content-Type": "application/json",
    "Authorization": "string",     # base64 encode of user:password
    "Accept": "application/json"
}

response = requests.request('POST', url, headers=headers, data = payload)

print(response.text.encode('utf8'))
7 base64 encoding
Where: String composed of "Basic”, followed by a space, followed by the
Base64 encoding of “username:password”, NOT including the quotes. For example
Basic YWRtaW46TWFnbGV2MTIz, where YWRtaW46TWFnbGV2MTIz is the Base 64
encoding.
To get the credentials into a Base64 encoding you can send username:password through any Base54 encoding site, such as base64encode.org or in terminal:
echo -n "username:password" | base64
For example, echo -n "devnet:Cisco123" | base64 gets me ZGV2bmV0OkNpc2NvMTIzC
To do it right though, you either use base64encode.org or make sure that
you do NOT include a line feed ("\n") in the string you want to encode.
For me, all I had to do was change the last character from a "K" to a "="
But the correct way to do this is have echo not add a linefeed before you
pass it to base64. So echo -n "username:password" | base64 is your ticket
Note that this is NOT secure. Anyone can decrypt this using base64 as well.
Note also that if you want the password to contain special characters that
are normally interpretted by the shell, you must \ escape the character first
as in: echo -n "devnet:Cisco123\!" | base64 which is ZGV2bmV0OkNpc2NvMTIzXCEK=
The = or == are padding characters at the end of the string, if it does not
land on proper boundary that base64 is looking for.
7.1 base64 in python base64.b64encode(auth)
Here's what I did using python.
import base64
auth = b'devnetuser:Cisco123!'
base64.b64encode(auth)
Note that b64encode requires a bytes type object, NOT a string. So if I was to make auth = 'devnetuser:Cisco123!' the encoding with fail
7.1.1 decoding base64
echo "ZGV2bmV0OkNpc2NvMTIzXCEK" | base64 –decode -i to decode, & ignore non-base64 characters.
8 DevNet Sandbox for DNA Center AO 1.3.1.6
From Feb 2021:
The Cisco DNA Center Sandbox is designed to be accessed via the internet. VPN is not required or provided to connect to the Cisco DNA Center Appliance and sample network. The developer does not have any direct access to the sample network elements and hosts. To access the shared environment and integrate with the sample database, please follow these steps:
- Go to https://sandboxdnac.cisco.com
- Accept the self-signed certificate
- Allow for showing of Browser Notifications
- Login with credentials [devnetuser/Cisco123!]
But this gives you the GUI. See below for API examples.
9 DNA Center API Categories:
9.1 "Know Your Network"
This catagory includes four sub-headings:
- Sites
- Networks
- Devices
- https://sandboxdnac.cisco.com/dna/intent/api/v1/network-device (GET) (retrieves a list of ALL devices on the network)
- Narrow the returned list by using query parameters such as:
- ?hostname=Switch1
- ?managementIpAddress=10.1.1.1
- ?macAddress=…
- ?serialNumber=
- ?location=
- ?family
- ?type
- ?series
- collectionStatus
These all go at the end of the above API call. You can put more than one in a request by separating them with a snowman, "&"
- Clients
This might be outdated. Look to developer.cisco.com/docs for up-to-date info.

These docs are specific to a given release. Always check the release. Here is the link for version 1.3.3.x
9.2 Northbound API
Well DNA-Center API has north, south, and east-west bound APIs.
- Northbound API Intent Based API
IBN - Southbound API Multivendor SDK
- Eastbound API Webhooks, Events & Notifications API
- Westbound API Integration API, ITSM/IT4IT, Assurance

10 DNA Center ID Fields
Every object has an "id" that is unique. It lets you link objects together. If you append just that unique ID to the end of the GET request, you can retrieve detailed info on just that device so for example:
- https://sandboxdnac.cisco.com/dna/intent/api/v1/network-device/${id} where $id = the full device id retrieved from the get devices list.
11 Interfaces in DNA Center
https://sandboxdnac.cisco.com/dna/intent/api/v1/interface or as in postman https://{{dnac}}:{{port}}/dna/intent/api/V1/interface
This will give you too much info. Therefore a good approach is to narrow the list, by using more specific API interface request URIs as detailed in the API Catalog
12 Example DNA GET client health
import requests
url = "https:///dna/intent/api/v1/client-health"

payload = None

headers = {
    "Content-Type": "application/json",
    "Accept": "application/json"
}

response = requests.request('GET', url, headers=headers, data = payload)

print(response.text.encode('utf8'))
import requests
current_token =  'eyJ0eXAiOiJKV1QiLCJhbGciOiJSUzI1NiJ9.eyJzdWIiOiI1ZTlkYmI3NzdjZDQ3ZTAwNGM2N2RkMGUiLCJhdXRoU291cmNlIjoiaW50ZXJuYWwiLCJ0ZW5hbnROYW1lIjoiVE5UMCIsInJvbGVzIjpbIjVkYzQ0NGQ1MTQ4NWM1MDA0YzBmYjIxMiJdLCJ0ZW5hbnRJZCI6IjVkYzQ0NGQzMTQ4NWM1MDA0YzBmYjIwYiIsImV4cCI6MTYxMjIxNjY4MCwiaWF0IjoxNjEyMjEzMDgwLCJqdGkiOiJhMjhkYjc5Ny1jOTZkLTQyOTYtODdhOC0yNTY5NzQyNmZiMjkiLCJ1c2VybmFtZSI6ImRldm5ldHVzZXIifQ.GjGsKA_j4T2ki_8CyctJ4FH8JqzlCiNBokToKA6kOc3MRW6ZSNjXk3VvSrtD9flH4vid_IE-YAlOfl4zFFJVQqHk-m8-U_uSBIqIz48QNbofqsoMMwyl7LpD6zoKW6X7fDaXQ48jjmyt9T-tNgZolMD-kJ4fNKIz2ZFRUHZuwb4vn9ePrE7sQNIg1Wms3nEtCb7Ryg2LDz3oZgr6tf29nZfTdisLt5F_EoUcTuLrO9-EU0cv0mWOhdkmN4K0PVgZ62UZoR7-9vQS7rRMF6vMI6Y785fCu5Wf_k9qZ2wZzzWtIOe8keWmQepmD4LN1oL1BK_NriTJ1BmCeowfikr0RQ'
url = "https://sandboxdnac.cisco.com:443/dna/intent/api/v1/network-device"

payload={}
headers = {
  'Content-Type': 'application/json',
  'Accept': 'application/json',
  'x-auth-token': current_token
}

response = requests.request("GET", url, headers=headers, data=payload, timeout=400)

print(response.text)
13 Working Examples in my bin directory
I have several working examples in ~/bin/python/bin as follows:
- sbox-dnac.py which runs several dnac queries
- zp-update-tokens.py which updates dna center tokens (among other tokens)
- envuserzp.py where my tokens are stored and then used by sbox-dnac.py etc.
Also note, zp-update-tokens.py upates the file envuserzp.py so you should never edit that file directly.