KVM machine state for OPS335
1 Summary of VM states for OPS335
1.1 C8host
| Mount point | Size | File System Type | Volume Mgr | Notes |
| /home | 40GiB | ext4 | LVM | |
| /var/lib/libvirt/images | 100GiB | ext4 | LVM | |
| /boot/efi | 2994 | partition | standard | |
| /swap | 16 GiB | swap | lvm | |
| /boot | 500 MiB | partition | standard |
lsblk
lsblk output:
NAME                            MAJ:MIN RM SIZE RO TYPE MOUNTPOINT

sda                             8:0     0  238G  0 disk
├─sda1                          8:1     0  2.9G  0 part /boot/efi
├─sda2                          8:2     0  500M  0 part /boot
└─sda3                          8:3     0  186G  0 part
    ├─cl-root                   253:0   0   30G  0 lvm  /
    ├─cl-swap                   253:1   0   16G  0 lvm  [SWAP]
    ├─cl-home                   253:2   0   40G  0 lvm  /home
    └─cl-var_lib_libvirt_images 253:3   0  100G  0 lvm  /var/lib/libvirt/images
1.2 C8host packages
sudo dnf list –installed | wc -l gives 1342 # way more than needed, but hey..
1.2.1 List of added packages as root (replace yum with dnf)
yum updateyum install nmapyum install telnetyum install net-toolsyum install openssh-serveryum install iptablesyum install iptables-servicesyum install bind-utilsyum install tmuxyum install wgetyum install rsyncyum install NetworkManageryum install qemu-kvmyum install qemu-imgyum install virt-manageryum install libvirtyum install libvirt-python # did not work for meyum install libvirt-clientyum install virt-installyum install virt-vieweryum install bridge-utils
=
1.2.2 List of services enabled/disabled
SELinux set to enforcing (edit /etc/selinux/config )
- yum update
- Turn off firewalld with "systemctl disable firewalld" # what happens at boot time
- Turn off firewalld with "systemctl stop firewalld" # what happens now
systemctl status firewalld
systemctl stop firewalld
systemctl disable firewalld
systemctl status firewalld
systemctl status firewalld.service    #in case your system needs 'service'

yum install iptables
systemctl enable iptables
systemctl start iptables
1.2.3 iptables commands applied to C8host
sudo iptables -I OUTPUT 3 -s 10.10.10.0/24 -j DROP
- view with iptables -L -v
- view with iptables -L INPUT
- view with iptables -L OUTPUT
1.2.4 Adding Apache Jan 28
sudo dnf install httpd
sudo  systemctl eneable httpd
sudo systemctl start httpd
1.2.5 Installing fish on CentOS8
tried to install it according to: fish release 3 at opensuse.org The dnf install fish complained about python required but nothing provides it:
sudo dnf install fish
Fish shell - 3.x release series (CentOS_8)          8.6 kB/s | 9.9 kB     00:01
Error:
Problem: conflicting requests
- nothing provides python needed by fish-3.1.0-2.1.x86_64
(try to add '--skip-broken' to skip uninstallable packages or '--nobest' to use not
only best candidate packages)
So, I checked dnf, and it claims to have it installed, but which python turns up null…
1.2.6 More dependencies installed; extras from epel and python 3
sudo yum install epel-release

sudo dnf repo-list
1.3 C7guest
1.3.1 List of added packages as root
yum update
yum install nmap
yum install telnet
yum install net-tools
yum install openssh-server
yum install iptables
yum install bind-utils
yum install tmux
yum install wget
yum install rsync
1.3.2 List of added packages as user
yum install kompare
1.3.3 Show if these are installed
yum list –installed nmap telnet net-tools openssh openssh-server iptables bind-utils tmux wget rsync
1.4 vm1
1.4.1 List of added packages as root
yum update
yum install nmap
yum install telnet  * skip thissudo
yum install net-tools
yum install openssh-server
yum install iptables
yum install bind-utils
yum install tmux
yum install wget
yum install rsync
dnf list available | grep
1.4.2 List of added packages as user
yum install kompare
1.4.3 Show if these are installed
yum list –installed nmap telnet net-tools openssh openssh-server iptables bind-utils tmux wget rsync
1.4.4 Adding Apache Jan 28
sudo dnf install httpd
sydo  systemctl eneable httpd
sudo systemctl start httpd
1.4.5 Adding php Feb 12
sudo dnf install php
1.4.6 Adding php-mysqlnd Feb 12
It turns out that php-mysql was not available. apparently php-mysqlnd, for "native drivers" is a direct replacement so I added that:
sudo dnf install php-mysqlnd
1.4.7 Adding mariadb and mariadb-server Feb 12
If the mysqlnd does not work out, an alternative is mariadb. I installed it:
sudo dnf install mariadbsudo dnf install mariadb-server
1.4.8 Adding semanage (for roundcube) Mar 16
First install the required package needed by /usr/sbin/semanage.
To find out which package provides the file called /usr/sbin/semanage use:
dnf provides /usr/sbin/semanage
will tell you the package that you need to install to get semanage For me it was: policycoreutils-python-utils-2.9-3.el81.1.noarch so I used: dnf install policycoreutils-python-utils-2.9-3.el81.1.noarch
root@vm1 /var/www/html [780]$
which semanage
/sbin/semanage
root@vm1 var/www/html [781]$
=semanage fcontext -a -t httpdlogt '/var/www/html/webmail/temp(.*)?'=
Root@vm1 var/www/html [782]$
=semanage fcontext -a -t httpdlogt '/var/www/html/webmail/logs(.*)?'=
root@vm1 /var/www/html [783]$
restorecon -v -R /var/www/html/webmail
Relabeled var/www/html/webmail/temp from unconfinedu:objectr:httpdsyscontentt:s0 to unconfinedu:objectr:httpdlogt:s0
Relabeled /var/www/html/webmail/temp.htaccess from unconfinedu:objectr:httpdsyscontentt:s0 to unconfinedu:objectr:httpdlogt:s0
Relabeled var/www/html/webmail/logs from unconfinedu:objectr:httpdsyscontentt:s0 to unconfinedu:objectr:httpdlogt:s0
Relabeled /var/www/html/webmail/logs.htaccess from unconfinedu:objectr:httpdsyscontentt:s0 to unconfinedu:objectr:httpdlogt:s0
root@vm1 /var/www/html [784]$
A bunch of stuff from the roundcube (/var/www/html/webmail) installation instructions, including php-xml and php-mbstring
1.4.9 dnf history commands April 2nd
This could be useful to see what my changes were the past 6 weeks.
root@vm1/home[1034]$
history | grep dnf
72  dnf info php
73  dnf upgrade php
89  dnf info php-mysqlnd
90  dnf upgrade php-mysqlnd
197  dnf install policycoreutils-python
201  dnf repolist
202  dnf provides /usr/sbin/semanage
203  dnf install policycoreutils-python-utils-2.9-3.el8_1.1.noarch
273  dnf upgrade policycoreutils-python-utils-2.9-3.el8.noarch
450  dnf info php-xml
451  dnf install php-xml
452  dnf install php-mbstring
457  dnf install php-json.x86_64
616  dnf install https://rpms.remirepo.net/enterprise/remi-release-8.rpm

752  dnf provides semanage
783  dnf module reset php
784  dnf module enable php:remi-7.4 -y
785  dnf install php-ldap php-imagick php-common php-gd php-imap php-json php-curl php-zip php-xml php-mbstring php-bz2 php-intl php-gmp
786  dnf upgrade

917  dnf list installed  | grep php
957  dnf install -y openldap-clients nss-pam-ldpad
959  dnf install nss-pam-ldapd-0.9.9-3.el8.x86_64.rpm

960  dnf provides nss-pam-ldapd
961  dnf install -y nss-pam-ldapd-0.9.9-3.el8.x86_64

964  dnf provides authconfig
1014  dnf info nss-pam-ldapd
1015  dnf provides nsswitch
1017  dnf info nsswitch

1032  dnf list installed | grep nss
1.5 Installed but not enabled (yet)
I decided to try php-mysqlnd first, and leave mariadb installed, but not enabled. So, I only enabled (and started) php-mysqlnd.
Actually I tried systemctl start mysqld and it appears to been linked to mariadb so this command:
sudo systemctl start mysqld
sudo systemctl status mysqld
started mariaDB 10.3 database server. So better do it straight-up by doing:
sudo dnf clean all
sudo dnf install mariadb-server
sudo systemctl enable mariadb
sudo systemctl start mariadb
sudo systemctl status mariadb
   sudo systemctl status mysqld
● mariadb.service - MariaDB 10.3 database server
   Loaded: loaded (/usr/lib/systemd/system/mariadb.service; enabled; vendor preset: disabled)
   Active: active (running) since Tue 2020-02-11 23:47:33 EST; 37min ago
     Docs: man:mysqld(8)
           https://mariadb.com/kb/en/library/systemd/
 Main PID: 16368 (mysqld)
   Status: "Taking your SQL requests now..."
    Tasks: 30 (limit: 5048)
   Memory: 87.6M
   CGroup: /system.slice/mariadb.service
           └─16368 /usr/libexec/mysqld --basedir=/usr

Feb 11 23:47:33 vm1.localdomain mysql-prepare-db-dir[16265]: Please report any problems at http://mariadb.org/jira
Feb 11 23:47:33 vm1.localdomain mysql-prepare-db-dir[16265]: The latest information about MariaDB is available at http://mariadb.org/.
Feb 11 23:47:33 vm1.localdomain mysql-prepare-db-dir[16265]: You can find additional information about the MySQL part at:
Feb 11 23:47:33 vm1.localdomain mysql-prepare-db-dir[16265]: http://dev.mysql.com
Feb 11 23:47:33 vm1.localdomain mysql-prepare-db-dir[16265]: Consider joining MariaDB's strong and vibrant community:
Feb 11 23:47:33 vm1.localdomain mysql-prepare-db-dir[16265]: https://mariadb.org/get-involved/
Feb 11 23:47:33 vm1.localdomain mysqld[16368]: 2020-02-11 23:47:33 0 [Note] /usr/libexec/mysqld (mysqld 10.3.17-MariaDB) starting as process 163>
Feb 11 23:47:33 vm1.localdomain mysqld[16368]: 2020-02-11 23:47:33 0 [Warning] Could not increase number of max_open_files to more than 1024 (re>
Feb 11 23:47:33 vm1.localdomain mysqld[16368]: 2020-02-11 23:47:33 0 [Warning] Changed limits: max_open_files: 1024  max_connections: 151 (was 1>
Feb 11 23:47:33 vm1.localdomain systemd[1]: Started MariaDB 10.3 database server.
sudo systemctl start mariadb-server did not work but ... mariadb did work.
So for good measure, I also started (and enabled) mariadb:
sudo systemctl start mariadb
and shortly after
sudo systemctl enable mariadb
2 Did not record mysql password, so will re-install mysql (or rather mariadb)
this is documented in mysql.org
2.1 More on vm1 (for apache/php/mysql labs and later)
curl, wget, lynx, and w3m are possible text based web browsers. I installed: lynx, as I already have curl and wget on VM1.
Had to run a yum install lynx from a PowerTools repo, which I temporarily added using this command:
look it up…
2.2 vm2
2.2.1 List of added packages as root
yum update
yum install nmap
yum install telnet
yum install net-tools
yum install openssh-server
yum install iptables
yum install bind-utils
yum install tmux
yum install wget
yum install rsync
dnf install lynx (check yum.org for syntax.  needed to use PowerTools repo)
2.2.2 List of added packages as user
yum install kompare
2.2.3 Show if these are installed
yum list –installed nmap telnet net-tools openssh openssh-server iptables bind-utils tmux wget rsync
2.3 vm3
2.3.1 List of added packages as root
yum update
yum install nmap
yum install telnet
yum install net-tools
yum install openssh-server    # for ssh
yum install iptable
yum install bind-utils
yum install tmux
yum install wget
yum install rsync
2.3.2 List of added packages as user
yum install kompare
2.3.3 Show if these are installed
yum list –installed nmap telnet net-tools openssh openssh-server iptables bind-utils tmux wget rsync
2.3.4 postfix configs
Need to run justthefax and save here
2.3.5 dovecot configs
Need to run justthefax and save here
2.4 Cloning vm1 to vm4, so that I can test python install as per
tecmint.com and
2.5 vm5
2.6 required changes to make vm4 unique (after cloning)
2.6.1 change ip address
ip addr 1.1.1.5/24
ip route add 0.0.0.0/0 192.168.111.1 etc etc
you might be tempted to edit /etc/sysconfig/network-scripts/ifcfg-ens3 to change the static address from 192.168.111.11 to 192.168.111.14 but don't do it!
- To make changes, use: nmcli
- To make the changes persistent, use: nmcli connection.
For example:
sudo nmcli connection mod Wired\ connection\ 1 ipv.dns "208.67.222.222 208.67.220.220"
{connetionName} is "Wired\ connection\ 1"
--------------------------
sudo nmcli connection mod Wired\ connection\ 1 ipv4.address 192.168.111.14
sudo nmcli connection mod Wired\ connection\ 1 ipv4.gateway 192.168.111.1
sudo nmcli connection mod Wired\ connection\ 1 ipv4.manual
sudo nmcli connection mod Wired\ connection\ 1 connection.autoconnect yes
result is that /etc/sysconfig/network-scripts/ifcfg-ens3 had changed to these values.
2.6.2 change hostname
nmcli general hostname
nmcli general hostname vm4-pyenv
hostnamectl
hostnamectl set-hostname vm4-pyenv
2.6.3 check iptables
2.6.4 check aliases
2.6.5 ssh setup
If this machine is 172.28.105.100, on the host machine issue the command:
ssh-copy-id -i id_rsa.pub root@172.28.105.100     (as root) and
ssh-copy-id -i id_rsa.pub zintis@172.28.105.100   (as zintis)
To copy the hosts public key to pangaea (172.28.105.100)
Also allow root to login directly, but only with public key authentication, NOT with username/password.
edit /etc/ssh/sshdconfig
3 Absent from the Seneca course
3.1 EPEL
Extra Packages for Enterprise Linux repository is missing, and will not be installed. If you did want to install it it would be with:
sudo yum install epel-release
sudo yum repolist  or sudo dnf ????  this needs finishing...
3.2 htop
Once EPEL has been installed above, you can install htop using: turn on EPEL repo
sudo yum search htop
sudo yum install htop    or sudo yum -y htop
sudo yum info htop
sudo yum update htop
sudo yum info htop
4 .bashrc
User specific aliases and functions Every colour tag looks like \[\033[ATTRIBUTE;COLORm\] or \[\033[COLORm\]
export PS1="\[\033[01;32m\]\u\[\033[01;31m\]@\h \w[\!] $\[\033[00m\]\n"

# export PS1="\[\033[01;32m\]\u@\h \w\\[\033[36m\]$ \[\033[00m\] "
# export PS1="\[\033[01;32m\]\u@\h \w\\[\033[33m\]$ \[\033[00m\]"
# export PS1="\[\033[01;32m\]\u@\h \w\\[\033[32m\]$ \[\033[00m\]"
# export PS1="\[\033[01;32m\]\u@\h \w\\[\033[31m\]\n$ \[\033[00m\]"

alias font16='setfont LatGrkCyr-8x16.psfu.gz'
alias font22='setfont LatGrkCyr-12x22.psfu.gz'
alias lst='ls -lartG'
alias pings='ping -c 3 -n'
alias check='sudo dnf list --showduplicates '
alias showdup='sudo dnf list --showduplicates '
alias ship='ip route get

alias n='nmcli '

alias fis='sudo iptables -S INPUT'
alias fos='sudo iptables -S OUTPUT'
alias nis='sudo iptables -t nat -S PREROUTING'
alias nos='sudo iptables -t nat -S POSTROUTING'

alias fi='sudo iptables -L INPUT --line-numbers -n'
alias fo='sudo iptables -L OUTPUT --line-numbers -n'
alias ni='sudo iptables -t nat -L PREROUTING --line-numbers '
alias no='sudo iptables -t nat -L POSTROUTING --line-numbers '

alias restore='sudo iptables-restore < /home/zintis/iptables-zintis-edited-Jan30'
alias sip='sudo iptables '

alias wi='sudo watch -n 2 iptables -L INPUT -v -n'
alias ws='sudo watch -n 2 iptables -L MYSSH -v -n'
alias wf='sudo watch -n 2 iptables -L FORWARD-v -n'

sudo watch -n 3 iptables -L INPUT -v -n

# alias addr="ip addr show ens33 | grep inet | awk '{ print $2; }'| sed 's/\/.*$//'"
# alias addr="ip addr | grep inet | awk '{ print $2; }'| sed 's/\/.*$//'"
alias addr="ip addr | egrep '([0-9]{1,3}\.[0-9]{1,3}\.[0-9]{1,3}\.[0-9]{1,3})'"
alias ip4='nmcli -f ip4 device show'
---
# .bashrc

# Source global definitions
if [ -f /etc/bashrc ]; then
        . /etc/bashrc
fi

# User specific environment
PATH="$HOME/.local/bin:$HOME/bin:$PATH"
export PATH

# Uncomment the following line if you don't like systemctl's auto-paging feature:
# export SYSTEMD_PAGER=

# User specific aliases and functions
# Every colour tag looks like \[\033[ATTRIBUTE;COLORm\] or \[\033[COLORm\]

export PS1="\[\033[01;32m\]\u@\h \w [\!]\[\033[01;31m\]$\[\033[00m\]\n"

# export PS1="\[\033[01;32m\]\u@\h \w\\[\033[33m\]$ \[\033[00m\]"

alias lst='ls -lartG'
alias pings='ping -c 3 -n'
alias font16='setfont LatGrkCyr-8x16.psfu.gz'
alias font22='setfont LatGrkCyr-12x22.psfu.gz'

alias showdup='sudo dnf list --showduplicates '

alias fis='sudo iptables -S INPUT --line-numbers -n'
alias fos='sudo iptables -S OUTPUT --line-numbers -n'
alias nis='sudo iptables -t nat -S PREROUTING --line-numbers '
alias nos='sudo iptables -t nat -S POSTROUTING --line-numbers '

alias fi='sudo iptables -L INPUT --line-numbers -n'
alias fo='sudo iptables -L OUTPUT --line-numbers -n'
alias ni='sudo iptables -t nat -L PREROUTING --line-numbers '
alias no='sudo iptables -t nat -L POSTROUTING --line-numbers '

alias restore='sudo iptables-restore < /home/zintis/iptables-zintis-edited-Jan30'
alias sip='sudo iptables '

#alias check='sudo yum list --showduplicates '
alias ship='ip route get '
alias n='nmcli '
5 Split VM into multiple files
From sanbarrow.com
5.0.1 make the following into a table later…
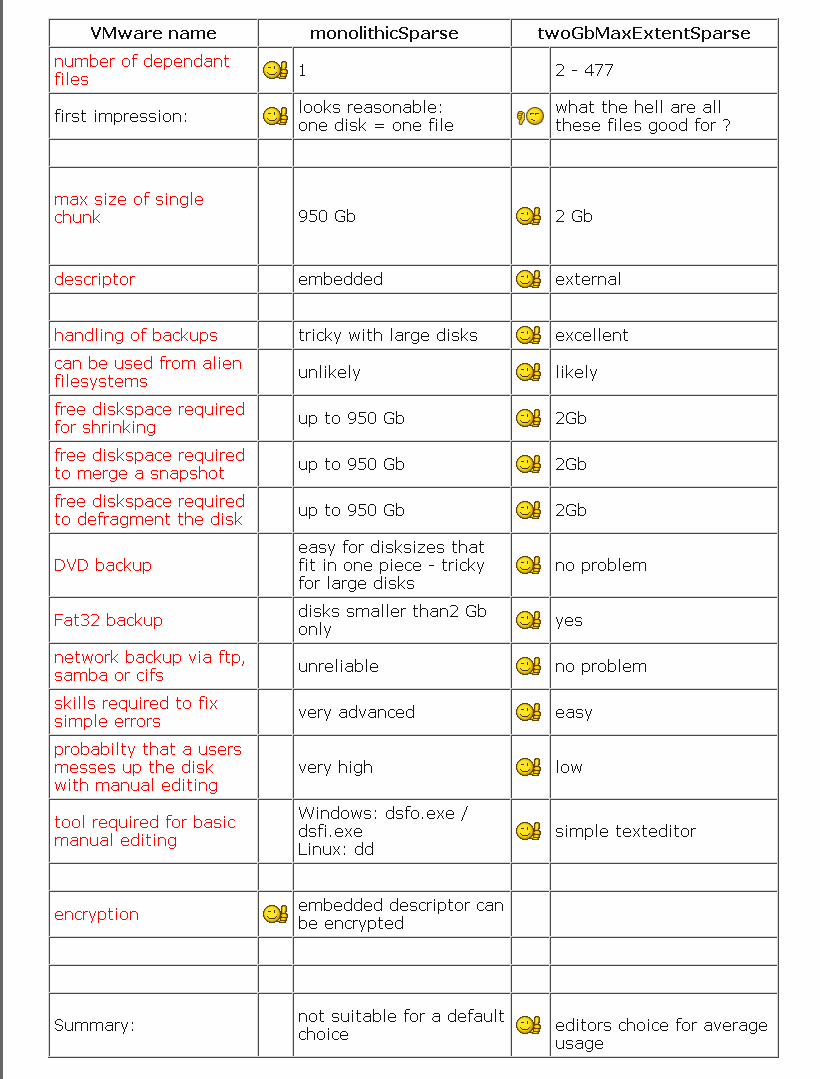
VMware name monolithicSparse twoGbMaxExtentSparse number of dependant files 1 2 - 477 first impression: looks reasonable: one disk = one file what the hell are all these files good for ?
max size of single chunk
950 Gb 2 Gb descriptor embedded external
handling of backups tricky with large disks excellent can be used from alien filesystems unlikely likely free diskspace required for shrinking up to 950 Gb 2Gb free diskspace required to merge a snapshot up to 950 Gb 2Gb free diskspace required to defragment the disk up to 950 Gb 2Gb DVD backup easy for disksizes that fit in one piece - tricky for large disks no problem Fat32 backup disks smaller than2 Gb only yes network backup via ftp, samba or cifs unreliable no problem skills required to fix simple errors very advanced easy probabilty that a users messes up the disk with manual editing very high low tool required for basic manual editing Windows: dsfo.exe / dsfi.exe Linux: dd simple texteditor
encryption embedded descriptor can be encrypted
Summary: not suitable for a default choice
editors choice for average usage
6 Comparing file systems
ext4 : very good on performance stable.
betterfs : a slight hit on performance, but has a very good features. Downside is you have to understand its structure. Also, RAID 0, OR RAID 5, OR RAID 6 (a.k.a.) "stripping" will give you problems.
But using ANY stripping (RAID 0, 5 OR 6) you are looking for trouble…
Benefits are instant snap shots. - removes the need for backups almost… can backup stuff to the cloud.
Raid 10 is the much better solution. 4x read and 2x write Since Raid6 means you have four disk
Raid 1 is also good. If you have 4 disks, use RAID 10, as you get redundancy and a performance boost with stripping.
7 pangaea VM settings:
dnf install opensshdnf install openssh-serversystemctl start sshdsystemctl enable sshddnf install epel-releasednf install pv
Edit full backup script to pipe through pv
7.1 sshdconfig
8 australinea VM settings
dnf install bind
dnf install bind-utils
static ip 172.28.105.2
ip neigh ok
8.1 adduser (symlink to useradd, so just use useradd)
useradd zintis
passwd zintis
usermod -aG wheel zintis

visudo
add zintis below ROOT user privileges section.  Make it identical.
add into line: Defaults    env_reset,timestamp_timeout=120

## Allow root to run any commands anywhere
root    ALL=(ALL)       ALL
zintis  ALL=(ALL)       ALL
8.2 iptables
iptables -A INPUT -j LOG --log-prefix " .oO8Oo. .oO8Oo. " --log-level 6
iptables -I INPUT 6 -s 172.28.105.0/24 -p tcp --sport 53 -j ACCEPT
iptables -I INPUT 6 -s 172.28.105.0/24 -p udp --sport 53 -j ACCEPT

iptables -A INPUT -p udp --sport 53 -j ACCEPT
9 europe
9.1 dovecot configs
Files are: /etc/dovecot/conf.d as well as /etc/dovecot/dovecot.conf
 $
 justthefax 10-ssl.conf
 ssl = yes
 ssl_cert = </etc/pki/dovecot/certs/dovecot.pem
 ssl_key = </etc/pki/dovecot/private/dovecot.pem
 ssl_cipher_list = PROFILE=SYSTEM

 $
 justthefax 10-mail.conf

 mail_location = maildir:~/Maildir
 namespace inbox {
  inbox = yes
  }
 first_valid_uid = 1000
 protocol !indexer-worker {
 }
 mbox_write_locks = fcntl

 $
 justthefax 10-auth.conf

 disable_plaintext_auth = no
 auth_mechanisms = plain
 !include auth-system.conf.ext
 zintis@europe ~[140] $
 justthefax dovecot.conf
 protocols = imap
 dict {
 }
 !include conf.d/*.conf
 !include_try local.conf

root@europe /etc/dovecot[682]$
justthefax dovecot.conf

protocols = imap
dict {
}
!include conf.d/*.conf
!include_try local.conf
9.2 europe postfix settings
root@europe /etc/postfix[688]$
justthefax main.cf

compatibility_level = 2
queue_directory = /var/spool/postfix
command_directory = /usr/sbin
daemon_directory = /usr/libexec/postfix
data_directory = /var/lib/postfix
mail_owner = postfix
mydomain = continents.earth.ops
myorigin = $mydomain
inet_interfaces = all
inet_protocols = all
mydestination = $mydomain, $myhostname, localhost.$mydomain, localhost,
unknown_local_recipient_reject_code = 550
mynetworks = 172.28.105.0/24, 192.168.111.0/24,  127.0.0.0/8
alias_maps = hash:/etc/aliases
alias_database = hash:/etc/aliases
home_mailbox = Maildir/

mail_spool_directory = /var/spool/mail
mailbox_command = /usr/libexec/dovecot/dovecot-lda -f "$SENDER" -a "$RECIPIENT"

debug_peer_level = 2
debugger_command =
         PATH=/bin:/usr/bin:/usr/local/bin:/usr/X11R6/bin
         ddd $daemon_directory/$process_name $process_id & sleep 5
sendmail_path = /usr/sbin/sendmail.postfix
newaliases_path = /usr/bin/newaliases.postfix
mailq_path = /usr/bin/mailq.postfix
setgid_group = postdrop
html_directory = no
manpage_directory = /usr/share/man
sample_directory = /usr/share/doc/postfix/samples
readme_directory = /usr/share/doc/postfix/README_FILES
smtpd_tls_cert_file = /etc/pki/tls/certs/postfix.pem
smtpd_tls_key_file = /etc/pki/tls/private/postfix.key
smtpd_tls_security_level = may
smtp_tls_CApath = /etc/pki/tls/certs
smtp_tls_CAfile = /etc/pki/tls/certs/ca-bundle.crt
smtp_tls_security_level = may
meta_directory = /etc/postfix
shlib_directory = /usr/lib64/postfix
root@europe /etc/postfix[689]$
10 Troubleshooting setup
10.1 On c8host
iptables -A INPUT -j LOG --log-prefix " .oO8Oo. .oO8Oo. " --log-level 6
This will show too much from the outside (local bell model stuff). So we can filter to show ONLY the internal traffic to the logs.
iptables -A INPUT -s 192.168.111.0/24 -j LOG --log-prefix " .oO8Oo. 111 .oO8Oo. " --log-level 6
iptables -A INPUT -s 172.28.0.0/16 -j LOG --log-prefix " .oO8Oo. 172 .oO8Oo. " --log-level 6
11 Almalinux install
You can install just the base OS from an ISO, then intsall the remainder of the programs directly from a AlmaLinux repo.
I used this repo:
Other repos:
Release notes for AlmaLinux are all here: